Tapioca Pearls with Spicy Almonds and Toasted Coconut

img_2521.jpg
Tapioca Pearls (Sabudana) with Spicy Almonds and Toasted Coconut, via Eat the Vegan Rainbow

Most people probably think “bubble tea” when they hear “tapioca pearls”. But these delicious little pearls are definitely worth getting to know more intimately, especially in the context of gluten free cooking. They are inexpensive and very simple to make. They actually require no cooking – just soaking – so although no cooking skills are required, some level of patience (and a good amount of time) is.

Before we go any further lets try to answer this questions first: “What are tapioca pearls?”. They can come in different sizes and colors. The ones I will focus here are white and small, close to the size of Israeli couscous. But unlike the couscous, which is made with wheat and thus off limits for those watching their gluten intake, tapioca pearls are made from starch extracted from cassava root. So, they are little starch balls when all is said and done. Think micro potatoes that don’t need peeling!

If you are into Indian food, you have likely already had some tapioca pearls because they are often used to make desserts, like kheer pudding. Earlier this summer I had some homemade Sabudana Khichdi and I loved it. Sabudana Khichdi is a traditional dish and usually consumed during Hindu fast days. The dish includes tapioca pearls, finely chopped, cooked potatoes, finely chopped peanuts, finely grated coconut flakes, and a nice combination of spices (curry leaf, cumin seeds and green chilis). There are some variations on the recipe and the ingredients may vary depending on whethe Sabudana Khichdi is served during the fast or outside the fasting days, and my friend who made the dish for us also mentioned that a more protein-rich version of Sabudana Khichdi can be made using quinoa, and she suggested I check a blog by another friend of hers called Indfused, which I did and so should you, especially if you are interested in creative Indian/American fusion cooking (FYI: Infused is not a vegan blog, so keep that in mind).

Back to the the version of Sabudana Khichdi I had – it was a delicious addition to our summer cook out and prompted me to get some tapioca pearls of my own and start experimenting. The recipe below is the second iteration and deviates from the original recipe quite a bit. I took some liberties so my Tapioca Pearl Salad is Sabudana Khichdi inspired, but not meant to be “traditional” in any way. First point of difference is that I left the potatoes out. In my view, leaving potatoes out does not affect the taste nor the nutritional profile of the dish, yet saves some time and effort. I also left the peanuts out and replaces them with slivered almonds. I used slightly different spice mix, to make the dish a bit more fragrant. Finally, I toasted my coconut flakes, because in my mind coconut is just better toasted!

The key to making tapioca pearls is patience. All you need to do is rinse the pearls in cold water, then soak them in enough cold water, usually in 1:2 ratio (for example 1 cup pearls and 2 cups water), for 2-3 hours. How do you know they are ready? They should feel loose, not stuck together, and soft, yet slightly chewy, to bite – think pasta al dente. You can go a bit further if you prefer softer texture, but you do want your pearls to remain pearly, not mushy, so don’t overdo it.

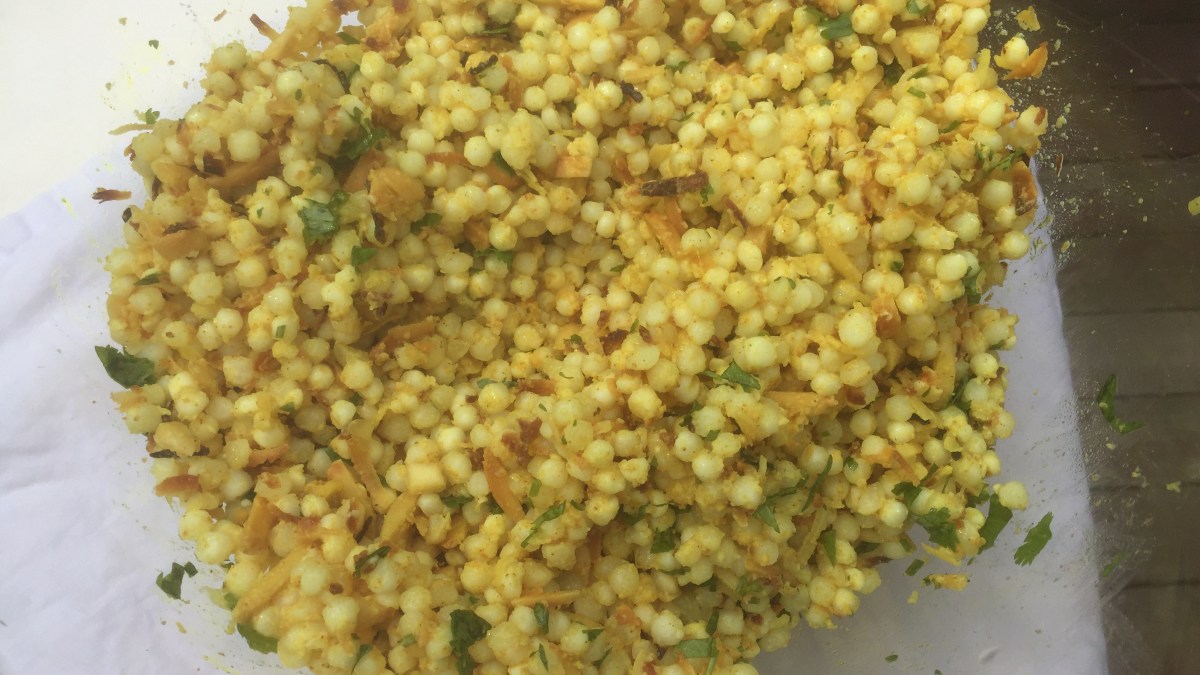
Now a key to make the dish really flavorful and spices vibrant, is toasting the spices. I use a frying pan here, and, although you can dry toast the spices, I do add a bit of oil in this case and let the spices toast for one to two minutes before adding the almonds to finish it off. I pour the toasted spice and almond mix over the drained tapioca pearls, instead the other way round, but that’s more of a personal preference I suppose. The toasted coconut flakes come next, and the chopped fresh cilantro is the final touch. You can serve this dish immediately, you can heat it up more and serve hot, or you can leave it in the refrigerator overnight and serve it cold. It actually works across the range of temperatures so it could work as a surprising pasta salad at your next picnic. It is a great, easy and inexpensive dish to make for your next pot luck or any other get together!

img_2525
Tapioca Pearls with Spicy Almonds and Toasted Coconut, via Eat the Vegan Rainbow

 Tapioca Pearls with Almonds and Toasted Coconut Flakes

What you’ll need:

2 cups tapioca pearl

4 cups water

1 cup slivered almonds

1/2 cup coconut flakes or shreds, unsweetened

2 tablespoon vegetable (or canola) oil

1 teaspoon cumin powder

1 teaspoon curry powder

1/2 teaspoon turmeric

2 tablespoon fresh cilantro, chopped


What you’ll do:

  1. Rinse the tapioca pearls under cold water and place into a large bowl. Cover with water and let stand for 2 to 3 hours. The pearls will absorb water and they should become soft and al dente.
  2. Drain the pearls well, pat dry with a paper towel and put into a large mixing bowl that you will use for serving as well. You can use the same bowl you used for soaking just remember to dry it well in the meantime.
  3. Heat the oil over medium high in a large frying pan. Add the dry spices (cumin, curry and turmeric powder) and toast in oil for 1 minute.
  4. Add slivered almonds and toast for another 2 to 3 minutes, until almonds start to brown.
  5. Pour the hot almond and spice mix over tapioca pearls and mix well.
  6. Toast coconut flakes in a toaster oven or a frying pan for 2-3 minutes. You need to keep an eye on your coconut flakes as they go from beautifully toasted to inedible in a blink of an eye! If you are using the frying pan, you can use the same pan you just used for almonds and spices, just don’t add extra oil as coconut flakes should be fatty enough.
  7. Add hot, toasted coconut flakes to your tapioca pearls and mix well.
  8. Let the mix stand for couple minutes and while those flavors are combining, wash and chop fresh cilantro.
  9. Sprinkle the cilantro over your tapioca pearls, mix again and serve!

Copyright ©Eat the Vegan Rainbow, 2017

Simple Summer Pasta Salad

img_2143
Simple Summer Pasta Salad, via Eat the Vegan Rainbow

For me, pasta salad is a conceptually hard thing to swallow since I equate salads with (mostly) green leafy vegetables. Growing up, there was a clear separation between salads and pastas in my mother’s cooking and our family meals. But, after living in US for almost two decades, I’ve come around and appreciate that pasta salads have a place on my plate, especially if I am holding that plate during a large summer cookout or a potluck.

Having said that, I still think that many pasta salads leave a lot to be desired as they tend to be overloaded with mayonnaise, meat or even cheese. So, I decided to develop a pasta salad recipe that is simple and light, yet full of flavors and surprising textures.

The recipe below really blew me away! It’s super simple, uses only six ingredients, it takes less than twenty minutes to make, and it is a perfect pasta salad for big get togethers because it is super inexpensive.

The recipe is very simple and self-explanatory. Few tips here are: don’t cook your pasta for too long, drain it well but don’t rinse; mix the pasta with the rest of ingredients while it’s still hot, and then let it cool while the flavors are developing and merging; and if using kalamata olives in oil, scale back on the amount of olive oil you actually add – otherwise you’ll end up with something that’s too oily, which will be too bad!

And speaking of olives – kalamata olives that I get come with a nice level of acidity so I don’t feel like I need to use extra vinegar when I’m using them. This means that my recipe below does not include vinegar. Now, if you like a bit more tang, feel free to add some lemon juice or a dash of red wine vinegar to adjust the acidity level in this salad to your personal taste.

Finally, if you don’t have a box of penne rigate on hand, don’t worry. You can use any spoon friendly pasta for this – meaning not long pasta. Why do I recommend NOT using long pasta? Well, if you are thinking of this salad as picnic, pot luck, sharing-with-friends-and-family friendly, then help your friends and family help themselves by not having to wrestle with long pasta. I also think that tubular pastas work better for this recipe than flat ones – think penne, ditalini, macaroni as better, and farfalle as perhaps less suitable for this recipe – as tubular pastas have a bit more surface area to absorb the subtle flavors. And among the tubular pastas, those with ridges will work just slightly better because of the same surface area availability principle I mentioned. Having said all this, and having dragged you through likely totally unnecessary details on how to choose just the right pasta for this recipe, I’d like to stress again – just grab a box of pasta you have on hand and it will be just fine!

STOP: I just remembered – I would not recommend black bean pasta for this. I did not like the flavor of that one when I paired it with my Clams-free “Clam” Sauce and can’t recommend it for this application either. 😦

Simple Summer Pasta Salad

What you’ll need:

12 oz (340 g) penne rigate pasta

1 cup kalamata olives, pitted and chopped

1 cup slivered almonds

1/4 cup olive oil, extra virgin

1 teaspoon garlic powder

3 tablespoons fresh basil

What you’ll do:

  1. Cook the pasta following the instructions on the box. Don’t overcook it – the pasta will be ready when it is slightly chewy to the bite.
  2. While pasta is cooking, chop the olives and the fresh basil leaves. Put to the side.
  3. Drain the pasta well and place in a large mixing bowl. Add oil, chopped kalamata olives, garlic powder, and mix well.
  4. Toast the almonds in a toaster oven or on the stove top in a heavy skillet. Watch the almonds constantly as they do burn quickly.
  5. Add the toasted almonds to the rest of the pasta salad, mix well and leave for an hour or so.
  6. Add fresh basil just before serving, toss everything together and enjoy. The result is fragrant, complex in flavors and textures, yet simple and cheap to make, perfect summer pasta salad.


Copyright ©Eat the Vegan Rainbow, 2017

A “Thank You” Cake, for All of You!

Dark Chocolate Brownie “Thank You” Cake, via Eat the Vegan Rainbow

10000 views… I can’t believe that my tiny,  homemade, low key, experimental, and very much just for fun blog recently hit a phenomenal milestone: 10000 views!

I am still in a bit of disbelief about it all, to be quite honest and totally humbled, yet thrilled.

Although I can’t explain how I went from my very first posted to 10000 views in less than 6 months, I’m guessing that this is a sign that there are many of you out there who are looking for guidance, inspiration and help in transitioning to 100% plant-based eating and cooking, while at the same time staying within a reasonable budget.

I can only hope that at least some of you have found my recipes to be yummy, homey, inviting, creative, entertaining and pure fun, which is what this entire transition to vegan cooking has been for me. Thank you for joining me on this journey and for helping me along the way with your kind comments, suggestions and many, many engagements.

And… this being a vegan, plant-based, healthy cooking type of a blog I thought that it would be cool to say a huge “Thank You, All” with some cake. So, thanks everyone – I hope you enjoy this Dark Chocolate Brownie “Thank you!” Cake, and come back again for seconds!!!

The recipe is super simple and uses ripe bananas as an egg replacement, and lots of dark, Dutch process cocoa. It also uses a simple trick to transform almond milk into almond butter milk by adding a tiny amount of cider vinegar to almond milk and letting it stand for fifteen minutes at room temperature before using. Finally, to help the dark cocoa release its color you will need to use some hot water.

Putting all this together, you will start by mixing dry ingredients in a large mixer bowl separately from wet ingredients (all except water), combine them together and then add the hot water gradually as you mix, keeping a close eye on consistency. You want your batter to be smooth and fluid, but not completely liquid. The recipe below makes two 8 in (20 cm) round brownie cakes, or one 9 x 13 in (23 x 33 cm) rectangular cake. I recommend lining the bottom of your baking pan with some parchment paper, as this helps get the cake out. In principle you could bake this cake in a springform pan, and it should pop right out.

The cake tastes rich and decadent, yet it’s relatively light in terms of the ingredients and especially in terms of added sugar. The bananas help not only hold the cake together, but add natural sweetness to it, so you can use 1/3 amount of sugar that a cake of this size would normally use. Of course, you are not limited to sugar and can use a sweetener of your choice, including artificial sweeteners if that’s what you like or need to use.

Dark Chocolate Brownie “Thank You” Cake

What you’ll need:

1 1/2 cup all purpose flour

3/4 cup cocoa, Dutch-processed

2 teaspoons baking soda

1 1/2 teaspoon baking powder

3/4 cup almond milk, unsweetened

3/4 teaspoon apple cider vinegar

1/4 cup canola oil

2 bananas, pretty ripe, brown ok

1/2 cup powdered sugar, vegan (+ 1 tablespoon for dusting)

1 tablespoon vanilla extract

1/2 cup hot water

2 tablespoons coconut flakes, unsweetened (optional)

Zest of one orange (optional)

What you you’ll do:

  1. Preheat oven to 350 F (180 C).
  2. Mix the almond milk with apple cider vinegar (or lemon juice) and let stand for 10 to 15 minutes. This will be your almond buttermilk.
  3. In a large mixing bowl, or the bowl of your standing mixer, combine all your dry ingredients (flour, cocoa powder, baking soda, and baking powder).
  4. In a separate bowl, combine all wet ingredients except the hot water. Note that powdered sugar and the bananas count as a wet ingredients. I recommend that you use a blender to cream your bananas, although you could simply mush them with a fork. Either way, make sure that your wet ingredients are fully mixed together and as smooth as possible.
  5. Next, slowly add your wet ingredients into the dry ones. For this, I keep my standing mixer runing on low, and pour the wet ingredients in, bit by bit.
  6. Let everything combine before adding the hot water. I recommend adding 1/4 cup water at a time, slowly so that you are in full control over the consistency of your batter. It should be smooth and pour out with ease.
  7. Line two 8 in (20 cm) round cake pans with parchment paper and pour the batter in.
  8. Put in the oven for 25 to 30 minutes.
  9. Take the cake out, flip it out of the pan, and leave it to cool for 1-2 hours.
  10. Cut into wedges and sprinkle with powdered sugar, coconut flakes and orange zest. Serve and enjoy!!!
img_2724
Saying “Thank You!” with a Cake, via Eat the Vegan Rainbow

Copyright ©Eat the Vegan Rainbow, 2017

Good Morning, Sunshine! Smoothie

Good Morning, Sunshine! Smoothie, via Eat the Vegan Rainbow

It’s a bit ridiculous to share a smoothie recipe like it is a thing. After all, smoothie is nothing more than throwing couple of things in a blender and pressing a button. But, I’ve now made this version a few times, never straying from the original recipe and it is a keeper. Even people who usually refuse to drink almond milk were able to get behind this one, so I decided to share it with the world.

The recipe is super fast, super easy, super cheap, super convenient – all in a real superlative fest! All you need is a banana, five frozen strawberries, some almond milk, preferably unsweetened and vanilla flavored, a dash of unsweetened coconut flakes and a sprinkle of vegan mini chocolate chips. These last two ingredients are completely optional but they do elevate this smoothie to the seventh heaven.

I do recommend using frozen whole strawberries. First of all, they have great flavor all year round as most brands use the best looking whole strawberries for freezing. Note that you should stay away from chopped frozen strawberries because I am not so sure that you can tell what those looked likes before they were chopped, and you should definitely check that strawberries are the only ingredient in the bag, just to be on the safe side. Frozen whole strawberries are usually cheaper than fresh, and they are really handy to have on hand in your freezer to use for smoothies, or other recipes. For the purpose of this recipe you can definitely use fresh strawberries if you have some. In that case you may want to add an ice cube or two, if you like your smoothie cold. The benefit of using frozen strawberries is that no extra ice is needed – they give this smoothie a nice, subtle chill that is just fabulous for summer breakfast at home or on the go.

Final note for those who like a sturdier breakfast. This smoothie is light, has no added sugar and a minimal amount of fat that comes from the almond milk, coconut flakes and the mini chocolate chips. If you want to make this smoothie thicker and more filling, you can simply add two to three spoonfuls of rolled oats. If you are adding oats, I recommend you letting the smoothie rest for five minutes or so before enjoying to let the oats soften just a smidge.

Good Morning, Sunshine! Smoothie

What you’ll need:

1 banana

5 frozen whole strawberries (fresh will work too!)

1/2 cup almond milk, unsweetened, vanilla flavor

1 tablespoon unsweetened coconut flakes (optional)

1 tablespoon mini chocolate chips, vegan (like Enjoy Life) (optional)

2-3 tablespoons rolled oats (optional)

What you’ll do:

  1. Place chopped banana, strawberries and almond milk into a blender. If you are using oats add them now. Blend until smooth and to consistency you like.
  2. Pour into a glass or a travel jug if you are taking it on the road.
  3. Sprinkle coconut flakes and chocolate chips and walk into the sunlight, figuratively and/or literally!

Copyright ©Eat the Vegan Rainbow, 2017

Miso Glazed Tempeh, From the Grill!

Miso Glazed Grilled Tempeh, via Eat the Vegan Rainbow

If you have not done so already, you should definitely try tempeh. I’ve been hearing about it for some time now, and seeing several different brands and varieties right next to the tofu that I usually get but I only got the first batch of tempeh just the other day. I bought several different varieties to try them out and spent few days reading about what’s tempeh good for and how to best cook with it. Tempeh is related to tofu because both are soy based. But, in terms of flavor and texture (and as far as I can tell in terms of how you actually make the two, based on what Wikipedia says), tofu and tempeh are quite different. Tempeh is firm, much firmer than the firmest tofu, and does not come in liquid. It is actually fermented soy beans mixed with rice [edited after reading comment from Mary S below – thanks Mary S, it’s good to get the facts all squared away. I am still a bit confused since the ingredients’ list of the tempeh I used did include rice; at the end of the day my confusion does not matter change the fact that the food was delicious], so although it is dry, it does feel sticky to touch and just a bit slimy. FYI: I am not saying this to freak you out, rather to forewarn you so that you are not as surprised when you start handling it as I was – I thought my tempeh has gone bad and wanted to throw it out! But, I double-checked the date on the bag, regained my cool and went for it.

I decided to start simple and build from there, so this Miso Glazed Grilled Tempeh is more or less my starting point. The brand of tempeh I got is Lightlife and the two varieties I started with are their Organic Garden Veggie and Organic Soy Tempeh. Each package is half a pound (about 250 g), and the block of tempeh comes in a vacuumed-sealed package, that’s within a sealed plastic bag, so there are two bags to remove! I used both blocks at the same time, since one just did not seem enough to make for the end of the week Friday dinner.

The first thing I did was to fire up the grill. I have a gas grill and it takes it about ten to fifteen minutes to get to be sizzling hot, with burners going at full blast and the lid down. That was just enough time for me to prep the tempeh and the glaze. For tempeh, I placed the pieces into a pan large enough to keep the pieces flat, covered with water, brought to boil and boiled for four to five minutes per side – I did flip the pieces over once since the pan I was using was shallow and the water did not fully cover the tempeh, so if your tempeh is fully covered you will not need to do the flip! After about ten minutes I took the tempeh out, pat dried the pieces, and left them uncovered on some paper towels.

While the tempeh was boiling and the grill was heating up, I mixed together a simple glaze with some soy sauce, Worcestershire sauce, white miso glaze and vegetable oil. I spread the glaze over the tempeh pieces just before placing them on the grill the glazed side down. Then I glazed the top and let it grill for about five to six minutes. By that time the grill marks will be perfect, and the pieces ready to be flipped. I did reglaze both sides again and flipped again, so that at the end each side got two layers of glaze and about eight to ten minutes of grilling, so in total the grilling bit took less than twenty minutes. If you are in a rush, you can definitely skip the reglazing, but if you are outside hanging around the grill with friends and family and enjoying the lovely summer evening, then why not give tempeh extra love, glaze and grill time?

Let grilled tempeh rest for just a second, then slice and serve. You can serve it in a hamburger or a hot dog bun with the usual trimmings, but note that condiments, like mustard and ketchup, are going to overpower the flavor of the grilled tempeh. So, I recommend serving tempeh with a side of coleslaw and baked, or barbecue beans, which is how I had mine. Add to that a glass of cold beverage of choice, and what can be better?

Miso Glazed Grilled Tempeh Sliced, via Eat the Vegan Rainbow

Miso Glazed Grilled Tempeh

What you’ll need:

2 8 oz (227 g) blocks of tempeh (any variety and brand you like)

2 tablespoons soy sauce, reduced sodium

2 tablespoons white miso paste

2 tablespoons vegetable oil

1/2 tablespoon Worcestershire sauce (vegan)

Oil for oiling the grill grates


What you’ll do:

  1. Prepare your grill like you normally do. I recommend getting the grill really hot and letting any bits and pieces from the previous grill session burn off, then scrapping the grates with an appropriate type of a brush (please be careful here because you can really damage your grill grates if you don’t follow the manufactures instructions and recommendations), and then oil them generously with a paper towel dipped in vegetable oil – please use long tongs here to prevent getting burned!
  2. Take tempeh out of the wrapping and palace in a pan large enough to hold it flat and straight. Cover with water, bring to boil and let it boil for 5 to 10 minutes. Make sure you flip the tempeh half way through if your tempeh is not fully submerged in water. If it is, no mid-way flipping is needed!
  3. While tempeh is boiling and the grill is getting hot, mix together the glaze by whisking together soy sauce, vegetable oil, miso paste and Worcestershire sauce. The glaze should be smooth, but even if you have few lumps in there don’t worry about it – it won’t matter at the end.
  4. Place the boiled tempeh onto some paper towels and gently dry.
  5. Using a (silicone) food brush spread the glaze liberally ove the tempeh and place the piece of tempeh glaze side down on the hot grill. Keep the gas grill on medium high heat, or if you are using a charcoal grill keep it as hot as you would when grilling vegetables, veggie burgers, or mushroom or tofu steaks. Grill the glazed tempeh 5 to 6 minutes on one side, and while it is grilling apply the glaze on the other side, flip over, grill for 4 to 5 minutes, glaze, flip, grill, repeat for as long as you like.
  6. Let stand for just a moment or two, slice and serve!!! This Miso Glazed Grilled Tempeh will work as an appetizer, finger food, as well as dinner, especially with some grilled corn, veggies, coleslaw, baked or barbecue beans, or as a salad topping…

Copyright ©Eat the Vegan Rainbow, 2017

Spicy and Cheesy Corn Muffins


img_2024
Spicy and Cheesy Corn Muffins, via Eat the Vegan Rainbow
Corn bread and corn muffins are a great way to enjoy freshly baked bread but without the agony of waiting for dough to rise and wondering whether the yeast is still alive. Corn bread and corn muffins are also very customizable – you can make them into a sweet tasting treat or you can add savory ingredients and make them into a complex tasting appetizers or breakfast items.These corn muffins are spicy, thanks to a good amount of fire roasted green chili peppers and vegan pepper Jack cheese. They also include a secret ingredient- pickles! Pickles add a bit of acidity and crunch to the muffins, pushing them over the edge of plain and into the area of edgy and fabulous.

What can you serve these with? Well, they go really well with a chili or a soup like the Bean & Leek Soup with Soy Chorizo, or Balkan Cabbage and Bean Stew. The muffins are somewhat similar to Balkan Style Cornbread but they do use green chilis and pickles whit gives them a very specific and spicy flavor. This means that they work well as appetizers, especially when paired with some guacamole. They are great for breakfast or a quick snack, and would complete any salad. They are best fresh from the oven, but should keep well for couple of days.

img_2027
Spicy, and oh, so cheesy, Corn Muffins, via Eat the Vegan Rainbow

Spicy and Cheesy Corn Muffins

What you’ll need:

1 1/2 cups yellow corn meal

1/2 cup corn starch

1 cup rice flour

1/2 teaspoon baking soda

1 teaspoon baking powder

1/4 teaspoon salt

2 pickles, finely chopped

4 oz (113 g) fire roasted diced green chiles

1 cup shredded pepper jack cheese, vegan

1 1/4 cup seltzer water

Cooking spray

What you’ll do:

  1. Preheat the oven to 400 F (205 C).
  2. In a large mixing bowl combine all the ingredients except seltzer water and mix well.
  3. Add 1 cup of water and mix. Keep adding the last 1/4 cup gradually to make sure your batter is smooth but not runny. Let stand for 10 min.
  4. Spray the muffin tin with cooking spray and divide the batter into 12 even amounts.
  5. Place the muffins in the oven for 10 min, then lower the heat to 350 F (180 C) and bake for another 25 to 30 minutes.
  6. These corn muffins come out bright yellow and are ready to eat after you let stand and cool for 10 to 15 minutes.


Copyright © Eat the Vegan Rainbow, 2017

Fancy Faux-Lobster Roll

Fancy Vegan
Fancy Faux-Lobster Roll, via Eat the Vegan Rainbow
During long, winter months when days are short, snow piles up high and it does not get above freezing for weeks on end, New Englander likes to enjoy things like pots and pots of piping hot New England Clam Chowder, a creamy and rich seafood based soup. This winter I did something that just a year ago would have sound like a total science fiction and impossibility. I made completely plant-based, clam-free New England “Clam” Chowder.

Now that we are approaching the high summer, I felt ready to tackles another recipe that New England self-identifies with, the Lobster Roll! If you’ve never tasted or seen a Lobster Roll let me quickly describe how it’s made. You take a hot dog bun, steam it or toast it and fill it with chunk so of cooked lobster meat tossed with some mayonnaise and chopped celery. The main flavor you get is usually the combination of mayo and celery, and you may get some citrus overtones since the roll is often served with a lemon wedge.

So far, jackfruit was my go-to seafood replacement. Jackfruit works really well in crab-less Jackfruit “Crab” Cakes, in Clam-free “Clam” Sauce, and in vegan New England “Clam” Chowder, but for the lobster rolls I wanted a different texture and milder flavor as canned jackfruit that I have access to is usually a bit salty and sour. So I did a little bit of research and discovered that heart of palm seems to be everybody’s favorite lobster stand-in. I have not really used heart of palm before so I was not sure what exactly to expect.

Luckily for me, my local Trader Joe’s carries 14 oz. jars of heart of palm in brine, so I decided to go for it. This amount of hearts of palm is enough to make four generous rolls using a standard size hot dog bun. The rolls come together in less than ten minutes and definitely qualify as a quick lunch or dinner. I recommend rinsing the heart of palm well and chopping it into relatively small piece. I know that chunks of lobster in some of the most revered lobster rolls out there are pretty large but in this case I do think that making celery and heart of palm pieces about the same size works better to integrate the flavors. Plus it makes for more manageable bites. So, get a large mixing bowl out and lets make a much lighter, cheaper, safer and, lets face it, tastier and kinder lobster roll.

Fancy Faux-Lobster Rolls
Fancy Faux-Lobster Rolls, kinder and safer, via Eat the Vegan Rainbow

Fancy Faux-lobster Roll

What you’ll need (for 4 servings):

1 14 oz (400 g) jar heart of palm
6 stalks celery
1/2 cup vegan Mayo (store bought or homemade)
1 tablespoon lemon juice
1 teaspoon old bay seasoning
1 teaspoon Dijon mustard
3-4 springs of fresh dill, chopped
4 hot dog buns


What you’ll do:

  1. Drain and rinse heart of palm. Pat dry and cut in half lengthwise and then across into 1/2 in (1 to 1.5 cm) pieces. Place into a large mixing bowl.
  2. Chop celery into thin slices, approximately matching the size of the heart of palm pieces. Add to the mixing bowl.
  3. Add the rest of the ingredients and mix well. Let rest for 30 minutes.
  4. Toast four hot dog rolls then top them with generous amount of faux-lobster filling. Sprinkle more dill on, if you like, and enjoy! The flavor is so fresh and satisfying that you will not want to add anything to this, but just in case you are wondering what to pair Fancy Faux-Lobster Roll with, you can try boiled or baked potatoes with just a splash of olive oil. That ought to do it!

Copyright ©Eat the Vegan Rainbow, 2017


Best DIY Sushi Ever!

Best DIY Sushi
Best DIY Sushi Rolls with Minty Peas & Red Cabbage, via Eat the Vegan Rainbow

If you think that making sushi requires hours of practice, one-on-one instruction from a sushi master chef and special equipment… well, you may be right if your goal is to make sushi that contains fish or seafood, especially given health risks involved. But, if you want to explore the wonderful and delightful world of plant-based sushi, all you need is about an hour or two, and some imagination.

I made my first vegan maki sushi, the kind where filling and rice are wrapped in sea weed, few months ago, and I really enjoyed the process and the flavors. I got inspired to start thinking about what ingredients would work together well, and whether there are any dipping sauces I could use to complement the sushi.

The results of this brainstorming are before you: Green & Orange Sushi Rolls and Peas & Cabbage Sushi Rolls, with Peanut Dipping Sauce and Sour Lemongrass Dipping Sauce.

The basic requirement for a great sushi is plenty of sticky rice. You can get special sushi rice but you can also use any short and medium grain variety of rice. For sushi, I use the same rice I use for risottos. The trick is to add the rice to boiling water, reduce the heat and let the rice gently simmer with occasional mixing.

Finally, leaving the rice to cool will help you handle it as well as help the rice get nice and very sticky. I recommend dipping your hands in water before handling the rice and then keep wetting them as you spread and press the rice.

One other thing you need to pay attention to is what side of seaweed sheet you pile your rice on. It should be the one that feels slightly rough, so that your outside is nice a smooth. What I discovered is that you don’t really need the bamboo sushi rolling mat or any special equipment. The main thing to remember is to go easy on the stuffing so your rolls don’t end up to full. This will make them hard to roll and more likely to rip. I hope you go for these vegan versions of sushi, or create your own. There really is no limit and no rules!

DIY Sushi with Two Dipping Sauces

What you’ll need:

FOR THE STICKY RICE

1 cup short or medium grain rice

2 cups water

FOR GREEN & ORANGE SUSHI ROLLS

1 1/2 cup cooked rice

3 seaweed (nori) sheets

1 carrot

1 English cucumber

1 avocado

1/4 cup sesame seeds

1/4 cup black sesame seeds

FOR CABBAGE AND PEAS SUSHI ROLLS

1 1/2 cup cooked rice

3 seaweed (nori) sheets

2 cups peas, frozen

2 cups water

2 cups shredded red cabbage

1 teaspoon sesame seeds, toasted

1 teaspoon black pepper

1 teaspoon salt

1/2 teaspoon garlic powder

2 teaspoons rice vinegar

1 cup fresh mint leaves

FOR PEANUT DIPPING SAUCE

2 tablespoons peanut butter, unsalted

1 tablespoon rice vinegar

2 teaspoons sriracha(or other hot sauce)

1/4 cup water

2 teaspoons panko, toasted

FOR LEMONGRASS DIPPING SAUCE

1/4 cup rice vinegar

2 tablespoons soy sauce, reduced sodium

1/4 cup fresh cilantro, finely chopped

1 tablespoon lemongrass, finely chopped

1 teaspoon ginger, grated

What you’ll do:

  1. Bring 2 cups of water to boil and add the rice. Lower the heat to gentle simmer and cook the rice, stirring occasionally, until all the water is absorbed, and the grains are soft. Set to the side and let it cool.
  2. In another pot bring 2 cups of water to boil and add frozen peas. Cook until well done for about 15 minutes.
  3. While rice and peas are cooking, put together the dipping sauces. In a medium size bowl, combine all the peanut sauce ingredients, except panko, and mix well to combine. Toast panko in the toaster oven, or in a pan over high heat, for 1-2 minutes. Top the peanut dipping sauce with toasted panko.
  4. In another bowl, combine all the ingredients for the lemongrass dipping sauce and set aside.
  5. Prepare your roll stuffers, like cucumbers, carrots, avocados or anything else you like. The trick is to make your veggie sticks long and thin.
  6. To make the red cabbage, place finely shredded red cabbage in a bowl and add all the rest of the ingredients except mint leaves. Mix everything well using your hands. Squeezing the cabbage as you mix will help soften it and make it absorb flavors better. Let the cabbage “marinate” for 30 to 60 minute.
  7. When peas are fully cooked drain and purée them.
  8. Once the rice is cool it is safe to handle. Place a piece of the seaweed sheet on the flat kitchen surface rough surface up. Place 1/2 cup of sticky rice on the sheet. Spread the rice to cover most of the seaweed sheet using your wet hands. Next, place the topping on 3/4 of the way towards one end of the sheet, and start rolling from that edg, slowly and gently. The roll should come together nicely.Cut the roll into sushi piece. One note on peas and cabbage rolls: spread the pea purée across entire rice and the pickled cabbage and mint leaves in a single line, 2/3 of the way from the edge.
  9. Serve the sushi with the two dipping sauces, some pickled ginger and wasabi paste. Enjoy!

Copyright ©Eat the Vegan Rainbow, 2017

Puffy Popovers of the Vegan Kind

Puffy Popovers of the Vegan Kind
Puffy Popovers of the Vegan Kind, via Eat the Vegan Rainbow

If you never had a popover before let me try to describe it to you: it is light as a feather and hollow, not actually fried dough but tasting as if the fried dough has decided to leave the deep frier and take a yoga breathing class to fill itself with air and become almost weightless. Popovers are a special breakfast treat to rejoice and enjoy, sprinkled with powdered sugar, with a spoonful of jam, or a handful of sliced fruit. Anyway you cut it they are amazing!

Popovers get their fluffy structure from lots of eggs, milk and butter, and their final elevated shape from a specially designed popover pan. Although popover pan may remind you of a muffin pan, which may lead you to believe that you can just your muffin pan to make popover, it’s best not to go there. I tried it, and it did not end well. So, you will need to get a real popover pan if you want to make the puffiest of popovers and there is not substitution for it!

But, is there a substitution for eggs, milk and butter? Of course there is! At first I was very skeptical that I can make popovers work by replacing basically the three quarters of ingredients that make popovers with vegan alternatives, but I did and it does!!!

My vegan, plant-based version is also very simple, with three main ingredients only: silken tofu, white wheat flour and unsweetened vanilla almond milk. To that you can add things like maple syrup, agave nectar or sugar, a bit more vanilla extract, a sprinkle of lemon, lime or orange zest, or cinnamon, for a sweet version, or stick with plain almond milk, a dash of salt and a sprinkle of dry basil and oregano for a more savory version. The basic batter is flexible and customizable, so feel free to make these popovers your own. Of course, you can always stick with the basic batter and add layers of flavors with condiments like jam, nuts, fruit, cashew sour cream, or macadamia nut queso fresco.

The main trick to making perfect, puffy popovers is to preheat the popover pan by itself before pouring in the batter, and then add the batter when pan is scorching hot and sizzling. Then bake the popovers at high temperature for a short period of time, lower it down and leave them to make for a while. I add an extra step where I decrease the temperature gradually so my popovers spend fifteen minutes at 425 F (220 C), then 20 minutes at 375 F (190 C) and finally another 10 minutes at 350 F (175 C). This helps them puff up and then cook through to their final glorious heights.

Puffy Popovers all in the row
Puffy Popovers all in the Row, Eat the Vegan Rainbow

Puffy Popovers

What you’ll need:

16 oz (454 g) silken tofu

1 1/2 cup unsweetened vanilla almond milk

1 1/2 cup flour

1 tablespoon vanilla extract

1 teaspoon turmeric (optional; for color only)

Salt, to taste (h/t to Pamela who left a helpful comment re adding a pinch of salt)

Cooking spray

What you’ll do:

  1. Preheat the oven to 425 F (220 C). Once preheated, place the popover pan in for 15 minutes to get sizzling hot.
  2. Drain excess liquid from tofu but don’t press. Place the tofu, almond milk and vanilla extract into a blender and blend on high until smooth.
  3. Add flour 1/2 cup at a time and blend well. Add turmeric if you like to give your batter a bit of a yellow tint and make it visually more egg-like. Mix everything well. The batter consistency should be similar to American pancakes (a bit denser than crapes).
  4. Wearing good oven mittens, take the popover pan out, spray with cooking spray, and pour the batter in, about 2/3 of the way. Place the popover pan on the baking sheet (to minimize splatter) and put it in the oven.
  5. Bake at 425 F (220 C) for 15 minutes, then lower the heat to 375 F (190 C) for 20 minutes and finish at 350 F (175 C) for an additional 10 minutes.
  6. Take out the oven and let cool for 10 minutes. The finished popovers should slide out the pan with ease.
  7. Enjoy warm as is, or with any topping you like!

Copyright © Eat the Vegan Rainbow, 2017

Grilled Eggplant

Grilled Eggplant
Grilled Eggplant, via Eat the Vegan Rainbow
Summertime and the grilling is easy… Well, that’s me paraphrasing the George Gershwin classic, but the statement is spot on. Grilling is easy, and it is my favorite way of preparing food during the hot summer months. Over the years I figured out how to grill quite a few different things, and at the end of the day grilling is really easy and with a little practice you can get really good at grilling almost anything.  My Grilled Portobello Steaks recipe was just the beginning of “From the Grill” section of this blog and in addition to that recipe and the Roasted Red Beets Hummus, there’s much more to come.

Today I am sharing a quick and easy way to make perfect grilled eggplant. Eggplant is a tricky vegetable to make because of its spongy texture that absorbs oil like crazy making almost every commonly encountered eggplant dish too oily and too rich. In the past I tried the trick where you sprinkle salt on the eggplant slices and let it sit between the paper towels, which does help but it adds salt and it takes time. More recently I started skipping all this and either simply cubing the eggplant, skin and all, or roasting the eggplant before stuffing.

Now this Grilled Eggplant recipe couldn’t be easier and does not require any special eggplant handling. Actually, the simple marinade I make, which includes couple of smokey spices, like smoked paprika, chili powder, liquid smoke and allspice, mixed with lemon juice and zest, can work well for summer squash, zucchini, or even tofu.

Grilled Eggplant
Grilled Eggplant, via Eat the Vegan Rainbow

Grilled Eggplant

What you’ll need:

2 large eggplants

1/2 lemon, juice and zest

2 tablespoons soy sauce

2 tablespoons liquid smoke

1 teaspoons smoked paprika

1 teaspoons allspice

1 teaspoons chili powder

1 teaspoons onion powder

1 teaspoons garlic powder

Vegetable oil

Cooking spray

What you’ll do: 

  1. In a large plastic container with a tight fitting lid, mix lemon juice and zest, soy sauce, liquid smoke and all the spices to make a pasty marinade.
  2. Wash and dry the eggplant. Cut lengthwise into 1/4 in (2.5 cm) thick slices.
  3. Place the eggplant into the marinade. Cover every piece well (use your fingers to help spread it out) and stack ghee eggplant slices. Cover with the lid and let stand for 30 to 60 minutes on the kitchen counter.
  4. Prepare your outdoor grill as you normally do. For me this means turning all the burners on high (I have a gas grill) with the lid down for 10 minutes, turning the flames down to low then using a steel brush to clean the grill grate. Finally, before placing food on the grill, I oil the grill well. I use a pair of long tongs and a paper towel dipped in vegetable oil.
  5. Bring the heat up to medium. Spray each eggplant slice with a bit of cooking spray before placing on the grill. Leave it to grill on one side for about 4 to 5 minutes. Depending on how hot your grill is this may take a bit longer.
  6. Spread the leftover marinade over the top of the eggplant slices before turning over. Grill for another 3 to 5 minutes.
  7. Take off the grill and serve. The grilled eggplant works well as a topping for couscous, rice or polenta. It also works really well in sandwiches and salads. My serving suggestion would be to wrap it in a grilled pita topped with plain hummus and sprinkled with kalamata olives.

Copyright © Eat the Vegan Rainbow, 2017

Sunday Slow Cooker Jackfruit Stew

Jackfruit is the “It” ingredient of the plant-based and vegan cooking world. When I started blogging about my plant-based cooking exploration and experimentation, jackfruit was one of those exotic ingredients that I could only get in a local Asian grocery store.

My first jackfruit recipe were the tacos, which still make a frequent appearance at the dinner table because they take no time to make and are really, really good. But what I discovered soon after is that jackfruit is a lovely and realistic stand in for seafood, and you can make a fabulous crab-free crab cakes and clam-free New England clam chowder. I’ve also used jackfruit to make a very rich chickenless tikka masala – yummy!

So in order to feed this new hunger for jackfruit I would go to the Asian grocery store and buy a pile of canned green jackfruit in brine. But, two weeks ago I found out that Trader Joe’s now carries jackfruit suggesting that this amazing plant has gone mainstream.  I still bought more than I need just in case and immediately jumped on testing it out.

What I did with two cans of young (green) jackfruit in brine this time around is transform it into a mellow slow cooker (crockpot) stew infused with onions, garlic, Indian bay leaf, dry basil and ground cumin, as well as spiced up with a bit of red and green chili pepper. In case you are wondering about the Indian bay leaf, the tree it comes from belongs to the same family as the cinnamon tree so the flavor is a bit of a mix between bay leaf and cinnamon. So, if you don’t have Indian bay leaf on hand, you can simply use some regular bay leaf and a dash of cinnamon.

What I like to do when using canned vegetables is to dump the contents of the can out into a strainer and rinse well with lots of water. Then I let access water drain out for few minutes before using. In the case of jackfruit I also prefer to pull the bits of fruit apart, so what I end up with is a pile of pulled jackfruit ready to be flavored in any way I like.

My favorite slow cooker trick that I mentioned before, but is definitely worth repeating, is to combine the aromatics (onion, garlic, chili peppers, and spices), add some oil or cooking spray, and soften in the microwave for three to five minutes.  This helps them develop some caramelization and flavors that slow cooker is not able to achieve. Finally, these days I don’t use the slow cooker unless lined up with crockpot liners that make the cleanup an absolute breeze.

One last note: don’t worry if you don’t have a slow cooker. You can try making this stew on a stovetop in a Dutch oven type of pot or any other. If this is what you are doing remember to brown your aromatics in a bit of oil first then add the jackfruit, and lastly diced tomatoes. The benefit of using a slow cooker is that you set it and forget it, which frees you up to spend your Sunday doing whatever…

Slow Cooker Jackfruit Stew

What you’ll need:

2 cans (10 oz, 280 g) young jackfruit in brine

1 can (28 oz, 800 g) petit diced tomatoes

1 yellow onion, diced

2 tablespoons garlic, crushed

1 red chili pepper, seeds and veins removed

1 green chili pepper, seeds and veins removed

1 tablespoon basil, dried

1 teaspoon ground cumin

2-3 Indian bay leaves

1 teaspoon vegetable oil

What you’ll do:

  1. Rinse and drain the jackfruit to clean out access brine. Pull the jackfruit pieces apart, removing any hard bits of core and seeds that may have been present (I leave softer bits of core and seeds in).
  2. Place the jackfruit in the crockpot that’s been lined with a liner.
  3. Remove the seeds and the veins from the chili peppers and diced them finely. Dice the onions and crush the garlic.
  4. Mix chili peppers, onion, garlic, dry basil, and ground cumin in a microwave safe bowl with the vegetable oil until everything is well coated. Microwave for 3-5 minutes.
  5. Add the aromatics to the crockpot as well as petit diced tomatoes and mix everything together.
  6. Cover and cook on low for 5 hours.
  7. Serve over basmati rice, or even pasta. This stew is fragrant and just discretely spicy. You can definitely adjust the level of spiciness to fit your palate.
  8. Copyright © Eat the Vegan Rainbow, 2017

Roasted Red Beets Hummus

Roasted Red Beets Hummus
Roasted Red Beets Hummus, via Eat the Vegan Rainbow

I am a bit on the roasted beets kick these days. I just shared how I used them in a salad, this post is all about a hummus I put together, and, believe it or not, I have a pile of roasted beets in the fridge that are waiting for me to figure out what to do with them.

Beets Roasting on a Grill
Beets Roasting on a Grill, via Eat the Vegan Rainbow

The batch in the fridge was roasted in the oven, and that method – cranking the heat to 425 F (220 C) and roasting them for about 30 to 45 minutes – will work here as well. But the beets that I used for this hummus were roasted on a grill. I recommend you try this next time you grill your veggies, tofu or try my Portobello Mushroom Steaks. Your grill will already be on so it’s perfect time to wrap your bits in some foil and toss them on!

The rest of this hummus recipe is super easy. You will need a large mixing bowl, two cans of chickpeas, rinsed and pat dried, some lemon juice, and a spoonful or two of almond butter, and all the lovely roasted beets, cooled and peeled. You will also need a hand-held, stick blender, and let it rip until everything is well blended and smooth. You can always use a good processor if you have one or a powerful blender. I have neither so hand-held, stick blender is my tool of choice.

What you’ll end up with is a nice pile of lovely and bright magenta hummus that will keep well in a plastic container with a tight lid for a week in the refrigerator.

Roasted Red Beets Hummus, via Eat the Vegan Rainbow

Roasted Red Beets Hummus

What you’ll need:

3 red beets

2 15.5 oz (439 g) cans chickpeas (garbanzo beans), low sodium

3-4 tablespoons lemon juice

2 tablespoons almond butter

What you’ll do:

  1. Roast the beets, let them cool and peel. You can roast them in the oven or on the grill. Either way I recommend wrapping them in foil. This will minimize the mess and speed up the roasting. Regardless of where you roast them, it will take about 30 to 45 minutes to get the beets roasted all the way through. Please note that you can eat beets raw, so you can actually skip the roasting all together. Roasting does help bring the natural sweetness of beets out more, so in my opinion it’s worth an effort.
  2. Cut the roasted beets into cubes, and place into a food processor or the large mixing bowl.
  3. Place the chickpeas into a strainer, rinse them well and pat dry.
  4. Add chickpeas to the bits, add the rest of the ingredients and blend until smooth. Serve any way you like. For me hummus is one of the best sandwich spreads ever, and this one works like a dream when paired with avocados!!!
  5. Copyright © Eat the Vegan Rainbow, 2017