BBQ Pulled Eggplant

BBQ Pulled Eggplant via Eat the Vegan Rainbow
BBQ Pulled Eggplant, via Eat the Vegan Rainbow

There’s something magical about barbecue or BBQ as we often call it. I am not sure that it can be put into words, and the best you can do is to try it. Perhaps you can start with the recipe below, which is, technically, not a BBQ; but it successfully recreates what using smoke and cooking low and slow (at low temperatures for prolonged periods of time – typical BBQ setup) results in. Or: you can take a look at a very inspirational cookbook in this area “Great Vegan BBQ without a Grill”.

Regardless of what you decide to do, I don’t think you will be disappointed. The basic idea behind a dish like the BBQ Pulled Eggplant below is to take advantage of the natural eggplant texture, which allows it to be pulled into long strips, and to use a rich marinade.   Like any great BBQ recipe, this one also takes time. And although there is no need for low and slow cooking here, there is a need for long marinating, which will help add an incredible amount of flavor to the eggplant.

If you are still hesitant, don’t be! The recipe is super simple. You will need to roast the eggplant, which can’t be easier. You will leave the skin on, wash the eggplant, and put it in the hot oven to roast for about an hour. Once eggplant is full roasted, you’ll leave it to cool, then open it up and scoop all the meat out. Some eggplants have quite a lot of seeds in them, and these may look unappetizing – if they do seem unappetizing to you, chuck them out (preferably on your compost pile!). They are actually completely edible and will not change the final flavor at all – so I suggest you keep them in. All the eggplant that you pull ad scoop out goes into the marinade for an hour or more (overnight in the fridge is fine too).

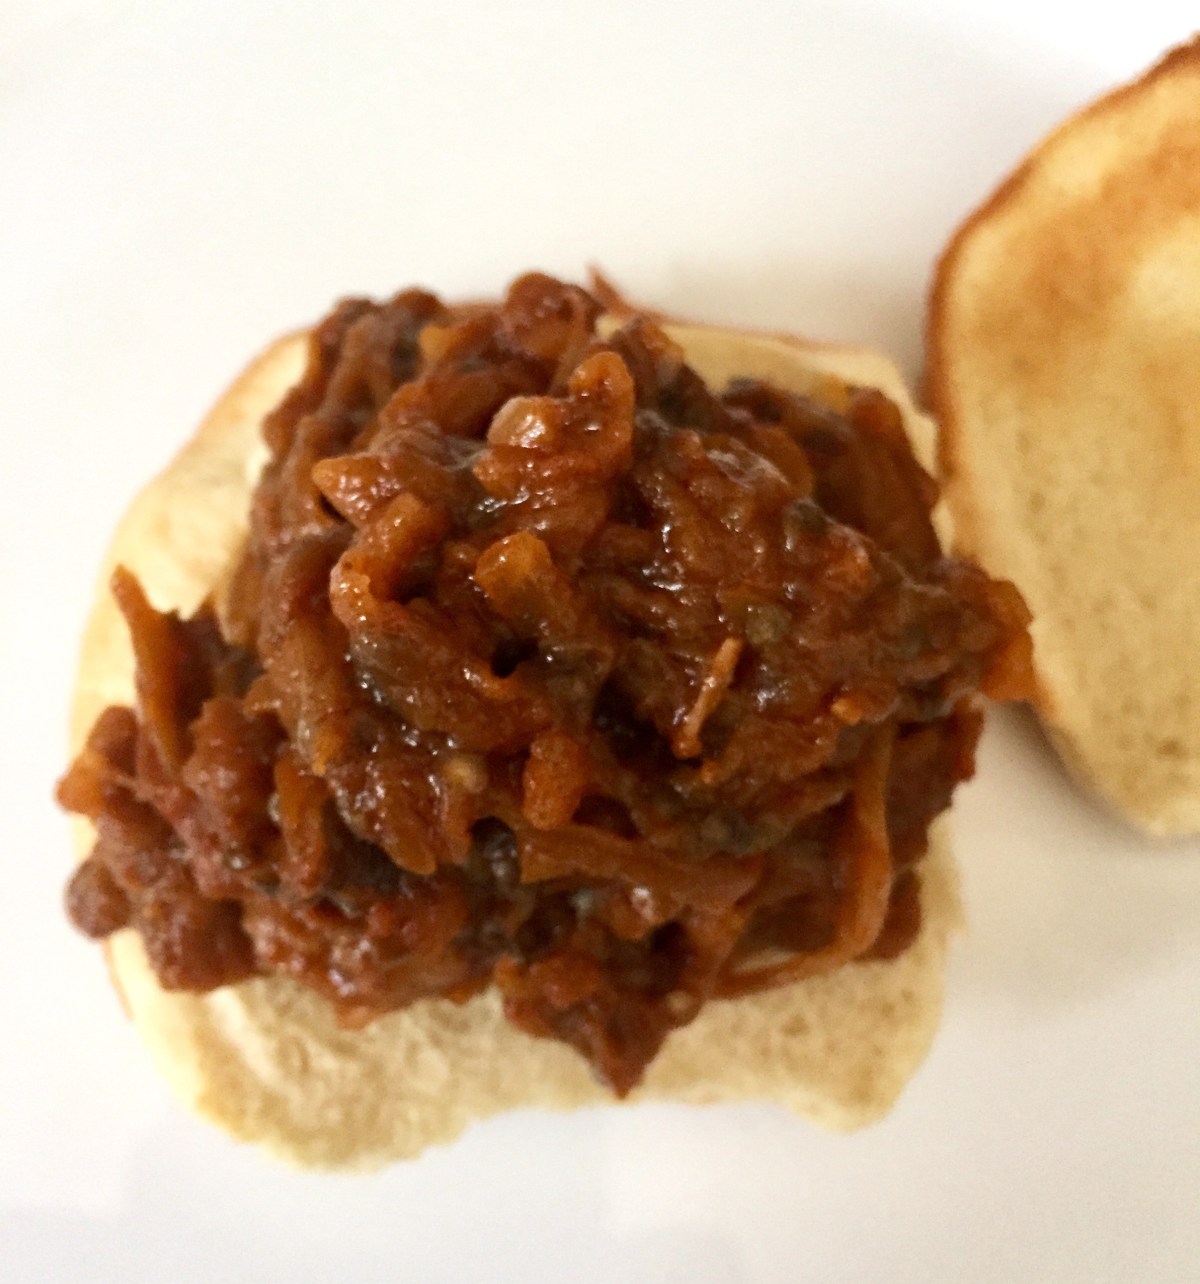
One time and resource saving tip you’ll like is that I use the marinade as a sort of BBQ sauce. As you will see below, the last step is dumping the pulled eggplant and the sauce it’s been marinading in into a hot pan which will help eggplant brown and caramelize, and the marinade thicken into a rich BBQ sauce. So, you will be hitting two birds with one stone!


BBQ Pulled Eggplant

What you’ll need:

  • 3 whole eggplants, washed and dried (do not peel)
  • 3 tablespoons canola (or other vegetable) oil
  • 3 tablespoon reduced-sodium soy sauce (or reduced-sodium tamari sauce for gluten-free option)
  • 3 tablespoons chili powder
  • 3 tablespoons dry chopped onion (for example these), or 1 tablespoon onion powder
  • 2 tablespoons smoked paprika
  • 1 tablespoon agave nectar or maple syrup

What you’ll do:

  1. Preheat the oven to 425 F (220 C).
  2. Wash and pat dry the eggplant. Place it on a baking sheet lined with some foil or parchment paper and roast for 50-60 minutes. The eggplant should be cooked all the way through.
  3. Take the eggplant out and let it cool. It does not need to be cooled all the way, but it needs to be cool enough to handle by hand.
  4. While the eggplant is cooling mix all the rest of the ingredients in a large container big enough to hold the pulled eggplant while it marinates. Set aside.
  5. When eggplant has cooled of, split the eggplant in half then using a fork start pulling the meat out by sliding the fork lengthwise. Some trips will be shorter, some longer. You can decide which length makes most sense to you – I personally keep it irregular. If your eggplant has a lot of seeds and you rather not use them, pull them out and set them aside to use for something else or compost. At the end of this process, all that will be left will be the eggplant skin. Discard the skin!
  6. Place all the pulled eggplant into the marinade, cover and marinate for at least an hour – overnight in the fridge works well!
  7. Final step: bring a large cast iron pan or a heavy frying pan or a skillet over high heat. Let the pan get really hot, lower the heat to medium to medium high, then dump all your marinated eggplant with the marinade into the pan and let it sizzle. The main purpose here is to get some browning going and thicken up the marinade. Keep stirring things around for about 5 minutes, then turn the heat off and serve as sliders (on mini hamburger buns), or as pulled BBQ sandwich on a large buns. Pickles, pickled onions, and/or coleslaw are all great sides to have on hand here. Enjoy!

Copyright © Eat the Vegan Rainbow, 2019


Barley Burgers, Barely Believable

img_3989
Barley and Mushroom Burgers, via Eat the Vegan Rainbow

When life gives you barley, you should probably make some burgers! This is especially true when life simultaneously gives you some mushrooms so that your burley burgers can take full inspiration from that old-time favorite, the Mushroom and Barley Soup. The soup is a traditional menu item in delis and other lunch places, and it work because it combines robustness and heartiness of barley with plenty of umami savoriness that comes from mushrooms.

These burgers are built on the same principles. Cooked barley is mixed with plenty of ground mushrooms, and a handful of flavoring agents to make these gently spicy and smokey baked burgers. The patties are sturdy enough to hold up to the outdoor grilling, so you don’t need to limit yourself to an oven.

The key flavor agents in this case are sliced black olives and chipotle peppers in adobo sauce. You need to be careful with the chipotle peppers because they are hot! I usually use either only the sauce or just one pepper as more than that can make a dish, including these burgers, quite uncomfortable. The adobo sauce itself is an excellent source of smokey flavor, so if your taste buds are sensitive you can skip the pepper, or replace the adobo sauce with some smoked paprika.


Mushroom and Barley Burgers

What you’ll need:

2 cups barley

4 cups water

1 cup black olives, sliced

10 oz mushrooms

3 tablespoons tomato paste

1/3 7 oz. (200 g) can chipotle peppers in adobo sauce

1 tablespoon minced garlic

2 tablespoons soy sauce

1 cup flat leaf parsley, fresh

Cooking spray


What you’ll do:

  1. Cook 2 cups of barley in 4 cups of water. I recommend using a pressure cooker (30 min bean cycle on the electric pressure cooker I have gave great results), or cook on the stove top using the instructions on the bag. Let cooked barley cool before using further.
  2. Preheat the oven to 425 F (220 C), or prepare your outdoor grill as you normally do. For the outdoor grilling I recommend getting the grill grates hot, burning off any bits that may have been stuck on them, then scrubbing them, and oiling them before use.
  3. Place the olives and the rest of the ingredients all the way to the cooking spray, into a food processor and process until finely chopped, then add into the cooked barley. Mix well, and using your hands form the patties.
  4. If you are using an oven, place the patties onto a baking sheet lined with some parchment paper. Spray them with cooking spray, then flip over and spray again. Bake on one side for 10-15 minutes then flip them over and bake for 10 min more. For outdoor grilling, 8-10 minutes per side should be enough to get the perfect grill marks and develop that lovely grilled flavor.
  5. Serve the burgers with all your favorite trimmings. They are hearty and just slightly spicy, and pair well with neutral flavors like avocado, lettuce and tomato.

Enjoy!

Copyright © Eat the Vegan Rainbow, 2018


Gluten-free Vegan BBQ Ribs

F3265A16-4525-47CB-BDAF-363E0887C4BE
Gluten-free, Vegan BBQ Ribs, via Eat the Vegan Rainbow

For all of you out there who’s mouths have been watering when you see people share their vegan BBQ ribs recipes but don’t eat gluten, this one is for you! Of course, all of you who are gluten-lovers, I hope you check this recipe out as well – you will not be disappointed!

Big credit for these ribs goes to Linda and Alex Meyerson and their amazing new cookbook “Great Vegan BBQ without a Grill” (read my review here). Their recipe for BBQ ribs (or RIBZ, as they call them!) is amazing and I love it, but my husband has been avoiding gluten so I had to come up with an alternative.

After few trials and errors, I came across couple of recipes that use quinoa as a replacement for gluten. I have been trying to include quinoa into my cooking more often (in a gumbo-jambalaya fusion, as a stuffing for roasted eggplant, and as a perfect side dish for winter holidays), because, although almost impossible for me to pronounce it properly (is it keen-wah or kee-noah or something else?), it is super nutritious. Loads and loads of plant-based protein, fiber, minerals and vitamins!

It also has a subtle flavor which makes many people think of quinoa as bland, while I view it as versatile. This absence of strong flavor means that I can dress quinoa any way I like, and make it come out flavorful and different every time. These BBQ ribs are the proof!

As I said, the real credit goes to Alex and Linda because their idea to bake the rib meat before grilling it further is a real breakthrough. This lets your meat come together, and makes grilling a breeze. These ribs will withstand the indoor and the outdoor grilling so go crazy – and remember that you can prep your “meat” a day or two in advance and store it in the fridge, which can be a real lifesaver if you are having a large party over. All you will need to do is get your “meat” out, cut into the ribs, and grill before serving. This recipe is so fantastic that you can easily serve it to your omni friends and family, and they will not know the difference. Happy grilling!!!

Tip: this is definitely a recipe that you make in stages. You need to cook quinoa, roast some beets, sauté mushrooms, cook the beans (if not using store bought) – all before everything goes into the food processor, so be patient and plan ahead. It will be worth it!

Gluten-free Vegan BBQ Ribs

What you’ll need:

1 cup quinoa

1 1/2 cup vegetable broth

10 oz mushrooms, sautéed

2 tablespoons olive oil

1/2 beet, roasted

2 cups dark red beans (canned or homemade)

2 tablespoons tapioca starch

1 tablespoon tamari

1 tablespoon Worcestershire sauce

1 tablespoon liquid smoke (or less, depending on your taste)

2 teaspoons onion powder

2 teaspoons smoked paprika

1 teaspoon garlic powder

1/4 cup BBQ sauce (homemade or store bought, I love Stubb’s Original)

Oil or cooking spray for preparing the grill or a grill pan

Extra BBQ sauce for serving!

What you’ll do:

  1. Roast the beet – actually, instead of roasting one lonely beet, I recommend roasting a whole bunch of beets at the same time, at 425 F (220 C) for 45 minutes or so, and then using them to make these ribs, as well as eat them in a salad or make them into a hummus. This can be done on the grill too – wrap the beets in some foil and let them hang on the grill for about 45 minutes as you grill other things! You can make the beets in advance and store in the fridge for up to a week, and use in this, and many other recipes as needed. If you are in a tight time crunch you can use canned beets as well, but the roasted ones do add a bit of nice, earthy aroma that the canned ones simply don’t have.
  2. Combine quinoa and vegetable broth into a pot large enough to hold it all, place over high heat, bring to boil, then reduce the heat and simmer for 10-15 minutes until all liquid is absorbed. Set aside.
  3. Preheat the oven to 375 F (190 C).
  4. Place a large frying pan over medium high heat, add the oil then sliced mushrooms, and sauté the mushrooms until nicely browned.
  5. If you have a large food processor, you can combine cooked quinoa, sautéd mushrooms, beans, 1/2 beet, and all the rest of the ingredients – except the BBQ sauce! – in the food processor and process until smooth and homogenous. If you don’t have a large food processor, but have a stick blender you can place everything into a large mixing bowl and then use the stick blender to blend it all together. This is your rib “meat” mix.
  6. Line a 9 x 13 in (23 x 33 cm) baking dish with parchment paper and spray the bottom and the sides with some cooking spray. Pour your rib “meat” mix into the pan, even out and bake for 30 minutes, or until baked through, and browned at the edges. Let the baked rib “meat” cool. This is also a good stopping point, as the “meat” can stay in the fridge overnight and be used the next day.
  7. When you are ready to grill, slice the rib “meat” into strips – they should be roughly the same size as the real ribs, which is about 1 inch or 2-3 cm.
  8. Prepare your grill pan or your outdoor grill as you normally do. For me, this means turning on the heat to high and letting the pan heat up nice and good before brushing with a little bit of oil or spraying with some cooking spray. For the outdoor grill, I turn the burners on to the max (I have a gas grill) and leave the grill covered for 10 minutes, then I use the brush to scrape the grates, oil them with a paper towel dipped into some oil (use your heat proof tongs to handle the towel paper and stay safe), and they are ready (note that the type of a brush you use depends on the kind of the grill grates you have, so follow the manufacturer instruction closely otherwise you may permanently damage your grill!).
  9. Place the ribs on the grill or the grill pan and brush the top with some BBQ sauce. Let them grill for 3-4 minutes on one side then flip over, brush with some BBQ sauce and repeat. I usually flip the ribs three times so that each side has 2 brushes of BBQ sauce and two grilling periods, for a total of about 6 – 8 minutes per side.
  10. Serve hot with the side of your favorite BBQ sauce (I recommend warming the sauce just slightly), and enjoy with your favorite sides, such as grilled corn, spicy cole slaw, or this fantastic arugula and watermelon salad that I just discovered!

Copyright © Eat the Vegan Rainbow, 2018

Sweet Potato Burgers

img_2978
Sweet Potatoe Burgers, via Eat the Vegan Rainbow

Let me make one thing clear – if you are looking for a veggie burger recipe that looks and tastes like meat, you really should look elsewhere since this ain’t it! But, if you are looking for a different type of burger, that is unusual yet appealing, and that is amazingly nutritious then you have come to the right place.

This is my Sweet Potato Burger which is made of roasted sweet potatoes, oats, flax meal “egg”, and a dash of very spicy adobo sauce. The patties are held together by the joined action of oats and the flax meal egg, and do just fine on the outdoor grill. The flavor is nicely sweet, perfect for combining with some mustard, pickles and lettuce. In my view, tomatoes, mayo and cheese do not work well on this burger, but caramelized onions, sautéed mushrooms, or sliced avocado would add to it. Feel free to experiment and see how it goes!

Sweet Potato Burgers

What you’ll need:

2 cups roasted sweet potatoes, mashed

1 cup rolled oats

3 tablespoons flax meal

6 tablespoons water

1 tablespoon adobo sauce

1 teaspoon maple flavor

1 teaspoon coriander powder

1/4 teaspoon cinnamon

1/8 teaspoon nutmeg


What you’ll do:

  1. Roast sweet potatoes as you would normally. I usually roast them at 425 F (220 C) without peeling for 45 minutes or so, then let them cool completely before handling. My usual batch is about 8 large potatoes and I store them roasted in the refrigerator and use them through the week.
  2. Start soaking flax meal in hot water 15-20 minutes prior to use. You can find detailed instructions on making the flax egg here.
  3. Peel two potatoes and mash them with a fork or a potatoe masher. This should yield 2 cups of sweet potatoes. Measure it out and adjust by adding and removing the mashed sweet potato. The final amount does not need to be absolutely precise but do keep it close to the recipe.
  4. Place the mashed sweet potatoe into a large mixing bowl, and add all the rest of the ingredients. Mix well, and use the immersion (stick) blender to get the consistency nice and smooth, and the oats broken up. If you don’t have the stick blender you can always use your food processor. Let the mix stand for 20 minutes or so to allow the oats to begin soaking up the excess moisture and swell.
  5. Form the burger patties, and place them on a wax paper lined platter. Place the patties in a refrigerator for up to an hour to firm up.
  6. Prepare and preheat your outdoor or indoor grill, or your grill pan in a usual way. I recommend oiling the grill grates well and grilling the burgers at medium heat. You can also use a grill pan or a regular pan – the burger will come out as delicious albeit without the lovely, charred grill marks. Sweet Potato Burgers need about 4-5 minutes per side, and they are ready to enjoy!

Copyright © Eat the Vegan Rainbow, 2018

Chickpea Burgers with Sun Dried Tomatoes and Walnut Meat

img_2974
Chickpea Burgers with Sun Dried Tomatoes and Walnut Meat, via Eat the Vegan Rainbow

You should get to know walnuts. They are super nutritious because they have a large amounts of polyunsaturated fats, and surprisingly high amounts of protein, fiber, even vitamins B-6.

Walnuts are also fun and funky. They look like large, green balls when young, and their pretty green skin shrivels into dark brown to black husk as they ripen. This husk eventually falls off, revealing the nut. If you do find yourself with a pile of walnuts still wearing their husks on your hands, do use gloves when peeling them. The walnut husks will release dark brown pigments that will color your skin, and the stuff does not come off easily. It’s actually still used as a natural hair dye in some places, and if you ever get a pile of green walnuts stick them into some brandy and make some dark liquor called nocino.

If you are like me, chances are the walnuts you can easily find come nicely cleaned and sometimes even chopped. These days I prefer to get chopped walnuts as that speeds things up in the kitchen. I use walnuts in my desserts, as a quick snack, and as a meat substitute. This recipe here falls into the “walnuts as a meat replacement” category and to boost their meaty flavor I combine them with sun dried tomatoes, caramelized onions, cumin, smoked paprika, and chili powder. This serves as a fantastic flavor add-on to chickpeas, which are the main ingredients in this burger. Having said that, I think chunks chickpeas here are more of a filler and that walnuts and the sundried tomatoes are the stars.

The main binding agents here are flax meal and bread crumbs. Flax meal has to be soaked in hot water for about fifteen minutes, which should be enough to transform it into sticky goo that you can use instead of eggs as a binding agent.

Chickpea Burgers with Sun Dried Tomatoes and Walnut Meat

What you’ll need:

1 onion, diced

1 cup walnuts, chopped

3 oz. (85 g) sun dried tomatoes, sliced

3 tablespoons flax meal

6 tablespoons water, boiling

2 15.5 oz. (439g) cans chickpeas, rinsed and drained

3 tablespoons olive oil

2/3 cup plain bread crumbs

1 teaspoon smoked paprika

1 teaspoon cumin

1 teaspoon chili

Cooking spray

What you’ll do:

  1. In a large cup or a measuring cup mix flax meal and the boiling water. Let the mixture stand for 15-20 minutes.
  2. Spray the bottom of a large frying or sauté pan with cooking spray and place over medium heat. Add the diced onions and sauté for 8-10 minutes until the onions are nicely caramelized.
  3. Add chopped walnuts and let them toast slightly. This will take 3-5 minutes.
  4. Add the sun dried tomatoes, mix well and sauté for another couple of minutes.
  5. Transfer the sautéed mixture into a large mixing bowl. Add the chickpeas that have been carefully washed, drained and half-mashed with either a hand or a fork. Add the soaked flax meal, spices, oil, and bread crumbs and mix well.
  6. Form the burger patties, and place them on the wax paper lined platter. Put the patties in the fridge for at least 30 minutes to firm up.
  7. Grill the burgers using an outside or an inside grill, or a grill pan. These burgers are sturdy and should not fall apart while grilling. They need 3-5 minutes per side to get nice grill marks.
  8. Serve them on a ham burger bun with your choice of toppings and condiments!!!

Copyright © Eat the Vegan Rainbow, 2018

White Bean Burger with Chia Seeds

img_3284-1
White Bean Burgers with Chia Seeds, via Eat the Vegan Rainbow

Another veggie burger, another sensation (if you like to see some past examples, there are here, here, here, and here)! And you don’t need to take my word for it, just go ahead and make a batch of these. First of all, they are ultra-cheap. I use dry beans and one pound, approximately half a kilo, of dry beans will make a huge pile of these burgers. At the end, I think my yield from this recipe was about 15 burgers. The burgers store well in the tightly sealed container in a fridge – you can keep them for a week – and reheat easily in the microwave oven, toaster oven or on the stove top. I am not entirely sure they freeze well, but you can try. If you do decide to freeze a batch, I recommend cooking them through, letting them cool, then separating individual burgers with some wax paper, then freezing. In that way you can grab a burger any time you need it!

Chia seeds are the magic ingredient here. I’ve used chia seeds in the past to make puddings, but here I use them as the main binding agent, the same way you would use egg or a flax “egg”. To make chia “egg”  all you need to do is soak chia seeds in some water for about 30 minutes or so. By the time half an hour is up you should have a very thick and gooey mixture that looks quite slimy and that is a good sign. It means your chia seeds are ready to use. Chia seeds add not only the cohesiveness to this recipe, but bump up the nutritional value of your burgers because they are rich in polyunsaturated fatty acids.

I used to be afraid of cooking the beans and would get canned ones only. But, I recently started using a pressure cooker and I love it! I soak the beans overnight to speed things up, although I did make the beans without soaking and that works as well – you just need to cook them for a longer time. Once ready for the pressure cooker, I rinse the beans, place them in the pot and cover with water. I use an electric pressure cooker and use a preset bean program which takes about fifteen minutes of pressuraized cooking. Once the program is done and the pressure cooker is safe to open, I drain the beans and use without rinsing. You can save the liquid too, and make it into a soup if you like.

Note: if you are cooking dry chickpeas this water is the actual aquafaba that everybody is raving about, so do keep it and use it as the egg white substitute. I recently made aquafaba meringue and topped my Butter Squash and Cranberry Pie with Praline and Meringue Topping.

Once you have your chia egg and your cooked beans the rest is easy. All the ingredients so into a large mixing bowl or a food processor and get processed together. Once formed, the burger patties need to sit in the fridge or on the kitchen counter for about half an hour to an hour to firm up, and they are ready to go. I made my batch in a non-stick pan sprayed with some cooking spray, but you can grill them or even put them in the oven. They don’t need much cooking really since all the ingredients have already been cooked, so what you are really looking to do is brown the patties nicely on both side and heat them through.

You can serve these veggie burgers through the year and with any condiments you enjoy. I can recommend a piece or two of avocados and a spoonful of Macadamia Nut Queso Fresco with just a spring of cilantro. That out to do the trick!


White Bean Burgers with Chia Seeds

What you’ll need:

1 lbs (450 g) white beans, dry

1/2 cup red pepper paste (or tomato paste, if you don’t have red pepper paste)

2 tablespoons chia seeds

6 oz (3/4 cup) water

1 cup coarse corn meal

1/2 cup fine corn meal

2 tablespoons stake sauce

1 teaspoon cumin powder

1 teaspoon chili lime powder (or regular chili powder)

Cooking spray

What you’ll need: 

  1. Cover the beans with water and soak overnight at room temperature.
  2. Rinse the beans before cooking, then cook them in a fresh batch of water until done. If you are using a pressure cooker the total cooking time will likely be about 30 minutes. If you are cooking them in a regular pot they will probably need an hour or an hour and a half. You can also use the canned beans and you probably need 3-4 15 oz (425 g) cans to get the amount equivalent to what you get from a pound of dry beans.
  3. While beans are cooling, start soaking chia seeds in 3/4 cup of water. This will take 30 minutes or so.
  4. By the time chia seeds are ready to use, your beans will be cool. Place the beans, chia seeds, and the rest of the ingredients into a large mixing bowl and process everything together with a stick blender. You can also use a food processor for this step.
  5. For the burger patties and leave them to firm up for about 30 minutes. You can leave them on the kitchen counter or in the fridge. You can also make them a day ahead and leave them in a fridge and finish cooking them the next day.
  6. Preheat the grill, grill pan or a non-stick frying pan to medium-high. I recommend using some cooking spray to help the burgers brown and get them going, but if you do have a good non-stick pan you can probably get away with not using any oil or cooking spray. The burgers need 3-4 minutes per side.
  7. Serve them fresh from the grill/out of the pan and enjoy with your favorite toppings and condiments!

Copyright © Eat the Vegan Rainbow, 2018

Asian Meatballs with Spiralized Zucchini and Carrot Salad

Vegan, fully plant-based meatballs are one of the easiest thing in the world to make. I like putting meat-free “meatballs” together because they are fun – fun always comes first of course – and they are versatile, you can stick them into a sandwich, over pasta, serve with mashed potatoes, with rice and beans, and the list goes on and on…

Plus: unlike dealing with meat, especially poultry, all the ingredients in these meatballs are safe to eat as is, which means that even young kids can get involved and roll some meatballs. I told you – these can be fun for everyone!

What makes these meatballs Asian is the combination of scallions (green onions), Sriracha (hot red chili sauce), fresh ginger, panko (Japanese breadcrumbs), and peanut butter that get mixed with chopped, not ground, soya chunks. The idea is to retain some of the soya chunks structure rather than grind them to the consistency of ground beef. Think chicken salad, rather than taco meat.

To complete the meal you will need to do some spiralizing, which is one of my favorite things to do with zucchini, summer squash, and even potatoes. Here, I combined carrots and zucchini which gives the salad a nice contrast of crunch versus softness, plus a colorful appearance. The spiralized vegetables are mixed with some slivered almonds, lime juice and zest, and tossed to combine. Top them with a meatball or three, and you got yourself a dinner!

Asian Meatballs with Spiralized Zucchini and Carrot Salad

What you’ll need:

FOR THE SALAD

3 zucchinis, spiralized

3 fat carrots, spiralized

1/2 cup slivered almonds

1 lime, juice and zest

FOR THE MEATBALLS

200 g soya chunks

1 1/2 cup panko, Japanese breadcrumbs, regular or gluten-free

3 scallions, white and green parts, finely chopped

1 tablespoon ginger, freshly grated

1 tablespoon peanut butter, natural and unsalted

3 tablespoons soy sauce, reduced sodium

1/2 teaspoon hot chili sauce (sriracha)

Cooking spray


What you’ll do:

  1. Prepare soya chunks according to the instructions on the box. They usually need about 3-5 minutes in a pot of boiling water.
  2. Drain and rinse your soya chunks under some cold water, then chop or grind them into small chunks, similar to chicken chunks commonly used in Asian Dumplings recipes. Place them in a large bowl, and add all the rest of the ingredients. Mix everything well and let stand for 5-10 minutes before making the meatballs.
  3. Heat a large skillet or a cast iron pan over the medium high heat. Spray with some cooking spray and brown the meatballs on all sides until golden brown. Brown the meatballs in batches and make sure you don’t overcrowd the pan.
  4. While the meatballs are browning, prepare the salad. You can either buy a box of spiralized carrots and spiralized zucchini and toss them with some lime juice, lime zest, and toasted slivered almonds, or you can spiralize your own if you have the spiralizer. Let the salad rest while the meatballs finish browning.
  5. To plate, place a good amount of salad in the middle of the plate, and top with 2-3 meatballs. Enjoy!

Copyright © Eat the Vegan Rainbow, 2018

Broiled Vegan Koftas

img_3533
Broiled Vegan Koftas, via Eat the Vegan Rainbow

Although it may seem like a mission impossible, recreating meat like appearance, consistency and even the taste with plant-based ingredients is not all that hard. The basis for many of my meatless recipes are mushrooms. I usually use baby portobello mushrooms, also known as the crimini mushrooms, but white button mushrooms would work just as well. Very often I grind the mushrooms into a paste and this also helps with the final meat-like vibe of a dish. Finally, I cook the dish with the same spices and in the same way as someone would a meat version of the same recipe.

The meatless Shepherd’s Pie I made some time ago nicely illustrates these tips. For that recipe I used mushrooms and lentils, as the key umami components, and combined them with herbs that you would typically use in this pie – thyme and plenty of rosemary. What you see and smell will evoke the right memories and experiences, so by the time you have the first bite your brain is already convinced it’s having meat.

Here I use all those strategies to make koftas, which are sort of flat-ish lamb meatballs placed on a skewer and grilled. Minced mushrooms give the right level of umami and TVP (textured vegetable protein) gives the koftas structure. One note on the TVP – instructions usually say that you need to soak the TVP flakes before using which is true for many applications but not for this one. Use dry TVP and mix it with minced mushrooms and the rest of the ingredients to get to the right consistency for the koftas. After all they will need to go on the skewers and need to be robust enough for broiling on high. I did add some bread crumbs to the mix as well, as an extra binding agent. If you are not a fan of bread crumbs, you could add oats, or some corn meal.

Koftas need to be shaped by hand, and the skewers gently threaded through. Ideally, the skewers you are using are long enough to rest on the edges of your broiler pan (see picture below) so that you can turn them midway through broiling and get all sides well browned. I can’t recommend the bamboo skewers I used here – by the end of the broiling they were all black band falling apart – so metal ones seem like a much better idea.

Serve Broiled Vegan Koftas with some Saffron Cauliflower Rice, and with a spoonful of mint chutney, and you will have yourself a great, well-rounded meal.

Broiled Vegan Koftas

What you’ll need:

10 oz (280 g) white button mushrooms

10 oz (280 g) TVP

1 cup bread crumbs, plain, gluten-free

4 cloves garlic

3 tablespoons olive oil

2 teaspoons coriander powder

2 teaspoons ground cumin

2 teaspoons smoked paprika

1 teaspoon crushed red pepper flakes

Cooking spray

What you’ll do:

  1. In a large food processor, mix all the ingredients (except the cooking spray) and pulse to mix and combine. Let this mixture stand for at least 30 minutes and up to one hour.
  2. Start your broiler on “HI” or use the outdoor grill if you like.
  3. Line a broiler pan with some foil. You don’t need the top grate part that broiler pans usually have so leave it aside.
  4. Using your hands take about 1/2 cup worth of koftas’ mix and form an elongated oblong shape about 1 1/2 in (3-4 cm) wide then pierce it with a skewer. These koftas are gentle so handle them with care. You may need to adjust the amount of bread crumbs, or add some flex meal as a blunder. Leaving them in a fridge or freezer to firm up will help them hold their shape. Place the skewers on a broiler pan making sure their ends rest on the pan’s rim and the koftas don’t touch the bottom (see picture above).
  5. Broil on high for 5-8 minutes than turn over to broil on the other side.
  6. Let koftas cool just for a moment then serve with some rice, Saffron Cauliflower Rice, or a mild yogurt, like almond or cashew ones.

Copyright © Eat the Vegan Rainbow, 2018

Top 5 Eat the Vegan Rainbow Posts of 2017

F1597261-7190-4781-9AF9-17F04368D991
Top 5 Eat the Vegan Rainbow Recipes of 2017, via Eat the Vegan Rainbow

Well, the year came and went. 2017 saw two major changes in my life: I decided to become vegan, and I changed my job after a decade. Both of these changes have helped me rebalance, and regain control of my wellness. The change I made to my diet had profound effects on my energy levels, and gave an incredible boost to my culinary creativity. I’ve have not felt so inspired and motivated to try new things for a long, long time.

On top of wanting to eat and make different food, I also decided to share everything. That’s how this blog was born! It’s been a great adventure because blogging, sharing, and being engaged in social media in many plant-based and vegan groups has been eye-opening. There’s so much creativity, encouragement, and positive energy out there!

I appreciate that many of you may be struggling because a life-style change is never an easy thing, and I also gather from comments and posts that many are surrounded by family, friends or work environment that does not support or even approve of the plant-based and vegan eating and living. The best advice I can give you is to take it one step at a time, and keep reminding yourself of why you decided to make this huge change to begin with. And: keep creating delicious dishes and keep serving them to all you love and care in your lives to spread the well-being and comfort that well-prepared and nutritious food brings.

So, as is customary to do as a year is winding down I took a look at Eat the Vegan Rainbow to see what people enjoyed reading the most. Not surprisingly, the most read post of 2017 is “5 Must-try Recipes for Beginner Vegans” which I put together after being a vegan for about 6 months, to highlight some of the recipes that I found incredibly helpful. And I am glad to see that many of you have found it to be useful as well!

When it comes to my original recipes, there is definitely a clear pattern to the top five. All top five recipes are substitutes to animal-based recipes, and provide a healthier alternative to the types of foods most of us have been exposed to for most of our lives. So, without further ado I give you the Top 5 Eat the Vegan Rainbow Posts of 2017:

  1. Hottest Summer Trend: Carrot Dogs – these “hotdogs” made from marinated carrots that have been grilled are the most amazing thing that I had so far, and it did not surprise me to see that others have loved them too! Since that summer treat, I’ve use similar ingredients to make an incredible Cream of Carrot Soup, which is also a winner in my book and if you have not tried it yet do give it a go!
  2. Homemade Ground Beef Substitute – this was an essential recipe for me to develop since the store-bought ground beef substitutes were just not making me happy. They were either too expensive to really work for me, or had weird ingredients, or spices I did not enjoy, or left a strange aftertaste. So, I developed my own mix that works, and I’ve been using it in tacos, nachos, stuffed peppers, and similar dishes that use ground beef as a filler. It is spot on!!!
  3. Chicken-less Tikka Masala – for those of you who love Indian food, this one is the winner! The blend of spices and nut-based yogurt, with gentle tomato sauce and soya chunks as chicken replacement work incredibly well. You will get all the texture and flavors of the original dish!!! And if you not familiar with Indian cuisine, you should make it one of your New Year’s Resolutions to give it a try. First of all, many of Indian dishes are already vegetarian since India has a huge culture of not eating meat, and many of the traditional dishes are easily veganized. Just take a look at the Vegan Saag Paneer, and Sabudana Khichdi.
  4. Vegan Jackfruit “Crab” Cakes – these “crab” cakes are simply amazing! They deserve quite a few superlatives, because they are super easy to make, super cheap, and super impressive. They will be able to convince even the hard core crab cake lovers that you can have a great crab cake without the crab. You can actually have an excellent New England Clam-free “Clam” Chowder as well, and while we are talking about seafood replacements, you can also have a great Faux-lobster roll, although some have been saying that it just not the same! For me all these recipes are really good, and so close to the original thing that I can not longer tell the difference, and that’s good enough for me.
  5. A Very Beefy Veggie Burger – as it turns out, and perhaps not surprisingly, we all love to grill outdoors during the summer days, and we all enjoy a great burger. The veggie burgers that are out there fall a bit short of delivering that meaty bite and flavor, and the high-tech Beyond Burgers are fantastic but really pricey. So, I’ve been playing around and making all sorts of burgers, like the Avocado Burgers, Black-Eyed Peas Burgers, and Roasted Red Pepper Chickpea Burgers, which were all worth getting excited about. They have different degrees of beefy flavor and texture, and they hold up to grilling to a different extent, and you can’t go wrong with any of them.

I can’t leave without asking you to share some of your favorite recipes. What were your clear winner in 2017? Something similar to what I highlighted above, or something completely different? Let’s share each other’s food and thoughts about eating and well-being, and keep helping each other navigate the world of plant-based foods and flavors. I wish you a Happy and a Healthy New Year!!!

Copyright © Eat the Vegan Rainbow, 2017


Hottest Summer Trend: Carrot Dogs

fullsizerender-4
Hottest Summer Trend: Carrot Dogs, via Eat the Vegan Rainbow

There are many ways for plant-based and vegan eaters to enjoy one of the summer food staples, the hot dog. Most grocery store (supermarket) chains in US now carry plant-based hot dogs, and I tried a few. They are OK, and some are really, really good! This makes dinner really quick and easy – from fridge to plate in less than 15 minutes, but the store bought vegan hot dogs are not cheap, and depending on the brand they may not taste all that great.

Enter a super cheap, super easy, super cute and super hero hot dog alternative: carrot dog! If you have not seen or tried these you are missing out. Carrot Dogs are what they are – carrots made into a hot dog. Now, some of you may think that carrot is a carrot and it’s perfect the way it is. I agree: carrots are perfect as they are, and joy to munch any time. But, we all now carrots have always led a secret agent life as a sweet vegetable that can be made into a cake, a muffin, a cookie or in many other things. So why not a hot dog?

I started seeing posts on Carrot Dogs few months ago and had to admit it to myself: Carrot Dogs are an IT items this summer. So, I went for it and boy or boy do I like the results. I made carrots dogs couple of times now and they made the rounds: to the beach, to the back yard BBQ party, to the laid back late summer dinner outdoors. Trust me: they are absolutely worth it!

One thing to keep in mind is the thickness of your carrots. They should be relatively evenly cylindrical and about the diameter of a regular hotdog. Take some time to eyeball your carrots and pick those that look they fit the part. Also, keep in mind that they should fit nicely into your hot dog bun, so cut them accordingly. If you want to get really realistic, you can shape their ends into a hot dog looking end lobes, but I didn’t. All this is purely cosmetic and at the end of the day will not change the taste. But, if you are entertaining and want to go for a real WOW factor, take some time to fine tune the look of your carrot dogs. You may want to do this final fine sculpting step after your carrot dogs are cooked, as they will be softer and easier to carve.

Speaking of cooking carrot dogs, there is one major trick to a perfect carrot dog: boiling the carrots just enough to make them as soft as a regular hot dog would be. This is a bit tricky because that level softness in a carrot is only a step or two removed from when the carrots start to fall apart when handled with a fork or a pair of grill tongs. The exact time will depend on how thick your carrrots are, and what variety they are. I started with boiling the carrots for 11 minutes and that turned out not to be enough, so I went up to about 15 to 16 minutes which was much better. I also tried the pressure cooker – that was way too much!

Once you have your perfectly shaped and perfectly cooked carrot dogs, they will need to spend some time marinating in a mix of oil, vinegar, and spices which all work together to add a layer of hot dogginess to the carrots. The marinating step can take anywhere between half an hour to couple of hours. Longer is fine, and you can make your carrots a day ahead and leave them to marinate overnight in the refrigerator. Less than half an hour is probably not going to be long enough.

The second to last thing that remains to be done is grilling, and that takes only a few minutes per side. The dogs are fully cooked so all you really want to do here is add some grill marks and get some caramelization going. If you like your hot dog buns warm, you can put them on the grill once your carrot dog is a minute away from being done. So, the very last thing is to put the dog into the bun and top it with your favorite hot dog topping. I go a bit wild with my condiments and pile on ketchup, yellow mustard, and dill relish but really anything goes. Bite in, and be amazed at how great carrot dogs taste. Believe me, you will immediately understand why people are raving about these!!!

Carrot Dogs

What you’ll need:

8-12 carrots (or as many as you like)

1/2 cup vegetable broth

1/3 cup apple cider vinegar

3 tablespoons vegetable oil

3 tablespoons soy sauce (reduced sodium)

1 tablespoon smoked paprika

2 teaspoons garlic powder

2 teaspoons onion powder

1 teaspoon ground yellow mustard

Cooking oil (for oiling the grill)

Hot dog buns, mustard, ketchup, relish, sauerkraut, chili – anything else you like – for serving!!!


What you’ll do:

  1. Peel and cut your carrots to be about the length of your hot dog buns. You don’t need to be super precise but do try to pick carrots that are more or less cylindrical, and about the same diameter as this will help them cook more evenly.CarrotDog
  2. Place carrots into a pot – I use the pot with large bottom so the carrots can lay flat – and cover with water. Bring water to boil, and boil carrots for 10 to 16 minutes. You will need to keep an eye on your carrots and check from time to time as the exact time will vary from a carrot variety to a carrot variety, and depend on how thick your carrot dogs are.
  3. While carrots are cooking, whisk together the marinade by mixing together vegetable broth, vinegar, oil, soy sauce, smoked paprika, garlic powder, onion powder and ground mustard.
  4. Run the hot carrots under the cold water to stop the cooking, drain, pat dry, and add to the marinade. Marinate for about 30 to 60 minutes at room temperature or overnight in the refrigerator.
  5. Prepare the outdoor grill for grilling as you would normally do. I have a gas grill and turn all my burners on full blast for 5 minutes, with the lid down to burn off any leftovers from last time. Then I dial them back and use my brush to clean off any remaining bits and pieces from the grill grates. Once that’s done I dip a paper towel in some oil and using a pair of long tongs pass the oiled paper towel over the grill grates. Now we are ready!
  6. Place your carrot dogs on the grill over medium high heat and grill for couple of minutes on each side, or until nice grill marks form. You could brush the carrot dogs with the marinade as they cook to prevent them from drying out, but the process is quite quick and this may not be necessary. One tip: if you marinated your carrot dogs in the refrigerator, take them out a hour before you plan to grill them to let them come to room temperature. That will help with flavors and the grilling.
  7. Enjoy the carrot dogs the way you would any ole’ hot dog!

Copyright © Eat the Vegan Rainbow, 2017

Avocado Burgers

You probably know that veggie burgers are going through somewhat of a revolution, with companies like Beyond Meat and Impossible Foods, leading the way within US in creating plant-based products that taste and look like the real meat.  I have not had an Impossible Burger yet, but I can attest to Beyond Burger being everything its creators wanted it to be – a plant-based burger that looks, cooks and tastes like fresh ground beef burger. It is absolutely spot on, thanks to some interesting protein biochemistry and biophysics that transfrorms pea protein into ground beef, as well as the use of plenty of fat for that greasy burger feeling, and a good amount of salt. And fat and salt are likely two components of this burger that, in addition to getting the texture of the protein component just right, make this type of burger so realistic and so delicious and so addictive.

Indulging in one of these burgers as an occasional treat is all fine and good, but making it on a daily basis is almost us unhealthy as eating the beef patty. That’s why I’ve been focusing on creating plant burgers (call them veggie burgers if you like) that can work on a grill or in a grill pan, look very burgery, and taste great without huge amounts of salt and fat. My blog now has the entire section dedicated to Burgers, Hot Dogs & More. Some of the burgers I made taste very much like a beef patty, some less so… At the end, what I discovered is that plant burger needs to pass two tests in order to qualify for being on my plate: it has to hold its shape well and sustain grilling on the grill or in a grill pan, and it has to taste amazing. Any burger that checks those two boxes off deserves to be shared!

The patty I am sharing today has three twists. Twist number one is that I decided to try using avocados as a fat source to add some juiciness to the burgers. Avocados, also known as Alligator Pear – isn’t that awesome? – are not something I ever considered cooking with but we recently had a huge avocado sales in my local grocery store and I got more than I should and there is a limit to how much avocado toasts one can eat in a week, so I was looking for something else to do with them. The idea to try making a burger with avocados was inspired by their high fat content and their creamy consistency (when they are ripe and perfect). I did quite a few internet searchers to see what other have done, but I could not find a single recipe that used avocados inside the actual burger patty. So, off I went to see if Avocado Burgers can be made into reality.

My twist number two is one of my favorite tricks to add umami flavor to just about anything – finely ground mushrooms. They work wonders in a dish like Meatless Shepherd’s Pie, or more generally any time you want to recreate that special “je ne sais quoi” of ground beef.

Final twist to this story is using extra firm tofu that has been frozen for few days than thawed all the way over the course of one to two days in the refrigerator. Freezing and defrosting tofu changes its texture daramatically. The tofu becomes tougher and stronger, and it absorbs the marinades and flavors better. There are no tricks to freezing tofu in my kitchen as I just put the container tofu comes in from the store into the freezer, but if you need a more refined method The Spruce has detailed step by step instructions. Before you use tofu, drain it well and then dig in – use your hands to press and squeeze and get the excess water out. I suppose you could use the tofu press for this or a method where you place tofu slices between paper towels and place a large weight on top for twenty minutes, but because tofu that’s been frozen then defrosted has this tougher and stronger texture, using your hands actually works quite well. Plus, you can easily go from squeezing to crumbling, which is the next step. At the end you will end up with a pile of small tofu crumbles.

To this pile of crumbles you will add mashed avocado, ground mushrooms, tomato paste, and couple of staples when it comes to boosting umami and grilled food flavors: soy sauce or liquid aminos, Worcestershire sauce and liquid smoke. The patties will be soft so it is a good idea to stick them into the fridge or a freezer to firm up before cooking. I felt like pairing only some crispy lattice with this burger but pickles, mustard, ketchup, tomatoes, and all the other common burger fixings will go well with it too!

Avocado Burger

What you’ll need:

1 16 oz. (450 g) block of extra firm tofu, frozen then thawed

8 oz. (225 g) crimini (baby bella) mushrooms

1 large avocado, ripe

2 tablespoon tomato paste

1 tablespoon Worcestershire sauce, vegan

1 tablespoon soy sauce or liquid aminos

1 teaspoon garlic powder

1 teaspoon liquid smoke

Cooking spray (for the pan)

What you’ll do:

  1. Freeze the tofu few days in advance and when completely frozen take it out of the freezer and leave it in refrigerator for a day or two, until completely defrosted. Drain the tofu and using your hands squeeze the water out of tofu. The tofu should feel like a relatively tough sponge soaked with water at the beginning, and at the end it should feel moist but not dripping wet. Crumble the tofu into a large mixing bowl.
  2. Chop the mushrooms using a food processor until they are finely ground. Few chunkier bits here and there will not hurt but try to get the mushrooms to be about the same consistency as your tofu crumbles. Add to the tofu.
  3. Cut and peel the avocado, and scoop out the green flesh into a small bowl and mash with the fork until finely mashed. Ideally the avocado should be as smooth as you can get it, and if you are using a perfectly ripe avocado this should not be a problem. Side note: If you discover that your avocado is tough that means that it is not ripe enough. If your avocado is turning black it means that it is past its prime. Unfortunately, when it comes to avocados only the perfectly ripe, perfectly green and perfectly soft will work, for this or any other recipe. If your avocados are tough to touch it means they need to ripen and you can help them out by putting them in a paper bag, closing it tightly and leaving them on the kitchen counter overnight. That usually helps – and if they are really, really green you can a ripe banana to the bag to help avocados along. 
  4. Add the avocado purée to the tofu mix, as well as the rest of ingredients.
  5. Mix well to combine using your hands. You want to work the mix a bit, which means squeezing and mixing at the same time. Once everything is combined together, use your hands to form patties. Place the patties onto a tray lined with wax paper, and put them into the refrigerator for 30-60 minutes or into a freezer for 15 minutes or so.
  6. Heat your grill pan or a cast iron skillet over the medium high heat. Spray with cooking spray and add 2-3 patties at a time. You need to leave enough room around tha patties to be able to flip them so keep that in mind. Cook on one side for 5 minutes then flip over and cook for another 4-5 minutes, until both sides are nice and brown.
  7. Serve on your favorite hamburger bun with your favorite toppings. And in case you have couple of avocados still left over, go wild – slice them up, toss them on top, and have yourself a Double Avocado Burger!

Copyright © Eat the Vegan Rainbow, 2017

Vegan Caprese Salad in a Sandwich

img_2518
Vegan Caprese Salad in a Sandwich, via Eat the Vegan Rainbow

In my other life, as the editor of two leading journals for chemical and structural biology (I know, sounds intimidating!), I once used Caprese Salad – tomatoes, basil, and fresh mozzarella – as an example of how simple is incredibly powerful, beautiful and irresistible, in an emphatic attempt to convince scientists to implement principles of simplicity when writing their scientific papers.

Here, my interests are purely culinary as I set out to recreate the Caprese salad out of plant based ingredients only. I started from a batch of vegan fresh mozzarella, following a recipe developed by Jules Aron and included in her “Vegan Cheese: Simple, Delicious, Plant-Based Recipes” book.

The path to fabulous vegan fresh mozzarella is long and slippery- meaning that it will take you about two to three days to have ready to eat batch of cheese on your hands, and there are few places along the way where a little mistake can derail your cheese making process. Having said that, I found Jules’s recipe to be clear and helpful, and the final result AMAZING!

I made only some minor adjustments to the recipe, as I used cashew yogurt for fermentation stage of the mozzarella, and agar powder and tapioca starch to firm it up – Jules recommends Kappa carrageenan powder and tapioca flour (which I think is the same thing as tapioca starch but it’s worth mentioning as a point of difference)!

The process starts, as many vegan cheeses do, by soaking some nuts. I usually cover the nuts, in this case cashews, with water and leave them in the fridge overnight. The next step for this cheese is blending the well soaked cashews, that have been drained and rinsed, with some almond milk or water until nice and smooth – I used almond milk.

Then, you add yogurt – here I used an amazing Cashew Yogurt by Forager – cover with cheese cloth and leave on the kitchen counter for a day or so. Make sure that your yogurt contains live cultures as you want the bacteria to start the process of fermentation and acidification, yielding a nice, subtly tangy flavor.

Making of vegan mozzarella, via Eat the Vegan Rainbow

The penultimate step is adding the thickener to the cheese mix, cooking it until it starts to thicken to a consistency of very thick oatmeal, porridge or polenta.


While the cheese was cooking, with frequent stirring, I made the brine. I used tap water and ice cubes, plus a tablespoon of plain kitchen salt since that’s what I had handy, and mixed it all until salt was fully dissolved.

Once the cheese was cooked, I used my measuring spoon (tablespoon size) to measure out cheese balls, formed a bit with hand – watch out here as it may be hot, so you can form the balls using two spoons at the same time. Dump the balls into ice/water/salt mixture, cover with cheese cloth and leave in the fridge overnight. Jules recommends at least 4 hours, so I just left my fresh mozzarella cheese balls to rest until the next day.

img_2513
Vegan Fresh Mozarella Balls in Brine, via Eat the Vegan Rainbow

Waiting wasn’t easy but it was worth it!!! I got some fresh baguette, fresh basil, a ripe tomato, a drizzle of balsamic vinegar, and my homemade vegan fresh mozzarella, and made myself a phenomenal sandwich for lunch.

I transferred the fresh mozzarella with the brine and all into a container with a tight lid, and stored it in the refrigerator. It lasted for about one week, at which point it was all gone!!! I will be making some more soon, but next one from Jules’s book I want to try is an almond-based baked feta!!!

Since this post is all about another person’s recipe, I am not sharing the notes, but encourage you to go visit Jules’s site, and get her book or better still borrow it from your local public library, which is what I did. I am happy to share what my Caprese Salad in a Sandwich looked like – it’s a real feast for your eyes!!!

img_2520
Vegan Caprese Salad in a Sandwich lunch, via Eat the Vegan Rainbow

Copyright ©Eat the Vegan Rainbow, 2017