Berry Bliss Breakfast Balls, via Eat the Vegan Rainbow
Never skip your breakfast – at least that’s what everyone keeps telling you! But: breakfast can be hard to fit in, and quite honestly sometimes I just need to get going. For those mornings when you want to be out the door as quickly as you can, it’s good to have something to grab on your way out. And these delicious breakfast balls pack all you need!
These breakfast treats are definitely make ahead – you will not be able to just whip them together if you are in a real hurry. That said, they are not that hard to make. All you need is a food processor and nothing more. The recipe below lists frozen berry mix, but you could use fresh berries or your choice. In that case, you may need to scale up the amount of dry ingredients to keep everything well glued together.
When working with frozen berries in this recipe, it is important to let them thaw completely, and drain the excess liquid out. You don’t need to squeeze them dry but I recommend using a strainer or a slotted spoon to get just the berries. For defrosting, you could use the microwave or you can leave the berries in your fridge for a day or so and they should be ready to go.
To make these breakfast calls sweeter, I recommend that you use same dried medjool dates. These are ultra-sweet dates that can be used instead of sugar. If you don’t have them on hand, you could go with raisins, or skip altogether, depending on how sweet is your fruit.
What makes these balls real breakfast items is the combination of ground hemp seeds, wheat germ, almond meal, and coconut flour. All these add the body to these and will keep you full and going for hours.
The final touch here is just a pinch of ground cardamom in the almond meal that I recommend that you roll your balls in after you form them. You can, of course, customize the spice (cinnamon, nutmeg or even clover come to mind as things that would work), but cardamom just adds something a bit unusual that you may enjoy. If you are looking for additional make-ahead or raw breakfast ideas, here are two versions of muffins for you – a baked one (gluten-free carrot cake muffin), and a raw one. Enjoy!
Berry Bliss Breakfast Balls
What you’ll need (4-6 servings):
2 cups frozen berry mix, defrosted and access liquid decanted
6 medjool dates, pits removed
1/2 cup hulled hemp seed hearts
1/2 cup wheat germ
1/2 + 1/4 cup almond meal, divided
1/2 cup coconut flour
1/4 teaspoon ground cardamom
What you’ll do:
Defrost the berry mix in the microwave or overnight in the fridge, then decant the access liquid and reserve for a smoothie or something else.
Place the defrosted berries, dates, and the rest of the ingredients except 1/4 cup almond meal and cardamom, into a food processor and process for 3-5 minutes, until the mix is smooth and combined.
Using a quarter cup measure or an ice cream scoop, scoop out part of the mix, roll it into a ball using your hands, and eat as is, or roll it into the 1/4 cup almond meal mixed with 1/4 teaspoon ground cardamom powder. Enjoy for breakfast, or as a dessert. You can also drizzle some melter chocolate for real dessert flavor. The balls keep well for 2-3 days in the fridge, in an air tight container. They are raw, so best to consume them as quickly as you can!
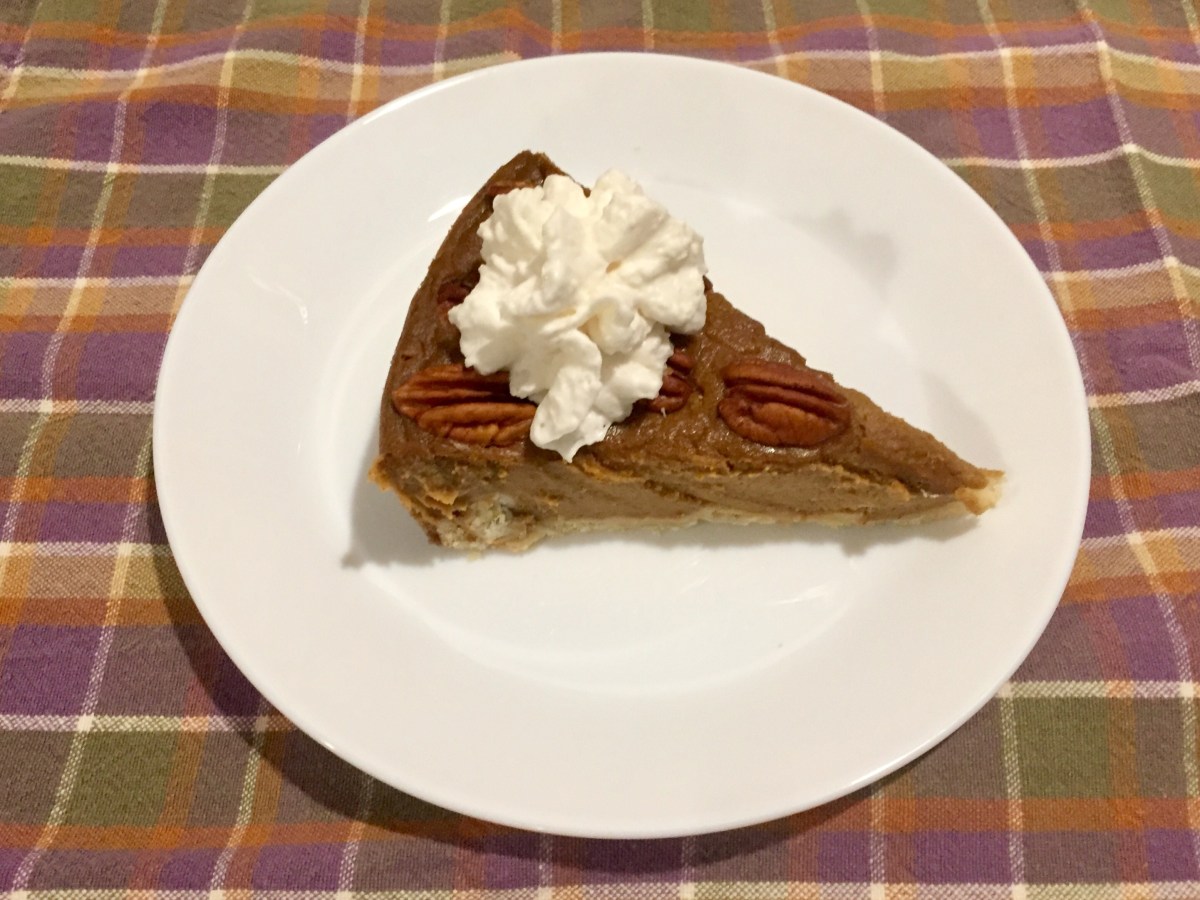
Vegan Sweet Potato Pie with Pecan Topping, via Eat the Vegan Rainbow
Sweet potatoes are the most amazing vegetable that I used to avoid like the plague. I could not stand being served sweet potatoes as a side dish at traditional American Thanksgiving dinners, and I did not enjoy them as fries either.
But: I did give them a second chance (under y own conditions) and I am very glad I did. Sweet potatoes are sweet, very sweet, especially when roasted! This makes them an ideal natural sweetener for desserts and treats, and I’ve been using them as a key ingredient for pancakes, super-sweet sweet potato butter, and even chocolate mousse pie. Sweet potatoes are also a handy substitute for pumpkin as the consistency of roasted then mashed sweet potatoes matches that of canned pumpkin well. The main difference is the sweetness level, as the sweet potatoes tend to be sweeter, while pumpkin tends to be mild. So, if you decide to make something like these brownies, you may want to adjust the amount of additional sweet ingredients you put in.
My main trick when using sweet potatoes as an ingredient in desserts, is to roast the potatoes. Roasting sweet potatoes usually takes about 45 minutes at 425 F (220 C), and can’t be simpler. All you need to do is wash the potatoes, then place them, unpeeled, on a baking sheet and let them roast until soft. You can eat these roasted sweet potatoes as a quick snack, plus breakfast, lunch and dinner. If using to make desserts, let the potatoes cool completely before puréeing, so it is best to do the roasting a day in advance.
Sweet Potato Pie is not my invention. Oh, no – it’s a very traditional dessert of the southern United States. As with its cousin, the pumpkin pie, this dessert is traditionally made with condensed (evaporated) milk and eggs, which results in a custard-like pie. For this vegan version, coconut milk and brown sugar are cooked together to make a thick and sweet “condensed milk” substitute. Plus: the recipe uses corn starch that combines to give the pie smooth, creamy and rich consistency that is very similar to the original, and cinnamon, nutmeg and clover, which give it the easily recognizable aroma.
If you love baking, you may want to make your own pie crust. However, the store-bought crusts work well and many are vegan, so you do have a choice here. I recommend baking the crust half way through before pouring in the pie filling, and pricking it with the fork before placing in the oven to back. You may even want to weigh the crust down with beans because these crusts do tend to puff up, which is to be avoided (here is some handy advice on how to get to the perfect pre-baked crust)!
The final touch for this sweet potato pie are pecans. These nuts are also traditionally found in the southern United States, and if you don’t have them where you live you can definitely use walnuts, or almonds. You can also skip the topping altogether – the pie will not taste any less awesome!!!
Vegan Sweet Potato Pie with Pecan Topping
What you’ll need:
1 store-bought pie crust (or make your own – a good recipe to follow is here)
1 can (13.5 fl oz; 400 mL) full fat coconut milk (you can use coconut cream, but I don’t recommend using light coconut milk)
1 cup brown sugar
1 tablespoon vanilla extract
3 roasted sweet potatoes, puréed
1 cup corn starch
1 teaspoon cinnamon
1/2 teaspoon ground nutmeg
1/4 teaspoon grund clover
30-40 whole pecans
Whip cream for serving (optional)
What you’ll do:
Preheat the oven to 350 F (175 C).
In a heavy sauce pan, combine coconut milk, sugar and vanilla extract and place over medium heat. Bring to boil and decrease the heat to low, then simmer for 15 to 20 minutes, until thick. Final volume will be about 1/3 to 1/2 less than what you started with. Set aside and let the “condensed milk” cool.
While the “condensed milk” is cooling, pre-bake the crust to about half way through, which will take about 10-15 minutes (if you are making your own crust, you will need to have one ready to go so plan accordingly). Take the pre-baked crust out and let it cool.
As the crust is cooling, use a food processor to combine the “condensed milk”, sweet potato purée, corn starch, and the spices. The pie filling should be smooth, thick and rich.
Pour the filling into the pre-baked pie crust, and return everything into the oven for another 20 minutes. After about 20 minutes, take the pie out, and working quickly top with pecan (or walnut, or almond) halves, arranging them in neat circles or spiral until the entire surface is covered. Return to the oven and bake for another 5 to 10 minutes, to allow the pie to finish baking and pecans to get slightly toasted. If you are keeping this pie nut free, skip the nuts, and bake for a total baking time of about 25 to 30 minutes.
Leave the pie to cool completely before serving. Traditionally, this pie is served with whip cream, but you can serve it just as is, with whip cream or ice cream. Yummy!
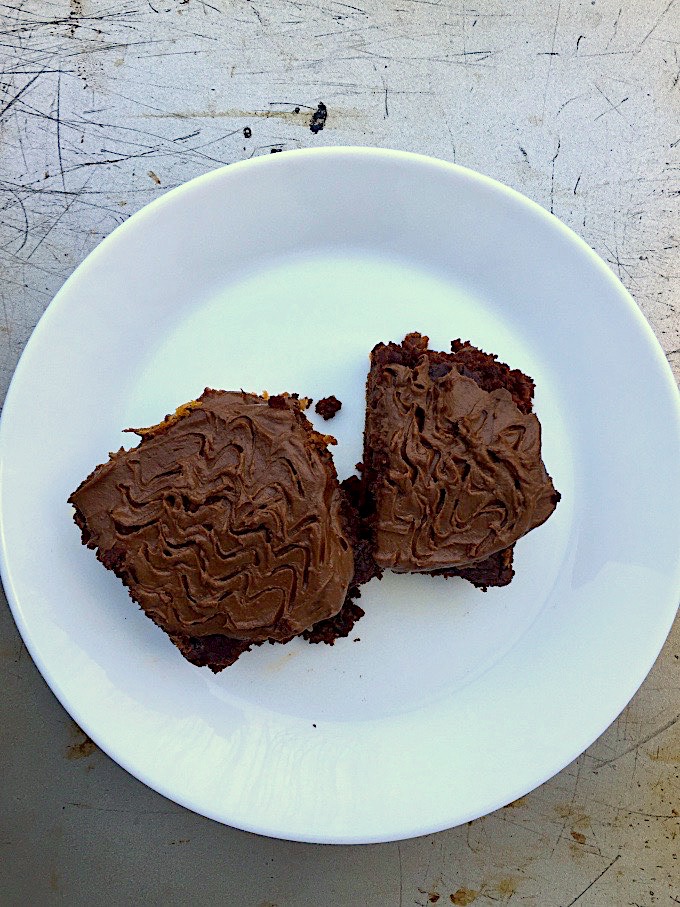
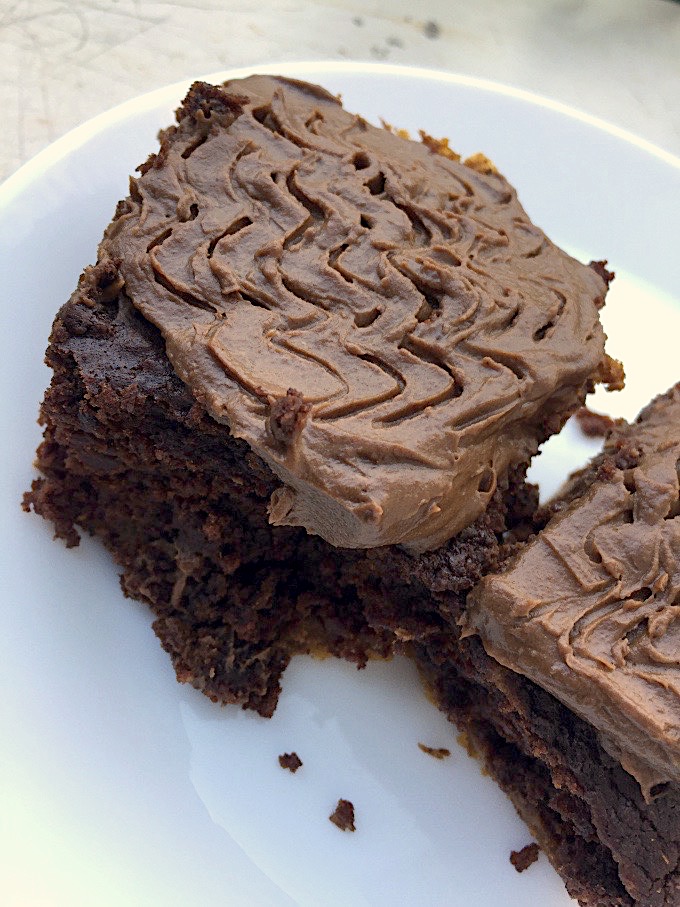
Pumpkin Brownies with Chocolate Avocado Frosting, via Eat the Vegan Rainbow
The magic of chocolate is real – just ask anyone who has ever had a piece of delicious, rich, dark chocolate goodness. Of course, that makes desserts like brownies so addictive. But: they don’t need to be such a guilty pleasure if you take the time to add couple of things that are good for you, like fruit and veggies, and take away couple of things that are not so good, like added sugar and eggs. And the best thing about this strategy is that, guess what? – nobody will know your secret.
I recently profiled a Veggie Patch Brownie recipe from a recently published cook book, and that inspired me to experiment on my own. My concoction includes lots of vegan chocolate – Enjoy Life is the brand I can find around where I live but any semi-sweet vegan chocolate chips or baking chocolate will work – and some vegan butter which you could likely omit if going for a really healthy version. But, if you are making these brownies for a special occasion like Valentine’s Day, Thanksgiving, St. Patrick’s Day, New Year’s Eve, graduation…, being a bit indulgent seems justified to me. In a need of healthier option? These brownies full of oats and chickpeas may do the trick!
Another thing to note is that you don’t need to use pumpkin purée if not available. You can replace it with sweet potato or butternut squash purée. Even carrots would work here – all you need is a dense purée made of somewhat sweet vegetable and you should be fine. I usually recommend roasting (not boiling) the vegetables, as roasting brings out more sweetness and makes the veggies less mushy.
One final tip? Oh, yes: let the brownies cool completely before frosting and after you frost them it’s best to give them some time for the frosting to firm up a bit before biting in. Happy eating!
Pumpkin Brownies with Chocolate Avocado Frosting
What you’ll need:
FOR THE BROWNIES:
4 tablespoons golden flax meal (other flax meal will work as well)
1 cup hot water
1 stick butter, softened (vegan, or if making vegetarian version regular butter will work)
10 oz dark chocolate chips (vegan brand I like is Enjoy Life)
1 15 oz (425 g) can pumpkin purée
2 cups flour (all-purpose gluten-free if needed)
2 teaspoons baking powder
1 teaspoon baking soda
1 teaspoon cinnamon
1/2 teaspoon nutmeg
1/4 teaspoon clover
1 tablespoon lemon juice
FOR THE FROSTING
1 cup dark chocolate chips, melted
1 avocado
2 tablespoons butter, softened
(Optional toppings): Sprinkle with crushed freeze-dried strawberries and/or raspberries for a Valentine’s Day version; or chopped shelledpistachios for St. Patrick’s Day; or top with chopped walnuts or shredded coconut for an extra special winter holiday spread.
What you’ll do:
Preheat the oven to 350 F (175 C).
Pour 1 cup of boiling water over the flax meal, mix really well and set aside to soak for 5-10 minutes. Flax meal should become gooey and dense, almost like a gel.
Place the chocolate chips into a microwave safe bowl or a double boiler. If using a double boiler, bring water to boil then add the chocolate chips, and mix until about 75% melted. Take off the double boiler and continue mixing until all chocolate is melted, smooth and combined. You will need to do the same if using microwave oven. Microwave on high in 30 second increments. After each 30 second period, check the chocolate and mix. Stop when about 75% of chips are melted, but continue to mix. Your bowl and the chocolate will have enough residual heat to melt the rest.
Add softened butter, melted chocolate chips, pumpkin purée, and soaked flax meal into the food processor and combine until smooth.
In a large mixing bowl, combine the dry ingredients: flour, baking soda, baking powder and all the dry spices.
Add the wet ingredients as well as the lemon juice and mix well.
Pour the batter into a 9 x 13 in (23 x 33 cm) slightly greased pan. Even the top out then bake for 25 minutes or so. Your brownies are done when the top looks baked and the sides look as they are starting to come loose. Please note that these brownies have lots of chocolate so the toothpick may not come out dry. But, it should still be fairly dry, with perhaps some melted chocolate on it.
Take the brownies out of the oven and let them cool completely. They should be room temperature before frosting.
To make the frosting, mix the softened butter with avocado using a hand held mixer, a stick blender or a blender. Add melted chocolate and mix until creamy. Spread the frosting over the brownies, decorate as desired (the wiggles on my photo above were done using a fork), and let the frosting firm up (30-60 minutes should do it!). You can sprinkle any or all of the optional toppings or leave as is.
Cut into square and serve! These brownies are very rich, without being very sweet and you will likely not need ice cream or whip cream to go with them – but if that’s how you roll, then just roll with it!!!
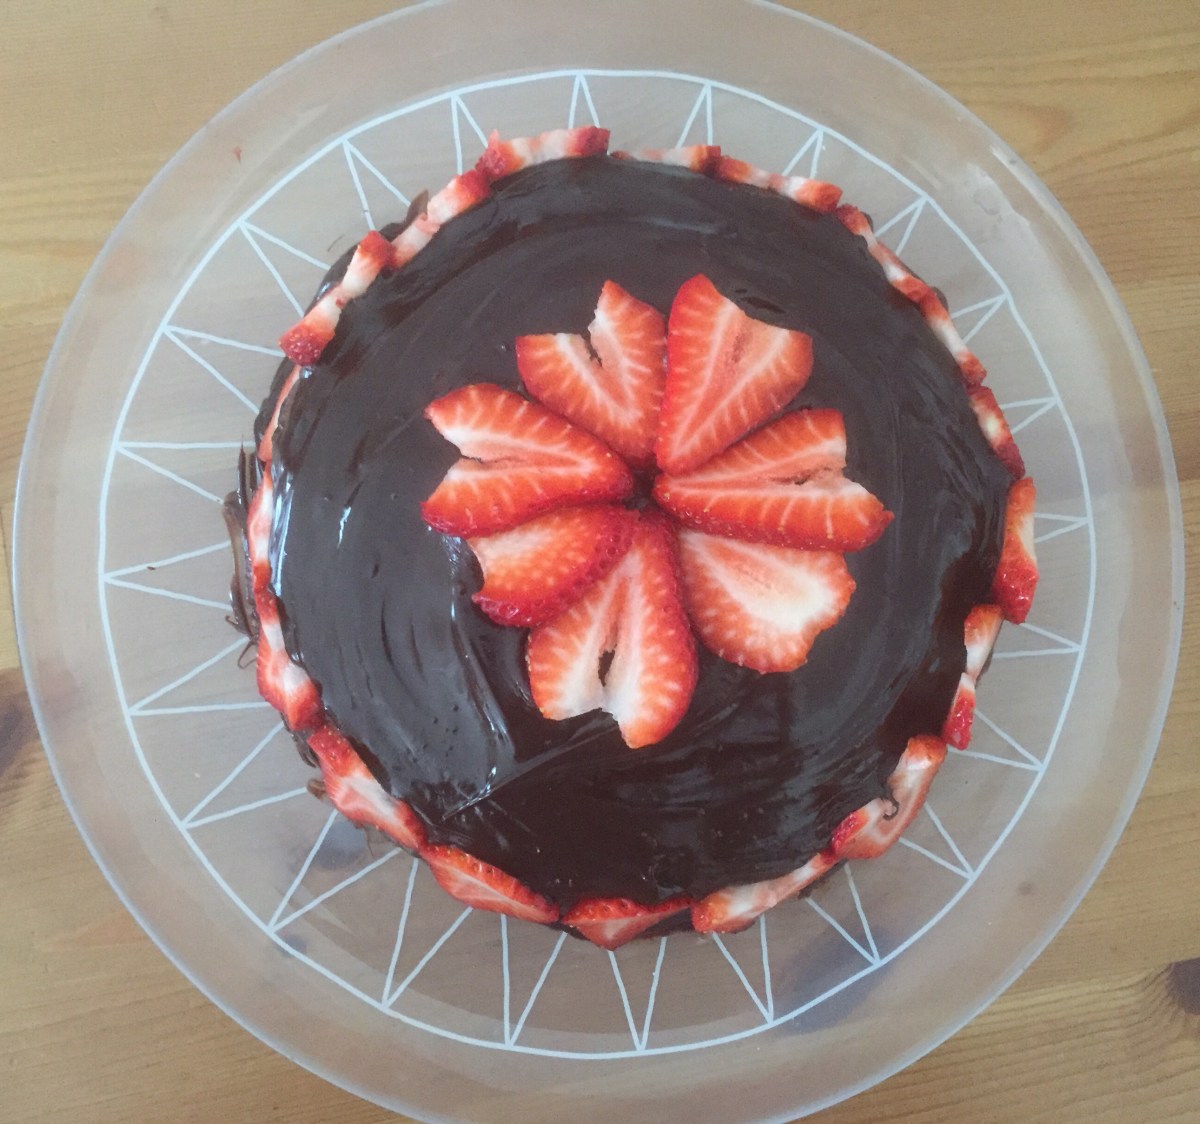
Vegan Chocolate Mousse Pie, via Eat the Vegan Rainbow
It’s OK to indulge and be decadent from time to time, and in my book the best way to feel indulgent and decadent is to go for some chocolate. Vegan chocolate is not hard to find. Almost any dark chocolate with high cocoa content is likely to be acceptable, so there are no reasons to stay away from chocolate treats. Having said that, if you are trying to drop a few pounds, the recipe below is not for you and most of chocolate treats is probably off limits.
The amazing thing about my chocolate mousse pie recipe below is that it uses roasted sweet potatoes. Roasted sweet potatoes are my favorite snack, often even breakfast , and definitely one of my favorite ways to reduce the amount of sugar that I use in my recipes. Roasting helps the natural sweetness of the potatoes come through, and what you end up with is super sweet and super soft root vegetable ready for puréeing and use in things like pancakes and even ice cream! If you are looking for instructions on how to roast sweet potatoes, you may want to check my post on Sweet Potato Butter for details.
My Chocolate Mousse Pie is as easy as a pie – really! There is no baking involved and all you really need to do is melt lots of chocolate and not shy away from using some butter to help things along. My favorite brand of vegan butter sticks is Melt – the price may be higher than other butters out there, and especially the margarine which is plant-based but just not that good for you because of all those hydrogenated trans fat acids, but I recommend you use it only on special occasions and in small quantities. This means that the pound (half a kilo) of butter will last you a long time!
Final note is that you should feel to customize the frosting to feature your favorite nut butter, or to include cocoa powder for example. I personally love almond butter and also think that almond butter mousse frosting works really well to bring the pie together, by connecting the crust flavors with the frosting. In this way, every single mouthful has harmonized flavors, from the beginning to the end.
Vegan Chocolate Mousse Pie
What you’ll need:
FOR THE CRUST
4-6 large madjool dates
1 tablespoon vegan butter, melted
1 cup raw almonds (unsalted)
FOR THE FILLING
10 oz silken tofu
2 roasted sweet potatoes
2 cups melted chocolate
1 teaspoon cinnamon
1/4 teaspoon nutmeg
2 tablespoon unsweetened, plain rice milk (or any other plant-based milk)
FOR THE FROSTING
1 stick vegan butter
1/2 cup almond butter
2 tablespoons agave syrup
What you’ll do:
To prepare the crust, melt the butter in a microwave (1-2 minutes in 30 second increments until fully melted), then added it to a food processor with dates and almonds. Pulse for 8-10 times, until everything is finely chopped and combined. When the crust is smooth and sticks together well, transfer it into a springform pan, the pan you would normally use to make cheesecake. Using your fingers, press the crust into the bottom, until firmly packed. Place the pan into a refrigerator for 15-20 minutes to allow the crust to firm up.
While the crust is firming up add the drained tofu and chopped roasted sweet potatoes into a large food processor and process for 30-45 seconds. Add the melted chocolate and process for another minute. To melt your chocolate, you can use a double boiler method or a microwave method. At the end, add the spices and plant-based milk and processes until the mixture is smooth.
Pour the filling into the springform pan and even out the surface. Sometimes banging the pan on the kitchen counter helps the filling set, and prevents random empty space areas from forming. Leave the chocolate mousse pie in the fridge for at least 4 hours to firm up. I recommend leaving the pie in the fridge overnight and finishing the frosting the next day.
To mix the frosting, combine the almond butter, butter and agave syrup (or another sweetener like maple syrup) into a bowl and mix until smooth and combined using a hand held mixer. You can also do this using a standing mixer. Apply the frosting any way you prefer. I usually place the frosting into a zip lock bag, and then snip of a corner with scissors to make a hole of a desired size. Holding the top of the bag firmly in my left hand (I am right handed), I then use my right hand to guide the piping bag and create frosting patterns I like. In this case, I went for a flower in the middle, but you can really do anything you like.
After you frosted the pie, pop it back into the fridge for 30-60 minutes. This should be enough time for the frosting to firm, and once that’s done you are ready to pull the pie out. I recommend leaving the pie at room temperature for 15 minutes before serving, and then dig in!
Oui, oui… we all love crêpes! Savory or sweet these flat wraps are easy to make and delightful. Of course, those in the business of crêpes making may lead you to believe that crêpes are beyond your capabilities. And even if you are brave to venture into the crêpes land, you may hesitate to accept the vegan crêpes challenge. Yet, there’s nothing to worry about as crêpes can be not only vegan but gluten-free as well.
Choosing the right crêpes pan
The pan you use makes a huge amount of difference when making crêpes. You need a good, preferably non-stick, shallow frying pan with large surface area. The pan should also not be too heavy because there is a fair bit of pan handling (lifting, tilting, swirling) that will need to take place. I use IKEA but you can use any pan the fits this description – roughly.
Preparing the pan
I recommend getting the pan nice and hot before adding a batch of batter. Also, remember to oil the pan before each crêpes. I place my oil in a small bowl which I keep on the stove for easy access and use a silicone brush to brush the oil over the pan’s bottom just before pouring in a batch of batter. And keep doing this each time!
The first crêpe is always the worst!
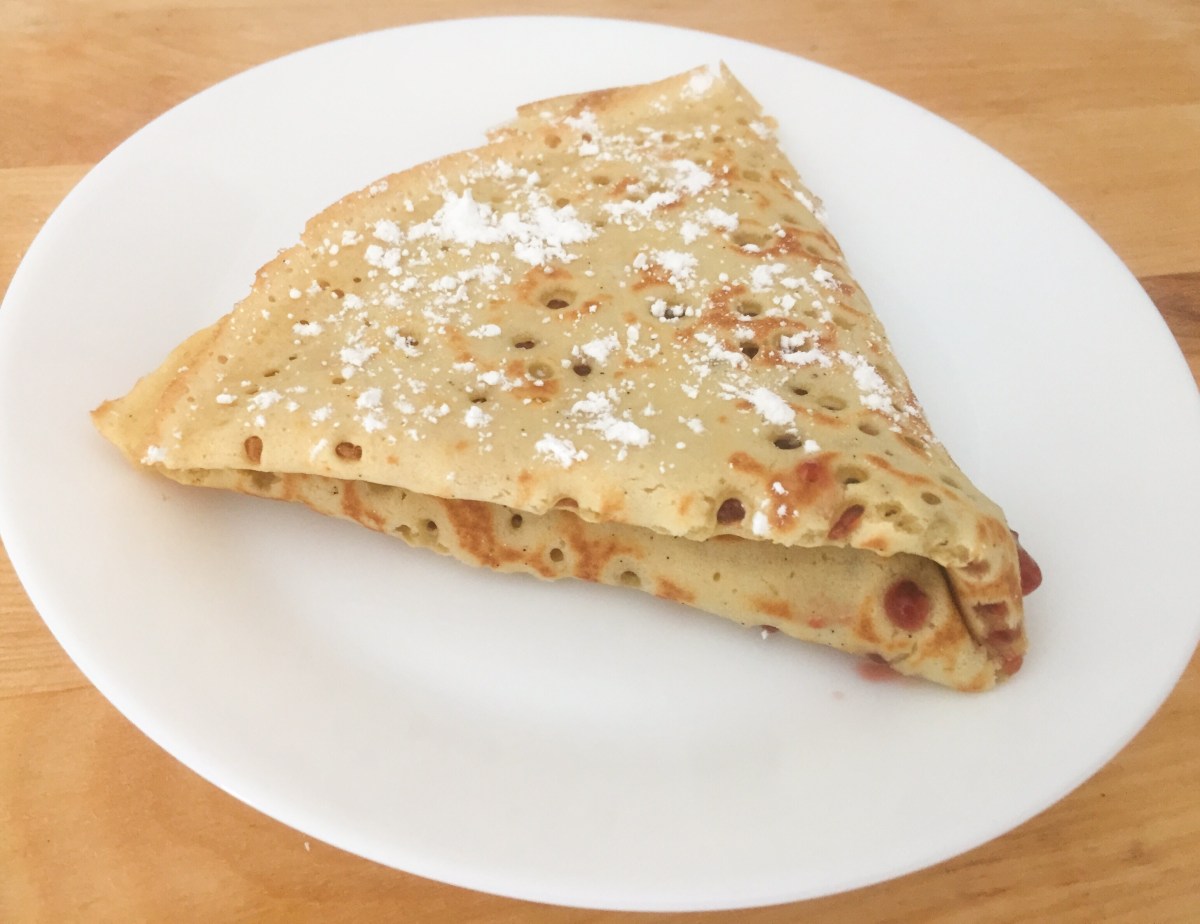
One dirty little secret of crêpe making is that the first crêpe is always the worst!!! So, although this first crêpe will be nerve wracking and make you feel like a total crêpe disaster, please do persevere and things will get better. This phenomenon seems to be all down to improperly oiled and insufficiently heated pan – and following the instructions here or in this very helpful post will ensure that your second, third, fourth, and so on crêpe all come out perfect. What helps is keeping the heat up, oiling the surface and using a really long and thin spatula to gently peel the crêpe off and flip over. What also help is being stingy with a batter. You are going for a very, very thin pancake here and the pictures below show you what my crêpes looked like.
Finishing crêpe touches
There are many different ways to enjoy the crêpes. You can use light spreads, like jams, chocolate syrup or nut butters, or simply sprinkle with some sugar and cinnamon, or go for the classic combination of butter and maple syrup. Chopped up fruit and/or nuts, as well as walnut and almond meal also work. If you are want to totally impress your guests you may want to make a crêpe cake, and if you made a batch of savory crêpes you can definitely use them in the same way as tortillas or other thin, unleavened breads. If you are wondering what savory crêpes are all about, I previously shared an easy to make scallion crêpe recipe with a sesame dipping sauce.
All in all, this recipe is perfect for a Sunday brunch, or a nice family breakfast around the Holidays. It is something that you could make ahead and bring to a pot luck, but the best way to enjoy crêpes is straight out of the pan, while they are still hot and soft. Incredible – oh là là!!!
Basic Gluten-free Vegan Crêpes
What you’ll need:
2 cups chickpea flour
1 cup corn starch
2 tablespoon agave syrup (omit if you plan on savory toppings)
1 teaspoon baking powder
1 teaspoon baking soda
1/4 teaspoon salt
1 tablespoon vanilla paste
1 teaspoon maple flavor
2 cups almond milk
1 cup water
2-3 tablespoons vegetable oil
What you’ll do:
Combine all the ingredients as listed in a large mixing bowl, and whisk them all together. Let the batter rest for 15-20 minutes.
Place a large pan with a flat surface over high heat. Let the pan heat up then using a silicon brush spread some oil uniformly over the entire surface. Pour just enough batter to cover the surface with a thin layer – for my 9 in (23 cm) pan I use about 3/4 cup. Pour the batter gradually towards the middle and keep pouring as you twirl the pan around.
Place the crêpe over high heat for 2 minutes or so, then lower the heat just a tad and let the crêpe finish cooking on the first side. The way you can tell the crêpe is ready to be flipped is by looking at the surface – once the surface starts looking dry you are ready to flip.
If you have a very good pan and have done everything right your crêpe will not be tightly attached to the bottom and you may even be able to flip it through the air. But if your crêpe is not loose then use your spatula to gently loosen the crêpe and flip it over. The flipping needs some practice, so be patient.
The crêpe needs to cook on the other side for just 1-2 extra minutes. Slide the crêpe out, then increase the heat, leave the pan on for a minute to get it back to being really hot, spread some oil and repeat. Your friends and family may want to start eating the crêpes are they come out of the pan, and I say let them! Crêpes are the best when fresh, so it makes total sense to jump right in!!!
Quick Protein Power Balls with Apples, Hazelnut Meal and Oats, via Eat the Vegan Rainbow
This recipe is as quick as lightning and perfect for those crazy and hectic mornings. I made it as we were heading out for a day at a beach, as a healthy snack that packs lots of protein, fiber and general goodness.
All you need really is a food processor, and you’ll be done in no time. All ingredients get added one by one, in the order they appear on the recipe list. I recommend switching your cutting blade with the kneading blade once you are done processing oats and apples. Or you can dump your oat/apple mix into a large bowl and continue to combine everything by hand.
To form the balls, scoop out a tablespoon of the mix at a time, then roll the dough around until tightly together. These snacks held up well to the car ride and beach time when kept in a plastic box. They also store well in the fridge and you can enjoy them for several days.
With oats, apple, pea protein powder and hazelnut meal, these balls can also be a quick breakfast as well as the afternoon pick-me-up.
Quick Protein Power Balls with Apples, Hazelnut Meal and Oats
What you’ll need:
1 cup oats
1/2 cup hazelnut meal
1 Granny Smith (or another tart) apple, peeled, cored and processed
1/2 cup pea protein powder
1/4 cup agave syrup
1 tablespoon vanilla bean paste
1 tablespoon cocoa nibs
What you’ll do:
Place the oats into a food processor and process into a fine meal.
Add the apple and process until fully chopped and incorporated.
Replace the chopping blade with a kneading one, then add the rest of the ingredients, and pulse until everything is smooth and incorporated ( you can do this without a kneading blade, by using a mixing bowl and your hands to mush and mesh).
Scooping 1 tablespoon at a time, form balls and arrange on a baking sheet, covered with wax paper, or another type of platter.
Enjoy immediately, pack for a trip, have for lunch or snack – yummy!
Gluten-free chocolate crêpe cake, via Eat the Vegan Rainbow
Crêpes are great – and if you ever hear anyone say otherwise you can safely assume that they don’t know what they are talking about or perhaps did not have an opportunity to try some. Perhaps they don’t know that plant-based, 100% vegan crêpes are easy to make, or perhaps they don’t or can’t consume gluten and are unaware that gluten-free crêpes are within their reach. Or, and this is the final myth that I will dispel, they think that only highly skilled and trained chefs can embark on crêpe making, which is far from reality.
If you own a flat frying pan, and have a whisk that you are willing to use (or a blender!), you can make crêpes. These light, thin, flat pancakes are versatile and can be made into a savory dish, like these Scallion Crêpes, or topped with a range of sweet toppings for a quick and easy breakfast or dessert.
But, there is more to crêpes than that and I recently discovered that you can use them to make multilayered cakes! It usually takes 10-12 crêpes, nice, relatively firm filing, and topping of choice and you’ll have an impressive looking no-bake cake on your hands.
I wanted to make my crêpe cake gluten-free as well, so I followed a crêpe recipe that uses chickpea flour since that was the the type of flour I had on hand (I found the recipe in The Chickpea Flour Cookbook by Camilla Saulsbury and I recommend you check this cookbook out because it does offer lots of gluten-free recipes with helpful comments on how to make each recipe vegan!). The recipe below is a slight modification from the original as I added more almond milk and some vanilla extract, and you should feel free to customize the flavors further or replace some of the flour with cocoa powder if you want your cake to be all chocolate all the way. Additionally, if you prefer to omit oil you can do that as well – here is another excellent and very simple recipe.
The cake is easy to assemble and looks fantastic! If you are not sure you like chickpea flour you can use any gluten-free pancake mix and make a batter that is less dense than your standard pancakes. One way to test whether your batter is the way it’s supposed to be is to pour 1/2 cup in the middle of the pan and then swirl it around until the entire bottom is well covered. If your batter can do this you are all set, if not perhaps you need to add just a bit more water. Go slowly and test frequently, because you don’t want to end up with unusable slurry either.
If you would like to add some sweetness to the crêpes, feel free to add a bit of maple syrup, agave nectar, or other sweetener you like. The chocolate filling and the ganache are quite sweet so you may not need this extra sugar.
Making the chocolate filling is also simple – if you ever made pudding you will know what to do. The filling requires some simmering almond milk, starch and agar, as well we some dark cocoa and maple syrup, and needs to cook over low heat until dense. What kicks the filling up a notch is orange zest which adds citrus tones to the entire cake.
You will need to let your crêpes cool then put the cake together by layering a crêpe then covering it with a tablespoon or two of the chocolate filling, then placing another crêpe on top, the the filling and so on and so forth until all the filling is used up.
The last touch is chocolate ganache which you can make in the microwave, and pour all over the cake to completely cover the layers. You can decorate the cake with freshly cut strawberries, blueberries, toasted almonds, or some whip cream. Use your imagination to make it unique and incredible!
Gluten-free chocolate crêpe cake, via Eat the Vegan Rainbow
1 cup almond milk, unsweetened, preferably vanilla flavor
2 tablespoons tapioca starch
1/2 teaspoon agar agar powder
4 tablespoons maple syrup
2 tablespoons dark cocoa
1 teaspoon vanilla extract (add more if using plain almond milk)
Zest of one orange
FOR DARK CHOCOLATE GANACHE:
2 cups dark semi-sweet chocolate chips (vegan, like Enjoy Life)
4 tablespoons vegan cream or half’n’half (I used ripple; you can also use any plant-based milk as well, but decrease the amount to 2-3 tablespoons)
4-5 large strawberries, sliced – for decoration (optional)
What you’ll do:
Prepare egg replacer according to instructions. If using flax meal based egg replacer or similar the preparations may require soaking the flax meal in hot water for 5-10 minutes usually by mixing the dry ingredients with water in 1:2 ration (in this case 6 tablespoons egg replacer and 12 tablespoons water).
Mix all the crêpe ingredients (except oil for the pan) using a blender, a mixer or a whisk. The batter should be smooth and clump free.
Place a large frying pan over high heat. Use a brush to brush the oil across the hot surface of the frying pan, then pour in 1/3-1/2 cup of batter and twirl the pan around until all the bottom if covered with a uniform layer of the batter.
Leave the pan over medium-high heat until the surface is completely dry, then flip the crêpe over and continue cooking for 2-3 minutes on the other side. Continue until all the batter is used up, and leave the crêpes to cool.
For the filling start from cold ingredients and bring the almond milk to a gentle boil. Mix tapioca starch and agar powder into the hot milk and continue cooking over low hear until the mix firms up. Leave the mix to cool, which make take some time. You could make both the crêpes and the filling a day ahead and assemble the cake couple of hours before serving.
To assemble this cake, please use a large plate or a cake stand and start by placing a crêpe on the bottom, then the filling (1-2 tablespoons), then another crêpe and more cake filling until no filling is left!
To prepare a ganache, place the chocolate chips and milk, cream or half’n’ half into a microwave safe bowl and microwave on high for 30 seconds. Mix and microwave again, check and repeat until chocolate is about 60% melted. Take the bowl out and start mixing to help finish the melting process.
Pour the melted chocolate ganache over the top and spread as evenly as possible over the top and around the sides. Decorate with fresh strawberries, set aside for 2-3 hours then dive in!
Just how free and beautiful are these brownies? On the “free” side they are vegan, so dairy-free and egg-free, they are also gluten-free and nut-free, plus they are no-added sugar! So, what on Earth do they have? They have plenty of chocolate, cocoa powder, and cocoa nibs, which gives them their chocolate richness.
They are also full of ingredients that you will not find in your regular brownies, like a banana I use here for sweetness and a egg replacement, and oats and chickpeas, which I use as the key flour-like components. Chickpeas and the chickpea water – the miraculous aquafaba – are essential here. They add the protein needed to help give the brownies a bit of structure and texture. They combine well with oats so that the result is not chocolate oatmeal but a real double chocolate brownie with a bite and a chew.
For this and other baking projects, like my meatloaf and my marshmallow topping, I suggest you try making your own chickpeas. They do need some work – you soak them overnight in lots of water, then you rinse them and boil them in double the amount of water to get soft chickpeas and very useful aquafaba. I cook them in an electric pressure cooker on the “beans” setting. To help aquafaba along, I recommend letting the liquid that chickpeas were cooked in sit in the refrigerator for a day or so before using.
Other than cooking the chickpeas that’s a bit elaborate, everything else is smooth sailing. You will need a large food processor, pile everything in, and pulse to mix and combine. The baking is a standard deal, using a 350 F (175 C) oven and taking somewhere between 20 and 25 minutes. Let your brownies rest for at least 15 minutes before serving, then cut and plate. They’d be great with some vanilla nicecream, if you’d like to make them fancy. They are also great as is or with some orange zest on top.
Flourless Double Chocolate Brownies with Chickpeas and Oats
What you’ll need:
2 cups oats, gluten-free
2 cups chickpeas, cooked
1 banana
3/4 cup aquafaba
1/2 cup cocoa powder
1/3 cup chocolate chips or chunks, vegan
2 tablespoons cocoa nibs
2 teaspoons vanilla
1 teaspoon baking powder
What you’ll do:
Preheat the oven to 350 F (175 C).
Place cooked chickpeas, oats, roughly chopped banana, and all the rest of the ingredients except chocolate chips and cocoa nibs into a food processor, and process until you form a dough.
Add the cocoa nibs and chocolate chips and mix everything together.
Pour the mix into a square, 8 x 8 in (20 x 20 cm) baking dish and put your brownies to bake for 20 minutes.
Take the brownies out and let them rest for at least 15 minutes before cutting and serving. Enjoy with some vegan ice cream or as is!
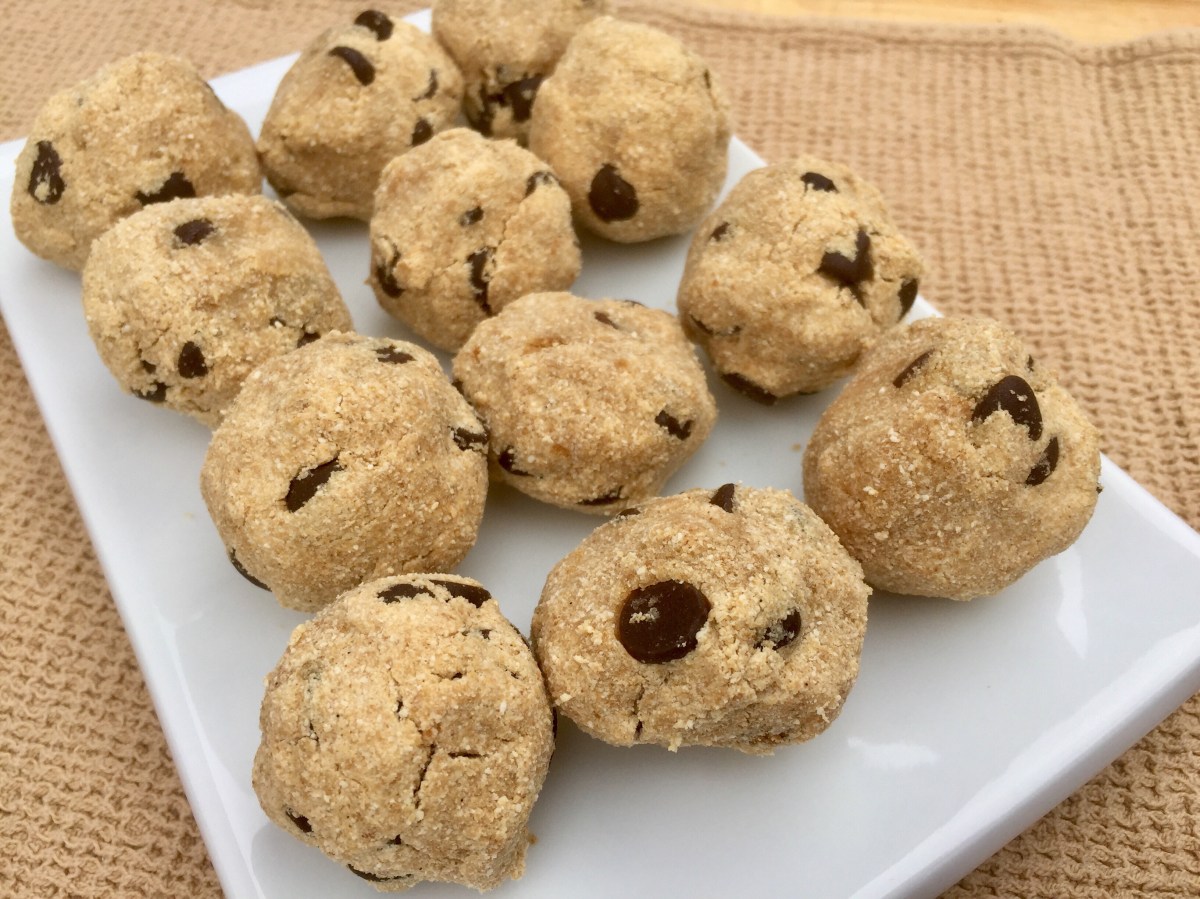
Gluten-free and Vegan Chocolate Chip Cookie Dough Balls, via Eat the Vegan Rainbow
If you are looking for a quick, fun, satisfying and irresistible dessert, well look no further. These Chocolate Chip Cookie Dough Balls are it!
They are no-bake dessert that you can whip up on a whim by using a handful of ingredients, most of which you can find in your local grocery store or easily make in a food processor. Some ingredients that you likely already have are almond flour, coconut flour, vegan chocolate chips (I recommend Enjoy Life brand, especially the mini chocolate chips!), almond milk, almond extract, agave nectar, and vanilla bean. Mixing all these together will give you lovely and yummy treats.
What kicks the flavor over the top for me is mesquite powder. Yup, you heard that right – mesquite! This is a new ingredient for me and I’ve been experimenting with its use. The powder comes from and can be used raw, so I’ve been adding it to smoothies. The powder has an earthy and nutty flavor, and that’s why it works really well in these treats.
One tip: add the almond milk gradually in small increments, 1/4 cup at a time. After each addition mix your ingredients well and let them rest for few second before adding more milk. This will help your cookie dough absorb the liquid and result in a moist dough that will come together well as you roll it.
And speaking of rolling, be gentle but not too gentle. The dough should not be crumbly – if it is you likely need a drop or two more almond milk or if you like to kick it up a notch in terms of calories you could add some almond butter which will help hold things together. Use the same technique you would when putting together meatballs: scoop a tablespoon or so of the dough into the palm of your hand and start rolling and squeezing at the same time until you have a nice little treat in your hand.
Since these cookie doughs are free of eggs, butter and flour, they are totally fine to snack on as you make them. Just remember to save a few for later!
1/4 cup agave nectar (maple syrup, or other sweetener of choice)
1 teaspoon almond extract
1 vanilla bean, scraped
1 cup mini chocolate chips, vegan
3/4 – 1 cup vanilla almond milk, unsweetened (or another dairy-free alternative; if you are using a sweetened version just add less agave nectar; if you are using plain version add a bit more vanilla bean)
What you’ll do:
In a large mixing combine all the ingredients except almond milk. Mix well and start adding the milk, 1/4 cup at a time. The final dough should be moist but not wet.
Using your hands, take one tablespoon of the chocolate cookie dough mix and shape it into a tight ball. As you are shaping the ball, keep rolling and pressing. The ball should stick together, if not consider adding a tablespoon or two of almond milk.
You can enjoy these chocolate cookie dough balls immediately. They are best freshly made, but they also keep ok, covered at room temperature for 2 days or so.
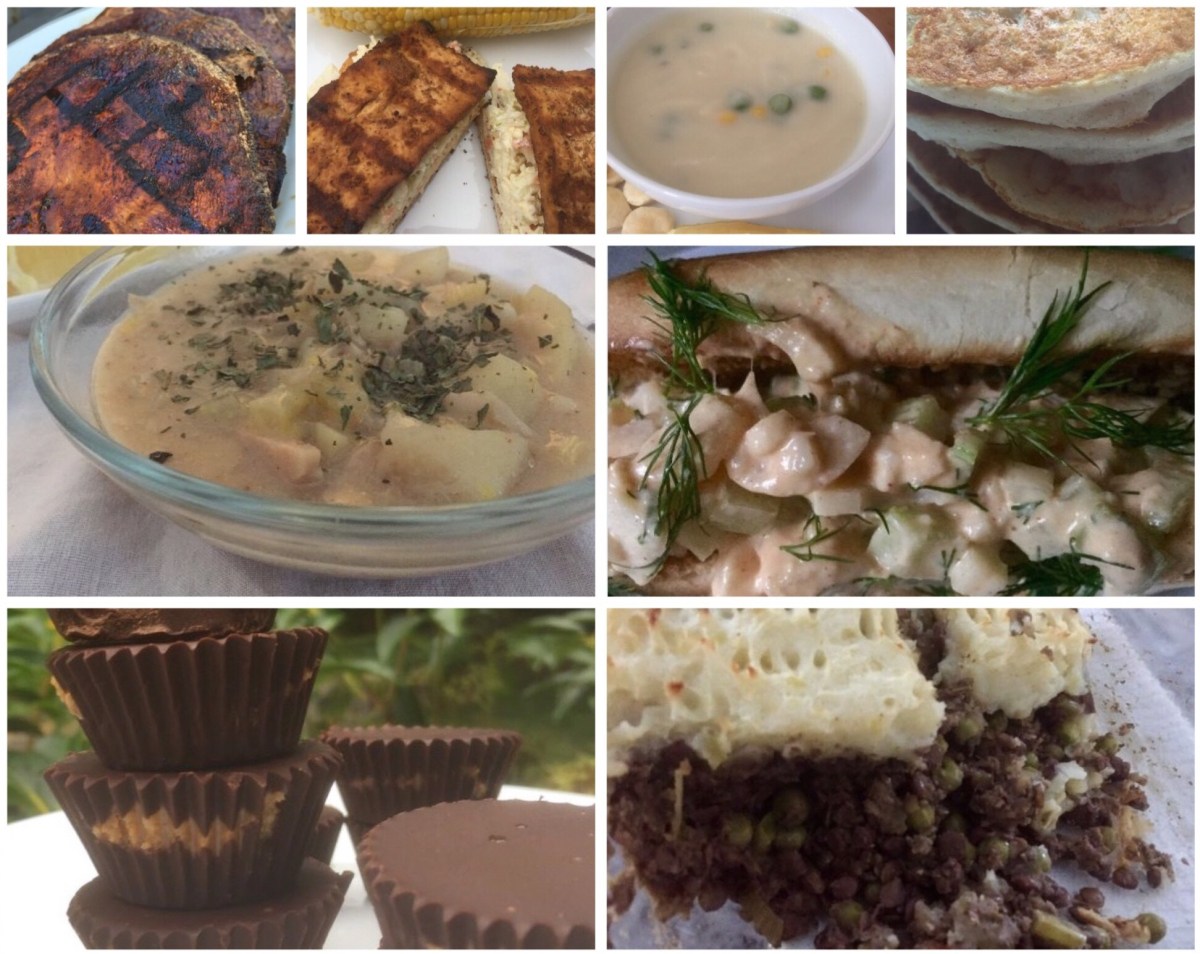
But, believe it or not, although I loved all of them, I loved some other recipes more. So, here is the list of 10 recipes I developed last year which I simply adore. I could make and enjoy each one of them over and over again, and I do make them every chance I have. The list below is organized from breakfast to dessert, and as you will see shows that I prefer things like soups and sandwiches, grilling and roasting, and really like the simplicity of a no-bake desserts. Simple, affordable, and delicious – these recipes really capture these three guiding principles of my cooking and eating style.
Gluten-free Sweet Potato Pancakes – these pancakes are an easy weekend breakfast or brunch that get all their sweetness from the roasted sweet potatoes. No eggs, no butter, no milk required! Making pancakes is a fun activity for the entire family and one of the best ways to fill your kitchen with inviting aromas and signal to the whole household that weekend is off to a great start. You can make these with all purpose flour as well, and use any topping you like – for me it’s usually sliced bananas and a drizzle of nut butter softened in the microwave for 30 seconds or so.
New England Clam-less Chowder – this chowder is simply amazing and with the flavor and texture that matches the original extremely well. I discovered that jackfruit works really well is some of the dishes that traditionally use seafood, and I used it for the Chowder, together with potatoes and a dash of potato starch to give it that chowder texture. My secret ingredient here? Some seaweed wraps which I soaked to create a seafood tasting broth! With a squeeze of lemon and a dash of Old Bay Seasoning, there’s nothing better to put in your bowl except maybe…
Creamy Cauliflower Winter Soup. If the chowder is complex, this soup is simple yet incredibly creamy. It is my favorite soup I’ve made thus far! The soup is nothing more than fresh cauliflower, boiled and creamed using a blender until smooth and silky. What completes the soup is some peas and corn, which I always have on hand in the freezer. The entire pot of soup is inexpensive and filling, cozy and perfect for the winter month, thus the name.
DIY Sushi – I’d never felt brave enough to make my own sushi before, but I finally gave it a go about 6 months ago, and I loved it. My favorite sushi fillers are carrots, avocado and cucumber with a sprinkle of black sesame seeds, so veggie rolls for the win! But you can as reactive as you like. For example, I made a batch with mushy peas and pickled red cabbage, as well as with Seaweed Pearls -aka vegan caviar -from IKEA (!), and tomato “tuna”, which I still need to work on to make it come out perfect
Faux-lobster Rolls – My love of seafood and fish alternatives does not stop at sushi and chowder, as these faux-lobster rolls prove. Some of you who tried were sold on this idea, some though they don’t even come close to the real deal. They work for me with heart of palms or artichoke hearts, both are yummy. What gives these rolls their lobster-y flavor is the seasoning, and to me nothing says “seafood” as much as the already mentioned Old Bay Seasoning, but you can adjust to match your flavor expectations and make them truly your own.
Grilled Tofu Sandwich – I love sandwiches, which explains my selection of both the faux-lobster rolls and the grilled tofu sandwich where a spicy coleslaw completes the ensemble. Plus both of these are light and summer-field recipes that can bring sunshine to your plate even in the dead of winter! For best results you do need to drain and press the tofu – you don’t need to go wild here but
Grilled Portobello Steaks – Grilling is one of the most powerful ways to maximize the umami flavors, and these portobello steaks are a great example of what grilling can do! Although you could grill most of the heartier vegetables and mushrooms as is, I think that marinating in a rich marinade that hits all the main tastes (sweet, sour, bitter, umami (savory), and salty) is a great strategy to get the most of your grilling. It definitely makes these hefty portobellos a stand out!
Simple Summer Pasta Salad – this is absolutely the favorite pasta salad I’ve ever tried. There’s really nothing special about the ingredients – pasta, toasted almonds, olive oil, onion powder and fresh basil get tossed together and that’s that. But I could eat this one by the bucketful. Unlike many pasta salads that can be overwhelming, this one is light yet elegant, and you can serve it warm or cold. It also makes a great contribution to any pot luck!
Shepherd’s Pie – this is the only more serious meal on this list, which is telling. The food I enjoy most is the one that comes together quickly without much fuss, but once in a while there’s an occasion to go wild and elaborate. This Shepherd’s Pie is a fantastic meal to make for a large family gathering. It will be a hit with both herbivores and omnivores in your lives, and it makes a lovely looking centerpiece. The meat replacement strategy here is to combine brown lentils with mushrooms and cook them with lots of rosemary and thyme for that amazing flavor.
Dark Chocolate Almond Butter Cups – no round-up of favorite dishes is complete without some chocolate, and these dark chocolate cups full of creamy almond butter are a perfect treat. They are no-bake, and hassle-free, yet look and taste amazing. If you are looking for a way to impress your guests, these will do the trick. The almond butter filling is super-complementary to the dark chocolate exterior and balances the crunchy chocolate shell out well. If you are trying to avoid nuts, you could try using a nut butter alternatives. Those will work as well.
I hope you enjoy this list, and give these recipes a try. As I said, they were my very favorite!
Vegan Fruitcake with Zucchini, via Eat the Vegan Rainbow
Fruitcake has a bad reputation. Nobody loves it, yet puts up with it because of the tradition and whatnot. And although some of you may find it hard to believe, fruitcake can be really delicious!
In this veganized version of the milenia-old (oh, yes – fruitcake dates back to Ancient Rome) tradition, I skip the butter, extra sugar, and eggs and go really wild with dried fruits. I combined everything I could get my hands on – figs, dates, cranberries, apricots, prunes, and pineapple – with a nice selection of spices featuring orange and lime zest, as well as almond extract, cinnamon, cloves, and nutmeg. I also used some finely grated, almost sauced, zucchini as a binder, and roughly chopped walnuts and red maraschino cherries for some added texture.
The key to this cake is soaking the fruit and although you could soak the fruit in rum, as is the custom, I soaked mine in water to avoid being too over the top with the flavors and the kick to the system this cake delivers. Although most of the alcohol would evaporate as the cake bakes, I wanted to keep this one rated G so that both kids and adults can enjoy as much of it as they like and decided to skip the rum altogether. At the end, the most important thing is to let the fruit soak in liquid (alcoholic or non-alcoholic) because that will help keep the cake moist and soft.
This fruitcake is pretty rich and filling. It makes for a lovely treat, as well as an excellent breakfast choice. It is definitely one more thing to add to your list of vegan Holiday treats and traditions, like the Peppermint Bark and the Gluten-free Sweet Potato Pancakes. If you are wondering whether this cake can be made gluten-free, the answer is yes, absolutely! Just use your favorite all-purpose gluten-free flour and go for it.
Vegan Fruitcake with Zucchini, via Eat the Vegan Rainbow
Vegan Fruitcake with Zucchini
What you’ll need:
1 zucchini, small (1 1/2 cup grated)
5 medjool dates
15 dried apricots
1/2 cup dried cranberries
2/3 cup dried pineapple
5 dried figs
1/3 cup prunes
1 cup maraschino cherries, drained and roughly chopped
1 cup flour
1 cup walnuts, chopped
1 tablespoon almond extract
2 teaspoon baking powder
1 teaspoon baking soda
1 teaspoon cinnamon
1/2 teaspoon nutmeg
1/4 teaspoon cloves
Zest of 1 orange
Zest of 1 lime
What you’ll do:
Combine all the dried fruits in a large bowl, cover with warm to hot water, and let soak for 30-60 minutes. Drain the fruit, pat dry to remove excess water, and chop to bits and pieces of different size. Place into a large mixing bowl.
Preheat the oven to 350 F (175 C).
Grate the zucchini using a fine grater or a food processor. The finer the grating the better!
Add the zucchini and the rest of the ingredients to the chopped fruit and mix well until everything is combined.
Line the bread pan, or any other baking pan (I used a spring form pan because it makes getting the cake out a breeze), with some parchment paper. Pour in the fruitcake batter and spread around to form a 1.5 in (3-4 cm) thick layer. The cake will not rise much, and it will be quite moist, so don’t make it too thick as your surface will burn while you wait for your center to bake.
Bake for 35 min or until a toothpick comes out clean. Let the cake stand for at least 15 minutes, ideally an hour, before cutting and serving. Serve with some vegan whip cream, ice cream, or with a glass of eggnog, and enjoy the season!
Gluten-free Sweet Potato Pancakes, via Eat the Vegan Rainbow
One thing that sweet potatoes have going for them is their amazing natural sweetness. Another thing they have going for them is their price – they are super affordable. And, for those of you keeping a nutritional score, sweet potatoes are an amazing source of vitamins, fiber and even protein.
Speaking from a recipe developer’s perspective, sweet potatoes are a versatile ingredient that lends itself to a range of recipes, from main dishes to desserts. The very first recipe I shared on this blog was the Sweet Potato Butter. More recently, I used sweet potatoes as a key ingredient in a red curry. And now it’s time to introduce Gluten-free Sweet Potato Pancakes.
The key ingredient for the Gluten-free Sweet Potato Pancakes are the roasted sweet potatoes. Roasting sweet potatoes brings out their sweetness and adds nice caramelized overtones. Plus it makes the otherwise hard potatoes easy to mash. You could boil the sweet potatoes as well, or put them in the microwave for ten minutes to soften them up, but none of these methods will help the sweetness fully develop. So, unless you are in a super huge rush do take the time to roast your spuds. What I do is roast the whole pile of sweet potatoes at the same time and stash them into the refrigerator. Then I have a roasted sweet potato on hand to use for all sort of different applications, like these pancakes.
The pancake recipe asks for two large sweet potatoes, and I mean large. They should yield anywhere between cup and a half to two cups of sweet potato purée, so find some good, big specimens for this one. Roasting sweet potatoes could not be easier. You will need to wash the potatoes, pat them dry and place them on a baking sheet – I like to line mine with either parchment paper or aluminum foil to easy cleanup more than anything else. Put the baking sheet into a hot oven – I recommend 425 F (220 C) and roast the potatoes for about thirty to forty five minutes. Take them out and let them cool completely before handling. And thats’ why is handy to have a stockpile of roasted sweet potatoes in your fridge!
One note on the flour. This recipe is gluten-free and uses a combination of white rice flour and corn starch, but if you are not looking to restrict your gluten intake feel free to use all-purpose flour. In that case you can skip corn starch and you don’t need to replace it with anything else. Two cups of all-purpose flour should work well enough.
Gluten-free Sweet Potato Pancakes
What you’ll need:
2 large sweet potatoes, roasted and peeled
2 cups rice flour
3 tablespoons corn starch
2 teaspoons baking powder
1 teaspoon baking soda
2 teaspoons imitation maple syrup flavor (or vanilla extract)
1 teaspoon cinnamon
1/4 teaspoon nutmeg
3 cups vanilla almond milk, unsweetened
Cooking spray (optional)
Topping suggestions: fresh fruit, powdered sugar, jam, maple syrup, vegan butter or cream cheese, nut butter, melted vegan chocolate…
What you’ll do:
Place all the ingredients in a large blender or a food processor. Blend untill a smooth, lump-free batter forms. Pour the batter into a large bowl – this will make it easier fo you to ladle out the pancakes. If you don’t a blender or a food processor, all this can be done by hand in an old fashioned, whisk-based sort of way. If you are doing everything by hand, do spend some time on mashing the sweet potatoes – the smoother you get them the better the pancakes. Let the batter rest for about 10 to 15 minutes.
Place a large frying pan over high heat. You can also use a griddle if you have one. In both cases make sure your surface is nice and hot before using. You could spray with some cooking spray if needed – some pans have a lovely non-stick surface and you can definitely skip the oil.
Pour out half a cup worth of the pancake batter per pancake. This should make 5 inch (12 cm) pancakes, and the amount of batter will be enough to serve 4 to 6 people. After the first 1-2 minutes lower the heat to medium-high and let the pancakes brown. You will know that it is time to flip them when the top surface becomes nice and bubbly and almost dry. Flip the pancakes, let them brown on the other side, which will take just a minute or two, them slide them to a serving plate. To keep the pancakes warm as you work you can keep the done batch in a warm oven or under some foil or a kitchen towel. To get the pan ready for a new batch increase the heat to high, let the pan come up to temperature again and repeat…
Serve warm with any topping you like, fruit, maple syrup, powdered sugar, chocolate syrup… I used sliced banana and a drizzle of softened almond butter. Yummy!!!
Note: These pancakes freeze well, so if you do end up with leftovers, let them cool than place them into a freezer safe bag or container, and you’ll have great pancakes to enjoy on another day. One trick to prevent frozen pancakes for sticking to each other is to use wax paper to separate the pancakes. You can separate them one by one, two by two, three by three, whatever is you preferred serving size. Then, when you are in a need for a quick breakfast, snack or even dessert you can take the batch out with ease. I usually zap mine in a microwave for a minute or so and they are ready. You can also use a toaster oven to heat them up, just remember that the toaster oven will dry them out a bit, so they will come out a bit less soft.


")
")
")