In the spirit of my more recent posts where I cut to the chase and get straight down to business aka the recipe, here we go!
Note on the recipe: the focus here was on recreating umami flavors of the bolognese sauce mixed in with Parmesan cheese. So, what you’ll see is a lot of umami ingredients: tomatoes, mushrooms, and marmite.
(Please note that I still enjoy writing and cooking, but the pandemic had imposed some restrictions on how much writing I can do. I will try to stick to sharing the recipes as they come, and I hope you don’t mind the decreased quality of phots which I don’t have time to stage these days. So, unlike the photos, food remains yummy.)
Place a large frying pan over medium–high heat. Once the pan is hot add the oil and onions. Sautéfor 5 minutes, or until onionhave softened. Note that onions, garlic and mushrooms don’t need to be finely chopped, rough chop/slicing is ok.
Add garlic, stir well, and sauté for another 1-2 minutes.
Mix in the chili powder and marmite, then add the sliced mushrooms. Toss everything to combine and sauté for another 3-5 minutes, until mushrooms are done.
While onion, garlic and mushroom mix is cooking, crumble the tempeh into rough crumbles into the large food processor (you can also use a hand held blender stick, in which case crumble into a large mixing bowl).
Add the sautéed mix into the tempeh and process until finely chopped and mixed. Please note that the mix will be hot, so handle with care.
Pour the contents of one large can of crushed tomatoes into the same frying pan you used for sautéing and place over medium heat. Add the tempeh mix, and gently fold everything in and combine. Once it starts to bubble, tomato sauce will start to spray all over so cover with the lid to minimize splatter.
Cook for 10 minutes or so with occasional stirring.
Serve immediately over pasta (my latest discovery is lentil and chickpea pasta, including the spaghetti), and sprinkle with fresh basil and/or oregano. Enjoy!
Gluten-free Pumpkin Cookies, via Eat the Vegan Rainbow
Looking for something easy and healthy to make for the holidays? Look no further than these super simple and super healthy cookies. They are full of pumpkin – and we all know that this is the pumpkin season – and are completely and naturally gluten-free. The combination of oats, coconut flour and almond flour does not really need backing and you could mix them all together, let the mix stand, and form the cookies as is. So, if you are into raw food, or minimally processed food this could be a path you take.
Baking the cookies does enhance the flavors, and that’s worth keeping this in mind. Baking also makes all the spices develop and merge. A combination of cinnamon, ginger and cardamom really blooms when heated up! At the end, baking the cookies will give you a more aromatic kitchen and platter.
What will also enhance the flavors is roasting your own pumpkin. (So, I guess not everything will be as a raw as possible since I am not sure you can use raw pumpkin – I have never tried and I am not even sure that it can be done!). Roasting the pumpkin is super easy – you don’t even need to peel it, just slice it in half, scoop out the seeds and place the pumpkin halves on a baking sheet, cut side down and roast at 425 F (220 C) for 45 minutes or so. It also helps to line the baking sheet with some foil or parchment paper – this helps the roasting and the clean up!
After the pumpkin is roasted, all you need to do is scoop the flash and purée, either in a food processor or using a masher. Food processor will make everything much smoother, but if you prefer your a more rustic pumpkin hands or a masher will do.
Enjoy!
Gluten-free Pumpkin Cookies, via Eat the Vegan Rainbow
Gluten-free Pumpkin Cookies – Yummy!
Gluten-free and Oil-free Pumpkin Cookies
What you’ll need:
1 15 oz (425 g) can pure pumpkin (not pumpkin pie filling) or 15 oz (425 g) roasted sugar pumpkin, puréed
1 cup old fashioned oats
1/2 cup coconut flour
1/2 cup almond flour
1/4 cup sugar (or solid sweetener of your choice)
2 teaspoons cinnamon
1 teaspoon cardamom
1/2 teaspoon ginger
Optional: 1/4 cup maple syrup, for brushing
What you’ll do:
Preheat the oven to 350 F (175 C).
Combine all the ingredients in a large food processor. If you don’t have a food processor that’s large enough, you can either process in batches or process pumpkin and oats well and then just mix in the rest of the ingredients (except the optional maple syrup) by hand.
Line a large cookie sheet with parchment paper.
Use an ice cream scoop to measure out the amount for each cookie, than form a round and flat shape and place on the parchment paper. This amount of batter should yield about 12-14 cookies.
Cross-hatch the surface of each cookie.
Bake for 18-23 minutes. Cookies will be lightly browned but stay soft.
Let the cookies cool for 15-20 minutes before brushing with maple syrup. You could skip this step, but why would you want to do that? Enjoy!
I grew up eating pâté and loving it. Some pâté, on a piece of freshly baked bread with a glass of yogurt (yes, the liquid kind you drink like they do in Middle East!) was one of my go to breakfasts. And the pâté I ate was not a fancy French kind made with duck fat. At some point I learned that it was actually made of who know what, random bits and pieces of an animal all ground up. Whether you eat meat or not, I hope we can all agree that that’s pretty unappetizing when you think about it!
But: if you don’t think about it and just go with your taste buds, pâtés are really tasty. They are full of umami, savory flavors that we all crave, they are silky and smooth, they are nicely spreadable, and they are an excellent add-on to a nice piece of bread. So, how can we re-create the perfect savoriness with just a small number of ingredients, and make a healthy and satisfying pâté that will keep you coming back for more?
Well, we start with mushrooms, the well-known source of umami. You can use white button mushrooms here or baby bella (cremini) mushrooms as well. I do not recommend some of the mushrooms that have distinct flavors, like shiitakes; however, other mild mushrooms may work. Still, white button mushrooms are readily available, affordable and work!
Another important umami component is tomato paste. Here, you can use any tomato paste you have on hand and you can adjust the amount – anywhere between a tablespoon or two will do the trick.
To make the dip smooth and rich in protein, I recommend adding canned beans. White beans work best (cannellini, great Northern or navy), but any other variety will probably be OK. If you cook your own beans, I recommend that you keep them slightly undercooked for this application, or at least squeeze some of the excesses liquid out before blending to avoid ending with a pâté that’s more of a soup than a rich and dense spread.
The main flavoring agent here is Herbes de Provence, a mixture of dried herbs that usually includes thyme, rosemary, oregano, marjoram and lavender. I use Trader Joe’s version, and they carry it only as a seasonal item in the fall, but any other mix with the same name will do. Alternatively, you can add a pinch of thyme, rosemary, oregano, and other herbs (including basil) that you may have on hand.
Finally, what also adds a lot to this pâté is sautéing and caramelizing onions, garlic and mushrooms before blending everything together. This will help the flavor deepen and develop!
Looking for serving suggestions? You can use it as a spread or a dip, as a pizza “sauce” and topping (why not?), in your quesadillas (let’s be adventurous!), for your baked potatoes, or for any other dish where you feel the need to add rich, yet smooth flavors. Enjoy!
Nut-free Mushroom Pâté, via Eat the Vegan Rainbow
Mushroom Pâté
What you’ll need:
8 oz white button mushrooms (or cremini mushrooms if you like stronger mushroom flavor), sliced
1/2 large, white onion, diced
4 cloves garlic, sliced
2 tablespoons olive oil
2 tablespoons tomato paste
2 teaspoons Herbes de Provence
1 15 oz (425 g) can white beans
Salt to taste
What you’ll do:
Place a large sauté pan over medium high heat. Heat up than add the oil and onions. Sauté for 2-3 minutes, then add the garlic. Let garlic start to release its aroma – this usually takes a minute.
Add the mushrooms and , increase the heat to high, mix well and sauté until mushrooms are browned. This will take about 4-5 minutes.
While the mushrooms are cooking, drain and rinse the can of beans. Shake access water off and place into a food processor or a large mixing bowl if you rather use a stick blender (this is an incredibly useful kitchen gadget and it’s what I used here).
Pour the sautéed mushrooms over the beans and blend until smooth and combined. Leave in the refrigerator until ready to serve.
Serve cold as a spread for sandwiches or as a dip for chips or crackers. This pâté is excellent addition to your menu and it offers a healthy and humane alternative.
“Where do you get your protein from?” is probably the most detested question that those enjoying plant-based (vegan) diet get asked all the time. Of course, we know that this is an easy question to answer because plants are full of protein.
But just in case you feel that you need an extra protein boost, especially when it comes to breakfast, I have a perfect solution for you. How about some protein packed English muffins? Actually, these are not oven-baked; rather they are done within a few minutes using a microwave.
Perhaps you’ve seen recipes for mug cakes? Or you may have seen new “mug cake” product lines in your local supermarket? The idea is that you whip up your ingredients in a mug, mix them together and after 3-5 minutes in a microwave you have your single-serve cake or a muffin ready to enjoy.
I use the same basic idea here except that instead of eggs and flour I use pea protein powder, peanut butter powder (which is really peanut protein powder), some flax meal, baking soda, a dash of vinegar (or lemon juice) and water or plant milk of choice. Believe it or not, after 3 minutes in the microwave on high power you get a nice little muffin. I recommend slicing the muffin across horizontally, then toasting it for some extra crunch. Yummy!
So, how does this work? I don’t know for sure but I do have a working theory that the carbon-dioxide released when baking soda meets a splash of vinegar or lemon juice is enough to lift the “dough”, and once up the protein molecules have sufficient strength to support the structure.
The main trick here is not to make the mix too wet. When you mix your ingredients together, you will have something that looks more like a paste than a muffin batter. Don’t worry, this is as it should be. The best dish to microwave the muffin in is a 3-4 inch (8-10 cm) ramekin, and I recommend that you grease it with either a bit of butter or some cooking spray. A little will go a long way to help your muffin slide out.
Lastly: a note about microwaves. They are all different and have moods of their own. I recommend you start on high power, and check how things are doing after about 2 minutes. You should look for a dry looking top and sides that are coming away from the ramekin. At the end, the muffin should slide out of the ramekin without much resistance, usually after you run a butter knife around the edges to release the muffin.
Gluten-free and Vegan Protein-Packed No-Bake English Muffins
What you’ll need:
2 tablespoons pea protein powder
2 tablespoons peanut protein powder
1 tablespoon ground flax meal (golden is preferred)
1/2 teaspoon baking soda
1/4 cup and 1 tablespoon almond milk or water
1 teaspoon apple cider vinegar
Vegan butter (optional)
What you’ll do:
Place all the ingredients into a small bowl, and mix to combine. I recommend adding a splash of acid (vinegar or lemon juice) last. The batter will be dense and sticky, just FYI.
Pour the batter into a microwave safe ramekin or a mug that’s about 3-4 in (8-10 cm) in diameter and that has been greased with butter or sprayed gently with some cooking spray.
Microwave on high for 3 minutes or so. The top should be dry and look baked, and the sides should be coming of. If all is well, the muffin will slide out of the ramekin without much resistance after you run a knife around the edges. If not, it means that the bottom is still moist, and the mix needs to go back for another 30-60 seconds.
Enjoy the muffin as is, or toast if you prefer things a bit crunchier. You can top the muffin with butter, jam, hummus, avocado, fruit, or anything else you like. The muffin itself is neither sweet nor salty so lends itself to utmost customization!
Let me make one thing clear – if you are looking for a veggie burger recipe that looks and tastes like meat, you really should look elsewhere since this ain’t it! But, if you are looking for a different type of burger, that is unusual yet appealing, and that is amazingly nutritious then you have come to the right place.
This is my Sweet Potato Burger which is made of roasted sweet potatoes, oats, flax meal “egg”, and a dash of very spicy adobo sauce. The patties are held together by the joined action of oats and the flax meal egg, and do just fine on the outdoor grill. The flavor is nicely sweet, perfect for combining with some mustard, pickles and lettuce. In my view, tomatoes, mayo and cheese do not work well on this burger, but caramelized onions, sautéed mushrooms, or sliced avocado would add to it. Feel free to experiment and see how it goes!
Sweet Potato Burgers
What you’ll need:
2 cups roasted sweet potatoes, mashed
1 cup rolled oats
3 tablespoons flax meal
6 tablespoons water
1 tablespoon adobo sauce
1 teaspoon maple flavor
1 teaspoon coriander powder
1/4 teaspoon cinnamon
1/8 teaspoon nutmeg
What you’ll do:
Roast sweet potatoes as you would normally. I usually roast them at 425 F (220 C) without peeling for 45 minutes or so, then let them cool completely before handling. My usual batch is about 8 large potatoes and I store them roasted in the refrigerator and use them through the week.
Start soaking flax meal in hot water 15-20 minutes prior to use. You can find detailed instructions on making the flax egg here.
Peel two potatoes and mash them with a fork or a potatoe masher. This should yield 2 cups of sweet potatoes. Measure it out and adjust by adding and removing the mashed sweet potato. The final amount does not need to be absolutely precise but do keep it close to the recipe.
Place the mashed sweet potatoe into a large mixing bowl, and add all the rest of the ingredients. Mix well, and use the immersion (stick) blender to get the consistency nice and smooth, and the oats broken up. If you don’t have the stick blender you can always use your food processor. Let the mix stand for 20 minutes or so to allow the oats to begin soaking up the excess moisture and swell.
Form the burger patties, and place them on a wax paper lined platter. Place the patties in a refrigerator for up to an hour to firm up.
Prepare and preheat your outdoor or indoor grill, or your grill pan in a usual way. I recommend oiling the grill grates well and grilling the burgers at medium heat. You can also use a grill pan or a regular pan – the burger will come out as delicious albeit without the lovely, charred grill marks. Sweet Potato Burgers need about 4-5 minutes per side, and they are ready to enjoy!
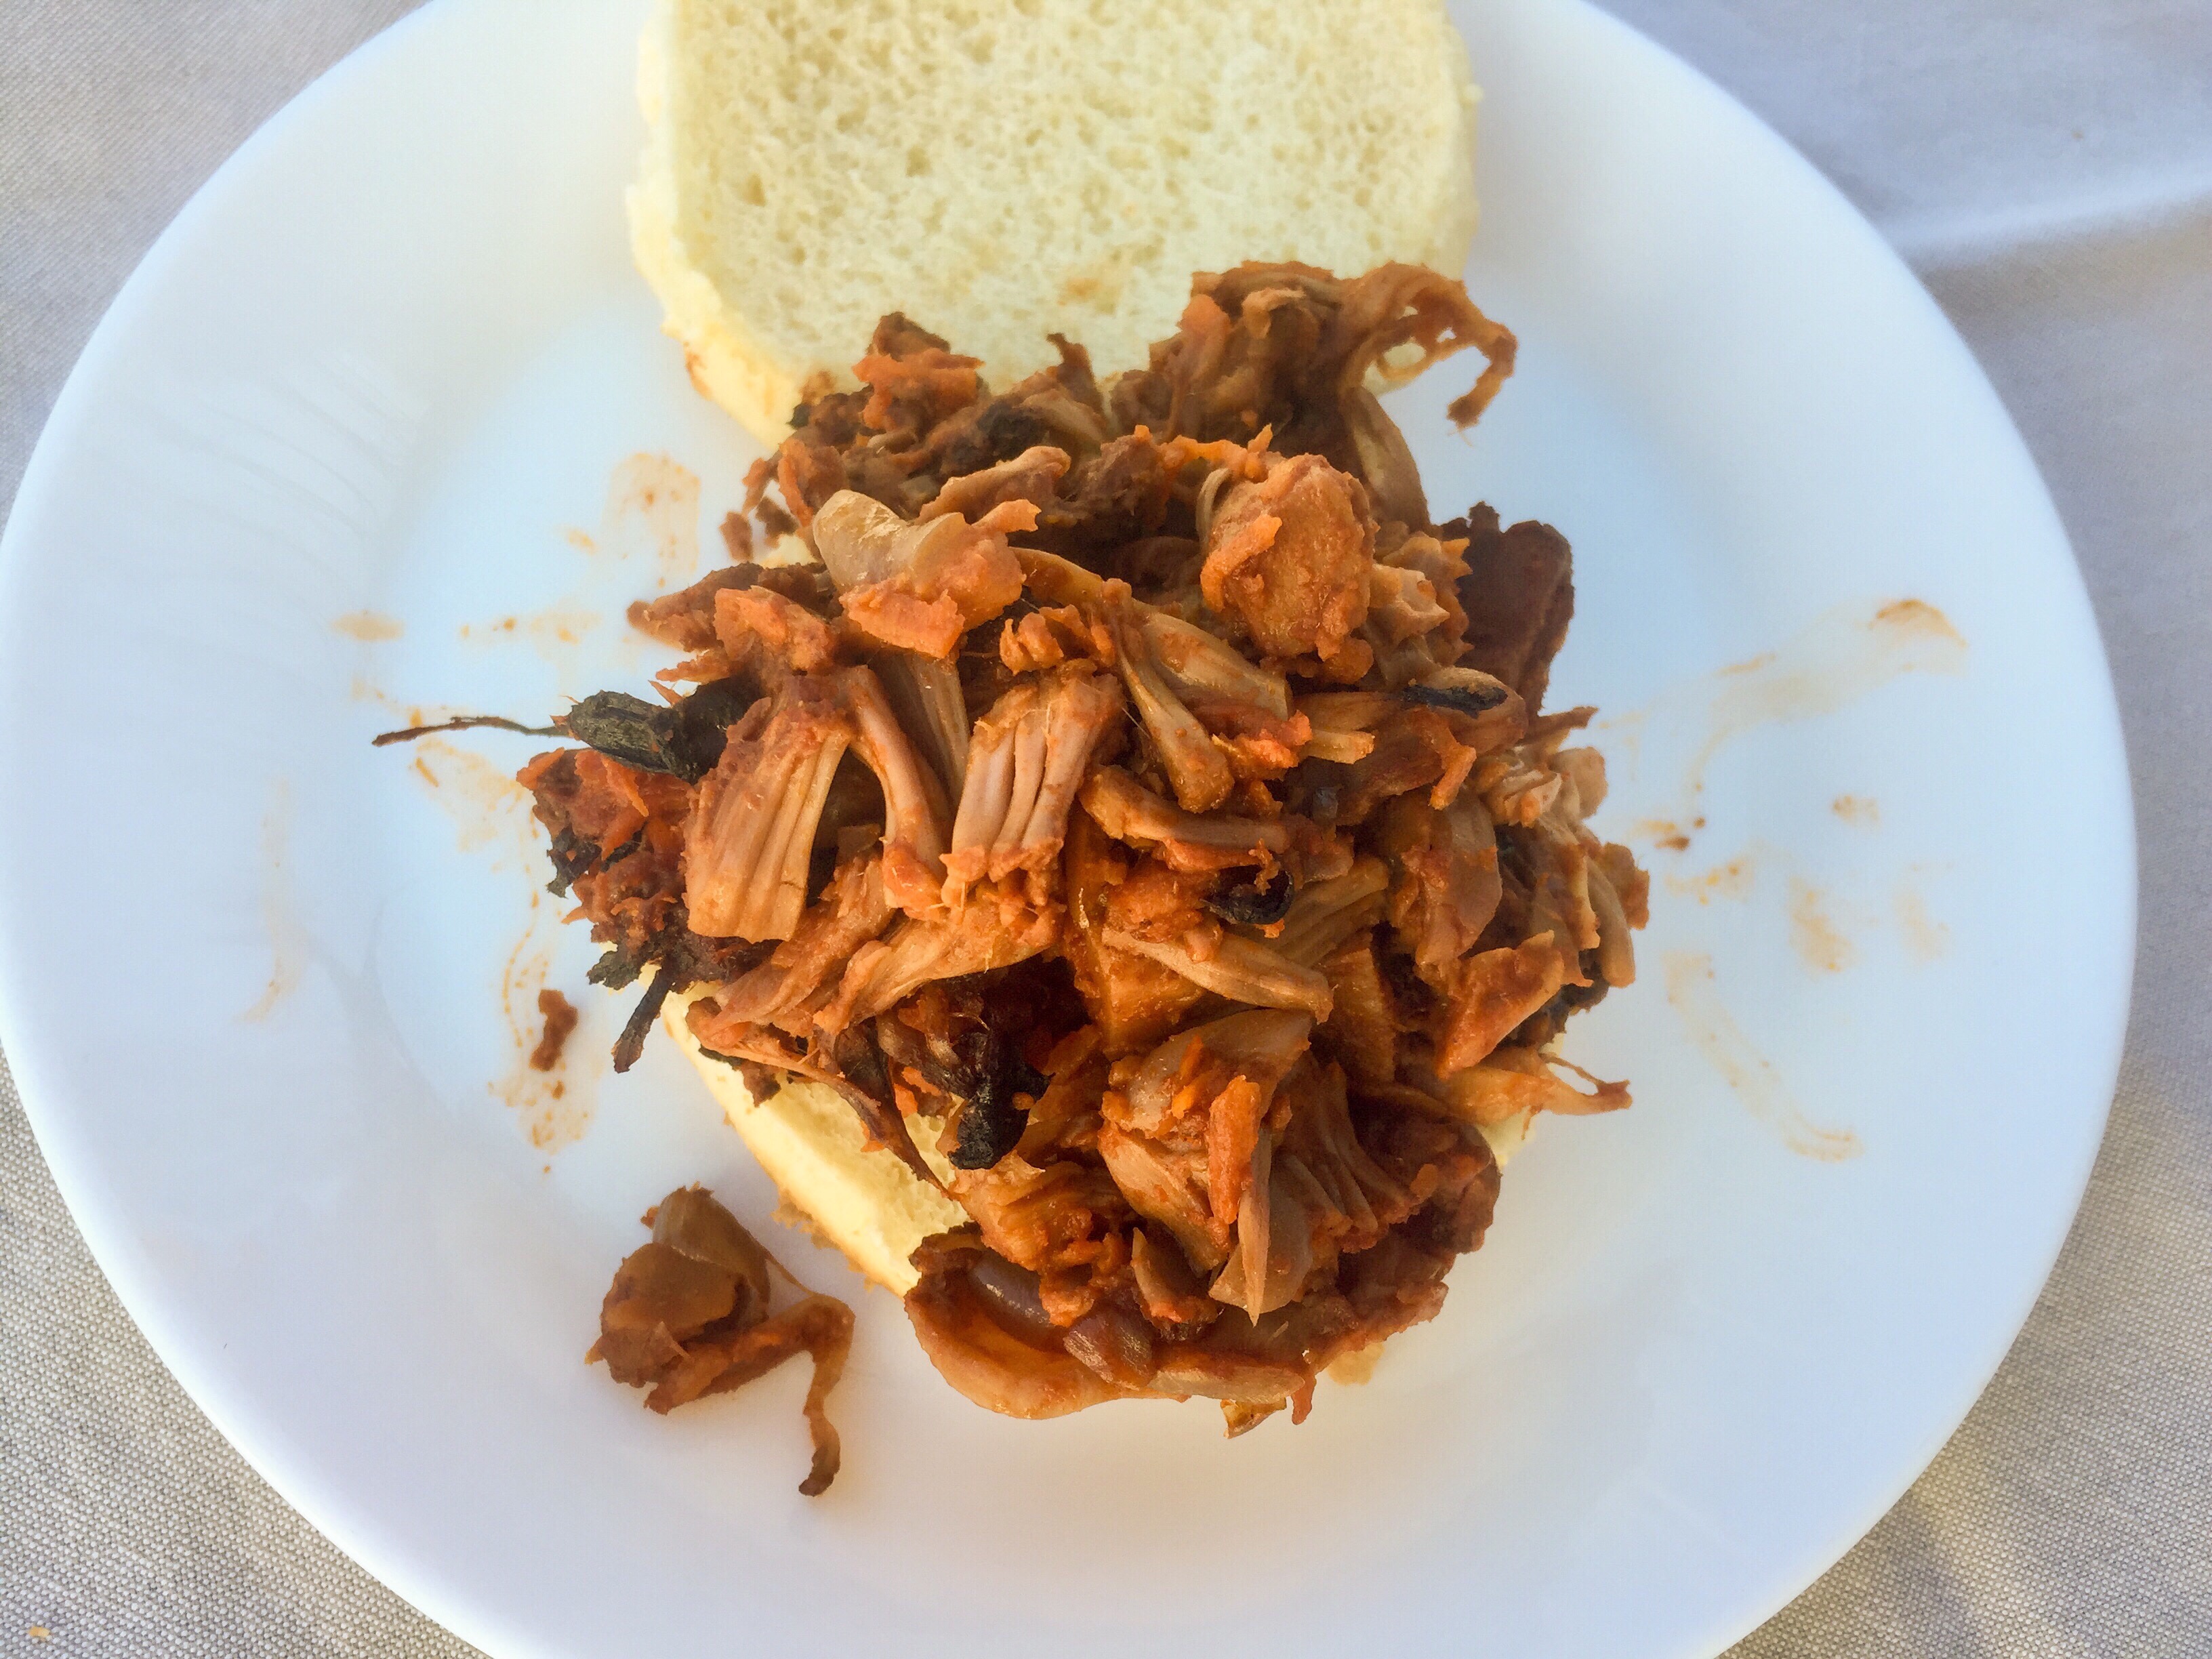
Spicy and Smokey Pulled “Pork” Jackfruit, via Eat the Vegan Rainbow
For many transitioning to plant-based, vegan or vegetarian diets giving up meat could be very difficult, especially during the summer months of outdoor grilling and the good ol’ BBQ. So, it’s no wonder that many recipe developers have been interested in capturing some of the BBQ flavors and channeling them into plant-based dishes.
Few weeks ago I reviewed one of the newest cookbooks dedicated entirely to vegan grilling, and I am currently going over the vegan butcher’s cookbook. Almost every one of these cookbooks as well as many vegan blogs and recipe aggregators include at least one vegan pulled “pork” recipe that uses green young jackfruit to recreate the look and feel of pulled pork. Jackfruit BBQ pulled pork recipe was even featured on TODAY.com as one of the biggest food trends of 2017!
I’ve been using jackfruit for over a year now, and have tried couple of different pulled pork recipes. They left me a bit underwhelmed, and I put the idea of BBQ pulled jackfruit on a side burner. And that’s where it stayed until very recently when I decided that it’s time to tackle this challenge again.
The recipe I came up with is slow cooker based and it takes about six hours to make. First, I combined lots of finely chopped onions and finely grated carrots to give the BBQ lots of natural sweetness. To help the aromas develop, I mixed the onions and carrots with oil and tomato paste and cooked them in the microwave oven for six minutes or so, until almost fully softened and slightly caramelized.
Next, I pulled the drained and rinsed jackfruit before cooking. I discarded all the very tough bits and pulled the rest apart with my fingers.
For smokiness and flavor, I added molasses, mesquite powder, and some sauce from chipotle peppers in adobo sauce. This sauce is super spicy so go easy with it, or replace it with some smoked paprika, or liquid smoke. I like a bit of a kick so this sauce (in moderation) works for me. The mesquite powder is something that you may need to order online (I got this brand from Amazon), but it is worth having on hand. It’s a powder that adds nice nutty and subtly smokey flavor to baked goods, desserts, and now “pulled” pork.
The slow cooker did all the work once I mixed everything together. The main pro tip when using a slow cooker (crock pot) is to use a liner to help with clean up. Other than that – you mix all the ingredients, put the lid on, turn on high for several hours, and you are done!
The pulled jackfruit really delivered! The sweetness and the heat from the adobo sauce combined to give this all sort of happy balance. Jackfruit turned out soft and very much like pulled pork in texture, while onions and carrots have almost melted into the final sauce, which is exactly what I wanted.
Spicy and Smokey BBQ Pulled “Pork” Jackfruit
What you’ll need:
1-2 yellow onions, finely diced
3 large carrots, finely grated
3 tablespoons tomato paste
2 tablespoons canola (or other neutral taste) oil
3 10 oz (280 g) cans green, young jackfruit in brine (drained, rinsed and pulled apart)
1/4 cup dark molasses
1 tablespoon adobo sauce
2 tablespoons mesquite powder
What you’ll do:
Mix diced onion, finely grated carrots, oil and tomato paste in a microwave safe bowl. Put in the microwave for 6-8 minutes until onions start to caramelize.
While the onion and carrot mix is caramelizing and softening, drain and rinse the jackfruit then use your fingers to pull apart all the soft bits while discarding the tough pieces of core.
Line the slow cooker with a liner, add the pulled jackfruit, onion and carrot mix, and the rest of the ingredients. Please note that adobo sauce from a can of chipotle chilis in adobo sauce is very smokey and very spicy, so you may want to dial down or dial up (if you are really adventures!) according to taste. If you rather not have the heat, you could use some smoked paprika and/or a teaspoon of liquid smoke.
Cover the slow cooker, and turn it on to high heat for 5-6 hours.
Serve the BBQ pulled “pork” in a hamburger bun, with some mashed potatoes, coleslaw, grilled corn, or any of other of your favorite sides. The BBQ pulled “pork” would also go really well with some freshly made cornbread, and you can always pour on some of your favorite BBQ sauce for that “finger lickin’ good” feel!
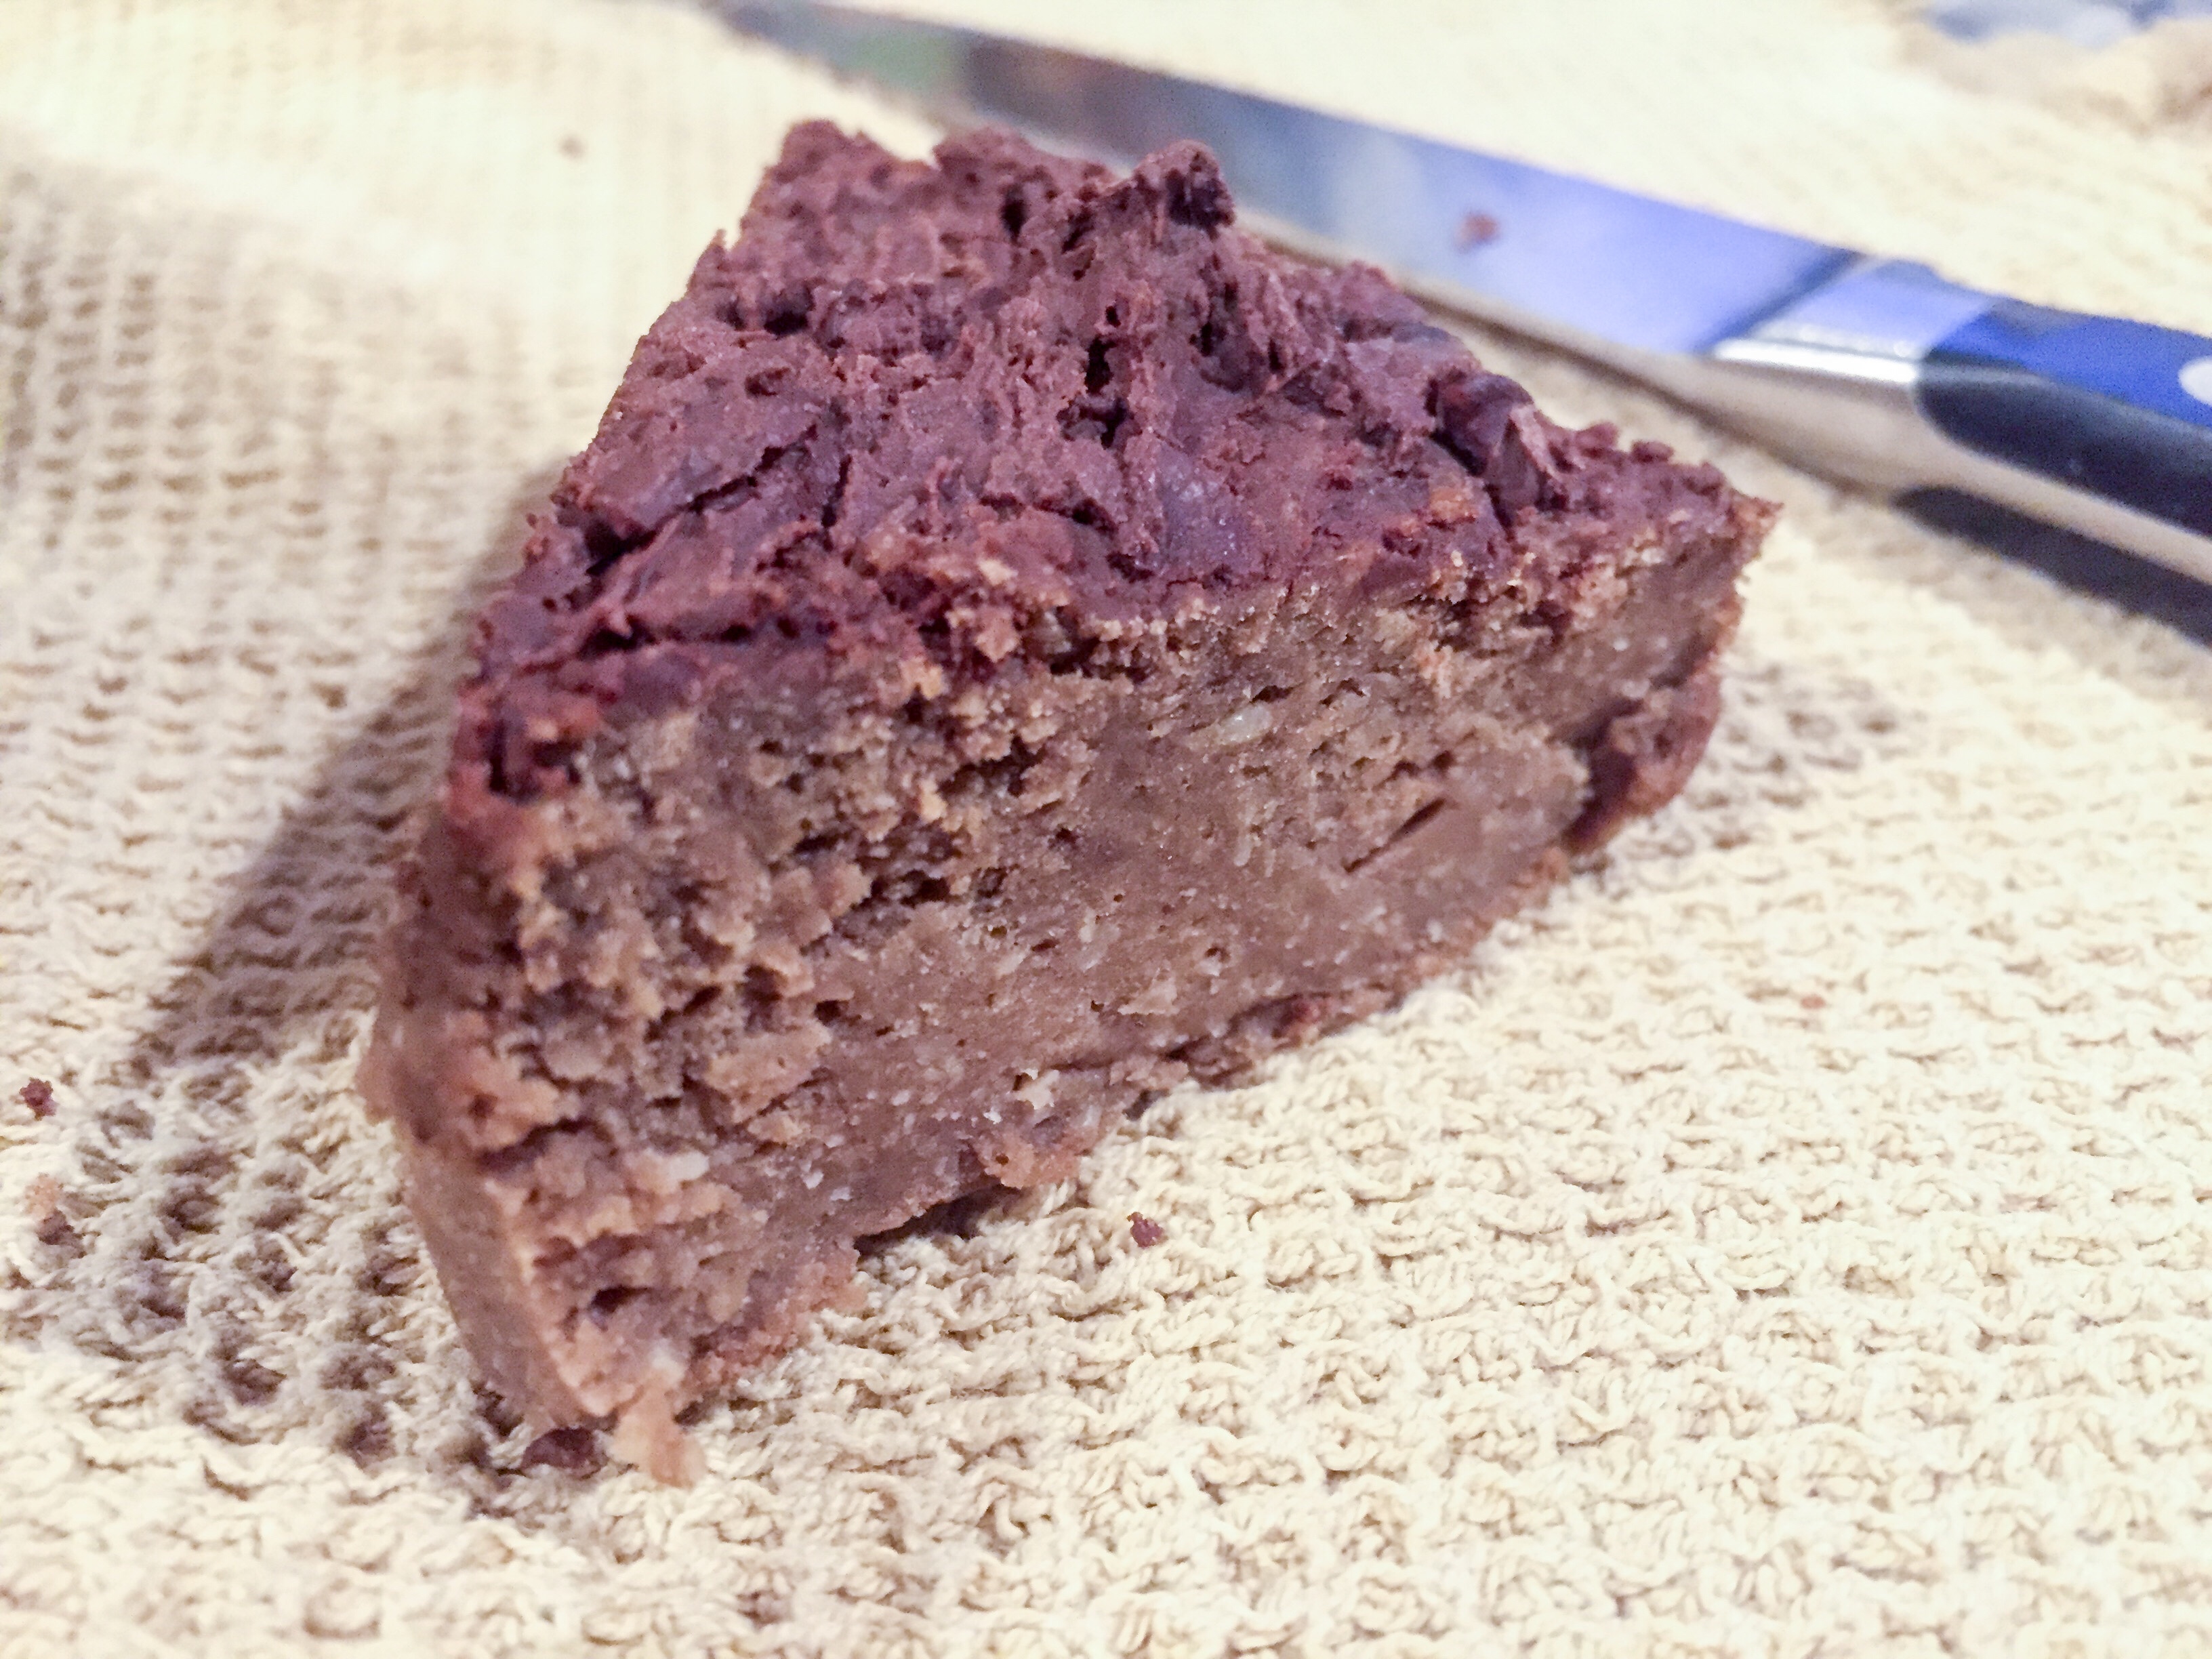
Just how free and beautiful are these brownies? On the “free” side they are vegan, so dairy-free and egg-free, they are also gluten-free and nut-free, plus they are no-added sugar! So, what on Earth do they have? They have plenty of chocolate, cocoa powder, and cocoa nibs, which gives them their chocolate richness.
They are also full of ingredients that you will not find in your regular brownies, like a banana I use here for sweetness and a egg replacement, and oats and chickpeas, which I use as the key flour-like components. Chickpeas and the chickpea water – the miraculous aquafaba – are essential here. They add the protein needed to help give the brownies a bit of structure and texture. They combine well with oats so that the result is not chocolate oatmeal but a real double chocolate brownie with a bite and a chew.
For this and other baking projects, like my meatloaf and my marshmallow topping, I suggest you try making your own chickpeas. They do need some work – you soak them overnight in lots of water, then you rinse them and boil them in double the amount of water to get soft chickpeas and very useful aquafaba. I cook them in an electric pressure cooker on the “beans” setting. To help aquafaba along, I recommend letting the liquid that chickpeas were cooked in sit in the refrigerator for a day or so before using.
Other than cooking the chickpeas that’s a bit elaborate, everything else is smooth sailing. You will need a large food processor, pile everything in, and pulse to mix and combine. The baking is a standard deal, using a 350 F (175 C) oven and taking somewhere between 20 and 25 minutes. Let your brownies rest for at least 15 minutes before serving, then cut and plate. They’d be great with some vanilla nicecream, if you’d like to make them fancy. They are also great as is or with some orange zest on top.
Flourless Double Chocolate Brownies with Chickpeas and Oats
What you’ll need:
2 cups oats, gluten-free
2 cups chickpeas, cooked
1 banana
3/4 cup aquafaba
1/2 cup cocoa powder
1/3 cup chocolate chips or chunks, vegan
2 tablespoons cocoa nibs
2 teaspoons vanilla
1 teaspoon baking powder
What you’ll do:
Preheat the oven to 350 F (175 C).
Place cooked chickpeas, oats, roughly chopped banana, and all the rest of the ingredients except chocolate chips and cocoa nibs into a food processor, and process until you form a dough.
Add the cocoa nibs and chocolate chips and mix everything together.
Pour the mix into a square, 8 x 8 in (20 x 20 cm) baking dish and put your brownies to bake for 20 minutes.
Take the brownies out and let them rest for at least 15 minutes before cutting and serving. Enjoy with some vegan ice cream or as is!
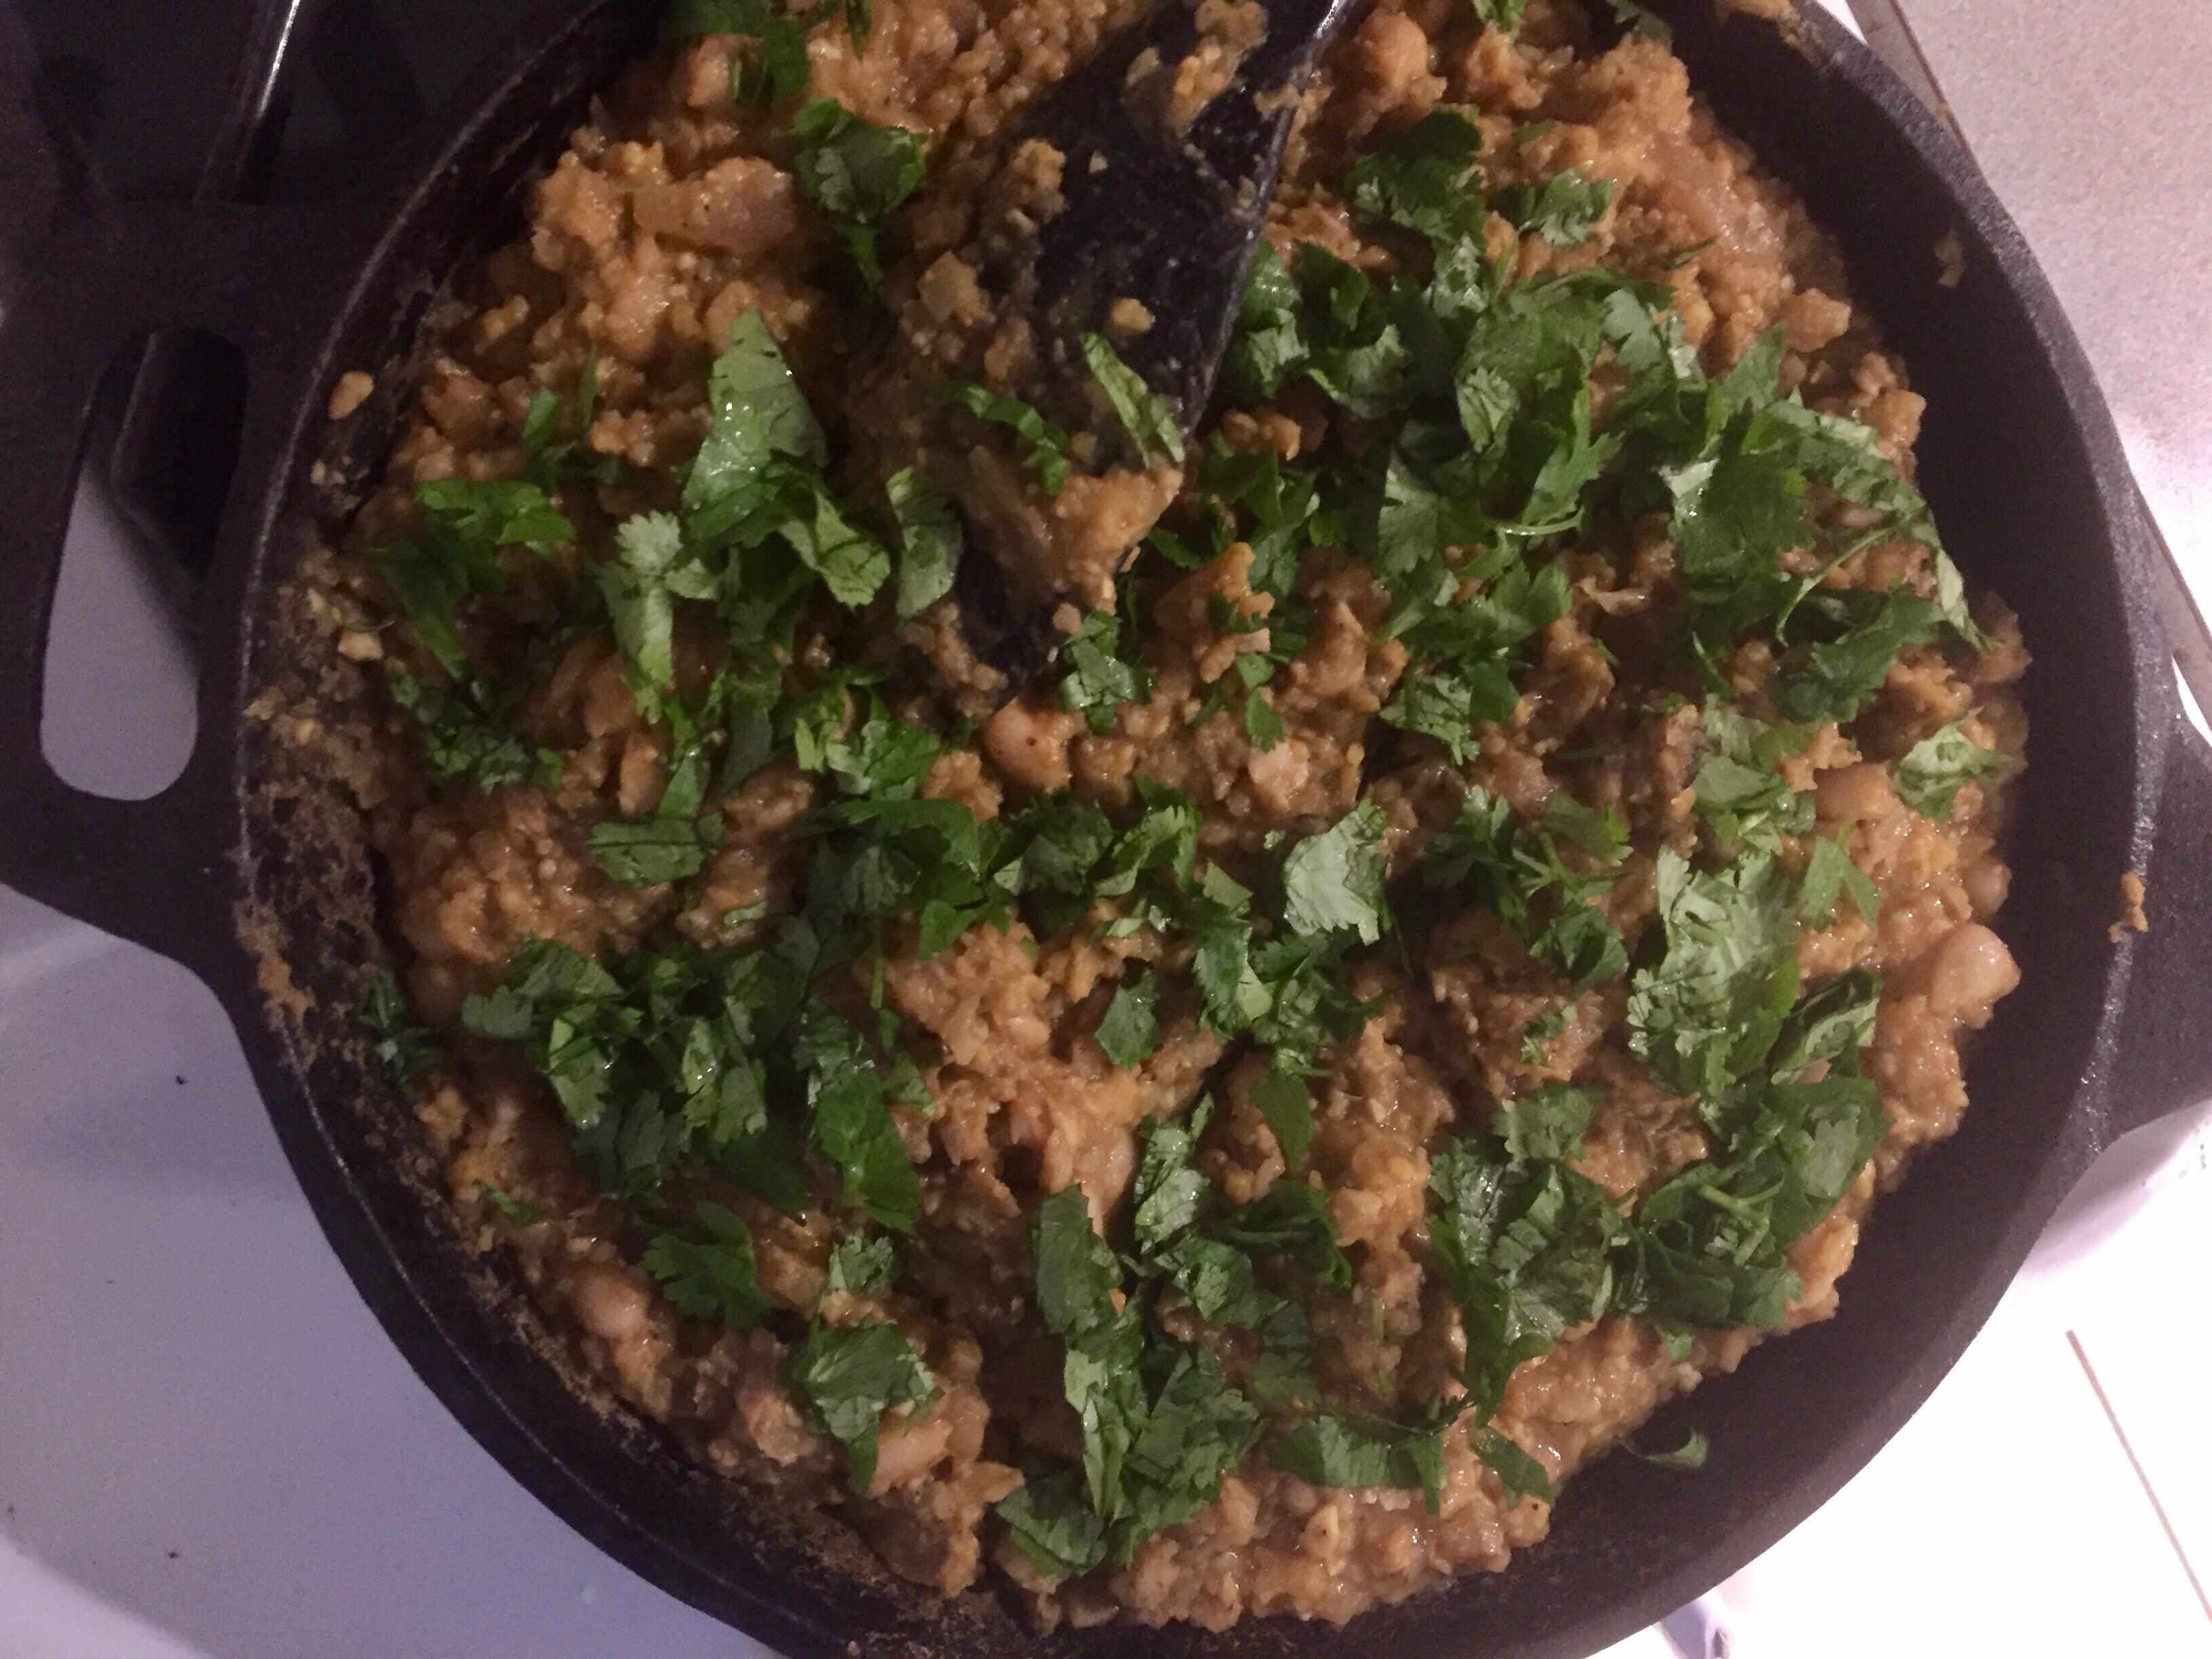
Plantains and Beans Chili, via Eat the Vegan Rainbow
Plantains are those weird looking, giant bananas that look either too green or way past their prime, and usually not very appetizing. But, they are a staple of certain cuisines and I’ve had them while I lived in Ghana, almost exclusively deep fried. Unfortunately, deep fried plantains were not quite to my taste and I stayed away from them until very recently.
I was inspired by a Puerto Rican “lasagna” recipe that used plantains instead of noodles and was happy with the results. Here, I wanted to do something slightly different. I started from really ripe plantains and roasted them without peeling. Then, I made mashed plantains and combined them with plain, white beans (navy beans), and a handful of spices to create a rich and dense chili. Why does this chili work? First of all, plantains are full of starch and relatively sweet, adding lots of great flavor almost as if you were adding molasses. The spices and flavor agents, tomato paste, Chile Lime seasoning bland, and paprika helped the taste along. Lastly, the navy beans worked well here because they added smoothness and creaminess. Sprinkling some fresh cilantro complements the ensemble, and you could also spoon some dairy-free sour cream on top or some plant-based yogurt.
Plantains and Beans Chili, via Eat the Vegan Rainbow
Plantain and Bean Chili
What you’ll need:
4 very ripe plantains, roasted
1/2 lbs (225 g) white beans, cooked or from the can
1 onion, diced
2 tablespoons tomato paste
1 teaspoon ground cumin
1 teaspoon Chile Lime seasoning bland (this is a product from Trader Joe’s but you can make your own with some chili powder, salt, and lime zest)
1/2 teaspoon paprika
Cooking spray
1/4 cups fresh cilantro, roughly chopped
What you’ll do:
Get ripe plantains – those that have quite a few black areas on them – wash them and place them on a baking sheet without peeling. Roast the plantains at 425 F (220 C) for an hour. Their skins will turn black and they should soften inside.
Let the plantains cool then peel them and mash with a potato masher. You could also put them into a food processor and pulse until fine.
Heat a cast iron pan over the medium high heat. Add the cooking spray, spices, tomato paste, and the diced onion and let everything caramelize well, which could take up to 15 minutes.
Add the plantains and let the bottom start to brown. Mix well and cook for 5 to 8 minutes.
Add the cooked beans – I cook mine in a pressure cooker after soaking them overnight – and let the dish simmer for 10 minutes or so.
Serve with a dash of fresh cilantro, or other types of topping you prefer to use on your chili.
Scallion Crêpes with Sesame and Ginger Dipping Sauce, via Eat the Vegan Rainbow
In Serbia, ex-Yugoslavia, where I grew up, there is only one type of pancakes people make – palačinke. They are huge in Central Europe and on the Balkans, and if you are wondering how to pronanounce their name before you munch on them, you would pronounce “č” the same way you do the digraph “ch”. They are thin, they roll and fold easily, they can handle any type of topping, and they are super easy to make. They are also pretty much the same thing as crêpes, so I am sticking with that better known name for the rest of the post. It’s probably one of the first recipes my mom taught me, and knowing how to make crêpes was a bit of a teenage rite of passage for my friends and me. If you knew how to make them you were definitely a part of the in-crowd!!!
And while crêpes are considered very much a French thing (and now you probably appreciate that they are also huge on the Balkans), scallion (or green onion) pancakes hail from a totally different culture – they are a staple of Chinese cooking. Some of the Scallion Pancake recipes use chicken fat (!), but the one by Ming Tsai, a TV chef known for his East-West fusion cuisine, is vegan-friendly, and you may want to give it a try. But, these pancakes do require kneading, and a bit more hands on than I am prepared to do.
So, channeling my inner Ming Tsai and his East-meets-West fusion style, I now give you Scallion Crêpes with Toasted Sesame Seeds and Ginger Dipping Sauce. The crêpes take about an hour to make, from start to finish, and the sauce comes together in five minutes or so.
If you have never made crêpes before, relax – they don’t take much time or much effort. All you need is a large bowl and a large whisk, or a large blender. Your goal is to mix wet and dry ingredients until a smooth and very runny batter forms. Crêpes come out best when you use a large frying pan with a very flat bottom, when you keep your pan hot, but not too hot, and when you drizzle a drop or two of fresh oil before pouring in a new batch of batter in. If you have a really fantastic non-stick pan, you may be able to skip the oil but crêpes can be sticky, so proceed with caution.
One of my mom’s tricks is to use a teaspoon of oil and a really hot pan for the first crêpe. That crêpe is too oily and is usually discarded, but cooking it seasons the pan so that you only a drop or two of oil for the rest of the crêpes that should slide right out there when done.
There’s a bit of technique to flipping the crêpes over. First of all, you will need to figure out how much batter you need to pour in to make a thin, yet not too flimsy crêpe. For a regular size frying pan (8 in; 20 cm) I’d say start with 3/4 cup of batter. Pour the batter in the middle of the pan and then move your pan around quickly to help the batter spread around all the way to the edges, making one smooth, thin layer.
Second thing that you will need to know is when to flip, and the answer to that is when the uncooked side starts to look dry, which should not take more than couple of minutes. Once you see that it’s time to take hold of the pan’s handle and give it a shake. If everything is working according to the plan your crêpe should be sliding around the pan freely. If not, you will need to use a thin spatula to slide it under the crêpe and ensure all the sticking points are unstuck. The best spatulas to use for this are the metal ones you would normally use to frost a cake.
With your crêpe’s surface looking dry and your crêpe moving freely around the pan you are ready to flip. I flip my crêpes either by tossing them in the air – that’s my signature move and a crowd pleaser, and it took quite a few mistakes to perfect – or by using my fingers. I grab the edge of a pancake with both hands and flip it over, taking good care not to touch the pan. This only works if the edges of your crêpe are curling up and away from the sides of the frying pan.
Now that you know what I typically do, let me tell you what I think you should do. The best thing to try first is to use a thin, long and wide spatula that can go under the crêpe and in one swift move flip the crêpe over.
Once the epic flipping of the crêpe has been accomplished the crêpe will need only a minute to finish cooking on the other side. Normally, you would add a spread or a filling just after you slide the crêpe out while it’s still hot. In this case I actually don’t think the spread is needed as all the scallions make the flavor pretty rich to begin with. Add to that the dipping sauce full of soy sauce, toasted sesame seeds, squeez of lime, and freshly grated ginger – mmmmm… – and you’ll get plenty of flavor.
Scallion Crêpes with Sesame and Ginger Dipping Sauce
What you’ll need:
For the Crêpes
2 cups all-purpose flour
2 tablespoon corn starch
1 3/4 cup aquafaba (liquid from a can of chickpeas)
1 cup almond milk, plain and unsweetened
1 cup scallions (spring onions), white and green parts, chopped
Oil for cooking
For the Sauce
1/2 cup soy sauce, reduced sodium
2 tablespoons lime juice, freshly squeezed
2 tablespoons sesame seeds, toasted
2 teaspoons ginger, freshly grated
1 teaspoon crushed red pepper flakes (optional; skip if you don’t enjoy spicy food)
What you’ll do:
Place all the crêpes’ ingredients except scallions in a blender and mix well. You can also mix everything up with a regular mixer or by hand. The resulting batter should be smooth and clumps-free.
Add the chopped scallions, mix them in and let the batter rest for 30 minutes.
While the batter is resting, mix together the dipping sauce. For best results use fresh ingredients, and toast the sesame seeds yourself – they need only 2-3 minutes in a toaster oven or in a frying pan on the stove top. Cool the seeds a bit before mixing with the rest of the ingredients.
Heat a large frying pan with a flat bottom until hot. Add a teaspoon of oil and 3/4 cup of batter. Spread the batter around until it covers the entire surface of the pan.
Lower the heat to medium to medium high, and cook until the upper side starts to look dry. Flip the crêpe and continue cooking on the other side for another 1-2 minutes.
Slide the crêpe out, fold twice, making a sort of triangle, and keep the crêpes warm either by covering them, or by putting them in a warm oven.
When all the crêpes are done, arrange them on a platter and enjoy with the dipping sauce (or without!).
10-Minute No-Sugar Added Blueberry Jam, via Eat the Vegan Rainbow
Let me try to make this post as short as the recipe itself. It’s probably already too long because, amazingly, you will need less than ten minutes to go from frozen blueberries to this instant blueberry jam!
The jam is sweet, spreadable and full of pure blueberry flavor. You can use it on anything you would normally put the jam on, and you can store it in the fridge for a week or so, although it will probably not last that long.
What’s the secret? Not much really. It all comes down to mixing frozen blueberries with tapioca starch in a large, microwave safe bowl and letting you microwave oven take care of the rest. You can have some warm jam on you pancakes but I recommend patience and letting the jam cool completely before enjoying!
10-Minute No-Sugar Added Blueberry Jam
What you’ll need:
3 cups blueberries, frozen
2 tablespoons tapioca starch
What you’ll do:
In a microwave safe bowl, mix together blueberries and tapioca starch. Mix well until the blueberries are well covered with starch.
Place in the microwave and microwave on full power for 5 minutes.
Take the bowl out, mix well again and put back into the microwave oven for another 5 minutes.
When the second 5 minutes are up, mix again and check that jam is starting to become dense.
You can use both the warm and the cold blueberry jam on pancakes, toast, oatmeal…
You see… I told you it was short and it is absolutely sweet!!!
Gluten-free Sweet Potato Pancakes, via Eat the Vegan Rainbow
One thing that sweet potatoes have going for them is their amazing natural sweetness. Another thing they have going for them is their price – they are super affordable. And, for those of you keeping a nutritional score, sweet potatoes are an amazing source of vitamins, fiber and even protein.
Speaking from a recipe developer’s perspective, sweet potatoes are a versatile ingredient that lends itself to a range of recipes, from main dishes to desserts. The very first recipe I shared on this blog was the Sweet Potato Butter. More recently, I used sweet potatoes as a key ingredient in a red curry. And now it’s time to introduce Gluten-free Sweet Potato Pancakes.
The key ingredient for the Gluten-free Sweet Potato Pancakes are the roasted sweet potatoes. Roasting sweet potatoes brings out their sweetness and adds nice caramelized overtones. Plus it makes the otherwise hard potatoes easy to mash. You could boil the sweet potatoes as well, or put them in the microwave for ten minutes to soften them up, but none of these methods will help the sweetness fully develop. So, unless you are in a super huge rush do take the time to roast your spuds. What I do is roast the whole pile of sweet potatoes at the same time and stash them into the refrigerator. Then I have a roasted sweet potato on hand to use for all sort of different applications, like these pancakes.
The pancake recipe asks for two large sweet potatoes, and I mean large. They should yield anywhere between cup and a half to two cups of sweet potato purée, so find some good, big specimens for this one. Roasting sweet potatoes could not be easier. You will need to wash the potatoes, pat them dry and place them on a baking sheet – I like to line mine with either parchment paper or aluminum foil to easy cleanup more than anything else. Put the baking sheet into a hot oven – I recommend 425 F (220 C) and roast the potatoes for about thirty to forty five minutes. Take them out and let them cool completely before handling. And thats’ why is handy to have a stockpile of roasted sweet potatoes in your fridge!
One note on the flour. This recipe is gluten-free and uses a combination of white rice flour and corn starch, but if you are not looking to restrict your gluten intake feel free to use all-purpose flour. In that case you can skip corn starch and you don’t need to replace it with anything else. Two cups of all-purpose flour should work well enough.
Gluten-free Sweet Potato Pancakes
What you’ll need:
2 large sweet potatoes, roasted and peeled
2 cups rice flour
3 tablespoons corn starch
2 teaspoons baking powder
1 teaspoon baking soda
2 teaspoons imitation maple syrup flavor (or vanilla extract)
1 teaspoon cinnamon
1/4 teaspoon nutmeg
3 cups vanilla almond milk, unsweetened
Cooking spray (optional)
Topping suggestions: fresh fruit, powdered sugar, jam, maple syrup, vegan butter or cream cheese, nut butter, melted vegan chocolate…
What you’ll do:
Place all the ingredients in a large blender or a food processor. Blend untill a smooth, lump-free batter forms. Pour the batter into a large bowl – this will make it easier fo you to ladle out the pancakes. If you don’t a blender or a food processor, all this can be done by hand in an old fashioned, whisk-based sort of way. If you are doing everything by hand, do spend some time on mashing the sweet potatoes – the smoother you get them the better the pancakes. Let the batter rest for about 10 to 15 minutes.
Place a large frying pan over high heat. You can also use a griddle if you have one. In both cases make sure your surface is nice and hot before using. You could spray with some cooking spray if needed – some pans have a lovely non-stick surface and you can definitely skip the oil.
Pour out half a cup worth of the pancake batter per pancake. This should make 5 inch (12 cm) pancakes, and the amount of batter will be enough to serve 4 to 6 people. After the first 1-2 minutes lower the heat to medium-high and let the pancakes brown. You will know that it is time to flip them when the top surface becomes nice and bubbly and almost dry. Flip the pancakes, let them brown on the other side, which will take just a minute or two, them slide them to a serving plate. To keep the pancakes warm as you work you can keep the done batch in a warm oven or under some foil or a kitchen towel. To get the pan ready for a new batch increase the heat to high, let the pan come up to temperature again and repeat…
Serve warm with any topping you like, fruit, maple syrup, powdered sugar, chocolate syrup… I used sliced banana and a drizzle of softened almond butter. Yummy!!!
Note: These pancakes freeze well, so if you do end up with leftovers, let them cool than place them into a freezer safe bag or container, and you’ll have great pancakes to enjoy on another day. One trick to prevent frozen pancakes for sticking to each other is to use wax paper to separate the pancakes. You can separate them one by one, two by two, three by three, whatever is you preferred serving size. Then, when you are in a need for a quick breakfast, snack or even dessert you can take the batch out with ease. I usually zap mine in a microwave for a minute or so and they are ready. You can also use a toaster oven to heat them up, just remember that the toaster oven will dry them out a bit, so they will come out a bit less soft.