In the spirit of my more recent posts where I cut to the chase and get straight down to business aka the recipe, here we go!
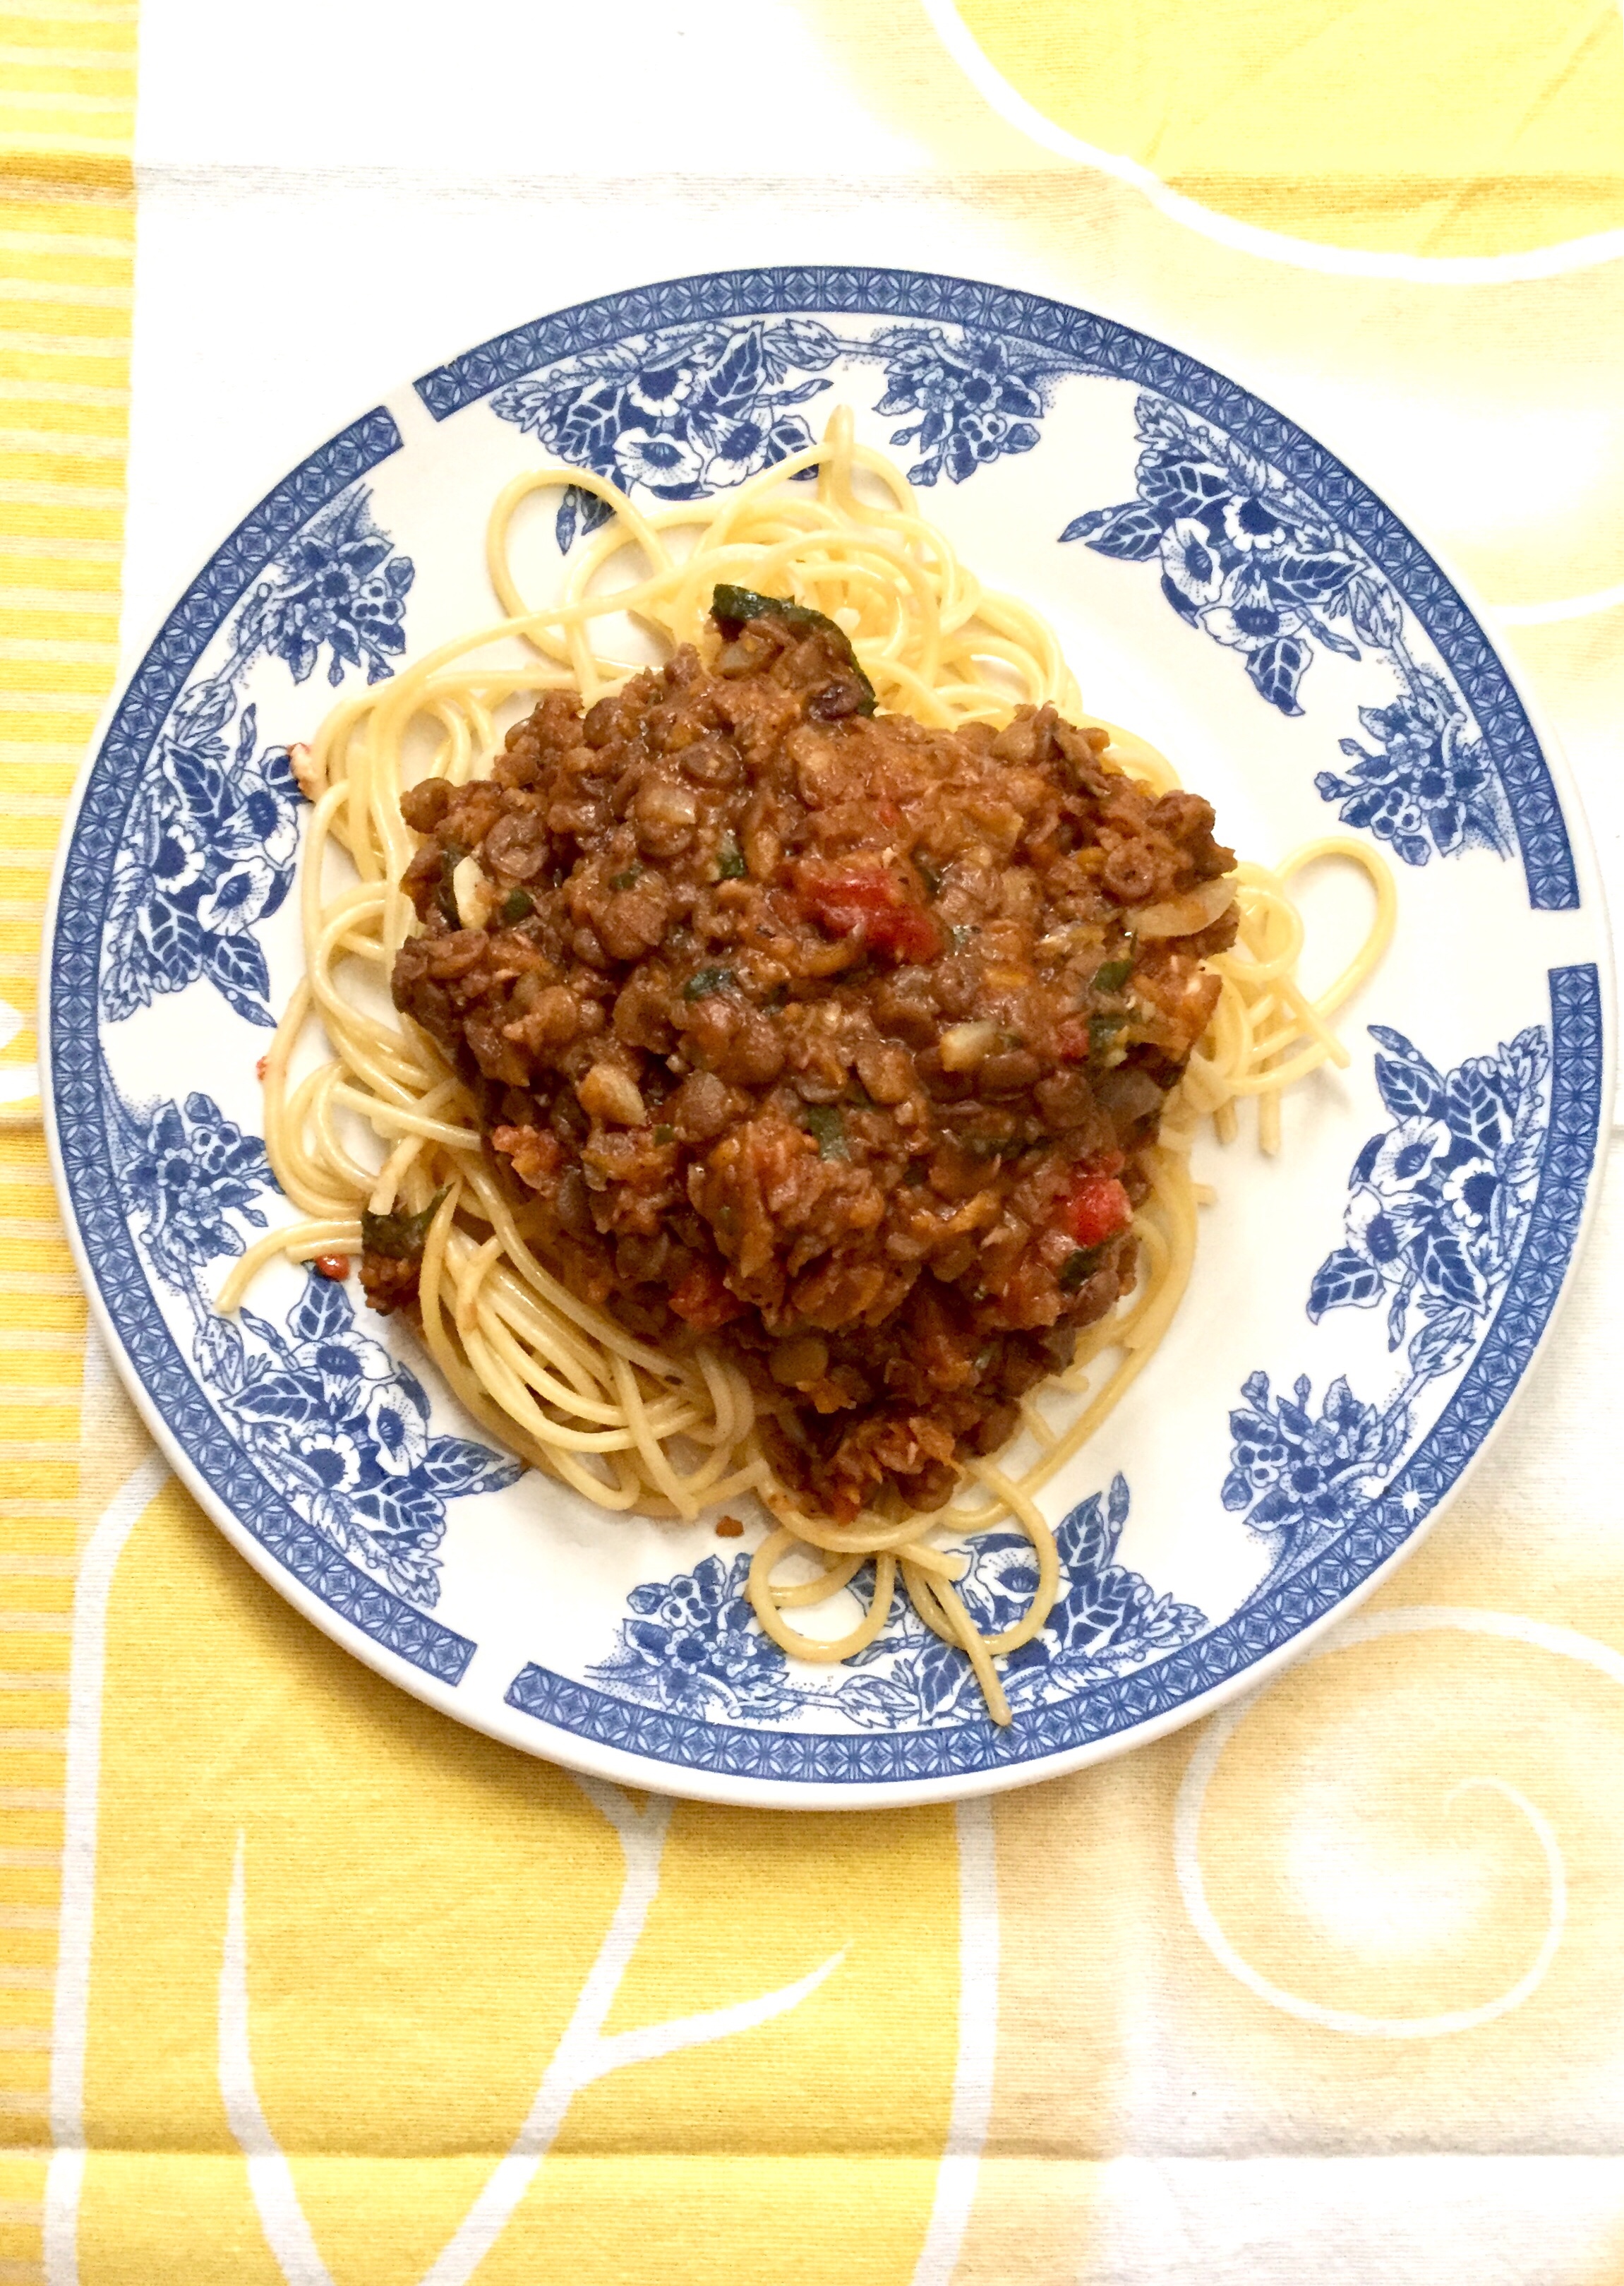
Note on the recipe: the focus here was on recreating umami flavors of the bolognese sauce mixed in with Parmesan cheese. So, what you’ll see is a lot of umami ingredients: tomatoes, mushrooms, and marmite.
(Please note that I still enjoy writing and cooking, but the pandemic had imposed some restrictions on how much writing I can do. I will try to stick to sharing the recipes as they come, and I hope you don’t mind the decreased quality of phots which I don’t have time to stage these days. So, unlike the photos, food remains yummy.)
Place a large frying pan over medium–high heat. Once the pan is hot add the oil and onions. Sautéfor 5 minutes, or until onionhave softened. Note that onions, garlic and mushrooms don’t need to be finely chopped, rough chop/slicing is ok.
Add garlic, stir well, and sauté for another 1-2 minutes.
Mix in the chili powder and marmite, then add the sliced mushrooms. Toss everything to combine and sauté for another 3-5 minutes, until mushrooms are done.
While onion, garlic and mushroom mix is cooking, crumble the tempeh into rough crumbles into the large food processor (you can also use a hand held blender stick, in which case crumble into a large mixing bowl).
Add the sautéed mix into the tempeh and process until finely chopped and mixed. Please note that the mix will be hot, so handle with care.
Pour the contents of one large can of crushed tomatoes into the same frying pan you used for sautéing and place over medium heat. Add the tempeh mix, and gently fold everything in and combine. Once it starts to bubble, tomato sauce will start to spray all over so cover with the lid to minimize splatter.
Cook for 10 minutes or so with occasional stirring.
Serve immediately over pasta (my latest discovery is lentil and chickpea pasta, including the spaghetti), and sprinkle with fresh basil and/or oregano. Enjoy!
When I was a college student, one of the most despised items served in the campus cafeteria was lentil stew. I can’t even remember the flavor now, but I remember that nobody really liked it so there was always plenty of it left over. So, every time I would run late from a class to lunch, I would end up with a bowl of lentil stew!
Things have, of course, changed quite dramatically since my college days, and I now make lentils almost every week and really enjoy them as a healthy, cheap and tasty ingredient. They are a great source of protein and they are versatile. Once cooked, they can be made into soups, burgers, or delicious Shepherd’s Pie, which I recommend you make and serve to everyone questioning your plant-based (vegan) diet and lamenting that they would never be able to give up meat!
Because of their texture and size, they are often used as a substitute for minced meat. That’s why they work really well in this simple Lentil Bolognese sauce. I hope you enjoy it and share with friends and family, neighbors and the world!!!
Basic Lentil Bolognese
What you’ll need:
200 g brown lentils, cooked
4 carrots, grated
1 yellow onion, diced
4 cloves garlic, thinly sliced
1 can (14.5 oz; 411 g) diced tomatoes
1 tablespoon dried basil
1 tablespoon dried oregano
1/4 cup fresh Italian (flat leaf) parsley, chopped
Freshly ground black pepper to taste
Salt to taste (optional)
Regular or gluten-free pasta to serve, cooked according to the instructions on the packaging
What you’ll do:
Wash the lentils and check them for any non-lentil bits – sometimes little stones and bits can end up in the lentil bag so it is always a good idea to check. Place lentils into a pressure cooker, cover with water, and cook for 10-25 minutes once the pot is fully pressurized. Please note that the time may vary depending on your pressure cooker and you actually can cook your lentils in a pot and skip the pressure cooker all together. You are aiming for lentils that are soft but not mushy.
Place a large pot over medium high heat, add oil, grated carrots, diced onions, and sliced garlic and cook for 5-8 minutes, mixing frequently. Next add the cooked lentils, basil and oregano, and finally diced tomatoes. Lower the heat down to low and let the sauce simmer for 15 minutes or so.
Turn the heat off, then mix in fresh parsley, freshly ground pepper and salt to taste. Serve over pasta or over mashed potatoes!
Baked Spaghetti Marinara, via Eat the Vegan Rainbow
What can be better than spaghetti tossed with a simple tomato sauce, and sprinkled with some parmesan cheese, olive oil and fresh basil? For me, pasta, and especially spaghetti, have been a huge go to food because they are (a) easy, quick and cheap to make, and (b) absolutely delicious!
Marinara sauce for all seasons
In my view, simple marinara sauce is the best sauce for dressing the spaghetti. Yes, sure, bolognese is also pretty good, especially this amazing lentil and mushroom bolognese sauce, or this ragù made with lentils and walnuts. Marinara sauce is the type of simplicity that can only be described as pure genius. The sauce is tomato based and usually includes only a couple of additional ingredients, like olive oil, garlic, onions, and herbs, like oregano and basil.
Homemade marinara sauce to the rescue
Although I have been known to reach for a jar of store-bought marinara sauce from time to time, I do prefer to make this sauce myself. It’s actually one of the easiest things to make as all you need is some olive oil, garlic, tomato sauce, and dried oregano and/or basil. The sauce is done in less than 15 minutes, which is probably less time than it will take you to boil the spaghetti given that getting a large pot of water to boil does take forever, and your dinner will be ready and on the table in a blink of an eye.
From quick pasta to baked pasta
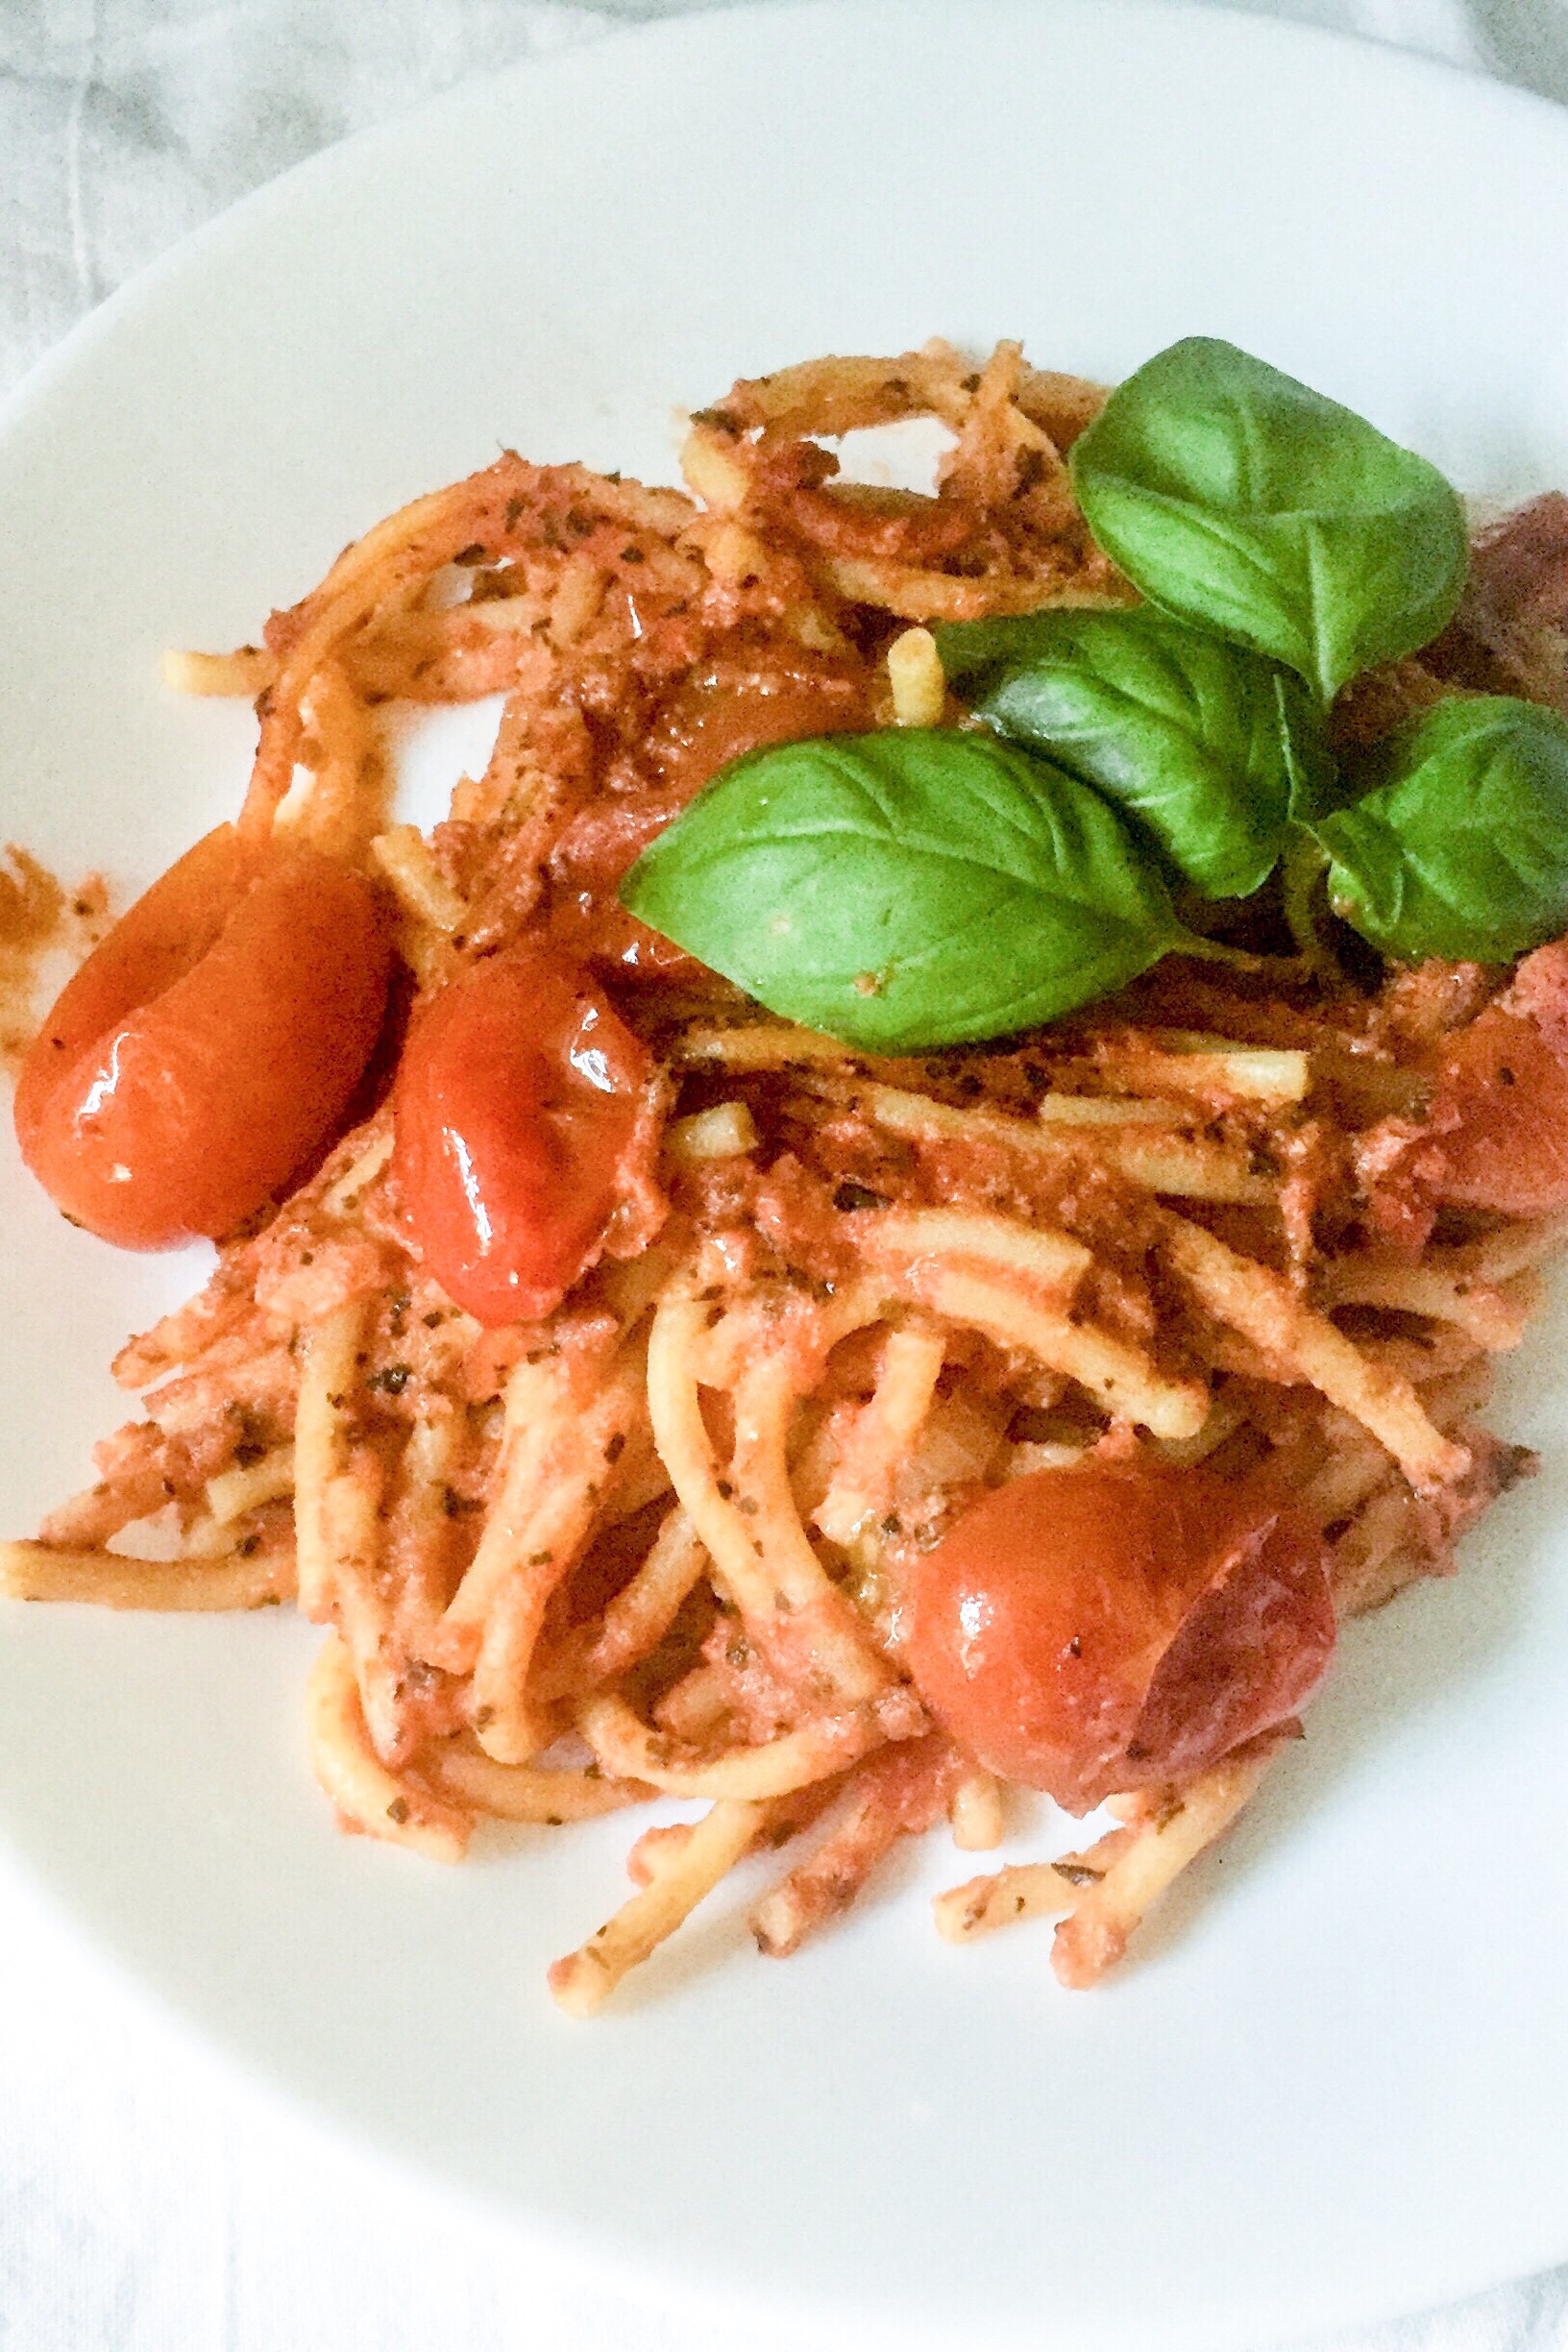
However, if you do have a bit more time and don’t have to rush I recommend that you give the recipe below a try. It is essentially the same recipe, just elevated to a bit more gourmet experience. The sauce is made with fresh and canned tomatoes, and includes nutritional yeast that boosts the “cheesy” flavors. The spaghetti and sauce are mixed together then baked to create a nice balance of smooth, soft, and just slightly crunchy. Given some gluten sensitivity, my recipe here was made using gluten-free pasta, but you can use any spaghetti you like. I recommend that you cook spaghetti only 80% through as they will continue to cook in the sauce as they bake. I also recommend that you use an ovenproof pot, such as a Dutch oven I used below, in order to go from the stove top directly into the oven.
Don’t forget fresh basil
Finally, don’t forget to top your pasta with some fresh basil. We all know what that will do of you, so let’s not belabor the point. Trust me, this Baked Spaghetti Marinara will quickly become your favorite!
Baked Spaghetti Marinara, via Eat the Vegan Rainbow
Baked Spaghetti Marinara
What you’ll need:
1 lbs (454 g) box spaghetti (regular or gluten free), cooked al dente
4 cloves garlic, finely sliced
1 pint (10 oz, about 300 g) cherry or grape tomatoes, halved
1 28 oz (794 g) can of chunky crushed tomatoes
1/2 cup nutritional yeast
2 teaspoons dried oregano
2 teaspoons dried basil
2 tablespoons olive oil
Fresh basil
A pinch of salt
What you’ll do:
Preheat the oven to 350 F (175 C).
Bring a large pot of water to boil. Add a pinch of salt, then place spaghetti gently into the boiling water until fully submerged. Cook about 1 minute less than what the instructions on the box suggest. The spaghetti should be al dente, meaning still a bit underdone.
Simultaneously with making the spaghetti, start working on your sauce. Add the oil to a large, ovenproof pot. I used my Dutch oven for this one, and it worked well. Place the pot over the medium heat, and add the sliced garlic. Let the garlic brown for 1-2 minutes.
Once the garlic starts to release its aroma, add the halved cherry (or grape) tomatoes, and sauté until tomatoes are softened. This will take about 5 minutes.
Add the nutritional yeast and let it brown for only a minute.
Next, add the crushed tomatoes and mix well. When the sauce starts to bubble, add dried herbs, cover with a lid and simmer for 5 to 10 minutes.
Turn the heat off, and add the cooked spaghetti to the sauce. Mix well until spaghetti are evenly distributed and fully covered. Place the pot into the oven and bake for 20 minutes or so, until the edges and the top are nicely browned.
Kale Pesto with Cashews, via Eat the Vegan Rainbow
Pesto, a fragrant bright green pasty sauce made by crushing or blending basil, garlic, pine nuts and olive oil together has been around in one form or another since Ancient Rome. There are quite a few variations on the original theme, but they all boil down to combining a ground nut base with a flavor enhancer, like garlic and basil, and fortifying these with some oil and usually cheese.
My first attempt at making pesto, many, many years ago did not go that well. I am a bit foggy on detail but as far as I can remember the follow up conversation with friends had revealed that I used arugula instead of basil, and that I should have used pine nuts, which I completely skipped. Still, it was not all a waste and a horde of graduate students, who this was made for, gobbled it all down nevertheless.
These days I know the difference between basil and arugula, and appreciate that a good pesto does need something more than just greens to give it real body and bite. Yet, as you will see, it seems that I remain determined not to use basil or pine nuts to make the pesto happen.
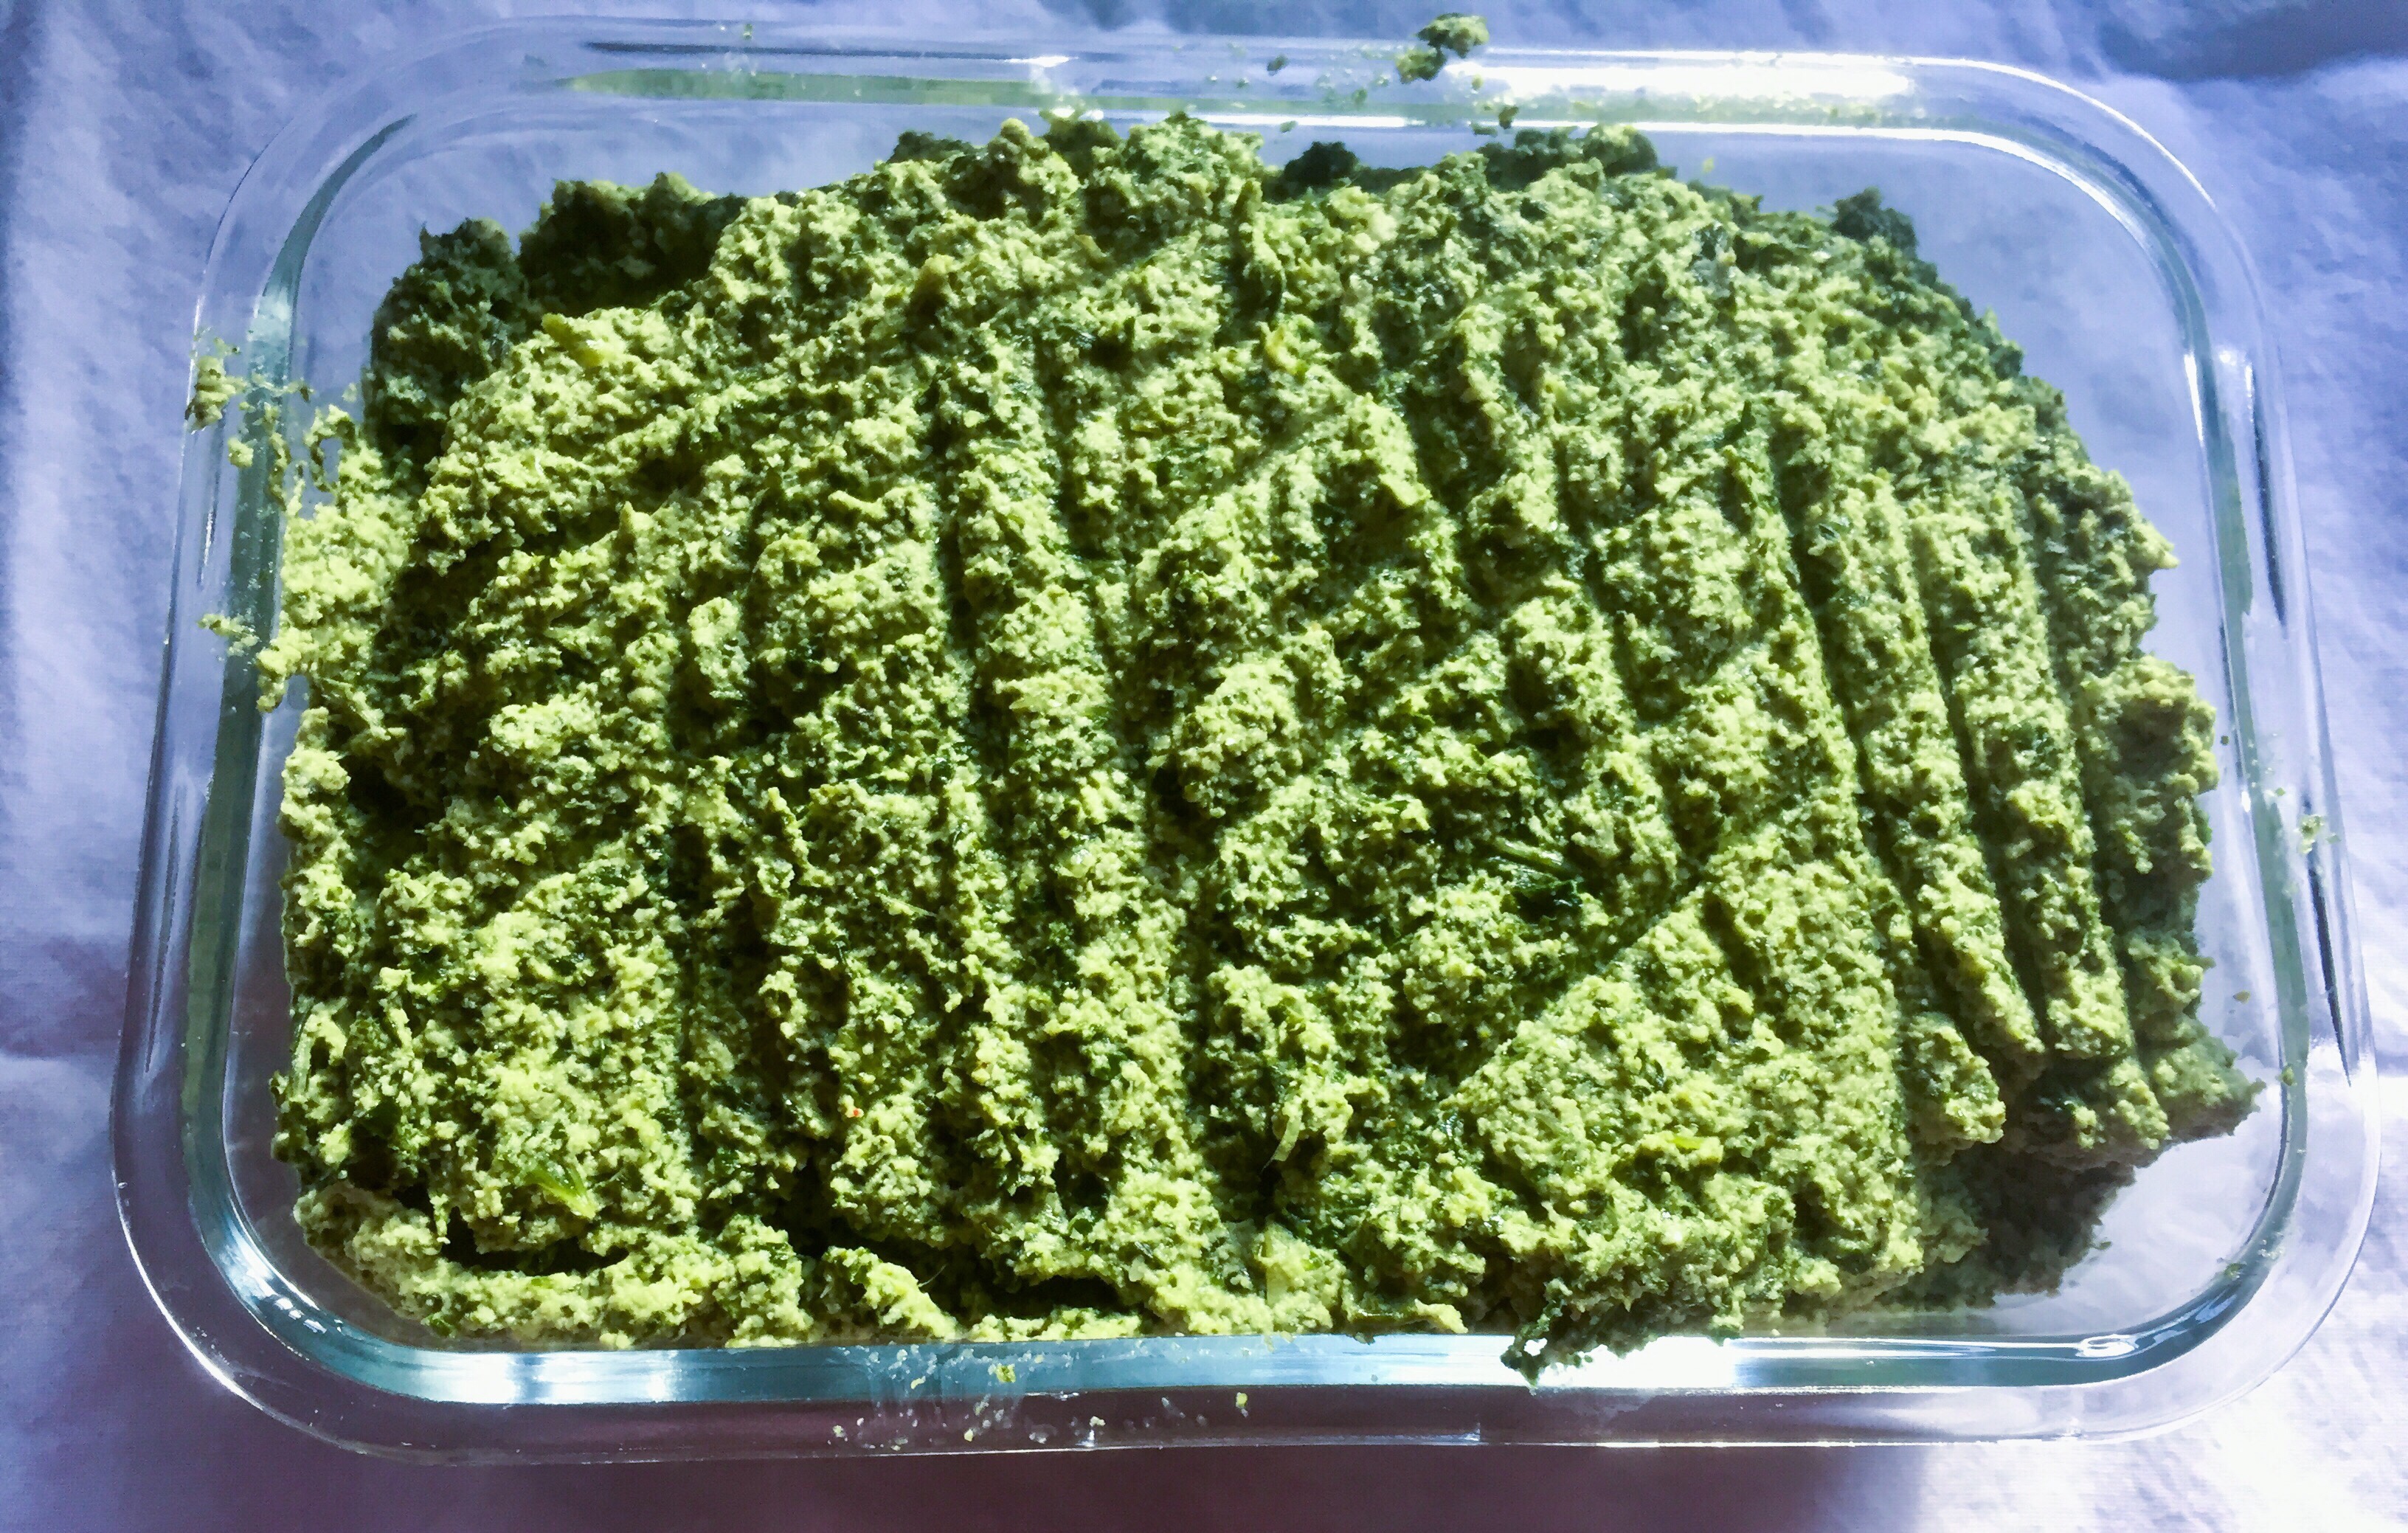
What happened this time around is that I had two large bags of kale without much interest to use them in a soup or roast them. So, I was looking for something more exciting to do – and the rest may go down in the pesto history!
And once I had my pile of pesto, I went very traditional and used it to dress my pasta. However, pesto, be it basil based or kale based, is quite versatile and you can use it in many different ways. There are even blog posts dedicated to showing what pesto can do beyond pasta (see here for a good example).
Whatever you decided to do with this pesto, I think you’ll like it. It offers a nice kale bite, mixed wit gentle cashew nuttiness and freshness that the lemon brings. And, of course there’s garlic!!!
Kale Pesto with Cashews
What you’ll need:
4 cups kale leaves, stemmed and chopped
1 cup raw cashews, soaked in water overnight
4 cloves garlic, sliced
1 lemon, juice and zest
1/4 teaspoon salt
2 tablespoon olive oil
What you’ll do:
Clean the kale carefully and make sure that all the woody pieces of stems are fully removed. Although you will be using a food processor, which should take care of all the tough kale pieces, I recommend that you do spend some time making sure you have mostly nice, green kale leaves.
Place a large pan over medium heat. Add oil and garlic, and sauté for just a minute, until the garlic starts to release it’s aroma.
Add chopped kale leaves and let them wilt by tossing them with oil and garlic continuously. This will take anywhere between 5 and 10 minutes depending on the size of your pan. The more surface area your bottom has, the quicker it will be. Once the kale is fully wilted, turn the heat of and let the kale cool.
Rinse the soaked cashews under some cold water, drain well and place in a large food processor. Add the wilted kale, lemon juice and lemon zest, and a pinch of salt and process until fully ground and smooth.
Enjoy on pasta, in a sandwich, as a dip, on a pizza… The possibilities are endless and just remember that you are keeping it healthy and eating a whole bunch of kale!
I was raised eating polenta with milk and sugar for breakfast. As I grew up and started experimenting with my food, I would add sour cream and even ajvar, the roasted red pepper and eggplant spread many associated with Bulgaria and the South East Balkans. But even with these add-ons, polenta remained a breakfast food.
So, I was quite surprised to discover that fancy Italian restaurants include polenta on their dinner menus. Of course I had to try it, and I liked it! I actually never met a polenta I did not like. And as a cook it’s something that you can whip together in minutes!
Polenta is basically boiled coarse corn meal, so it is in the same food family as grits. And, practically speaking it is as easy as it sounds – you bring a pot of water to boil and you add some corn meal to it while stirring constantly and furiously to prevent clumping. You let the pot boil for five minutes with constant stirring and the polenta is done.
The recipe here is two steps removed from the basic polenta. First, after you make the polenta according to the instructions on the box, you will need to pour it into a deep baking dish which is either lined with some parchment paper or well sprayed with the cooking spray. Spread the polenta into one even and smooth layer and let it set for at least an hour.
Once the polenta has set and hardened you will be able to slide it out of the dish and onto the cutting board. Slice polenta into 1 x 2 in (2.5 x 5 cm) sticks and arrange them on a baking sheet. Spray the tops with a cooking spray.
From here you can take your polenta in any direction you like. You can add fresh or dry spices, nutritional yeast, small bits of cheese or vegan butter that melt well, or sprinkle sugar and cinnamon if you want to make the baked polenta sticks into a dessert. Here, I decided to go two ways and top one set of polenta sticks with some cumin powder, dry basil and oregano. The second batch I spiced up a bit with freshly ground black pepper as well as smokey red pepper flakes. The topped polenta stick are then baked until their surface is nicely browned.
I served the Baked Polenta Sticks with vegan bolognese sauce but you can eat them as is, or serve them with a wide range of dishes. The flavor of polenta sticks is mild, slightly nutty, and depends on the spice combination you used. In general, Baked Polenta Sticks are great with any dish you would serve with corn bread, like chili, Jackfruit Barbacoa, or Bean and Leek Soup. They can also be used as an appetizer, served along side simple marinara dipping sauce and some olives.
Baked Polenta Sticks
What you’ll need:
2 cups polenta (or corn meal)
4 cups water
1/4 teaspoon salt (adjust salt to taste)
Cooking spray
Dried basil
Dried oregano
Cumin powder
Crushed red pepper flakes
(Onion powder, garlic powder, nutritional yeast, freshly ground black pepper, lemon zest,… quite a few toppings will work so feel free to experiment)
What you’ll do:
In a large pot, bring water to boil.
Add the salt and polenta to the boiling water while stirring rapidly to prevent clumps from forming. Decrease the heat to medium/medium low, and keep stirring the polenta for about 5 minutes.
Pour the polenta out into a baking dish that you previously sprayed with cooking spray. I recommend using 9 x 13 in (22 x 33 cm) dish for this amount of polenta – this will give you 1/2 in (1 cm or so) thick sticks – but you can use any other flat bottom container you have on hand. Just note that the thickness of the sticks will vary depending on what you use.
Let the polenta cool and set for at least an hour. The thicker your polenta layer, the longer it will take.
Slide the polenta slab out onto a cutting board. Cut into sticks of regular size.
Arrange your polenta sticks on a parchment paper lined baking sheet. Do leave some space between the stick so they can bake evenly, which means you may need to use two baking sheets or bake in two batches.
Spray the top with some cooking spray and sprinkle the toppings/spices of your choice liberally.
Place into the oven that was preheated to 400 F (205 C). Bake for 15 minutes or until the sticks are golden brown.
Serve as a side dish with a soup, or as an appetizer with marinara sauce, or simply munch on these any time. They are best served fresh from the proven, but couple of minutes in a toaster oven will help the next day!
Zucchini Lasagna with Walnut and Brown Lentil Ragù, via Eat the Vegan Rainbow
Let’s cut to the chase and be honest here – although we can pretend otherwise, we are all as obsessed with lasagnas as Garfield is! The layers of soft noodles, amazing sauce, fresh herbs, and most commonly lots and lots of ground meat and soft cheese. All this means that lasagnas are not the healthiest thing on the menu. Having said that, there is no reason to ban lasagnas from your plate; you just need to learn how to keep it healthy and plant-based, and I think I can help you to troubleshoot both of those problems.
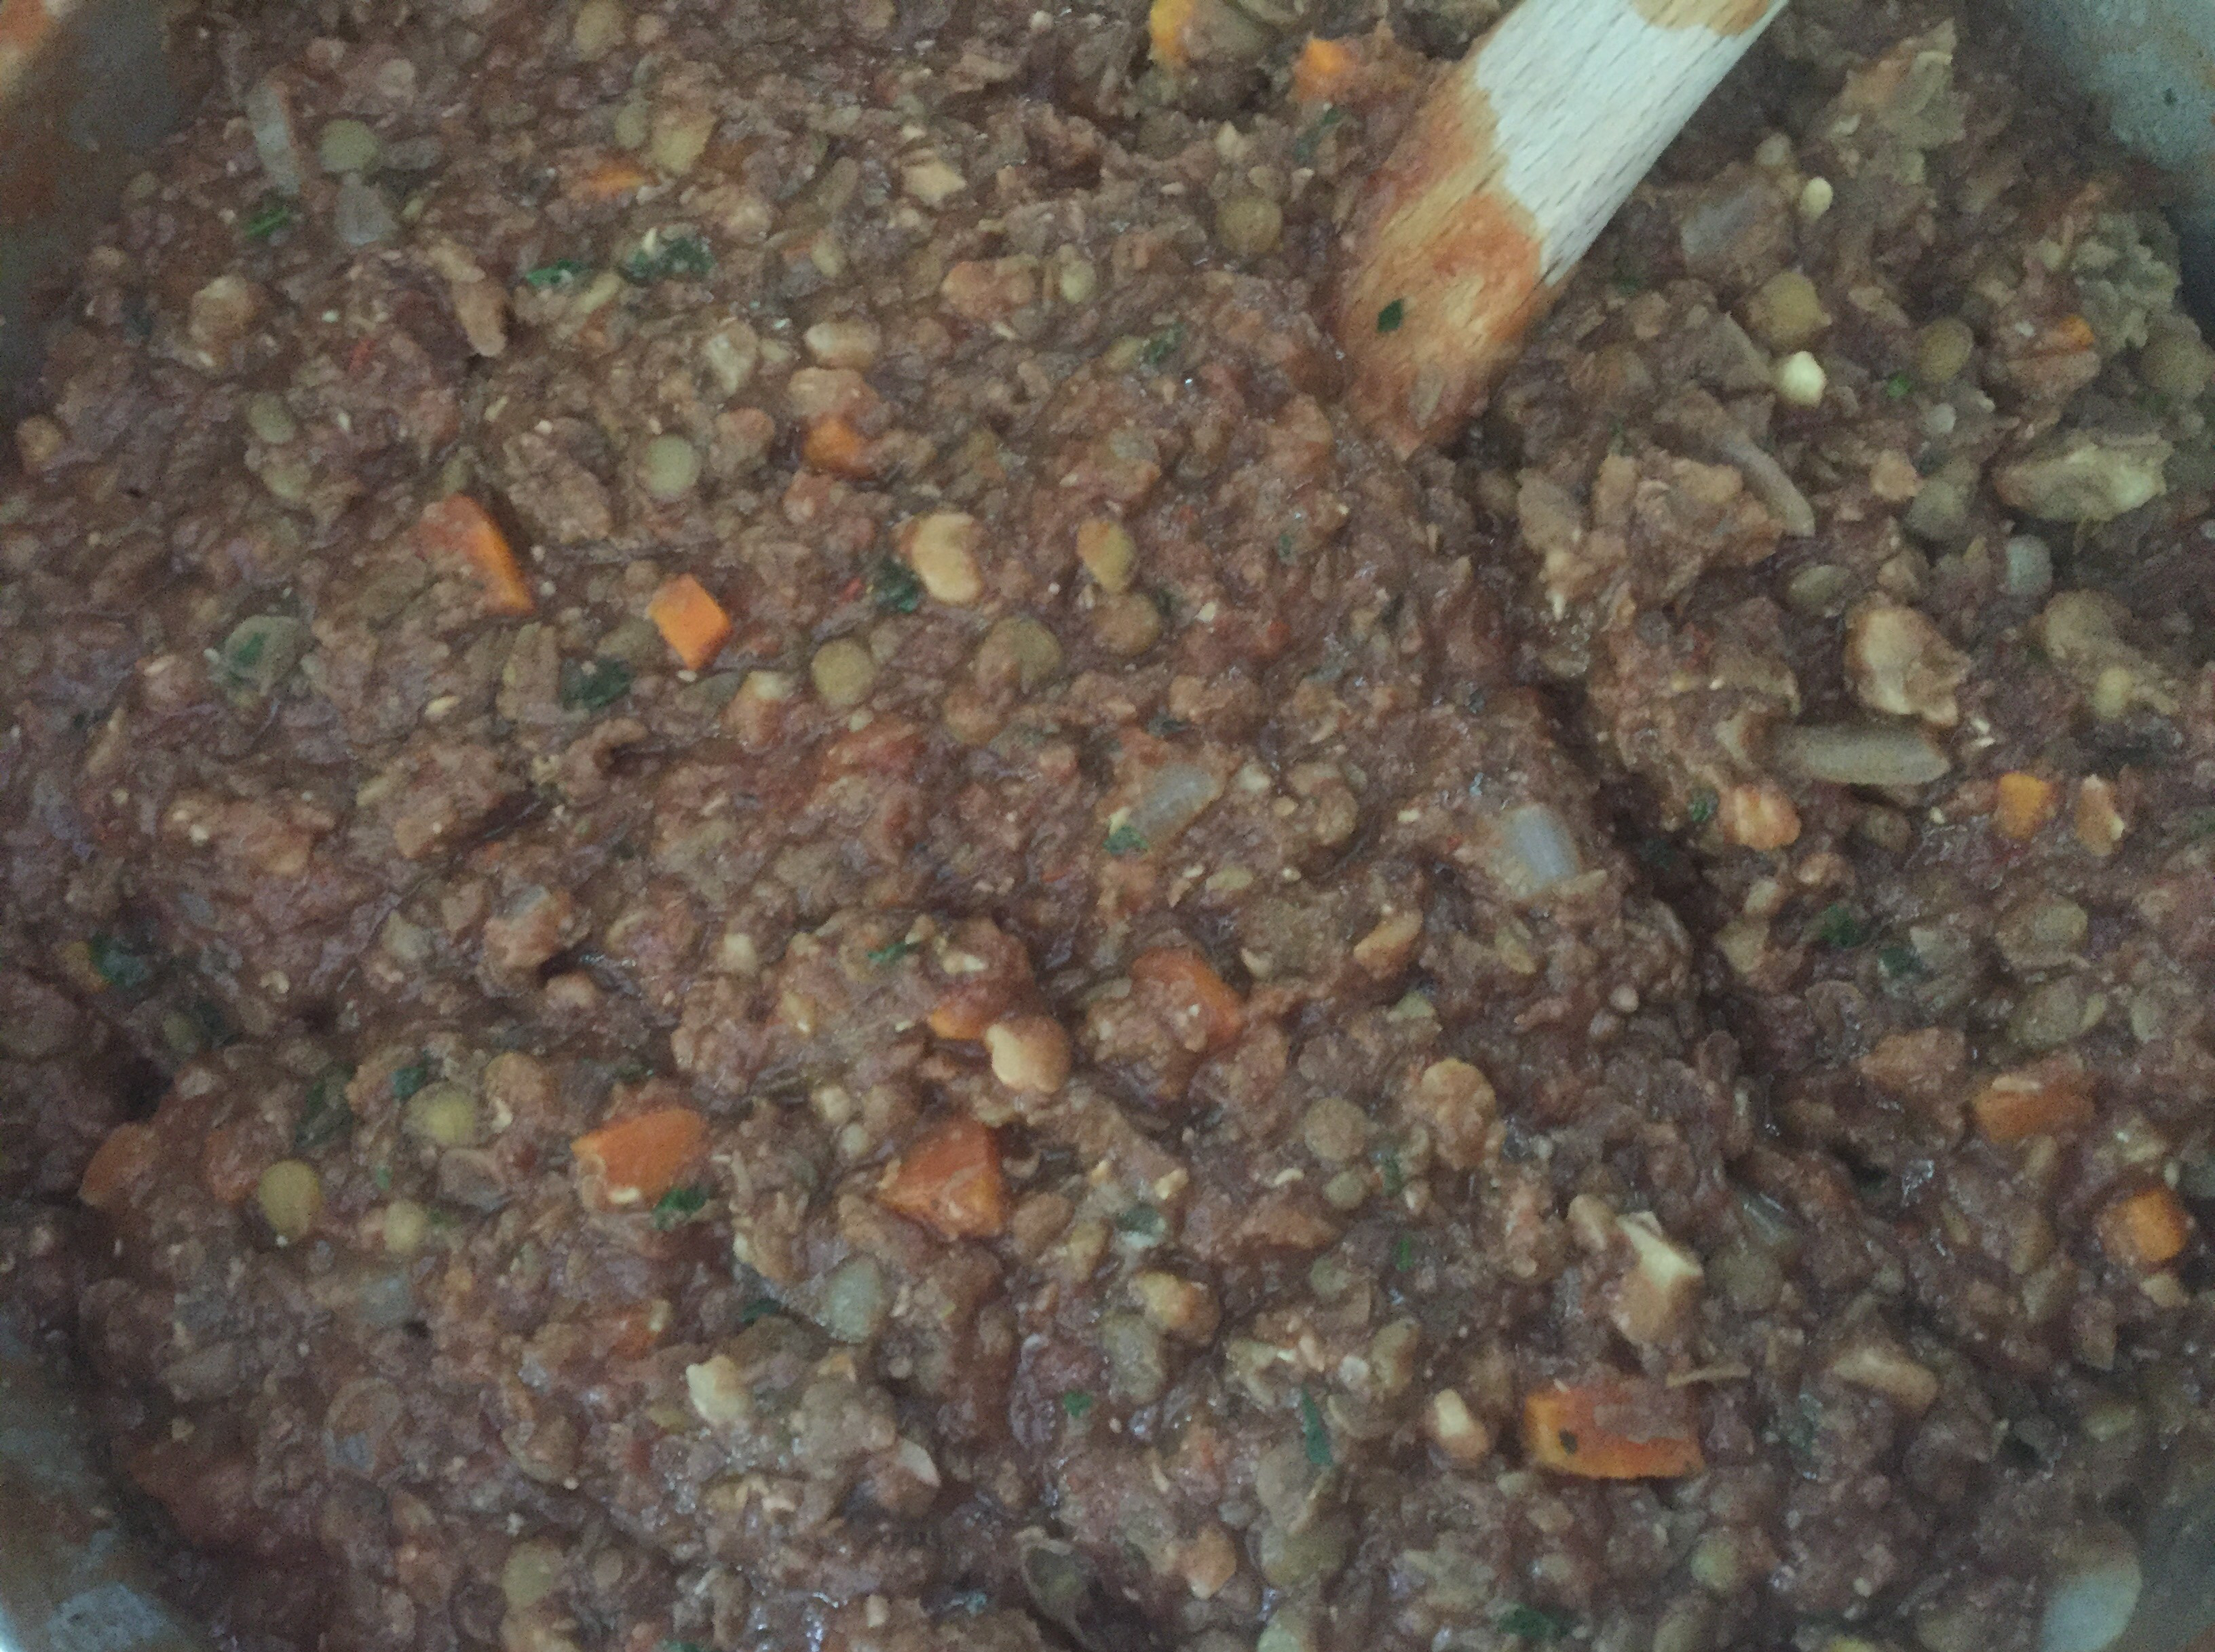
Keeping lasagnas meat-free seems to be the problem many have tackled, usually by overloading lasagna with cheese, cheese and eggs, or cheese and a selection of vegetables, like mushrooms, and increasing the amount of tomato sauce and making it chunkier. But, really the most prominent ingredient in majority of meatless lasagna recipes is the cheese. When I was developing this lasagna recipe I did not want to give up on idea of “meat”, so what I came up with is a hearty, meaty, and flavorful walnut and brown lentil “meat” ragù base. My thinking was inspired by my previous, wildly successful Meatless Shepherd’s Pie, which I served for Easter this year as a substitute for a more traditional, lamb-based dish. In that recipe, lentils, mixed with ground mushrooms and cooked with rosemary and thyme, made for an amazing feast.
Here, I wanted to recreate the traditional meat ragù and went for a combination of chopped walnuts and dark lentils. The trick is too cook the lentils separately and add them to the rest of the ragù when they are fully cooked. Also, chop your walnuts into pieces that are about the size of what ground meat pieces may look like. I chopped the walnuts by hand, just by going over walnut pieces with a knife few times, back and forth. You can buy whole walnuts, or walnut halves in store and start from there, but for this a bag of walnut pieces will make your life easier and make the dish cheaper. Walnuts work really well in this lasagna, because they add some of their natural crunchy texture, protein, and a bit of fattiness to the otherwise very lean recipe. Worried about this extra fat? Walnuts are known for having a lot of unsaturated fat, which is the good kind, so don’t skip it! The meatiness of the ragù is further enhanced by a good amount of tomato paste and crushed tomatoes and letting the ragù simmer for a while.
Walnut and Brown Lentil Ragù, via Eat the Vegan Rainbow
The preparation of any lasagna happens in several stages and this one is no different. In order to make the process more efficient I recommend that you start roasting the zucchini at the same time you start making the ragù, and then start boiling the lasagna noodles when zucchini is just about done. In that way you don’t even need to turn the oven off, you can just lower the temperature from roasting to baking and be ready for lasagna to go in immediately. Please note that I don’t use zucchini as a complete lasagna noodle replacement. I suppose you could, but then you’ll end up in a more of a Zucchini Mousaka territory than lasagna paradise. If you are concerned about gluten, there are now many gluten-free lasagna noodle options for you to choose from and most of them work perfectly.
The final touch on this lasagna is the Béchamel sauce (besciamella), which is a white sauce traditionally made with milk, butter and flour. In this case, the quick white sauce I put together requires only a blender, some soft, silken tofu, a squeeze of a lemon, and a bit of nutritional yeast. It is very much the blend-and-pour type of sauce, so you can do it a in a blink of an eye. The sauce adds a nice, slightly cheesy flavor to this very rich lasagna, and makes for a nice, almost golden glaze.
Zucchini Lasagna with Walnut and Brown Lentil Ragù
What you’ll need (for 9 x 13 in (23 x 33 cm) baking dish):
8-10 lasagna noodles, gluten-free if preferred
1 lbs (450 g) brown lentils
3 zucchinis, cut lengthwise into long strips
2 large carrots, diced
3 stalks celery, diced
1 cup raw walnut pieces, chopped
1/2 yellow onion, diced
1 can (28 oz, 800 g) crushed tomatoes
2 tablespoon tomato paste
1 tablespoon crushed garlic
1 teaspoon dried oregano
1 teaspoon dried basil
3 tablespoons fresh Italian (flat leaf) parsley
1 lbs (450 g) silken tofu
2 tablespoons lemon juice, freshly squeezed
1 tablespoon nutritional yeast
Cooking oil spray
What you’ll do:
Preheat oven to 425 F (220 C).
Prepare the lentils according to the instructions on the bag. Basically, bring 4 cups of water to boil and add the lentils that have been washed and picked over to remove any impurities that may have made their way to the lentils. Bring the lentils back to boil than lower the heat to a gentle simmer, and cook for 20 minutes or so, until lentils are completely cooked. Drain the lentils from excess water and set aside to cool.
While the oven is preheating, and lentils are cooking, prep your veggies. Peel, wash, and dice the onions and carrots, and wash and dice the celery. Wash the zucchini well, remove the ends, then cut into long, thin strips. You can use a mandolin slicer for this, but cutting by hand also works. The zucchini slices should be as close to the thickness of the lasagna noodles as possible, but you don’t need to go crazy here – just keep in mind that a bit thinner is better.
Line a baking sheet with parchment paper, place the zucchini slices on and spray with cooking spray. You may need to use two baking sheets, since you may discover that you can’t manage to have all your zucchini slices arranged in a single layer. Don’t pile the zucchini on top of each other and do roast in batches if needed. Place the zucchini “lasagna noodles” into the oven to roast. The roasting will take anywhere between 15 and 25 minutes and will depend on the thickness of your zucchini. Keep an eye on the oven and if you are roasting two pans of the zucchini at the same time do rotate the pans mid way through the roasting. You will know that the zucchini is done when the edges are slightly brown and the middle is golden. Once you take the zucchini out, decrease the oven temperature to 350 F (175 C).
While the zucchini is roasting, start your the ragù. Spray the bottom of a Dutch oven, or another type of heavy pan, with cooking spray and heat up over the medium to medium high heat. Add carrots, onions and celery and let them brown for 10 minutes. Add chopped walnuts and let them pan roast for about 2 to 3 minutes. Add garlic, oregano, and basil, and let the flavors develop for a minute. Next comes tomato paste – add it to the pan, mix well and let brown just slightly. This takes about 2 minutes or so. Add the cooked lentils and the crushed tomatoes, and mix well. Let the ragù simmer for 10 to 15 minutes. Turn the heat off, add the fresh parsley and mix well to combine.
Once the ragù is simmering, it’s time to start cooking your lasagna noodles. Most varieties ask for a large pot of boiling water and about 10 minutes of boiling time. The noodles don’t need to be cooked all the way through as they will continue to cook in the oven but they do need to soften quite a bit, so 8 to 10 minutes should be enough to achieve that. Drain the noodles and use immediately.
Combine tofu, lemon juice and nutritional yeast in a blender and blend until smooth. Set the besciamella to the side.
Spray the bottom and sides of your 9 x 13 in (23 x 33 cm) pan with some cooking spray. Cover the bottom liberally with the ragù (use about a half of the amount you made), layer the first set of noodles (for me that came to about 5 noodles per layer), then layer the zucchini in a single layer, pour the rest of the ragù, and top with the remaining noodles. Pour the besciamella over and cover with foil.
Place the covered lasagna into the 350 F (175 C) oven and let bake for 30 minutes covered and then about 10 minutes uncovered. Let the lasagna sit for about 10 minutes before serving. I like to add some freshly ground black pepper or a mix of black pepper and red pepper flakes to my lasagna just before enjoying, but you can also sprinkle some fresh parsley, or fresh basil. Have fun!
Gluten-free Vegan Spaghetti & Meatballs, via Eat the Vegan RainbowCan gluten-free, vegan cooking be budget friendly, healthy, feed the whole family, and yet leave everyone feeling they are getting away with something? The answer is yes, and this recipe is my evidence. I use no fancy ingredients, and no fancy techniques.
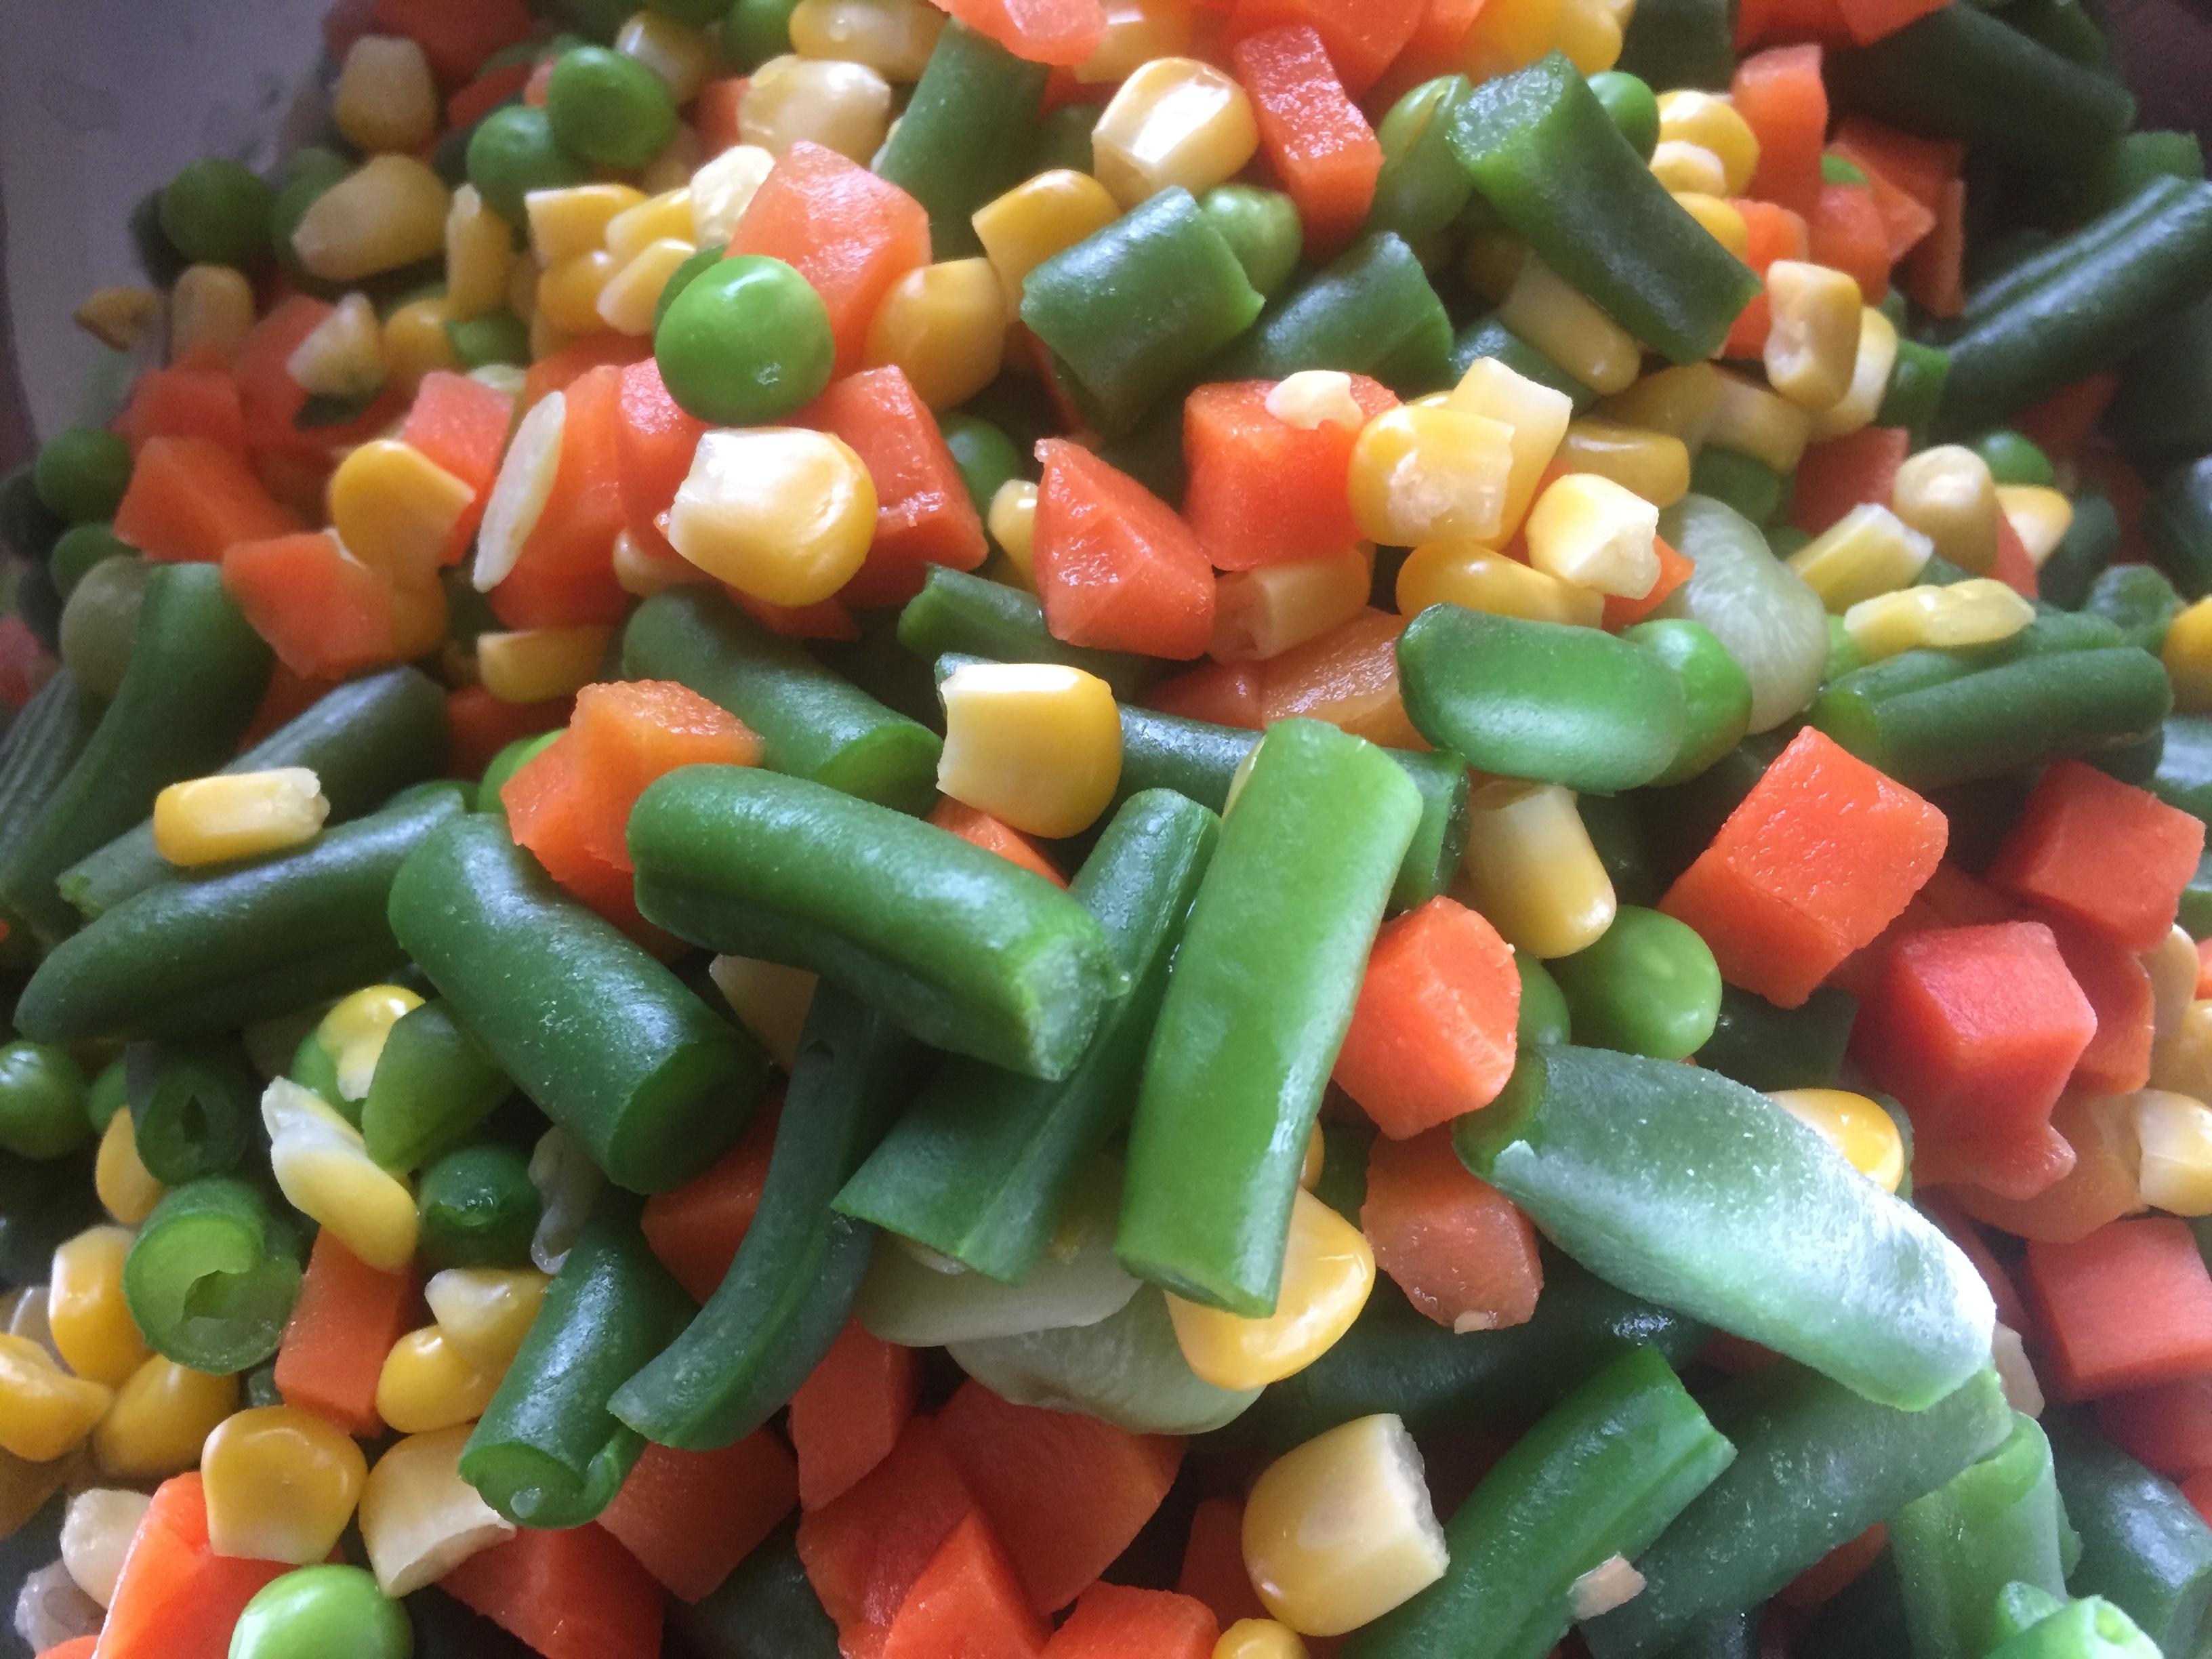
How did I end up here? Well, as they say “Necessity is the mother of invention”. What happened is that I found myself facing a large bag of frozen vegetable mix, which I have cooked with many times before never to any great success. This is a classic item you can find in any grocery store – a bag that includes unspecified amounts of frozen peas, corn, green beans, carrots, and lima beans. The price on these is usually too hard to resist, and they keep really well if kept frozen so I usually have a couple in my freezer in case of an emergency where all other options dry up.
So one of those emergency situations came up and this time around, perhaps because of all this blogging I’ve been doing recently, I had a real brain wave. I decided to transform the relatively amorphous tasting vegetable mix into really incredible vegan meatballs, or should I say veggie balls?
Frozen Vegetable Mix, thawed, via Eat the Vegan RainbowThere are couple of simple tips that when put together make this recipe work. First of all, thaw your vegetables don’t cook them! Depending on the amount of veggies you use this may take 5-10 minutes in the microwave on high. Once the veggies are thawed and soft all through, use a stick (immersion) blender, or a food processor to make a thick paste out of it all. This will be a base for your “meatballs”.
Another thing that you will need to do is add flavor to the mix. Although each one of these veggies is lovely on their own and when fresh, put all together and after freezing and thawing they do lose some of their flavor. My secret ingredient in this recipe is definitely a dash of Trader Joe’s Chile Lime Seasoning Bland. If you don’t live in the area with a handy Trader Joe’s store near by, you can use regular chili powder and add some lime or lemon zest – that will do the trick!
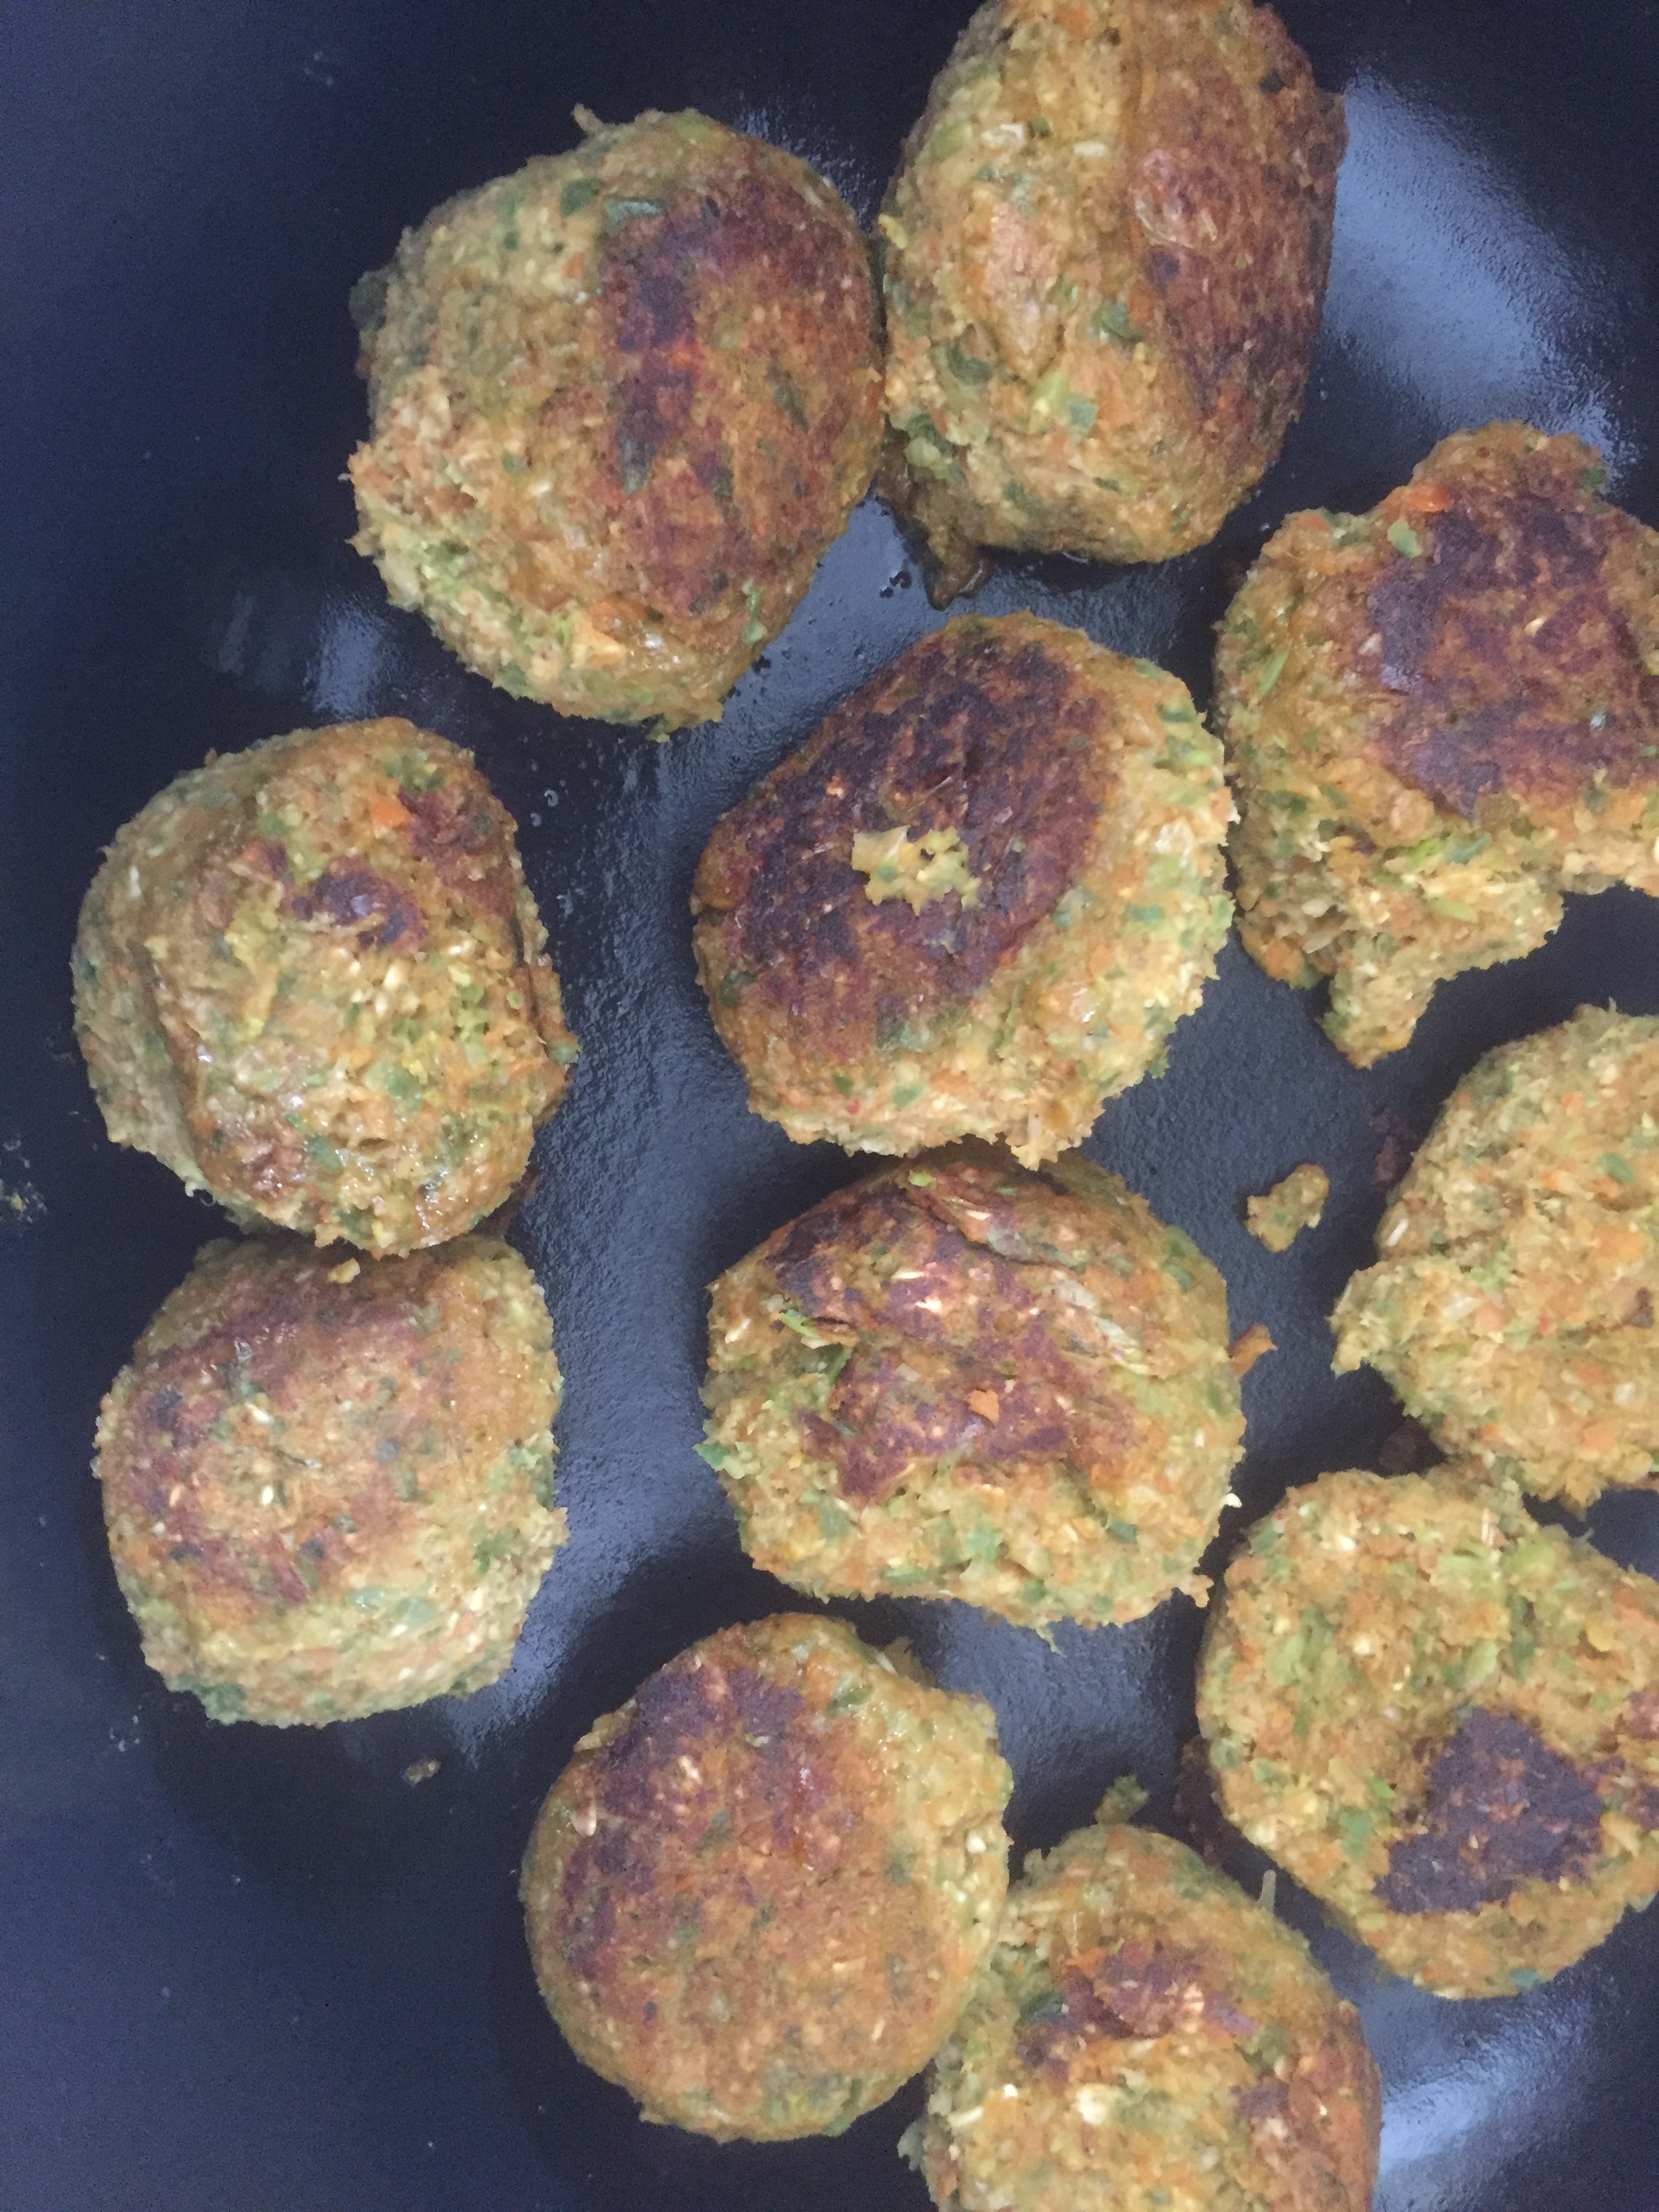
You will have to be a bit patient with this recipe as it does take a bit of time. First of all, I use oats to help the meatballs stick together. I did not leave the oats whole, rather I blended them all into the veggie mix using a stick blender, added the spices, and left the mix to sit for about 15 minutes. That gives oats some time to absorb the liquid and make the mix stick together better, which helps for the next step – forming the “meatballs” and browning them. I recommend using a Dutch oven to brown the “meatballs”, as well as simmering the rich tomato sauce.
Vegan “Meatballs” Browned in a Dutch Oven, via Eat the Vegan RainbowOne word of advice is not to overcrowd your Dutch oven, and keep some room in between the “meatballs”. This helps them cook, and helps you maneuver them around. Once the “meatballs” are nicely browned set them aside and use the same Dutch oven for putting your tomato sauce together. I kept my recipe simple and my cost down by using canned crushed tomatoes and using some crushed garlic, dried oregano and dried basil to flavor the sauce. The sauce does not need to cook for long, and once it starts to simmer nicely and gently you can add the “meatballs” back.
Vegan Meatballs in Tomato Sauce, via Eat the Vegan RainbowDon’t forget to lower the heat , bring the post to a very gentle simmer, and put the lid on! Without the lid you will soon end up with tomato sauce all over the stove top and the floor as this sauce does erupt in tiny little tomato sauce geysers.
To keep the recipe ultra healthy and gluten-free, I paired the meatballs with simple Zucchini Spaghetti.
Place the frozen vegetable into a microwave safe dish and microwave on high for 5-10 minutes to thaw the vegetables and slightly heat them through.
Place the vegetables into a large mixing bowl. Use the stick blender to grind the vegetables into a relatively fine paste.
Add oats and blend again.
Add tomato paste, soy sauce, as well as onion, garlic, chili and lime chili powder. Mix well and let stand for 15 minutes or so.
Spray the bottom of a large Dutch oven with cooking spray and bring to medium high heat. Use 1/4 cup or the ice cream scoop to scoop out the “meatball” mix and form the balls. Place them into the hot Dutch oven and let brown for 2-3 minutes. Turn the “meatballs” over and brown on the other side. Take them out of the Dutch oven and set aside. Spray with more cooking spray if needed and add another batch of “meatballs”. Continue until all your “meatballs” have been browned.
Bring the heat up to high, add more cooking spray, and add crushed garlic and dried oregano and basil. Let it bloom, develop & release the aroma for 1-2 minutes. Add crushed tomatoes. Depending how much tomato sauce you’d like to have you may need to adjust the amount of crushed tomatoes you add. Bring the tomato sauce to a simmer and let it simmer for 5-10 minutes.
Turn the heat way down and add back the “meatballs”. You will likely have two layers of meatballs which is fine, but it’s a good idea to keep in mind that they are relatively soft so treat them gently! Make sure they are nicely snuggled and covered by the sauce. Put the lid on and let the “meatballs” and sauce simmer for 15 – 20 minutes.
When you are ready to serve, start with a generous amount of Zucchini Spaghetti, add couple of vegan meatballs, spread some sauce, and top with fresh basil. Enjoy!
Update: Few days ago I used the same “meatball” mix and made a “meatloaf” out of it. It worked really well!!! Here are couple of pictures to show you what it all looks like. One tip: bake the “meatloaf” on 375 F (190 C) for 25-30 minutes first, before putting on the tomato paste, then bake for 15 minutes more. Let the “meatloaf” stand for 15 minutes before cutting – the loaf will be soft when it comes out of the oven but it will firm up!
Gluten-free Vegan Pizza Supreme, via Eat the Vegan Rainbow
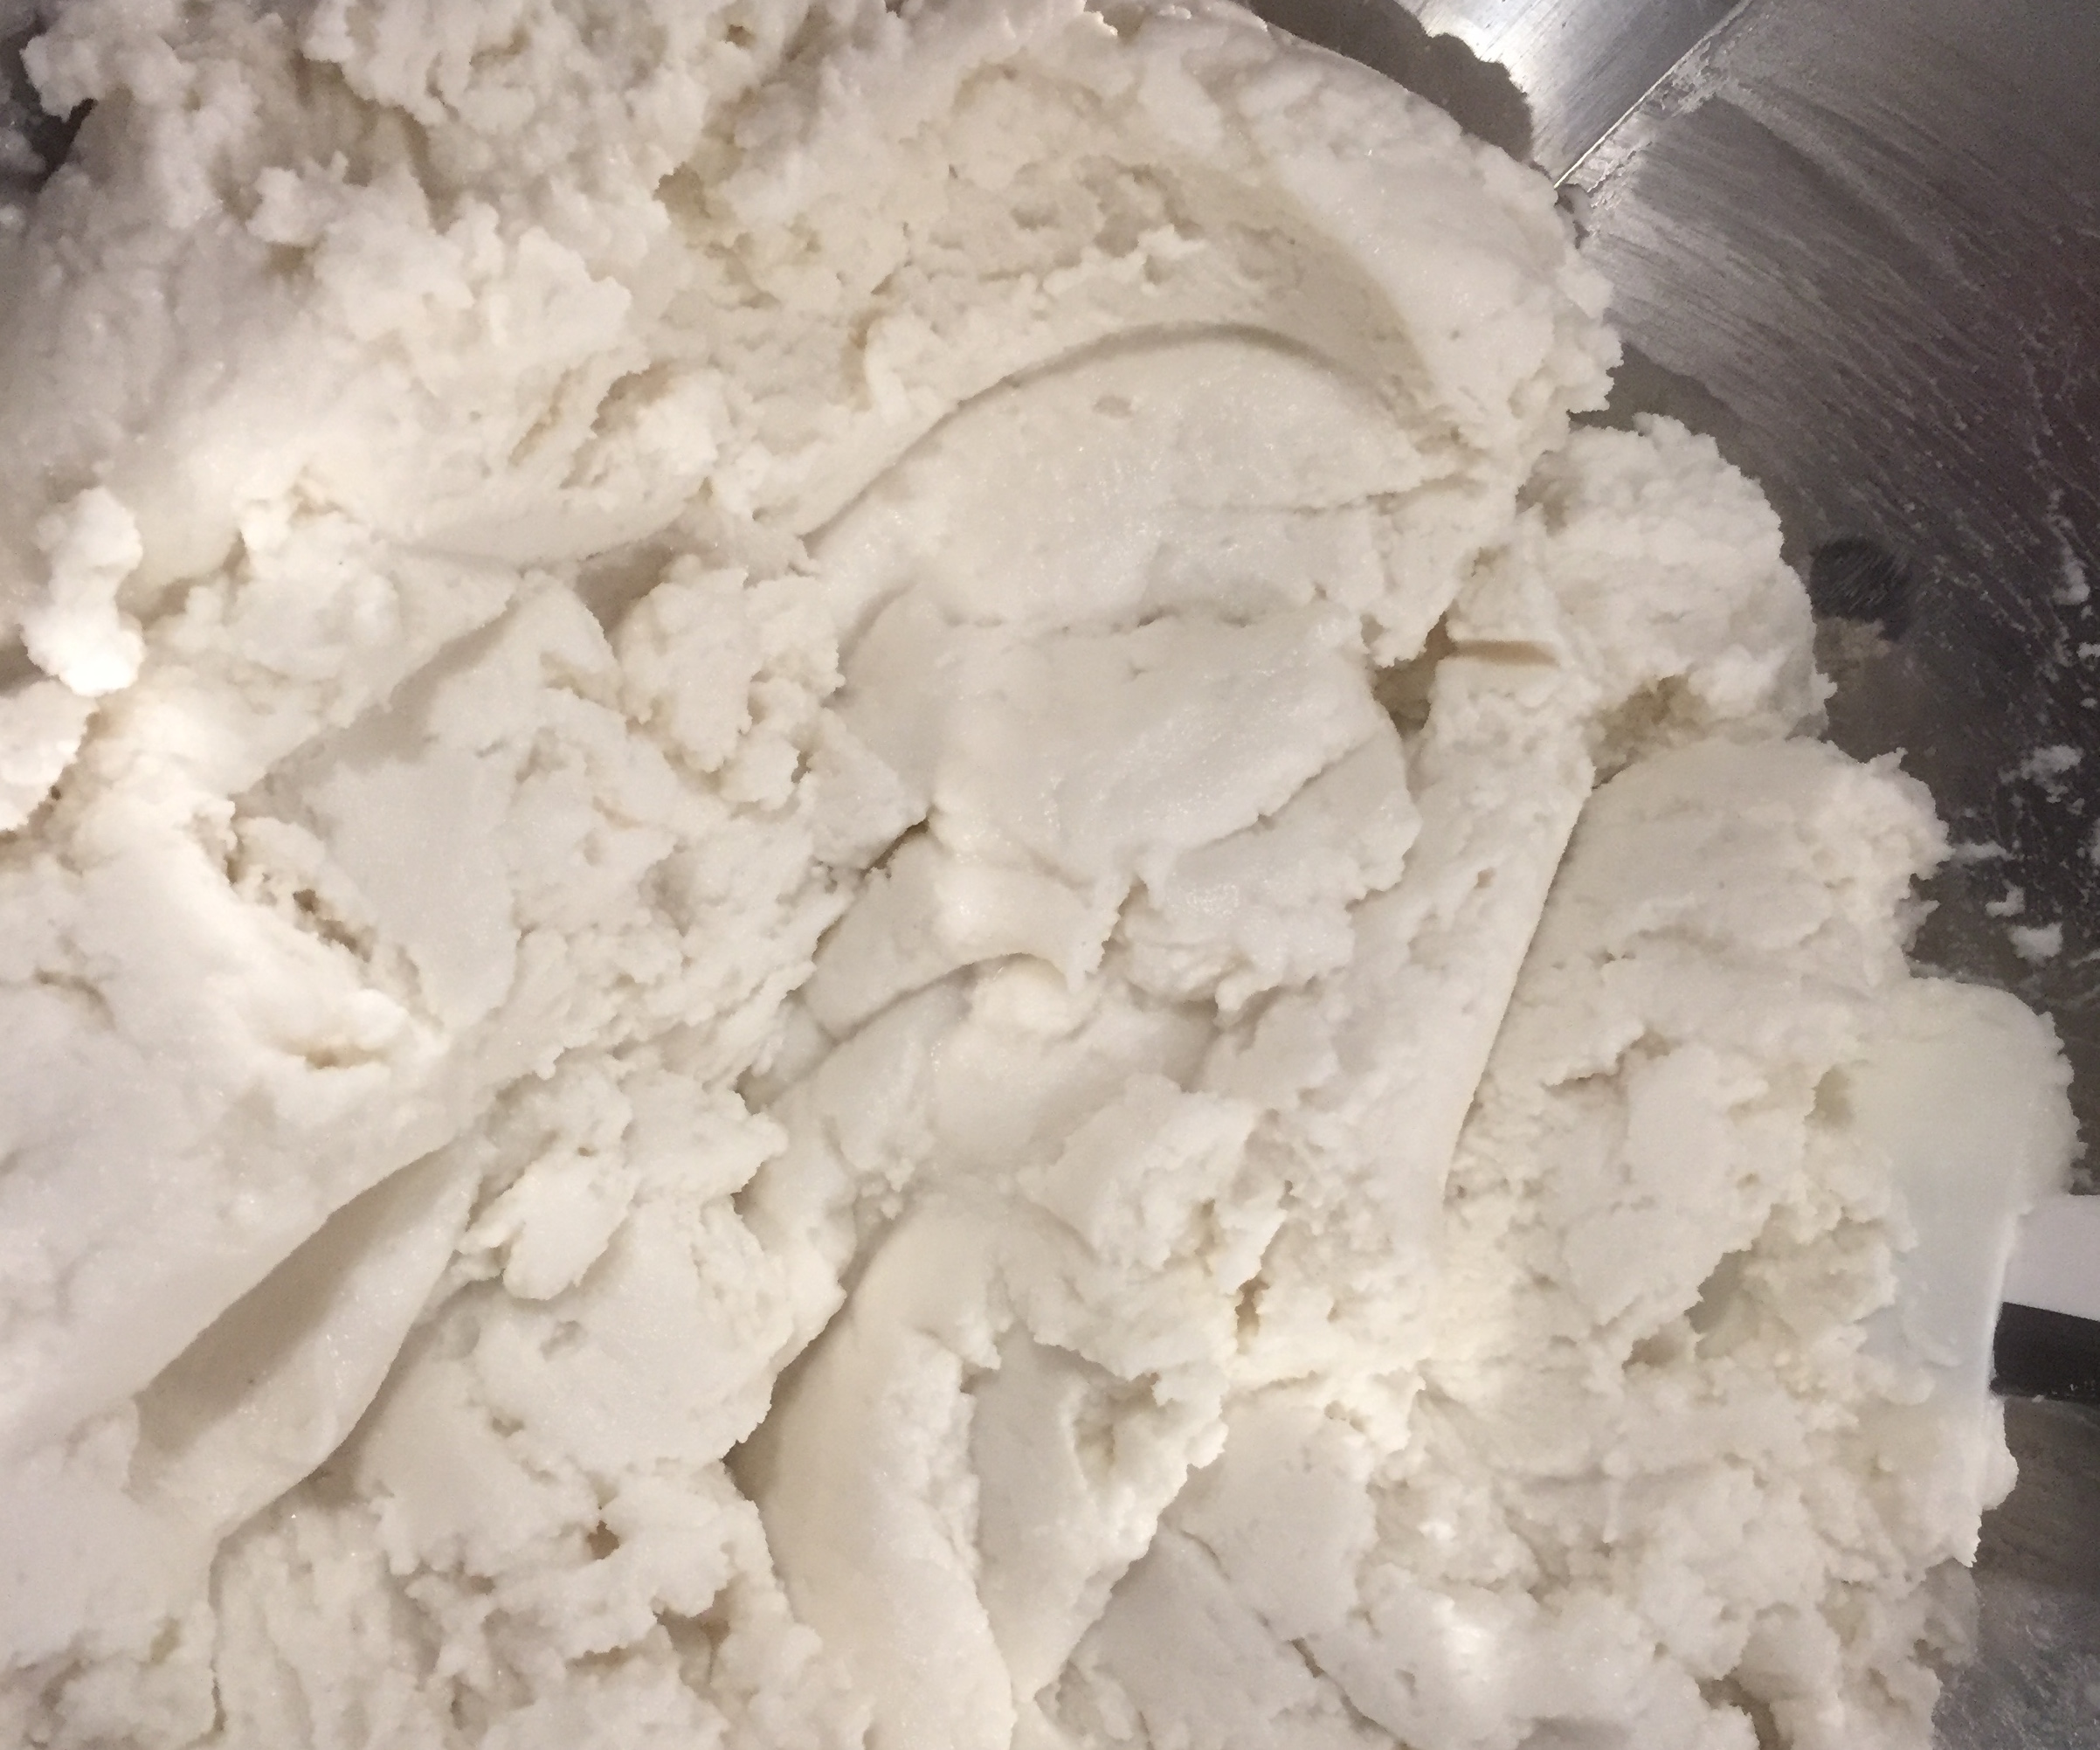
Friday night is pizza night, and making this gluten-free version has become part of regular easing into the weekend and unwinding ritual. Quite honestly, developing the perfect gluten-free pizza crust has not been easy. I tried many different recipes, from scratch and store-bought baking mixes, and many different techniques and none really worked. I would end up with a pizza crust that was either too thick or too soggy or too different from a nice thin and crunchy pizza crust that I prefer.
But, all this trial and error has not been a waste, since it led me slowly but steadily to my current recipe that is incredibly simple and works like a charm. Result is a thin and crispy pizza crust that is as close to the real thing as I think I can get. I start from three ingredients: rice flour, baking soda and baking powder. I mix rice flour and water in same amounts (1 cup rice flour to 1 cup water) and the dough I get is nice and smooth, yet slightly sticky. I let the dough sit for 20 to 30 minutes which is just enough time to get my roasted vegetable topping done, and other toppings and sauce organized, and I use a special technique to spread the dough as thin as I like it.
Gluten-free Pizza Crust Starts from Rice Flour Dough, via Eat the Vegan Rainbow
What I do to transform this sticky dough into a pizza crust that will bake well and hold the filling is to place a piece of parchment paper on the pizza peel, add enough dough to form one pizza pie, cover the dough with another piece of parchment paper and use fingers to spread the dough out by pressing over the parchment paper. This really help and if you are to try to do this without the second piece of parchment paper you would end up with sticky fingers and mess – trust me on this, I’ve been there! Once the dough is as thin as needed, peel off the top parchment paper, spray the top with cooking spray and the pie is ready for the oven.
Step 1 – Place the dough on the parchment paper
Step 2 – Cover with the second sheet of parchment paper and use fingers to press into the crust
Step 3 – Lift the second piece of parchment paper off and Gluten-free Pizza Dough is ready
There are also two tricks to baking the perfect gluten-free pizza. Trick number one is to give the dough a chance to bake on its own for 10-15 minutes at 425 F (220 C) on a pizza stone. Technically you can use any baking pan or cookie sheet but if you are into making lots of pizza getting a pizza stone is a wise investment – they are pretty much indestructible and one will last you forever! This will help both your top and the bottom get nice and crunchy, browned and caramelized.
The second trick is to pre-cook your toppings. My Gluten-free Vegan Pizza Supreme uses roasted red onions and roasted red peppers, which I slice and roast at 425 F (220 C) for 15-20 minutes while my dough is resting, and couple of other toppings that don’t require pre-cooking like sliced black olives, vegan ground beef substitute, and vegan shredded cheese. Why pre-cook? The assembled pizza will not stay in the oven long enough for toppings like peppers and onions to really brown and soften, and I do prefer them slightly charred. But if you like your veggies on a raw side you can skip this step.
The rest is really a breeze. Cover your half-baked pizza crust with good amount of sauce – on this occasion I used nothing fancier than marinara sauce from a jar – and top with roasted red peppers and red onions, sliced black olives, vegan ground beef substitute, homemade cashew ricotta, store-bought shredded vegan “mozzarella” cheese, or both, sprinkle with dry or fresh basil and oregano, and return to oven for another 12-15 minutes. Take out of the oven and let it rest for 2-3 minutes… or not!
Happy pizza time!!!
Gluten-free Vegan Pizza Supreme on the Menu Tonight, via Eat the Vegan Rainbow
Gluten-free Vegan Pizza Supreme
What you’ll need (for 2 x 12 inch (30 cm) thin-crust pizzas):
Preheat oven to 425 F (220 F) with your pizza stone (if using) inside.
In a large mixing bowl, mix rice flour, baking powder, baking soda and add water. Mix everything well until the dough forms. The dough will be soft and relatively sticky, but should still hold its shape. Let stand for 15-20 minutes.
Slice the red pepper and red onion thinly, spread on the cookie sheet covered with aluminum foil, spray with cooking spray and put in the preheated oven for 15-20 minutes, to brown, caramelize and slightly soften.
Place parchment paper on your pizza peel (if not using pizza peel and pizza stone, you would place the parchment paper on your cookie sheet or other baking pan you will be using), put half of your dough in the middle, cover with another piece of the parchment paper and use your fingers to spread the dough out to the size and thickness that you like. Peel the top parchment paper off with care – the dough may stick but the top parchment paper should come off relatively easily. Spray the top of your pizza dough with cooking spray and put in the oven for 12-15 minutes.
Take your pizza crust out of the oven. The top should be slightly golden and the edges should have gotten slightly browned. Spread the tomato sauce and all the toppings you like, and put the assembled pizza pie back in the oven for another 10-15 minutes. Enjoy!
Vegan Mexican Lasagna with Soy Chorizo, via Eat the Vegan Rainbow
Few years ago when I was first trying to minimize the amount of gluten in my diet, I discovered that corn tortillas work very well as a substitute for lasagna noodles. Corn tortillas as lasagna noodles have quite a few advantages over the regular kind. First of all, they are ready to go and don’t need any preparation. Having said that, I did initially experiment with toasting them just slightly before use, and this did enhance their flavor but at the end the taste benefit was not sufficient to going through the toasting process.
To me the second advantage is the flavor. The regular lasagna noodles are more of a bystanders without adding any specific flavor to the dish, while corn tortillas are in the midst of flavors. As I started using them in lasagnas, I also transitioned away from using Italian ingredients and flavors and to using types of things that you would find in burritos or fajitas.
This Vegan Mexican Lasagna with Soy Chorizo recipe uses the same strategy. I combine two types of peppers and two kinds of onions, which when nicely browned add a hint of fajitas to this lasagna. On this occasion I gave them a pretty fine dice, but you can definitely cut them lengthwise if you are into getting even closer to that fajita style.
Vegan Mexican Lasagna with Soy Chorizo Ingredients, via Eat the Vegan Rainbow
This recipe uses Trader Joe’s Soy Chorizo and because of the intense flavors that this soy chorizo brings to table you will not need to add much, if any, additional spices. Additionally, this soy chorizo is fairly oily so I start with the soy chorizo, let it brown just slightly and release the oil, and then I add peppers and onions and let them cook until veggies are gently caramelized.
Trader Joe’s Soy Chorizo, via Eat the Vegan Rainbow
Once the stuffing mix is done, it is time to assemble the lasagna and, about 25-30 minutes later, enjoy this dish rich in flavor!
Vegan Mexican Lasagna with Soy Chorizo
(2-4 servings)
What you’ll need:
1/2 Trader Joe’s Soy Chorizo
1 red pepper, diced
1 orange pepper, diced
1/2 red onion, diced
1/2 yellow onion, diced
Cooking spray
8 corn tortillas
1/4 cup shredded cheese, vegan
8 x 8 in (20 x 20 cm) baking dish
What you’ll do:
Preheat oven to 375F (190C).
Put Soy Chorizo into a non-stick pan and turn the heat on to medium high. Please note that Trader Joe’s Soy Chorizo comes in a inedible casing that you will have to remove and discard. Use your mixing spoon to break it apart. Let it brown and release its oil for 3-5 minutes.
Add diced peppers and onions to the pan, and let them gently brown and caramelize for 5-10 minutes. The exact time depends on whether you prefer your peppers and onions a bit more on the crunchy side or a bit more on a soft side.
Spray the bottom and the sides of your 8 x 8 in (20 x 20 cm) baking dish with the cooking spray. Place 4 tortillas on the bottom. Add your filling and spread over tortillas evenly. Top with 4 tortillas. Spray the top lightly with cooking spray. Sprinkle the cheese, and cover the dish with foil.
Put the Mexican lasagna into the oven and bake for 20 minutes covered, and the last 5 minutes uncovered so your cheese topping gets nice and melted.
Enjoy!
Note: Just before serving Vegan Mexican Lasagna with Soy Chorizo you can sprinkle the top with fresh cilantro and a squeeze of lime. And while we are packing on some good Mexican flavors, why not add some fresh simple salsa, guacamole, or pickled jalapeños on the side?