Roasted Turnips Recipe

Roasted Turnip Recipe
Roasted Turnip Recipe, via Eat the Vegan Rainbow

Turnips are one of those neglected vegetables – or at least I tend to neglect them. If you are not familiar with turnips they look like really really big radishes bleached by sun expect perhaps a bit of purple left on top. Their texture is in between potatoes and radish, not as dense as a potato and not as airy as a radish. Their taste is also somewhere in between those two – a bit starchy and a bit bite-y! They have quite a bit of vitamins A and K, so great to include into your cooking rota. Plus: they are a low-waste food – meaning that they need to be peeled only lightly and if you buy them with their greens still on, you can use turnip greens the same way you would beet greens or spinach.

My first experience with them was really all thanks to our summer CSA (Community Supported Agriculture) share, resulting in this favorite, Balsamic Vinegar Glazed Beets and Turnips recipe. They are also delicious roasted, as in the recipe below. Enjoy!


Roasted Turnip Recipe

What you’ll need:

  • 1 bunch of purple top turnips (if you can’t find purple top turnips, you can use a bunch of any other type of turnip that’s available where you are, or 4 turnips or so, if not in a bunch. Note: rutabaga is not turnip, although they are closely related. Confusingly, rutabaga is commonly labeled as turnip in the US stores and can be found next to potatoes. The big clue that what you are looking at is not a turnip but a rutabaga is that rutabaga will be pretty large and a bit waxy on the surface (and very hard to peel if you do buy it). Don’t get that one for this recipe, but feel free to explore it for other things as it is delicious as well.
  • 2 tablespoons canola (or other vegetable) oil, divided
  • 1 tablespoon BBQ spice mix, store bought or homemade (this is the one I like, to make you own you need a 1/4 teaspoon smoked paprika, 1/4 teaspoon chili powder, 1/4 teaspoon salt, 1/4 teaspoon brown sugar, 1 teaspoon onion powder (or onion flakes if you have them), and 1 teaspoon garlic powder (or fresh crushed garlic))

What you’ll do:

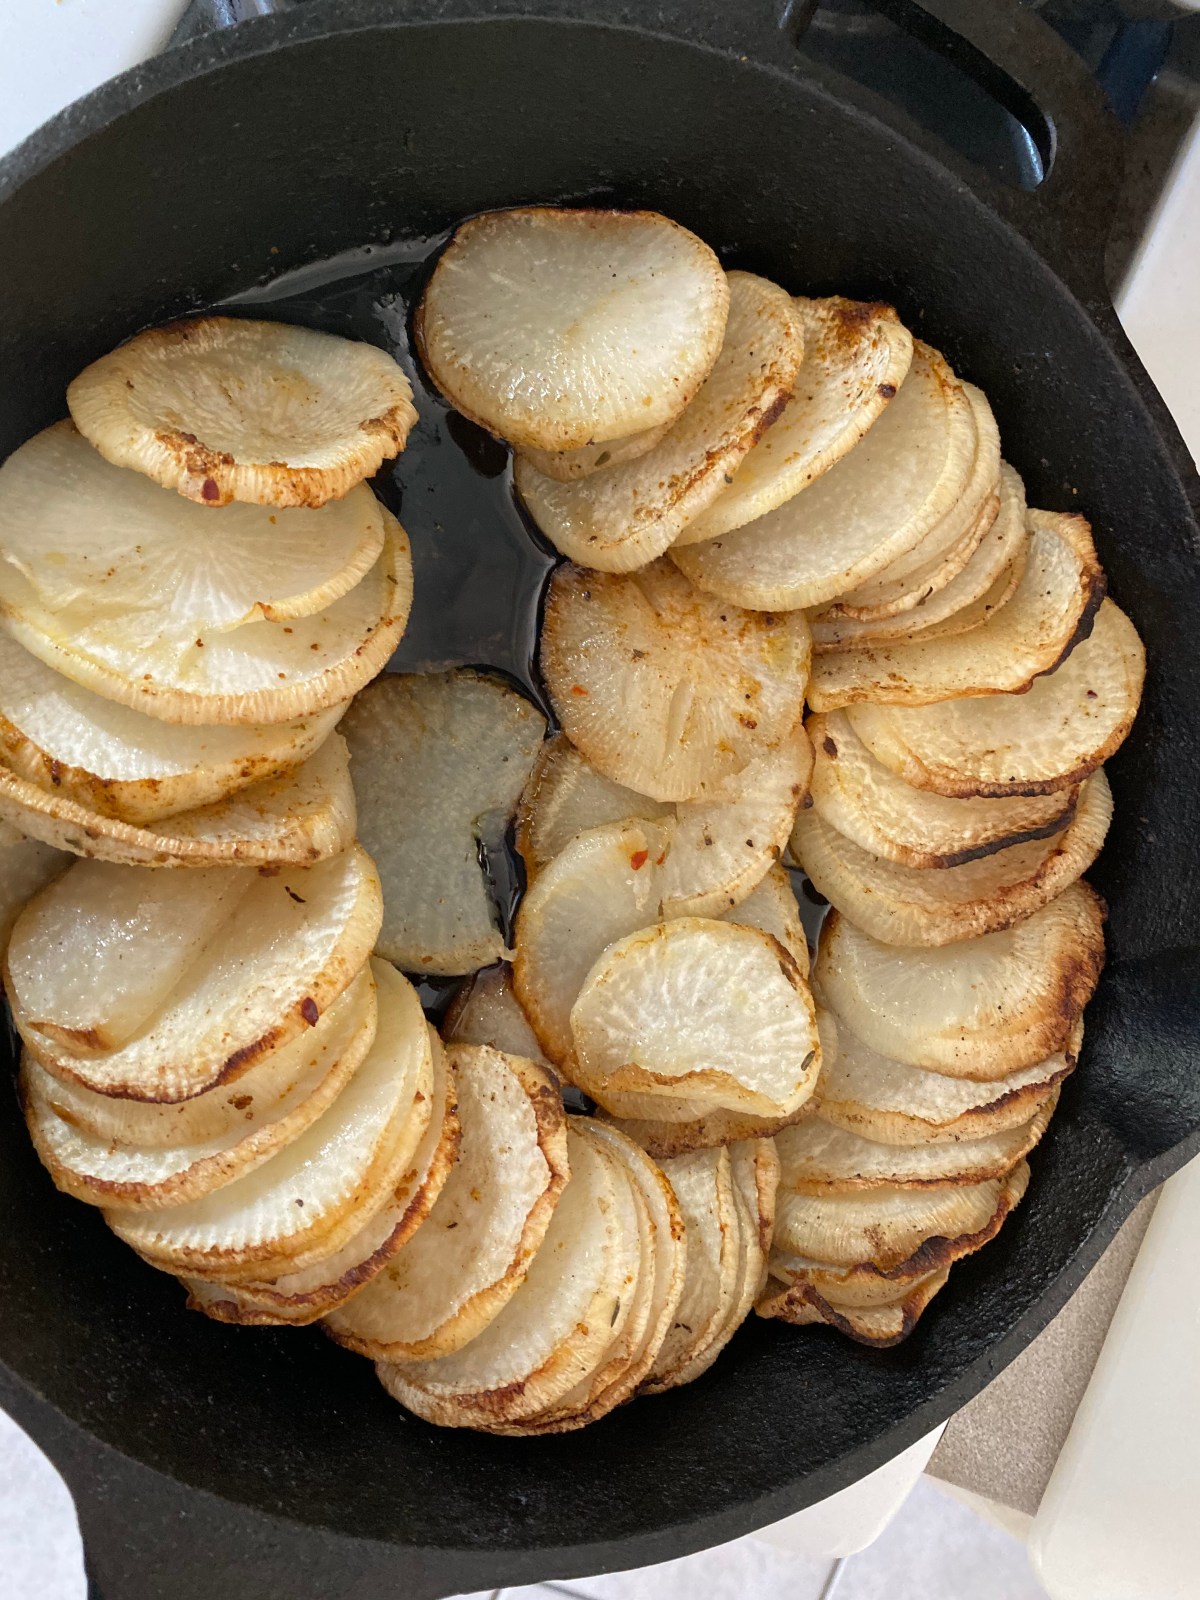
  1. Wash and peel the turnips. Slice them into thin round slices – about 1/8 in (2-3 mm) thickness works well.
  2. Spread 1 tablespoon of oil over your cast iron pan or another heavy and oven safe pan) bottom.
  3. Arrange sliced turnip in a circle, almost as if you were building a rose using turnip slices as petals.
  4. Sprinkle another tablespoon of oil over the top and sprinkle the spices.
  5. Preheat the oven to 425 F (220 C).
  6. While oven is preheating, place the cast iron pan over high heat to sear the turnip. Let the bottom edge of the turnip slices brown, and get slightly crunchy. This should take only a couple of minutes.
  7. Decrease the heat and, working with kitchen tongs, turn the turnip slices upside down, 4-5 at the time, until they are all flipped and ready to sear on the other edge.
  8. Increase the heat and sear the second edge. Once that’s done, turnips are ready for roasting.
  9. Place them into the oven and roast for 20-30 minutes. – note: if you don’t have a cast iron pan, you can use any other heavy pan that is oven safe.
  10. Take the turnips out, cool slightly and enjoy!
COPYRIGHT © EAT THE VEGAN RAINBOW, 2020

Quinoa Breakfast Scramble (oil-free)

Quinoa Breakfast Scramble, via Eat the Vegan Rainbow

What’s for breakfast? This question takes a whole new meaning on weekends (I luckily have those off), when I am around to spend time experimenting and entertaining. I love making waffles, pancakes, and muffins. Lately, I started getting myself into eating more protein for breakfast, so I’ve been gravitating towards tofu scrambles (see recipes here and here). They are yummy and delicious, and I love them!

But: I also like some variety, and that led me to looking for other high-protein plant-based alternatives. Quinoa is the queen of plant protein – it is a fantastic substitute for rice, and I use it in many different recipes, from those that are supposed to be complete meals (like stuffed eggplant (the same recipe can be used to stuff peppers) and gumbolaya), to side dishes (see here for a very festive side dish with quinoa, roasted cranberries and pistachios – yummy!). Because quinoa is such a great source of plant-based protein, I have also developed a recipe for a ground beef substitute featuring quinoa. In this way quinoa can me your go to for tacos, pizza topping and similar.

With all that said, I wanted to see whether quinoa makes a good breakfast – and it does! The recipe below is just one illustration of how great a quinoa-based breakfast can be. You can also eat quinoa the same way you would oat meal – topped with fruit, syrup, even granola and yogurt. However, quinoa is not as quick to make as oats, so I recommend that you prepare a batch of quinoa and then store it in fridge for 3-5 days and use as needed.

There are a few tips for preparing quinoa. First of all, I recommend soaking for few hours (on the kitchen countertop) to overnight (in the fridge). Quinoa is covered with bitter compounds called saponins. These are totally natural compounds produced by the plant as it grows, and used a sort of protection from pests (not even pests like bitter things!!!). Soaking and extensive rinsing will help wash these chemical compounds away, and you can tell they are there if foam forms as you are rinsing. One thing to note is that a lot of quinoa on the market has been treated to remove saponins – on one hand that is good because you don’t need to worry about the bitter taste, on the other hand depending on the process used some of the nutritional value of quinoa may have been removed as well. By the way, eating saponins at the amount present on quinoa will not hurt, just in case you are wondering, but the flavor is likely going to be affected. Bottomline: I soak and rinse my quinoa very well before cooking.

And because the quinoa is already wet and soaked, I cook it in less water, usually 1.5 cups of water to 1 cup quinoa. The easiest way to cook quinoa is to use a pressure cooker (it takes 8-10 min on rice cycle, if you have instant (electric) pressure cookers with preset menu to choose from), or about 20 min on the stove top.

Once quinoa is cooked and cooled, you can store it for 3-5 days in the fridge and use as needed, for a scramble recipe below, for salads, as a porridge-type breakfast, as a side for your dinner, or to make any one of your favorite recipes that call for rice or any other type of grain. Enjoy!

Quinoa Breakfast Scramble (oil-free)

What you’ll need:

  • 1 1/2 cups cooked quinoa
  • 8 oz mushrooms, sliced
  • 3-4 artichoke hearts, sliced
  • 8 oz baby spinach leaves
  • 1/4 cup nutritional yeast
  • 1 teaspoon garlic powder
  • 1 teaspoon onion powder
  • 1 teaspoon paprika
  • 1/2 teaspoon smoked paprika
  • (Optional): oil or cooking spray. Omit for oil-free version.

What you’ll do:

  1. Add mushrooms to a large non-stick pan and place over medium-high heat. If using oil or cooking spray, add to pan and bring to heat before adding the mushrooms. Cook with stirring until mushrooms are soft and browned. This takes about 4-5 minutes.
  2. Add the artichoke hearts, mix well and sauté for another 2-3 minutes.
  3. Add the cooked quinoa, and all the other ingredients except the spinach. Mix well and cook for 4-5 minutes more.
  4. Last: add the spinach – it will be bulky and take up a lot of space. But don’t panic: slowly incorporate the spinach. It will start to wilt and reduce in size as it heats up and mixes in. Baby spinach leaves take about 2-3 minutes to wilt and soften, so keep stirring until incorporated, reduce the heat to low, cover with a lid, and leave for couple of minutes.
  5. Serve as breakfast, lunch or dinner. If serving as a breakfast, complement with a bowl of fruit and perhaps a piece of toast. Enjoy!
COPYRIGHT © EAT THE VEGAN RAINBOW, 2020

Caramelized Brussels Sprouts with Corn

Caramelized Brussels sprouts with corn
Caramelized Brussels sprouts with corn, via Eat the Vegan Rainbow

So you hate Brussels sprouts, do you? And you really think that there is no way you will ever change your mind on that account?

Well, I have a recipe for you to try. First of all, you will have to find some fresh Brussels sprouts – I don’t think frozen will work. But, on the other hand, although I do think that fresh corn works best, you can cut yourself some slack and use frozen corn kernels or whole corn kernels from a can.

The recipe is super simple – so there’s not much to add really. I made this recipe with adding some dried cranberries and it is delicious! But, I made it without cranberries and it works just as well. This can be a yummy side dish to add to your Thanksgiving and/or Holiday (Christmas) feast, and in that case cranberries (especially for those of you in North America) are a must!

Note: using a cast iron pan is recommended but not required. I like using a cast iron pan for a recipe like this because it does help things caramelize nicely. And it also allows you to pop the pan under a broiler if you like your top to get extra crunchy, which can be a nice touch especially if you have guests that you are trying to impress. But you can achieve similar level or caramelization in almost any other type of a pan. CAUTION: you should not attempt placing just any pan under the broiler as most of them are not oven safe!!!

Caramelized Brussels Sprouts with Corn

What you’ll need:

  • 1-1.5 lbs (400-600 g) Brussels sprouts, cleaned and quartered
  • 1 yellow onion, diced
  • 2 ears of corn, just the kernels (frozen or canned corn is OK, but fresh is the best)
  • 1/2 cup sliced dried cranberries (optional)
  • 1/4-1/2 teaspoon salt
  • 2 tablespoons olive oil

What you’ll do:

  1. Place a heavy cast iron pan over the medium high heat. Add the oil and onion. Let the onion brown for 5-8 minutes.
  2. Add the Brussels sprouts and let them brown for another 5 minutes or so.
  3. Add the corn, sliced dried cranberries if using, add salt to taste, mix well and cook for another 10 minutes, with occasional stirring.
  4. Serve hot and enjoy!

Copyright ©Eat the Vegan Rainbow, 2019

Vegan Olivier “Russian” Salad with Toasted Sesame Seed

Vegan Olivier Salad with Toasted Sesame Seeds
Vegan Olivier Salad with Toasted Sesame Seeds, via Eat the Vegan Rainbow

Salads come in many different shapes and forms. Some are light and simple, some are complex and filling. Many don’t even have any greens in them, although most do have vegetables, unless they are a fruit salad. It’s this last requirement for vegetables that makes this next dish technically a salad. Olivier Salad, also known as Russian Salad (Ruska Salata) in the parts of the world I grew up in, is the type of a salad you get to enjoy when you don’t have much access to fresh vegetables but have plenty of frozen, pickled or frozen vegetables on hand. And plenty of potatoes, of course.

Growing up, we used to make large bowls of this salad for every special occasion, and serve it as an appetizer. The traditional recipe uses boiled potatoes, carrots, and peas, as well as boiled ham and even eggs, and pickles – all finely diced and mixed with mayo and a bit of mustard. Serve this concoction with fresh bread, and you don’t need much more!

I’ve spruced up this recipe into an amazing vegan feast below by omitting the ham and eggs and using vegan mayo. My secret ingredients? Toasted sesame seeds and fresh dill!

I served this new take on the old favorite at a party recently and people of Russian, Brazilian and US origin all went crazy for it. I suppose deep down we all find messy flavors of mushy vegetables smeared in mayonnaise with hints of pickle juice comforting and lovable!

I hope you give it a try. Looking for one last insider tip? Try it with some corn bread – you will go bananas, I guarantee it!!!

Vegan Olivier “Russian” Salad with Toasted Sesame Seeds

What you’ll need:

  • 2 15 oz (425g) cans peas and diced carrots (or 1 15 oz (425g) can each of sweet peas and diced carrots); you can also boil your own 1 1/2 cup finely diced carrots and the same amount of peas
  • 3 14 oz (400g) cans whole white potatoes, or peel and boil two large potatoes until done
  • 6-8 large kosher dill pickles (not sweet pickles – those will not work here!)
  • 1 cup mayo (vegan)
  • 1 tablespoon dijon mustard
  • 1 cup toasted sesame seeds (toasted in a toaster oven or on the stove top – if using a stove top method please watch out and use a lid as seeds will start to “jump” out of the pan as they get heated
  • 1 cup fresh dill, finely chopped

What you’ll do:

  1. Chop all the vegetables that need chopping (carrots, potatoes and pickles) finely. Place in a large mixing bowl, add mayo, mustard, toasted sesame seeds, and chopped dill. Mix together until combined and leave in the fridge for at least 3 hours, preferably overnight.
  2. Serve with crackers, bread, corn bread or enjoy as is!

Copyright © Eat the Vegan Rainbow, 2019

Easy Mediterranean Pasta Salad

Easy Mediterranean Pasta Salad
Easy Mediterranean Pasta Salad, via Eat the Vegan Rainbow

Looking for a great pasta salad recipe? Look no further – this is a pasta salad that even your picky eaters will adore. Just don’t tell them what’s in it, especially if you know that they’ll refuse to eat anything with avocados or chickpeas or cucumbers or olives…

A good choice of pasta will make all the difference to a pasta salad. The best kinds of pastas for salads are short and stout, with lots of nooks and crannies, twists and turns for the dressing to get into. And when it comes to nooks and crannies in the pasta world nothing comes close to radiatori – those little pastas that look like accordions or radiators. You should also cook your pasta al dente  (firm to bite) or it will be too mushy, and you should toss the freshly cooked and drained pasta with some olive oil to prevent it from sticking.

While the pasta is cooking you can chop all the vegetables: baby tomatoes, English cucumber, and Kalamata olives. Slice them and dice them any way you prefer. As you can tell from the picture, I usually just split baby tomatoes in half, slice the olives, and dice the cucumber without peeling it. You can adjust and customize, depending how rustic you like your salad to be.

One note on olives. If you can’t get Kalamata olives, you can replace them with any type of olive you can find. I recommend darker ones because they tend to have a stronger, and a bit more bitter, flavor which works well in a salad like this, but green ones will work too.

The very last thing that you will do once the cooked pasta is mixed with diced vegetables, chopped parsley and cooked (or canned) chickpeas, is to mix some dressing. In this case, the dressing is rich, smooth and green – it’s pretty much avocado blended with lots of lemon juice and some mustard.

Toss everything and you are done. This salad is great fresh, but I do recommend that you chill it for an hour or so before serving. Looking for more great pasta ideas? Check this simpler pasta salad, or a real fall (autumn) treat – Radish Salad with Apples, Carrots and Toasted Walnuts. Enjoy!

Easy Mediterranean Pasta Salad

What you’ll need:

  • 1 lbs (454 g) radiattore pasta
  • 1-2 tablespoons of olive oil (to prevent pasta from sticking)
  • 1 pint (1 1/2 to 2cups) cherry tomatoes, chopped in half of quarters, depending on size
  • 1 large English cucumber, diced
  • 1-2 cups Kalamata olives, sliced
  • 1 15.5oz (439g) can chickpeas, drained, rinsed and pat dried
  • 1/4 cup flat leaf parsley, finely chopped
DRESSING
  • 1 avocado
  • 1 lemon, juice only
  • 1 teaspoon dijon mustard

What you’ll do:

  1. Cook the pasta in salted water using the instructions on the box and subtracting a minute or so. You want the pasta to be al dente. Drain and rinse the pasta, then place into a large mixing bowl and toss with olive oil.
  2. While pasta is cooking, chop the tomatoes, cucumber and olives. Add to cooked pasta together with the chickpeas and parsley. If you are using canned chickpeas make sure they are drained, rinsed and dried to avoid adding access water/liquid into your salad.
  3. In a blender, combine lemon juice, avocado and mustard. Blend until silky and smooth.
  4. Pour the dressing over the salad, toss to combine and coat, and chill for an hour or so before serving. Enjoy!

Copyright © Eat the Vegan Rainbow, 2019


Vegan Baked Feta (no fat and no salt added)

Vegan Baked Feta no fat and no salt added
Vegan Baked Feta no fat and no salt added, via Eat the Vegan Rainbow

For many transitioning into plant-based diet and/or vegan life style, giving up cheese may be the most difficult thing to do. Although commercially available dairy-free cheese alternatives are getting better, they still tend to be pricier and, let’s be honest, they do take some getting used to. Plus: many of these cheeses are still not necessarily something to overindulge in – they usually come with a high fat and salt content. So, when it comes to dairy-free cheese you still need to proceed with caution.

One of the best ways to know exactly what you are getting is to get into DIY (do-it-yourself). Making your own cheese can sound intimidating. And some recipe do sound quite complicated and time consuming! But, there are quite a few vegan cheese recipes that you can do yourself and be happy with results.

For example, making a gooey nacho cheese or a cheese sauce for Mac’n’Cheese can’t be easier. Also, making homemade fresh mozzarella, although it takes time, is simple enough really. And if you want to impress guests, baked mini cheeses are your friends!

Vegan cheese making, including artisan plant-based cheese making, is now becoming very popular and there are quite a few really good cookbooks out there that you may want to take a look at. Before buying any of them, I encourage you to check out your local library! If you are looking for a good place to start, I think either “Artisan Vegan Cheese” by Miyoko Schinner, or “This Cheese is Nuts!” by Julie Piatt will give you plenty to work with.

The baked feta recipe below was created to make my life easier – it includes only 4 ingredients which I usually have on hand anyways, and uses the oven to do most of the work. Plus, it includes no added fat and no added salt, while being rich in protein, which makes it almost an essential ingredient for a healthy salad or sandwich lunch! The cheese stores well for about one week, so you may want to make a fresh batch every 7 days or so. Enjoy!

Vegan Baked Feta

What you’ll need:

  • 1 block (14 oz, 400 g) extra firm tofu, drained
  • 1/2 lemon, juice
  • 2 tablespoons apple cider vinegar
  • 1-2 tablespoons nutritional yeast

What you’ll do:

  1. Preheat the oven to 300 F (150 C).
  2. While the oven is preheating, place 1 block of tofu – drained but not pressed – into a food processor and add the rest of the ingredients. Pulse until everything is smooth and combined.
  3. Line an 8 x 8 in (20 x 20 cm) baking dish with some parchment paper. If you don’t have this specific size baking dish don’t worry – you can use any oven safe dish that will make your baked cheese block have about 1 in (2.5 cm) thickness.
  4. Pour your tofu cheese mix into the baking dish, even the surface out and put it in the oven for 45 minutes. Depending on your oven, you may want to check half way through. If your top and bottom are baking at a different rate you may want to flip the cheese, which can be tricky since it will still be went and fragile, or move the rack up or down. The main point is to allow both the top and the bottom to dry out as evenly as possible.
  5. After about 45 minutes, when the cheese looks more or less dried out on the surface, increase the heat to 425 F (220 C) to finish the baking. This step will produce a nicely roasted crust and add just a bit of caramelization. But keep it short, no longer than about 15 minutes!, because you still want your cheese to stay soft inside so it can crumble well!
  6. Take the baked feat out, cool it completely, then store it in the refrigerator for up to 7 days. I recommend you let it cool in the fridge for at least 2 hours before using for the first time as this will help with the crumbling and/or slicing. Enjoy!

Note on the salt: feel free to add salt to taste if you like, since this no-salt added version will be on a bland tasting side of things. Alternatively, you can simply add a pinch of salt to your salad or sandwich as you are putting them together. I will leave the answer to the question “To salt, or not to salt” to you!

Copyright © Eat the Vegan Rainbow, 2019

Simple Bean Salad

Simple Bean Salad via Eat the Vegan Rainbow
Simple Bean Salad, via Eat the Vegan Rainbow

Summer time, outdoor eating, picnics – what they all need is great, yet simple salads, especially those that don’t require constant refrigeration and come together in a jiffy!

This is exactly what this bean salad is all about. It uses four different types of canned beans – and you can mix and march any way you like! – as well as a nice combo of spices, including a bit of garam masala. If you are not familiar with garam masala, it is a spice mix commonly found in Indian cuisine, and it usually contains cumin, coriander, cardamom, cloves, cinnamon, pepper, and perhaps a bit of nutmeg or mace. All this makes for a very fragrant and please spice mix that you can use to make a plain old bean salad just a bit more adventurous. And don’t worry about having lots of garam masala leftover after you make this salad because it is a spice you can use to boost the flavor of rice, as well as to make Chicken-less Tikka Masala (one of my very favorites), Saag Paneer, or “Chicken” in Nut Sauce and it will be used up before you know it. It is one of the spices I can’t go without!

If you can’t find garam masala, you can use your favorite curry powder instead – it will work and you will have a bean salad with an elevated flavor. One other recommendation I’d like to make is to toast your spices using just a bit of oil and a very hot frying pan. This will help deepen the aroma and add just a bit of smokiness. If you are looking to cut out the oil you can toast your spices in a dry nonstick pan. Either way, you will have to be there and keep the spices moving as they toast. The toasting is fast, no longer than 2 minutes, and the spices can easily burn if you are not careful. So keep a close eye on your spices!

Finally, definitely use both the juice and the zest of the lime. The zest will do it’s zesty magic and add an exotic dimension to your salad. Enjoy!

Simple Bean Salad

What you’ll need:

  • 1/2 red pepper, deseeded and finely diced
  • 1/2 green pepper, deseeded and finely diced
  • 1/2 red onion, finely diced
  • 1 15.5 oz (440 g) can black beans
  • 1 15.5 oz (440 g) can red kidney beans
  • 1 15.5 oz (440 g) can black eyed peas
  • 1 15.5 oz (440 g) can small white beans
  • 1 4 oz (113g) can fire roasted green chilis
  • 1 tablespoon curry powder or garam masala
  • 1 tablespoon chili powder (or lime chili if on hand)
  • 1 tablespoon oil
  • 1 lime, juice and zest
  • 1/4 cup fresh cilantro, chopped

What you’ll do:

  1. Wash the peppers, half them lengthwise, and set the two halves you are not going to use aside (don’t through them out; there are many recipes you can use them for, or simply slice them into sticks and much on them as a snack!). Remove all the seeds and veins, then cut into a small dice. Do the same with the red onion. Place all your diced vegetables into a large mixing bowl.
  2. Rinse and drain all your canned beans, shake the access water off as much as you can, pat dry if needed and add to the mixing bowl together with the entire can of fire roasted green chilis. Note: If you don’t have these fire roasted green chilis where you live, you can use raw chili (spicy) pepper of your choosing. Or you can fire roasted a pepper yourself, let it cool, peel the skin, remove the seeds and chop finely. Regardless of what you decide to do, be careful about the heat and add the amount that tastes right to you. Using the amount listed in this recipe you will end up with a mild bean salad, so dial the heat up or down to taste.
  3. Place a small sauté or frying pan over medium-high heat, add the oil, then add the garam masala (or curry powder) and chili powder. Toast the spices for 1-2 minutes then immediately add to the mixing bowl. If you are trying to avoid oil, you can dry toast the spices in a non-stick pan, or skip toasting altogether. Without toasting the flavors will not be as rich, but milder may be better for some.
  4. Add the rest of the ingredients, mix well and you are done! You can serve this salad immediately, but for best results I recommend that you let it sit for 2-4 hours on the kitchen counter. You can also make this salad a day ahead, store in the fridge, then take it out and let come to room temperature before serving. Enjoy!

Copyright © Eat the Vegan Rainbow, 2019

Vegan Taco Salad with Homemade Beef Crumbles

Vegan Taco Salad with Homemade Beef Crumbles
Vegan Taco Salad with Homemade Beef Crumbles, via Eat the Vegan Rainbow

Taco Tuesdays – they are the best! Actually, tacos are great any day of the week, and especially handy when hosting a party. The reason why they work so well is that with 5-6 different toppings like shredded iceberg lettuce, diced tomatoes, guacamole, salsa, sour cream, beans, perhaps some pickled jalapeños, and some “beef” crumbles the food spread will look like a feast! Plus, everyone can go around and make their own tacos their way. What fun!!!

Plus: you can get almost everything from the store, and have the taco night done in no time. If you do have a bit of extra time on your hands, I do recommend that you make your own “beef” crumbles. It is cheaper, and you will be in control of additives and spices. There are many ways to make your own beef crumbles, and I shared the tofu-based as well as quinoa-based recipes before.

Both of those recipes required some time in the oven. Here, I have an easier option for you that is made entirely on the stove top. The recipe uses tempeh, and chopped walnuts to give it richness and protein. It also calls for quite a few spices, to infuse the crumble with umami flavors and smokiness. All you need to do really is crumble the tempeh, chopped the walnuts relatively finely, and sauté for a bit.

Although great, tacos can also be a bit frustrating. For example, I can never get enough lettuce and tomatoes into my taco shell before things start to fall apart. That’s why I decided to ditch the shell and go with a combination which I call taco salad. It starts with a load of shredded iceberg lettuce, and a good amount of tomatoes, beans and avocado (or guacamole). I added a bit of tortilla chips for some crunch, and a nice helping of the beef crumble. Final touch for this salad, as is for any other one, is a bit of acidity – lime juice works great here, and a bit of oil. The salad is pretty rich so you can skip oil if you like. Finally, if you have some fresh cilantro handy, go for it – it will add nice freshness to your salad.

By the way, this salad is a big meal. You will have plenty on your plate if you follow my measurements below – so you can certainly cut things in half if you are looking for a quick/small lunch!

IMG_8034


Vegan Taco Salad with Homemade Beef Crumbles

What you’ll need:

FOR BEEF CRUMBLE
  • 1 10 oz package of tempeh
  • 1 cup finely chopped walnuts
  • 1 tablespoon tomato paste
  • 1 tablespoon tamari sauce
  • 1 tablespoon canola oil (or any oil you like; you can also skip if on oil-free diet)
  • 2 teaspoons cocoa powder
  • 1 teaspoon cumin powder
  • 1 teaspoon chili powder
  • 1 teaspoon smoked paprika
FOR SERVING (per serving)
  • 8-10 tortilla chips
  • 1/2 cup diced plum (Roma) tomatoes
  • 1-2 cups shredded iceberg lettuce
  • 1 tablespoon vegan sour cream
  • 1/4 cup diced avocados
  • 1/4 cup canned black beans
  • 1/2 cup beef crumbles (recipe above)
  • freshly squeezed lime juice
  • 1/2 teaspoon olive oil


What you’ll do:

  1. Check your tempeh to figure out whether the tempeh can be used as is, or does it need to boiled first – some do! If boiled, let the tempeh cool for couple of minutes. Using a fork, crumble the tempeh by pulling it apart until the size of crumbles resembles what you may usually see in taco filling. Set aside.
  2. Chop the walnuts to about the same size as your tempeh crumbles. My tip for keeping the costs down when making something like this is to by walnut pieces, not halves, since they tend to be cheaper!
  3. Place a large skillet over medium high heat, add the oil, and the spices – cumin and chili powder and smoked paprika. Let them toast for 1 minute, then add the walnuts and let them roast for 2-3 minutes, until slightly browned. Mix in the tempeh and let caramelize for few minutes, 3-5 minutes should be sufficient. Add the tomato paste and cocoa powder, mix well and let the flavors develop over medium heat for another 5-10 minutes. Turn the heat off and let cool for 15 minutes or so.
  4. To assemble the salad, start with a large heap of shredded iceberg lettuce (or other type of shreds like kale shreds or romain), top with chopped tomatoes, black beans, taco “meat”, avocado, sour cream, tortilla chips, lime juice and olive oil (if using). Dig in!

Copyright © Eat the Vegan Rainbow, 2019

Easy Garden Vegetable Pasta Sauce

Easy Garden Vegetable Pasta Sauce
Easy Garden Vegetable Pasta Sauce, via Eat the Vegan Rainbow

It’s not quite summer yet, but it does not hurt to line up few new recipes to try when the vegetable gardens start to yield the wonderful, delicious produce. Of course, with modern day supermarkets, the produce in my Easy Garden Vegetable Pasta Sauce is on hand any time of the year!

The recipe is easy, because you only need a handful of ingredients: eggplant, zucchini, garlic, crushed tomatoes, olive oil, and a bit of salt, dried basil and dried oregano. You also need an ingredient that you may have hard time finding – pomegranate molasses. I found mine in a local Indian grocery store, and started experimenting with it recently. This molasses is thick and sticky, like the more common molasses made as a byproduct of refining sugar from sugar cane or sugar beets, but it is not sweet – actually it is quite tart. That’s why you will not find this molasses in many desserts, but you will in savory dishes.

If you are now thinking to yourself “I’n not buying yet another ingredient that I’ll never use again”, no worries – just use balsamic vinegar, especially the one that’s rich, sweet and dark. That will work just as well to add a bit of acidity and sweetness to the sauce.

Enjoy!


Easy Garden Vegetable Pasta Sauce

What you’ll need:

  • 1 eggplant, cubed
  • 1 zucchini, cubed
  • 3 cloves garlic, sliced
  • 1 28 oz (800 g) can crushed tomatoes
  • 2 tablespoons pomegranate molasses (or use balsamic vinegar)
  • 1 teaspoon basil, dried
  • 1/2 teaspoon oregano, dried
  • 1/4 teaspoon salt
  • 2 tablespoons olive oil


What you’ll do:

  1. Place a sturdy pot (I like my Dutch oven) over a medium high heat. Add olive oil and garlic. Sauté for a minute, to allow garlic to start releasing its aroma.
  2. Add the eggplant and zucchini, mix well and sauté for 10-15 minutes, until vegetables are fully cooked.
  3. Mix in the molasses (or balsamic vinegar), and all the herbs (basil and oregano), then pour in the crushed tomatoes. Bring to simmer, cover with a lid, lower the heat down all the way, and let cook for another 10 minutes.
  4. Using a stick blender or a regular kind, blend the sauce until rich and dense. Use on your favorite pasta, or spiraled vegetables, like zoodles, which are my personal favorite.

Copyright © Eat the Vegan Rainbow, 2019

White Bean and Spinach Soup

White Bean and Spinach Soup
White Bean and Spinach Soup, via Eat the Vegan Rainbow

From the very first time I tried a bite of this soup I was hooked! The texture is incredibly smooth and creamy, and the taste is amazing – this is real comfort food right there!!!

Plus: this soup is super easy and super affordable – and it is a perfect make-ahead or meal prep option since the flavor is even better the next day, or the day after, or the day after. The soup will hold well for 5-6 days if stored in a container with a tight lid in the fridge.

And if you are looking to throw an Italian-inspired party, this soup served with a tossed salad and fresh bread will do the trick! Vegan and non-vegan friends and family will just love it, especially those among them who seem alarmed by some of the less common vegan ingredients, like nutritional yeast, or unfamiliar add-ons. This soup is plain and simple – white beans (homemade or canned), tomatoes, baby spinach, olive oil, onion, garlic, oh and some pasta – THAT’S IT!

If you are wondering whether you have to use cannellini beans, the answer is no. Any small white bean will do – and you can definitely cook the beans yourself. About half a pound (225-250 g) of dried beans will probably be just about right for this soup. Quite frankly, the convenience of canned beans can’t be beat, ad that’s a fact – with a snap of a lid you are already there. And these days you can find most beans in “no salt added” version, in case you are monitoring your sodium intake. The same is true for crushed and diced tomatoes – in my grocery store you can find both in “no salt added” variety. Whether you prefer to skip salt or not, I should note that a little bit of salt goes a long way towards making this soup have a really exquisite flavor.

The pasta that I recommend for this soup is ditalini, small pasta that looks like very small and short macaroni. This type of pasta is commonly used in traditional Italian bean soup, Pasta e fagioli, which is really pasta and beans. Ditalini works well in bean dishes because it’s size is well matched to the size of the beans, so it harmonizes with the rest of the dish. If you can’t find ditalini, you can use any other short and tubular pasta, or even something like rotelle – the wheel shaped pasta which is kinda fun.

One huge trick for making this soup is to blend half of it and then add more chunkiness to it as it simmers. Blending part of the beans, sautéd onions and garlic, and crushed tomatoes makes for a perfect creamy base. You will think you are eating a soup made with a pile of butter and cream, or a heavy roux, or both – and none of this is true! one thing to be careful about is blending the hot mix – you can get burned so pay attention!!!


White Bean and Spinach Soup

What you’ll need:

  • 1/2 onion, diced
  • 6 cloves garlic, sliced
  • 3 15.5 oz (440 g) cans cannellini bean, divided
  • 1 28 oz (800 g) can crushed tomatoes
  • 1 14.5 oz (411 g) can diced tomatoes
  • 1 cup ditalini pasta (or other smaller pasta, like short macaroni
  • 1 lbs (454 g) baby spinach
  • 2 tablespoons olive oil


What you’ll do:

  1. Place the oil into a large pot and place it over the medium high heat. Add the onions and garlic. Sauté for 5 minutes, then add 1 1/2 can of cannellini beans and mix well. Cook for another 5 minutes, then turn the heat off. Add the crushed tomatoes and mix well.
  2. (TAKE EXTRA CARE) Pour the mix into a blender – take care as the soup will be very hot. Don’t use the blender unless the instructions state explicitly that it can be used with hot liquids. Make sure to use precaution to prevent burns. Blend the mix until smooth and silky. (You can also use a stick blender if you have one and blend the soup directly in the pot!)
  3. Pour the blended soup back into the pot, and use 1 to 2 cups of water to rinse out the blender. If you used a stick blender, do add 1-2 cups of water. Add diced tomatoes, and the rest of the beans. Bring to boil.
  4. Once the soup is boiling, add the spinach and wilt for 2 minutes or so. Finally, add the pasta (detalini), mix well and simmer for 5 minutes, then turn the heat off and let the pasta finish cooking. Serve with fresh salad, a piece of bread, and some vegan parmesan.

Copyright © Eat the Vegan Rainbow, 2019


Grilled Corn with Cilantro and Lime

Cilantro and Lime Grilled Corn, via Eat the Vegan Rainbow

Corn is amazing for many reasons. It’s incredibly sweet and delicious, it is easy to make, and it is super cheep during summer months while in season. Outside that window, fresh corn is still really affordable and you can enjoy it year round.

Corn requires minimal preparation, can be ready in no time and it’s naturally gluten-free. Moreover, if you can’t get fresh corn you can always youse frozen corn because it will work almost as good as fresh one.

Let me illustrate some of what I just said with a very simple corn side dish. I developed this recipe as a side for summer cook-outs and burgers (some of my favorite burgers that this corn goes really well with are Chickpea Burgers with Sun Dried Tomatoes and Walnut Meat – YUM!), but it can definitely be made year-round. Although you could steam your corn and then follow the steps below, for best results I recommend grilling. You can grill the corn on your outdoor grill, or using a grill pan – exact method does not matter. What matter are those lovely grill marks and getting some charring on the corn, which really adds a lot of flavor.

Other than getting those lovely grill marks, the rest of this recipe is super quick and easy. All you need to do is toss the chopped corn with couple of flavoring agents, lime juice for a bit of acidity, lime zest for a bit of crispness, some fresh cilantro for a bit of freshness, some fire roasted green chiles for some spiciness, and a bit of oil that helps all these flavors stick to the corn and each other better.

You can serve the corn immediately after tossing it with the rest of the ingredients, but I recommend that you stay patient and wait for 10-15 minutes for all the flavors to come together and infuse the corn. Then you can dig in!

img_5664

Grilled Corn with Cilantro and Lime

What you’ll need:

4 ears of corn, grilled

1 lime, juice and zest

2 tablespoons olive oil

1 tablespoon fire roasted chile peppers (from the can)

¼ fresh cilantro, finely chopped

Salt, to taste (optional)

What you’ll do:

  1. Grill the corn using an outdoor grill. If none is available, you can cook your corn in the microwave oven, then add grill marks using a grill pan, or go directly to the grill pan. Usually, it takes 3-5 minutes per side, and you do need to stay close and keep an eye on the corn so that it doesn’t burn. Let the corn cool just slightly, so that you can handle it, then chop each ear of the grilled corn into 4 pieces.
  2. In a large bowl, combine the rest of ingredients (lime juice and zest, jalapeños, olive oil, and cilantro; you can also add salt to taste – I don’t use much salt, and I don’t think this corn needs any, but you can decide for yourself). Toss the corn with the mix and set aside for 10-15 minutes to allow the flavors to mix and mingle. Serve with burgers, salads (like this Coleslaw), ribs, beans, or other goodies!

Copyright © Eat the Vegan Rainbow, 2019

SaveSave

High Protein Noodle Soup – the Best Thing for Colds Since the Chicken Noodle

img_6046
High Protein Noodle Soup, via Eat the Vegan Rainbow

Winter wonderland is all around us – at least for those of us who live in the Northern hemisphere somewhere above 30 to 40 degrees North. Unfortunately, in addition to all the fun stuff that winter brings, there are also the dreaded colds or even worse full on flus that get around. Just around the Christmas time as was waylaid by a serious cold – I call it a cold but it was more of a full body weakness and loss of energy with some minor runny nose and sore throat. I stayed in bed for a day, drank loads of fluids, and all was better in about 48 hours.

One things that really helped me power through is a soup I made, full of protein as well as mushrooms. It perked me right up, and kept me coming for more at a time when my appetite was not all that great. The main reason why I went for some soup at the time like this is thanks to the well-known, and scientifically slightly supported, power of the hot bowl of chicken noodle soup to make the cold go away.

The power of the soup resides to some extent to the fact that it is served hot – the steam helps with decongestion and is commonly recommended to get your nasal passages work again. Plus: soup, and other warm liquids, are easy to swallow and therefore usually gentle for the painful throat. And: when you are under weather, down with a cold, one of the best thing you can do is stay hydrated, something any soup will help you with.

But a soup like your old fashioned chicken noodle soup that you may have been chased around as a kid, have more hidden secrets. They are full of protein, as well as vitamins and minerals that come with those great vegetables hiding in there.

So, in my attempt to recreate the richness of flavors, level of protein, and intense apparent healing powers of the chicken noodle soup I went for, well, pure protein – pea protein powder and peanut butter powder, which is really almost all protein (but do check a label before buying to be sure and stay away from some of the products out there that add sugar!).

I also went for mushroom broth as it is deeper in flavor than a vegetable stock. I used store bought, but you can definitely make some on your own especially if you are looking for ways to use up all those mushroom scraps (this recipe is a great start). And to deepen the flavors further I recommend using soba noodles. These noodles are earthy, nutty and I simply love them!  I use them in stir fries and soups, and always have them on hand in my pantry.

By the time this soup is ready, which is very quick indeed, you will be holding in your hand something that will make you feel better and go “mmmmmmm…”.

img_6048

High Protein Noodle Soup

What you’ll need:

32 FL oz (1 L) mushroom broth (or vegetable stock if mushroom broth unavailable; homemade broth also a great option)
32 FL oz (1L) water
1/4 cup pea protein powder
1/4 cup peanut butter powder
1 tablespoon ground ginger
1 tablespoon curry powder
4 cups frozen or fresh broccoli florets
6.4 oz (180 g) soba noodles
1/4 cup Italian parsley, finely chopped
Freshly squeezed lime juice to taste

What you’ll do:

  1. Combine mushroom broth, water, pea protein powder, peanut butter powder, ginger and curry powder in a large pot. Mix well to combine and remove any lumps that may form. You can also use a blender or a whisk.
  2. Place the pot over the medium high heat and bring to boil.
  3. Once the soup is boiling, add broccoli and the noodles, lower the heat and let simmer for 5-7 minutes. This should be enough time for noodles and broccoli to be cooked al dente – so soft but not mushy.
  4. Turn the heat off, mix in the fresh parsley, and some lime juice for a bit of acidity, and serve. You can always serve with lime wedges, and let people add lime to taste themselves.

Copyright © Eat the Vegan Rainbow, 2019