Gluten-free flatbread with corn, cashews and chia seeds, via Eat the Vegan Rainbow
Making your own gluten-free flatbread is easy! Yes, you heard that right – so, now you don’t have any excuses not to try it. Why flatbread? Well, to be quite honest, I don’t have patience or the time needed to work with yeast – you need to babysit a piece of dough for hours and at the end all you have to show for is a loaf of bread. Undoubtedly, it’s a loaf superior to anything you may get in the store, but that usually does not compensate for the time investment.
That’s why I like my bread machine. It’s set-it-and-forget-it kind that does everything for you. And I’ve been able to get some great results this way. But sometimes you just need something more fun and unusual and flatbreads are something to try. I love tortillas (flatbread in my book), lavash, as well as Indian flatbreads, like chapati (or roti) and paratha. These are all great options for wraps, but what they miss is enough structure to make a sandwich.
Below is the result. I would call it a step in the right direction, as I wished that it was a bit crispier. Still, that’s nothing a toaster (or a toaster oven) can’t fix. The bread is basically made of corn, cashews and chia seeds all mixed together with some nutritional yeast, baking powder and spices.
The trick I discovered which helps bake the bread is to use a pizza stone. And if you don’t have one, don’t worry, I provide alternatives below.
Enjoy!
Gluten-free flatbread with corn, cashews and chia seeds, via Eat the Vegan Rainbow
Gluten-free flatbread with corn, cashews and chia seeds
What you’ll need:
4 cups corn kernels (fresh, frozen (defrosted) or from the can (drained))
1 cup cashews
1/3 cup chia seeds
1/3 cup nutritional yeast
1 teaspoon baking powder
1/2 teaspoon black pepper
1/4 teaspoon crushed red pepper flakes
Optional: 1/4-1/2 teaspoon salt (to taste)
Cooking spray
What you’ll do:
Preheat the oven to 425 F (220 C) with a pizza stone in it, if using.
Put all the ingredients into a food processor and process until fully combined and smooth. This will take couple of minutes.
If you are not using a pizza stone there are several different ways in which you can bake this. You can use a baking sheet or a 9 in x 13 in (23 cm x 33 cm) baking dish. Regardless of a method, you will need parchment paper. If using the pizza stone you will place the parchment paper on your pizza peel and pour the batter on it, shaping into a 1/4 in (5-6 mm) thick rectangle (I am assuming you have a pizza peel if you have a pizza stone, the two go hand in hand; but if you don’t just use your kitchen counter and be very, very, very careful when placing your bread onto the pizza stone as it will be hot and you can get burned). If you are using a baking sheet or a baking dish you need to spray the parchment paper with some cooking spray to prevent sticking and pour in your batter. Smooth the top and make sure the thickness is even throughout.
Place the bread into the oven. If using the pizza stone, it will take about 15 minutes to bake this bread half way through, then you will turn the oven off. Leave the bread in the oven with the heat turned off for another 15 minutes. The pizza stone and the oven retain lot of heat, so the bread will continue to bake. If you are baking without the pizza stone, bake for 25 minutes, then check for doneness. The bread will feel soft but it should not feel wet.
Take the bread out, and slide the parchment paper out of the baking sheet/dish. Let the bread cool on the parchment paper until cool enough to handle, then slide on the cooling rack. This will prevent the bottom from getting soggy.
Serve warm or cold, and use as you would normally use a flat bread. Enjoy!
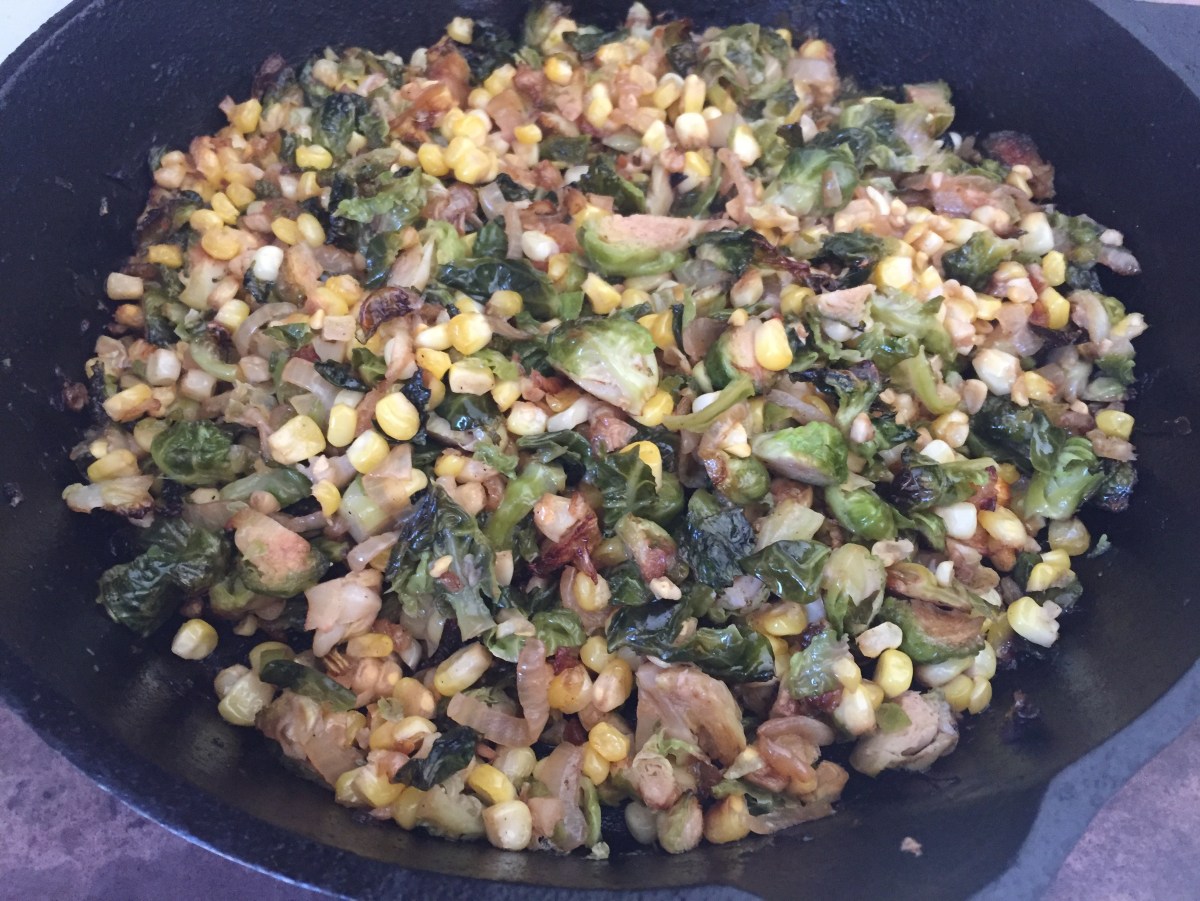
Caramelized Brussels sprouts with corn, via Eat the Vegan Rainbow
So you hate Brussels sprouts, do you? And you really think that there is no way you will ever change your mind on that account?
Well, I have a recipe for you to try. First of all, you will have to find some fresh Brussels sprouts – I don’t think frozen will work. But, on the other hand, although I do think that fresh corn works best, you can cut yourself some slack and use frozen corn kernels or whole corn kernels from a can.
The recipe is super simple – so there’s not much to add really. I made this recipe with adding some dried cranberries and it is delicious! But, I made it without cranberries and it works just as well. This can be a yummy side dish to add to your Thanksgiving and/or Holiday (Christmas) feast, and in that case cranberries (especially for those of you in North America) are a must!
Note: using a cast iron pan is recommended but not required. I like using a cast iron pan for a recipe like this because it does help things caramelize nicely. And it also allows you to pop the pan under a broiler if you like your top to get extra crunchy, which can be a nice touch especially if you have guests that you are trying to impress. But you can achieve similar level or caramelization in almost any other type of a pan. CAUTION: you should not attempt placing just any pan under the broiler as most of them are not oven safe!!!
Caramelized Brussels Sprouts with Corn, via Eat the Vegan Rainbow
Caramelized Brussels Sprouts with Corn
What you’ll need:
1-1.5 lbs (400-600 g) Brussels sprouts, cleaned and quartered
1 yellow onion, diced
2 ears of corn, just the kernels (frozen or canned corn is OK, but fresh is the best)
1/2 cup sliced dried cranberries (optional)
1/4-1/2 teaspoon salt
2 tablespoons olive oil
What you’ll do:
Place a heavy cast iron pan over the medium high heat. Add the oil and onion. Let the onion brown for 5-8 minutes.
Add the Brussels sprouts and let them brown for another 5 minutes or so.
Add the corn, sliced dried cranberries if using, add salt to taste, mix well and cook for another 10 minutes, with occasional stirring.
A slow cooker, also known as Crock Pot (which is a brand name I think), may seem like one of those kitchen gadgets that you’ll get, use once and forget. Although I use my slow cooker once a month or so, it is absolutely wonderful to have around. There have been many instances when my weekends were busier than my work days (and I do all my cooking on weekends) and slow cooker came to the rescue. I would set the thing up in the morning before I got out the door, and the dinner would be ready by the time I came back in the evening, warm and delicious!
For example, the recipe I am sharing here was the one I made for a dinner party – and everyone walked away with their bellies and taste buds completely happy!!! That’s another reason to get a slow cooker – it can really help with all those dinner parties and pot lucks. The crock pot serves not only to cook food but can hold food warm for hours.
My favorite thing to make in a crock post are sort of stews – hearty dishes with a handful of ingredients that are full of flavors and warmth. This jackfruit stew is a good example (and I also used jackfruit to make a “chicken” tikka masala in a slow cooker as well as BBQ pulled pork), as is this tofu-mango-chickpea curry.
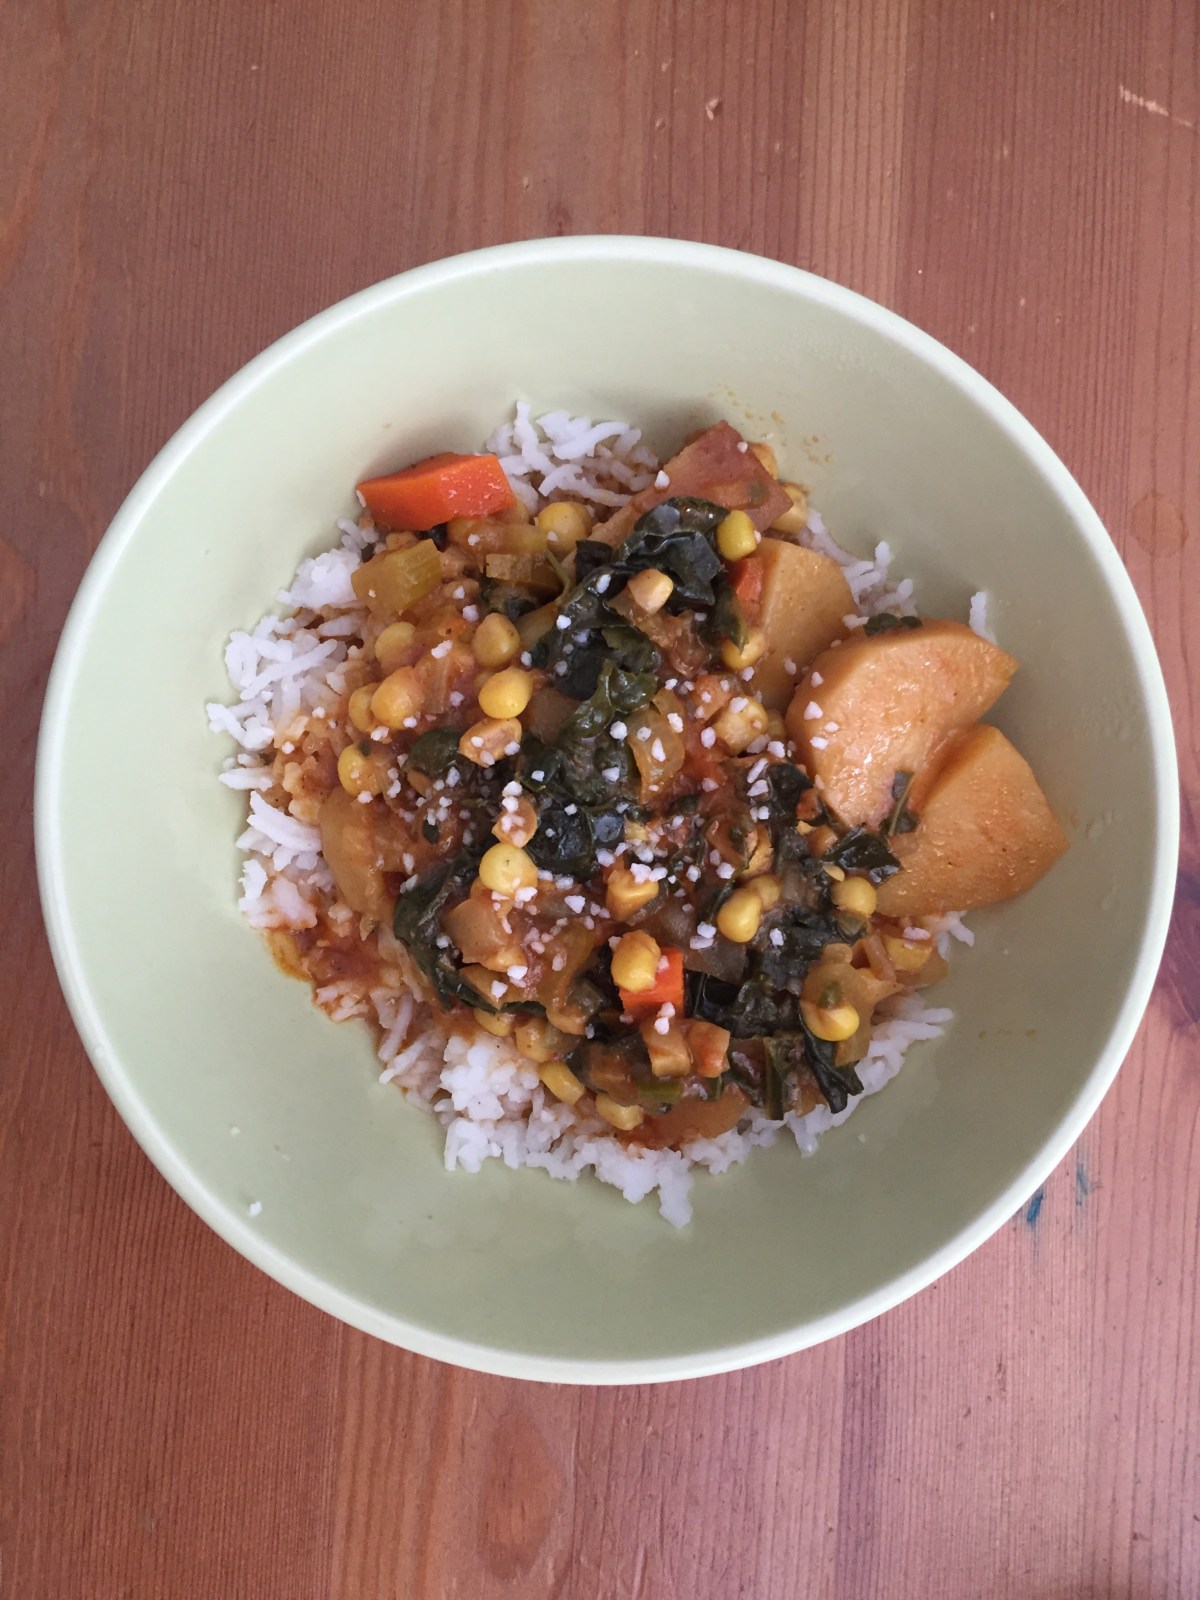
The inspiration for this hodgepodge – which technically means “confused mixture” – was all the great vegetables that were in my weekly CSA share (CSA stands for Community-Supported Agriculture and is a program in the area where I live that supports local farmers and give local folks like me access to farm fresh produce). The recipe uses corn (kernels only), kale, potatoes, carrots, celery, and onion. All these ingredients work together well, and I don’t recommend that you make some sweeping swaps. Things that would likely work are using peas instead of corn, using rutabaga or turnip instead of potatoes, and chard, collard greens or spinach instead of kale.
However, there really is no substitute for the mirepoix – carrots, onions and celery. This makes the base of the dish and I can’t think of the ways to sub these – my apologies for those of you with onion allergies! Usually, mirepoix ingredients are sautéd; however, the slow cooker does not have this function. So, I recommend either sautéing diced carrots, celery and onion in a pan over medium-high heat for 8-10 minutes, or mixing the diced vegetables with some oil and putting them in a microwave oven for about 5 minutes. This will help brown and soften them, and will help with flavors!
In addition to veggies, what makes this an amazing feast are the spices, curry powder and bay leaves, and coconut milk, which gives this stew its creaminess. Serve over rice or couscous, and perhaps with some coarse salt (which is what I topped mine with). Enjoy!
Slow Cooker Hodgepodge
What you’ll need:
1-1.5 lbs (500-800 g) white potatoes
4 ears of corn, just the kernels (or 4 cups frozen corn kernels, defrosted, or about 2 cans (15 oz; 400 g) of whole kernel corn)
1 bunch (6 cups) kale (or chard or collard greens), just sliced leaves, stems removed
4 large carrots, peeled and diced
6 talks celery, sliced
1 onion, diced
1 tablespoon curry powder
3 tablespoons tomato paste
2 cups vegetable stock
1 can (13.66 fl oz; 400 mL) coconut milk
4-5 bay leaves
1 tablespoon vegetable (or olive, or canola) oil
OPTIONAL: Rice to serve
What you’ll do:
Wash, peel and chop the potatoes into 1 to 1 1/2 in (2.5 – 3.5 cm) cubes. Place in the crock pot that has been lined with a liner, if using.
If starting from fresh corn, wash the ears, and using a sharp knife go down each ear and get just the kernels. If using frozen corn, it’s best to leave it on the kitchen counter overnight to defrost, but you can start from frozen as well. If using canned whole kernel corn, drain and rinse before using. Place over the potatoes.
Wash, drain and de-vein the kale to remove all the tough stems. Chop the leaves into rough shreds. Place over the corn.
Peel and dice the onions and carrots, and dice the celery. Place onions, carrots and celery into a microwave safe dish, mix with 1 tablespoon of oil, and place in a microwave for 5-6 minutes on high power. You can also sauté on the stove top. Pour over the potatoes, corn and kale.
Place a non-stick frying pan over medium-high heat. Add the curry powder and dry toast for 1-2 minutes, then pour over the veggies in the crock pot.
Pour the coconut milk, vegetable stock and tomato paste into a measuring cup or a mixing bowl large enough to hold everything. Mix together to combine. Don’t worry if there are chunks and clumps, but do give it a good mix. Pour over the vegetables in the crock pot.
Give everything a good mix, tuck the bay leaves throughout the stew, cover with the lid and turn the crock pot on high heat for 6-8 hours.
Serve over rice, or couscous, and sprinkle with salt (Note: this recipe does not use added salt, but you can add as little or as much salt as you like!).
Tex-Mex Stir Fry with Crispy Tofu, via Eat the Vegan Rainbow
Tofu seems to be an ingredient that many would like to use more often but don’t know where to start. It is also something that seems to taste so much better when you get it at a restaurant. I’ve seen a lot of people that complain about never getting tofu to be quite as crispy and quite as crunchy or quite as flavorful as when they have it in their take-outs or at the favorite Asian place.
I love making tofu – and I do it without any tofu presses or other special tofu preparing equipment. My favorite way to eat tofu is as a crunchy snack – I take a block of extra firm tofu (extra firm is my go-to kind of tofu for most of my recipes), drain the liquid out, leave in a colander to drain for about 30 minutes, then slice into cubes that are about 2 cm (3/4 in) long. For a block of tofu that you find in US-based supermarkets (14 oz or so), this means cutting it into 48 cubes – you slice the block of tofu in half, then each half into three slices, which gives you 6 mini blocks of tofu. Each mini block is then sliced in half, and each stick of tofu then divided into 4 cubes, giving you 12 x 4 = 48 cubes. If all this is too complicated math-wise, don’t worry, just cube into whichever number works. Remember to keep the chunks, well chunky!
Next, I lay the tofu cubes onto a baking sheet lined with some parchment paper, and spread them out, so that they don’t touch each other. They go into a hot oven (425 F (220 C)), and after about 15 minutes I check them, flip them around and roast for another 10 minutes. What this gives you at the end is tofu that’s crunchy on the outside and soft on the inside. I eat these as a snack, as is!
This, of course, is not the end of the story, and you can use the roasted tofu to make number of other dishes. For example, you can use it to make Saag Paneer. You can also toss tofu with your favorite dressing and use in a salad. And: you can use your roasted tofu to make a wonderful stir-fry, like the one I will share with you here.
This stir-fry is actually a sort of Mexican-Chinese fusion recipe, and it is sweet from all the caramelized onions and sweet red, yellow and orange peppers, as well as a bit of agave nectar that goes into the tofu marinade. I kept it sweet to encourage my kids to eat it – they are not big fans of hot spices at the moment. Having said all that, you can definitely spice things up and adding a bit of Sriracha into the tofu marinade, and/or sprinkling some crushed red pepper flakes will add some serious spice punch!
I recommend that you serve this stir-fry with simple rice or, even you are counting carbs, this cauliflower rice recipe will definitely work for you. If you are looking for something totally different, this stir-fry will also go well with polenta, or even baked polenta. Enjoy!
Tex-Mex Stir Fry with Crispy Tofu, via Eat the Vegan Rainbow
Tex-Mex Stir Fry with Crispy Tofu
What you’ll need:
2 blocks (14 oz, 400 g) extra firm tofu, drained
1 tablespoon agave nectar
1 tablespoon toasted sesame seed oil
1 tablespoon low-sodium soy sauce (or tamari sauce, if gluten-free)
1/2 yellow or white onion, finely diced
4 scallions, white and green bits, finely sliced
2 tablespoon grated ginger (or pickled ginger, diced very finely)
2 tablespoon canola oil
3 cups finely sliced yellow, orange and/or red peppers sticks
2 cups yellow corn kernels (I used frozen, but fresh or canned would work as well)
What you’ll do:
Preheat the oven to 425 F (220 C).
Take the blocks of tofu out of its packaging and leave in the sieve or a colander to drain for 30 minutes or so. Slice the tofu into 3/4 in-1in (2 cm) cubes (each block should give about 40-48 cubes). Line the baking sheet with some parchment paper and spread the tofu cubes around, so they are not touching each other. Roast the tofu for 15 minutes, check and flip the cubes, then roast for another 10 minutes.
Place agave nectar, toasted sesame seed oil and soy sauce into a large mixing bowl and whisk together.
Slide the hot tofu into the marinade, mix together and set aside.
Place a large wok, or a deep trying pan, over high heat. Add the canola oil, diced onions, sliced scallions, and grated ginger and fry for 2-3 minutes with frequent stirring.
Add sliced peppers and continue to fry at high heat for 10 minutes or so.
Add frozen corn, and fry for another 5-8 minutes.
Finally, add the tofu and the marinade in and stir well. Leave on high heat for another couple of minutes, then turn the heat off. Serve hot over some rice, or polenta – and don’t forget to add some Sriracha to the marinade if you are into spicy!
Cilantro and Lime Grilled Corn, via Eat the Vegan Rainbow
Corn is amazing for many reasons. It’s incredibly sweet and delicious, it is easy to make, and it is super cheep during summer months while in season. Outside that window, fresh corn is still really affordable and you can enjoy it year round.
Corn requires minimal preparation, can be ready in no time and it’s naturally gluten-free. Moreover, if you can’t get fresh corn you can always youse frozen corn because it will work almost as good as fresh one.
Let me illustrate some of what I just said with a very simple corn side dish. I developed this recipe as a side for summer cook-outs and burgers (some of my favorite burgers that this corn goes really well with are Chickpea Burgers with Sun Dried Tomatoes and Walnut Meat – YUM!), but it can definitely be made year-round. Although you could steam your corn and then follow the steps below, for best results I recommend grilling. You can grill the corn on your outdoor grill, or using a grill pan – exact method does not matter. What matter are those lovely grill marks and getting some charring on the corn, which really adds a lot of flavor.
Other than getting those lovely grill marks, the rest of this recipe is super quick and easy. All you need to do is toss the chopped corn with couple of flavoring agents, lime juice for a bit of acidity, lime zest for a bit of crispness, some fresh cilantro for a bit of freshness, some fire roasted green chiles for some spiciness, and a bit of oil that helps all these flavors stick to the corn and each other better.
You can serve the corn immediately after tossing it with the rest of the ingredients, but I recommend that you stay patient and wait for 10-15 minutes for all the flavors to come together and infuse the corn. Then you can dig in!
Grilled Corn with Cilantro and Lime
What you’ll need:
4 ears of corn, grilled
1 lime, juice and zest
2 tablespoons olive oil
1 tablespoon fire roasted chile peppers (from the can)
¼ fresh cilantro, finely chopped
Salt, to taste (optional)
What you’ll do:
Grill the corn using an outdoor grill. If none is available, you can cook your corn in the microwave oven, then add grill marks using a grill pan, or go directly to the grill pan. Usually, it takes 3-5 minutes per side, and you do need to stay close and keep an eye on the corn so that it doesn’t burn. Let the corn cool just slightly, so that you can handle it, then chop each ear of the grilled corn into 4 pieces.
In a large bowl, combine the rest of ingredients (lime juice and zest, jalapeños, olive oil, and cilantro; you can also add salt to taste – I don’t use much salt, and I don’t think this corn needs any, but you can decide for yourself). Toss the corn with the mix and set aside for 10-15 minutes to allow the flavors to mix and mingle. Serve with burgers, salads (like this Coleslaw), ribs, beans, or other goodies!
Tex-Mex Stuffed Zucchini with Homemade Salsa and Diced Avocado, via Eat the Vegan Rainbow
When life gives you zucchini, there are actually many things you can do with it, grilling and sautéing being my go-tos most of the time. But, doing same thing over over again, no matter how tasty and satisfying they are, does get old. When it comes to zucchini, I have been trying new things, like zucchini lasagna, and zucchini fruitcake – I did also give zucchini cheese a try but that one did not work for me, so I am putting my zucchini cheese making days behind me.
To me, perfect stuffing zucchini is about 8-9 in (20-25 cm) and what makes this the perfect size is the fact that it matches is the size of my 9 x 13 in (23 x 33 cm) baking dish! Plus, the zucchini in this size range is in the Goldilocks zone – not too big and not too small, yet just right for carrying a good amount of stuffing.
The best way to get the zucchini ready for stuffing is to wash them, cut the ends off (this step is actually optional, you could skip it and leave the ends on – this would give your dish a nice, rustic presentation at the end), then slice the zucchini lengthwise and scoop out the seeds. If the zucchini is old and seeds look well-formed and unappetizing, please feel free to discard them. But, if the inside looks fresh and soft, scoop it out into a bowl and put aside to use as a part of the stuffing.
Par-roasting zucchini
You may have heard about par-boiling, when you boil something only half way through before doing something else with it. Par-roasting is essentially the same thing, just using roasting as a strategy to get the nice, roasted and caramelized flavors going without too much oven time. This can come in handy during hot summer months, for example.
I use par-roasting when prepping most of my stuffed vegetables, be it mushrooms, peppers, eggplant, or zucchini. The method is simple: you turn your oven on high (425 F (220 C) or higher), line a baking sheet with some parchment paper, toss the veggies with some oil, or spray with some cooking spray, or skip the oil altogether if avoiding fat (you can also sprinkle salt on if using, I don’t because the stuffing is usually plenty salty for me), and let the veggies brown for 15 minutes or so, flipping them over once if needed to get them equally browned on both sides.
Why par-roasting?
Well, most stuffing I make is already cooked by the time all is said and done. So, the stuffing itself usually does not need any more cooking time – all it needs to do is go into the oven for 10 minutes or so to get nicely browned on top. Par-roasting is my way of brining whichever vegetable is supposed to hold the stuffing up to speed so that the vehicle is ready for the final oven ride, when the stuffing gets browned and the vehicle finishes baking while absorbing some of the flavors that seep from the stuffing. In this way everything gets harmonized and delicious.
My secret to a perfect (and easy) Tex-Mex flavor
The best way to get the tex-mix flavors going is to start with a good chili powder, then add cumin powder and smoked paprika. These three things combined make for nice smokiness with just a hint of heat, so even with the amount of chili powder I use here the heat will not be overpowering. Having said that, do adjust the chili powder to fit your preferences. Of course, having corn and black beans in this dish is also essential. Here, I used canned corn and canned beans, but you can definitely use frozen corn and cook your beans from scratch. If you are using frozen corn, 1-1/2 cups of frozen corn should be enough, and if you are cooking the beans, 1 cup dry beans will probably be plenty.
Easy homemade salsa
What also helps tex-mix flavors is topping the stuffed zucchini with some freshly made salsa. If you don’t have the time, store-bought is perfectly fine to use here, either freshly made or from a jar – you can pick your own favorite flavor and enjoy! But, if you do want a quick homemade salsa, then follow the instructions below. The main tip here is to cut the tomatoes lengthwise and scoop out the seeds. Don’t throw them out – you can mix them into the tex-mex stuffing! Here, almost everything goes into a food processor for easy chopping. I recommend leaving one cleaned out tomato aside, and dicing it finely by hand to give the final salsa a bit more texture. This salsa takes only a few minutes to make, and you will love the flavor of freshly chopped cilantro and freshly squeezed lime, so it is worth doing it from scratch.
Diced avocado for a final touch
Last but not least is the diced avocado. You actually don’t need the avocado if you can’t stomach it (I know there are some people out there that have trouble with avocado), but it does add a nice, smooth, rich and creamy flavor to the final dish. It’s like a five layer dip right there in your zucchini “boat”!
To pick the best avocado, get those that are still quite hard and then leave them next to some bananas on your kitchen counter for a day or so. The avocado will soften and then you can store it in the fridge until ready to use. In this way you will avoid getting avocados that are too bruised by all the squeezing and poking, and can buy extra avocados on sale and use them 5-7 days later.
After that PSA, back to the Tex-Mex Stuffed Zucchini – to finish the stuffed zucchini, squeeze some fresh lime juice over your avocado and sprinkle some fresh cilantro. If you are using homemade salsa you can skip the cilantro, but if you are using the store-bought then no cilantro-skipping is allowed!
Tex-Mex Stuffed Zucchini with Homemade Salsa and Diced Avocado
What you’ll need:
3 zucchini, washed but not peeled
1 15.25 oz (430 g) can yellow corn (whole kernel)
1 29 oz (820 g) can black beans
1 medium yellow onion, finely diced
4 cloves garlic, thinly sliced or crushed if you prefer
2 tablespoons vegetable oil
2 teaspoons chili powder
1 teaspoon cumin powder
1 teaspoon smoked paprika
Freshly ground black pepper and additional salt to taste!* (see Note)
1 avocado, finely diced, for garnish, optional
Fresh cilantro and freshly squeezed lime juice for topping (optional)
SIMPLE HOMEMADE SALSA
4 plum tomatoes, seeded, divided
1/4 – 1/2 jalapeño pepper, deseeded (or more, to taste)
1/4 onion or red onion
3 tablespoons tomato paste
1/2 cup fresh cilantro
1/2 lime, juice
1/4 teaspoon sat (more or less, to taste)
Cooking spray, salt, pepper
What you’ll do:
Preheat the oven to 425 F (220 C).
To make the salsa, cut the tomatoes lengthwise, the use a paring knife to take out the seeds and the middle of the tomato. Reserve the middles for the stuffing. Place all the ingredients, except one tomato into a food processor and buy until finely chopped. Dice the leftover tomato finely and mix in with the rest of pasta. Once mixed, set the pasta to the side.
Wash the zucchini, remove the ends, and cut lengthwise into two pieces (I prefer to remove the ends but you don’t need to do that). Use a teaspoon to scrape out the inside of the zucchini – if full of seeds you can discard, otherwise add to the tomato scrap pieces and put aside.
Line a large baking sheet with parchment paper. Spray with some cooking spray, then place zucchini on, spray the tops and place the zucchinis into the oven. Zucchini will be nicely browned in about 10 minutes. Take the zucchini out and set aside.
Lower the oven temperature to 375 F (190 C).
While the zucchini is par-roasting, get going on the stuffing. Add the oil to a large pan (frying or sauté) and place over the medium-high heat. Add the chopped onions and sliced garlic and let them caramelize for 2 minutes or so. Next add the spices (chili powder, cumin powder, smoked paprika) and let them “bloom” for 1-2 minutes.
Next add the scooped out zucchini and tomato scraps, and mix well. Sauté for couple of minutes, then add corn and black beans. For corn and black beans, I recommend straining them using a large colander, and rinsing them for half a minute under some cold water before using. If you are using frozen corn, or fresh corn, and the beans you cooked yourself this washing and straining step is, of course, not necessary! Mix everything well and sauté for another 8-10 minutes.
Spray a 9 x 13 in (23 x 33 cm) baking dish (or a large casserole pan) with cooking spray, then cover the bottom with a layer of stuffing. Place the par-roasted zucchini boats in and fill them with stuffing. Pile the stuffing high, and press gently in as you fill to make sure you get to all the little nooks and crannies. (You may end up with extra stuffing – if that’s the case you can serve the stuffing itself as a side for another dinner, for example this would be a grate thing to put into a taco shell and enjoy, or serve cold on your next tex-mix salad!).
Put the stuffed zucchini into the oven and bake for about 15 minutes. All you are looking for is some nice caramelization on the top and the sides. Pull the stuffed zucchini out, and let it cool for couple of minutes before serving.
When serving, top each zucchini boat with salsa and diced avocado, freshly chopped cilantro, and a squeeze of lime and you are done!
Hearty Vegetable Soup with Kale, via Eat the Vegan Rainbow
There’s always room for soup, and in some cases the soup is so rich that there’s room only for the soup. I definitely like making hearty soups that are rich and filling. I’ve already shared with you my split pea soup, which is on the left lighter side, and “clam” chowder and bean and leek soup with soy chorizo, which are both really more a meal in a bowl than a light intro to a main course.
Today’s soup is somewhere in between: not quite hearty enough to qualify as a meal yet not light by any means. It is full with vegetables and resembles Minestrone Soup. The soup builds on the classic mirepoix, a classic base of many soups and stews. Practically speaking mirepoix is a mix of diced carrots, onions and celery that is sautéed until caramelization starts to take place. This what I would normally do when making a soup like this but this time around I had to take a shortcut and I used a lot of frozen and canned veggies, including the frozen peas and carrots mix so my mirepoix started with only onions and celery.
At the end the soup came together well, with frozen corn and canned tomatoes and beans, and a whole bunch of kale. The main trick here was to let the soup simmer for a long time which helps soften kale, which has quite a sturdy leaf structure.
Hearty Vegetable Soup with Kale
What you’ll need:
6 stalks celery, diced
1 yellow onion, diced
16 oz (454 g) kale, roughly chopped
15.5 oz (439 g) can red kidney beans
2 cups yellow corn kernels, frozen
16 oz (454 g) peas and diced carrots mix, frozen
28 oz. (794 g) can crushed tomatoes
32 oz (907 g; 4 cups) vegetable stock
3 cups water
Cooking spray
What you’ll do:
Dice celery and onions to a medium dice. It does not have to be very fine or precise because the whole soup is a bit rustic.
Spray the bottom of a large soup pot with cooking spray and place over medium high heat. Add celery and onions and sauté for 5 to 10 minutes, with occasional stirring.
While onions and celery are cooking, wash the kale and remove any parts of stalk that look particularly tough. Chop the kale roughly into smaller bits. If you are wondering how small should you make them, it’s really up to you. My preference is to keep them at about 2 in (5 cm). Set aside.
Add the frozen veggies in all at once and cook with stirring for 5 to 10 minutes. They will not be completely thawed but they will start to soften.
Add the beans – I usually drain and rinse mine but if you are a fan of keeping all the flavors of canned beans intact (including extra salt they use when canning) go ahead ad just dump the whole thing right in. Stir to combine and cook for 5 minutes.
Add the crushed tomatoes, stir again and cook for another 5 minutes.
At this point you are ready to add the kale. As with all other green leafy vegetables, the raw leaves occupy a significantly larger space than cooked, so don’t panic if adding the kale pushes your pot to its size limits. The kale will settle down. Gently fold the kale into the soup and cook for another 5 to 10 minutes. By the end of this process your pot should look like it can fit the stock and water.
Add the stock and as much water as you like really. What I do is dump the stock into the pot and then use water to rinse the carton out. But if you would like to keep this Soup really dense and almost like a stew you can skip adding water.
Bring everything to boil, lower the heat to low and simmer for another 30 to 45 minutes or until the kale is done to your liking.
Enjoy this soup with some fresh bread, top with some fresh parsley, with a squeeze of lemon or top with a bit of Cashew Sour Cream.