Chia Seed Bread (Bread Machine Recipe)

Chia Seed Bread (Bread Machine Recipe)
Chia Seed Bread (Bread Machine Recipe), via Eat the Vegan Rainbow

When it comes to comfort food, I think we can all agree that there are not many things that can compete with freshly baked bread. Bread making is part science, part art, and part therapy. Watching the dough rise, pounding the dough down, letting the house fill with the aroma of freshly baked bread…, and then biting into a fresh, crusty loaf.

This sounds almost too good to be true, and in practice it really is. Who has the time to baby sit the dough? Not me! That’s why I bought a bread machine. It’s a specialized kitchen gadget that I use 5-6 times a year, which may not seem like much but it is worth it!

The model I have is a very basis one, without too many fancy bells and whistles. However, it is consistent and although it did not produce a good gluten-free loaf I did come close.  (To be fair, the reason for not having luck with gluten-free breads is that my bread machine does not have a gluten-free setting as some fancier machine do, and gluten-free dough does require a totally different treatment and timing.)

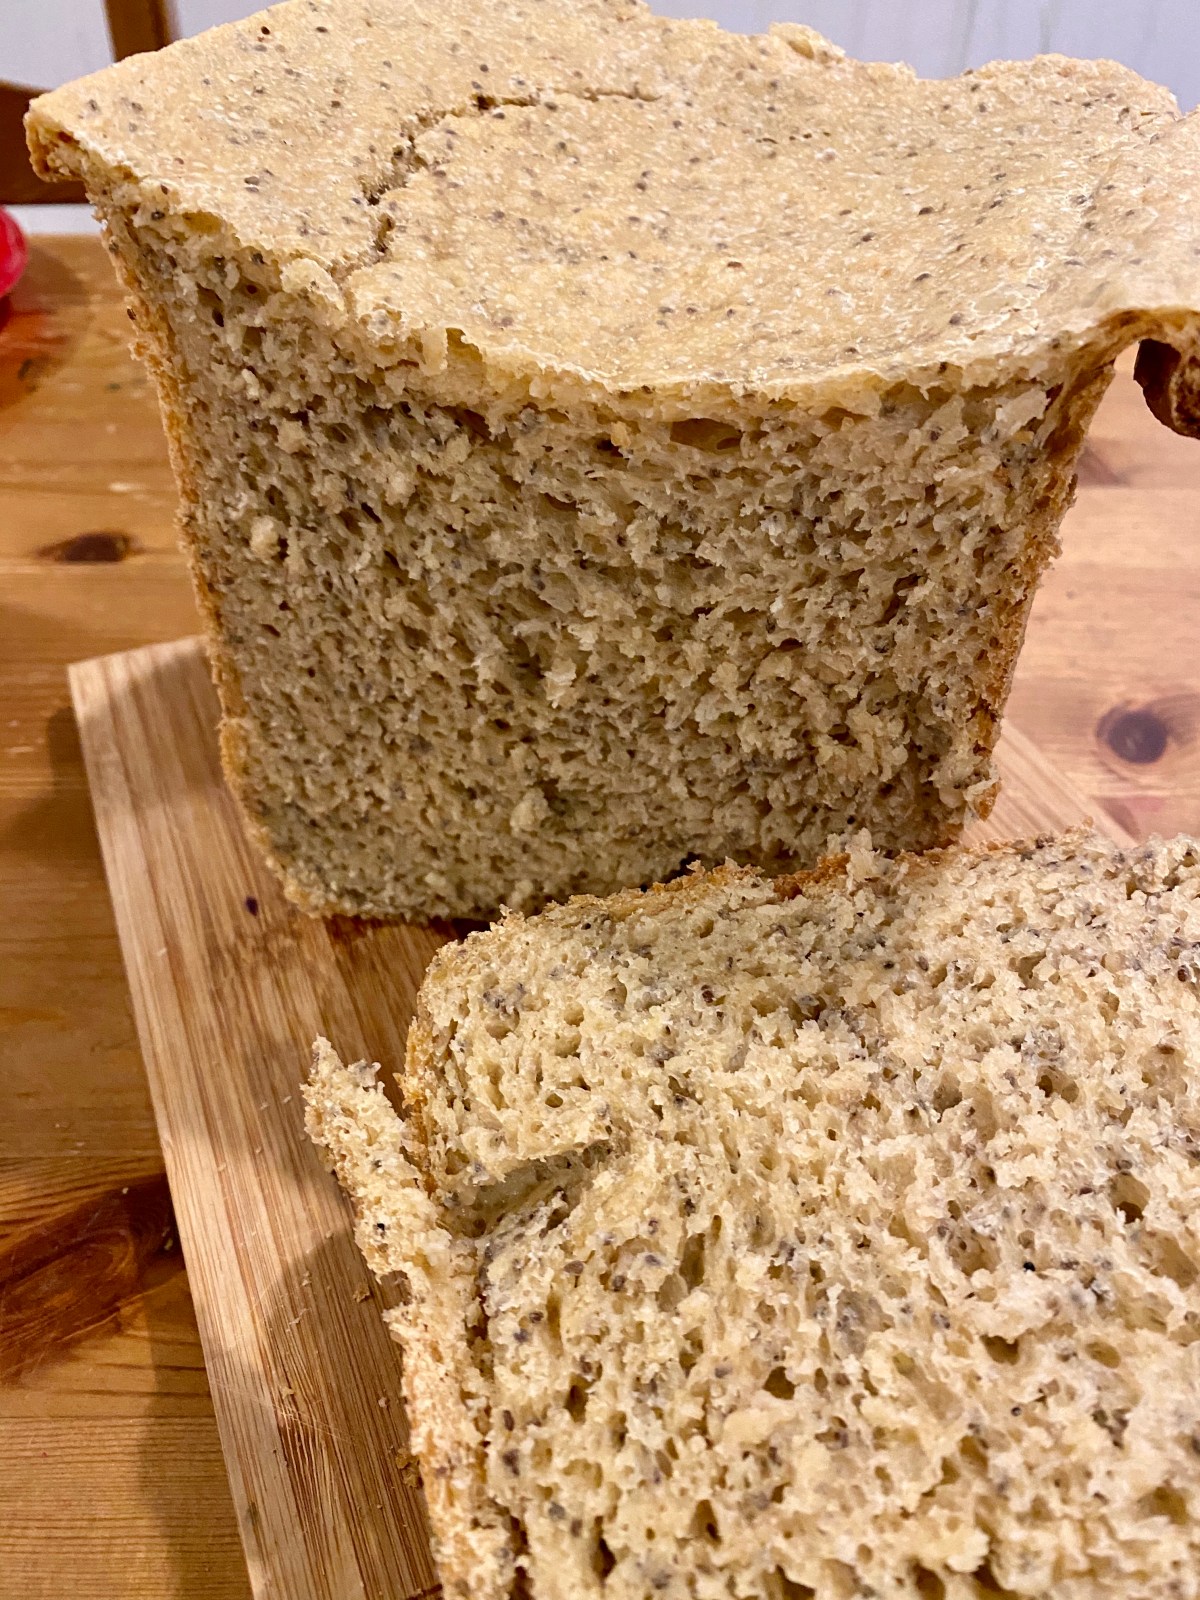
Back to the chia seed seed bread. I decided to try to make a rustic bread with chia seeds for added nutritional touch and a bit of texture. If you have not used chia seeds before, they are often used to make vegan puddings, or as a substitute for eggs in vegan baking. When soaked, these seeds produce a thick, gelatinous mass which can be used as a binder. This was the basic idea behind using them in a bread recipe.

The first step in this recipe, and in others that use chia seeds is soaking the seeds. I recommend using hot water to speed things up here, but you can also soak your seeds in cold water overnight. If you are using hot water please remember to let the water temperature come down to room temperature before using it in the bread machine as hot water will destroy your yeast.

Last tip for this chia seed bread is to use some lemon juice and a bit of lemon zest, plus some baking powder to help the bread rise. Chia seeds are heavy and may weigh the bread down, so a bit more leavening helps. Another modifications to the bread machine set-it-and-forget-it is to use the first resting time in the bread machine program to go in with a spatula and make sure that chia seeds are well incorporated throughout. Once that’s done, you can walk away and let the machine take care of the rest. Enjoy!

Chia Seed Bread (Bread Machine Recipe)

FOR A 2 LBS (1 KG) LOAF, FRENCH BREAD SETTING ON A BASIC OSTER MODEL)

What you’ll need:

  • 1/4 cup chia seeds
  • 3/4 cup hot water
  • 2 3/8 cups water
  • 1/4 cup oil
  • 1/2 lemon, zest and juice
  • 1 3/4 cups white flour
  • 1 3/4 cups whole wheat flour
  • 2 teaspoons baking powder
  • 1 teaspoon salt
  • 1 tablespoon sugar
  • 2 1/2 teaspoons quick rise yeast


What you’ll do:

  1. Place chia seeds in a bowl or a mug, cover with hot water, mix well and let stand until chia seeds are soaked and gelatinous, and don’t feel warm to touch. This may take 30 minutes or more, so you may want to do this step in the morning if you are planing to have the bread ready for dinner.
  2. Follow your bread machine instructions for the order in which you put your ingredients in. In my case, the order is water, oil, lemon juice and lemon zest, chia seeds, salt, flour, sugar, baking powder and yeast as the very last ingredient.
  3. Turn the program on and let the machine complete the first mixing step. When the mixing blade stops moving, open the machine and mix everything by hand with a spatula. This step is necessary as chia seeds may lump together and not mix well with the rest of the ingredients. Once you have ensured that everything is well mixed together, close the lid and let the machine take care of the rest.
  4. Your bread should be ready in 3 hours or so. Enjoy!
Copyright © Eat the Vegan Rainbow, 2020


Gluten-free flatbread with corn, cashews and chia seeds

Gluten-free flatbread with corn, cashews and chia seeds
Gluten-free flatbread with corn, cashews and chia seeds, via Eat the Vegan Rainbow

Making your own gluten-free flatbread is easy! Yes, you heard that right – so, now you don’t have any excuses not to try it. Why flatbread? Well, to be quite honest, I don’t have patience or the time needed to work with yeast – you need to babysit a piece of dough for hours and at the end all you have to show for is a loaf of bread. Undoubtedly, it’s a loaf superior to anything you may get in the store, but that usually does not compensate for the time investment.

That’s why I like my bread machine. It’s set-it-and-forget-it kind that does everything for you. And I’ve been able to get some great results this way. But sometimes you just need something more fun and unusual and flatbreads are something to try. I love tortillas (flatbread in my book), lavash, as well as Indian flatbreads, like chapati (or roti) and paratha. These are all great options for wraps, but what they miss is enough structure to make a sandwich.

I love sandwiches, and have shared recipes for sandwiches in the past, like this grilled tofu with coleslaw sandwich, or this tomato-basil-mozarella (aka caprese salad) one. So, I needed a quick, easy and flat (but not floppy) bread. Plus: the bread needed to be gluten-free.

Below is the result. I would call it a step in the right direction, as I wished that it was a bit crispier. Still, that’s nothing a toaster (or a toaster oven) can’t fix. The bread is basically made of corn, cashews and chia seeds all mixed together with some nutritional yeast, baking powder and spices.

The trick I discovered which helps bake the bread is to use a pizza stone. And if you don’t have one, don’t worry, I provide alternatives below.

Enjoy!


Gluten-free flatbread with corn, cashews and chia seeds

What you’ll need:

  • 4 cups corn kernels (fresh, frozen (defrosted) or from the can (drained))
  • 1 cup cashews
  • 1/3 cup chia seeds
  • 1/3 cup nutritional yeast
  • 1 teaspoon baking powder
  • 1/2 teaspoon black pepper
  • 1/4 teaspoon crushed red pepper flakes
  • Optional: 1/4-1/2 teaspoon salt (to taste)
  • Cooking spray

What you’ll do:

  1. Preheat the oven to 425 F (220 C) with a pizza stone in it, if using.
  2. Put all the ingredients into a food processor and process until fully combined and smooth. This will take couple of minutes.
  3. If you are not using a pizza stone there are several different ways in which you can bake this. You can use a baking sheet or a 9 in x 13 in (23 cm x 33 cm) baking dish. Regardless of a method, you will need parchment paper. If using the pizza stone you will place the parchment paper on your pizza peel and pour the batter on it, shaping into a 1/4 in (5-6 mm) thick rectangle (I am assuming you have a pizza peel if you have a pizza stone, the two go hand in hand; but if you don’t just use your kitchen counter and be very, very, very careful when placing your bread onto the pizza stone as it will be hot and you can get burned). If you are using a baking sheet or a baking dish you need to spray the parchment paper with some cooking spray to prevent sticking and pour in your batter. Smooth the top and make sure the thickness is even throughout.
  4. Place the bread into the oven. If using the pizza stone, it will take about 15 minutes to bake this bread half way through, then you will turn the oven off. Leave the bread in the oven with the heat turned off for another 15 minutes. The pizza stone and the oven retain lot of heat, so the bread will continue to bake. If you are baking without the pizza stone, bake for 25 minutes, then check for doneness. The bread will feel soft but it should not feel wet.
  5. Take the bread out, and slide the parchment paper out of the baking sheet/dish. Let the bread cool on the parchment paper until cool enough to handle, then slide on the cooling rack. This will prevent the bottom from getting soggy.
  6. Serve warm or cold, and use as you would normally use a flat bread. Enjoy!

Copyright © Eat the Vegan Rainbow, 2020

Beet, Carrot and Apple Fritters – CSA Week 4

315c00f7-53f9-450a-b294-9b9cbd514d7a
Beets, Carrots and Apple Latkes, via Eat the Vegan Rainbow

It’s early July, and here in New England (which is, for those of you who hail from across the globe, a name for the Northeastern-most part of the United States that includes six states: Rhode Island, Connecticut, Massachusetts, New Hampshire, Maine, and Vermont) the farm activities are in full swing. The greater Boston area is brimming with farms of different size and produce selection. For example, we went cherry picking on July 4th, and ended up with an amazing selection of cherries. We ate a lot, shared some with neighbors, and washed, pitted  and froze the rest. In this way, the frozen cherries are ready for smoothies, sauces or pies later in the year.

What’s in this week’s CSA basket?

At our local farm where we get our CSA (Community Supported Agriculture) share  the Upswing Farm, the vegetables this week included beets, like it did last week (and I shared  about how to pan roast beets and sauté the beet greens few days ago), carrots, zucchini, squash, cucumbers, yellow and green, cilantro, fennel, and so on and so forth. It was a really great week!

Beets are versatile!

If you are skeptical about beets, don’t be – they are versatile! Yes, you may think that I am saying that because I an Eastern European and there is a bit of a beet culture on the Balkans, but beets really can work in many different ways. In addition to the two recipes I shared last week, beets can be made into a hummus (yummy), used as a salad, sandwich or a veggie burger topping, and also made into tasty burgers (see here, and here for some great beet burger recipes to try). And they are an essential, as in not-to-be-skipped-under-any-circumstance, ingredient for fabulous BBQ ribs, either those made with wheat gluten or gluten-free.

So, how about beet fritters?

And this brings us to these fritters. Without a doubt, vegetable, and in some cases fruit, fritters are ubiquitous. Every cuisine has a recipe or two that fall into this category and take advantage of ingredients in season, often times potatoes, zucchini, squash, carrots, a grater, a bit of flour and usually some eggs, to make a quick meal. So, how about beet fritters? And how about vegan and gluten-free? Well, the recipe here answers these question in affirmative.

Chia seeds and flaxseed meal as binding agents

Grated beets, carrots and the apple make the body of these fritters. The easiest way to grate them is using a large grating attachment on your food processors, although, of course, grating by hand will work too! You don’t need to cooked the beets first, but do peel and wash them, as well as the carrots – apple is the only ingredient that does not require peeling. Just before you start grating you should start soaking your flaxseed meal by combining flaxseed meal with hot water in 1 to 3 ratio. Because the grated fruits and veggies have high moisture content, they do need extra binding agents and that’s why I recommend using quite a bit of flaxseed meal as well as chia seeds. Together, flaxseed meal and chia seeds work together to created fritters that hold their shape well without any eggs or flour.

Don’t forget the spices

I recommend using lime juice and zest, as well as freshly grated ginger and finely chopped fresh cilantro to enhance the flavors. The result are light fritters with interesting texture and


Beet, Carrot and Apple Fritters

What you’ll need:

1/4 cup golden flaxseed meal (you can use other types of flaxseed meal as well)

3/4 cup hot water

2 cups shredded carrots (4-6 carrots depending on size)

2 cups shredded beets (3-4 beets or so)

1 shredded Granny Smith apple

1 teaspoon baking soda

1 teaspoon onion powder

1 teaspoon garlic powder

1/2 lime, zest an juice

1/2 inch ginger root, grated

1/2 cup chia seeds

1/4 cup chopped fresh cilantro

Oil or cooking spray for the pan

Extra lime slices, coarsely ground black pepper and/or apple sauce for serving

What you’ll do:

  1. Place the flaxseed meal and hot water into a bowl and mix well. Let the “flax egg” rest for at least 10 minutes. The final result will be a very gooey mix that will work together with chia seeds to bind the fritters together.
  2. While the “flax egg” is resting, grate beets, carrots and an apple by hand or using a food processor equipped with a grating attachment, then transfer into a large mixing bowl. Add all the rest of ingredients, including the “flax egg”, mix well and let stand for 20-30 minutes. This resting time is needed for chia seeds to soak the extra liquid released by the grated beets, carrots and apple, and transform into a gel-like substance.
  3. Place a large pan over high heat and let it get nice and hot. Add oil or some cooking spray – if you do have a great non-stick pan you can omit the oil – and place small firm patties in. To form a patty, take about 1/4 cup worth of your mix, and using your hands form a 1/2 inch thick patty. Brown over high heat for 2 minutes then lower the heat down to medium and continue browning for 3 more minutes.
  4. Flip the patties over and brown on the other side for 3-4 minutes.
  5. Serve warm as a side dish, or even as an alternative to breakfast pancakes. These fritters go well with yogurt, as well as maple sauce, and I bet they would be delicious cold as well!
BeetCarrotApple_Fritters
Beet, Carrot and Apple Fritters, via Eat the Vegan Rainbow on Pinterest

Copyright © Eat the Vegan Rainbow, 2018

Gluten-free and Vegan Scones with Chia and Coconut

IMG_5069
Gluten-free and Vegan Scone with Chia and Coconut, via Eat the Vegan Rainbow

I recently had a pleasure of teaching an evening plant-based cooking class at our local technical and vocational school. I enjoyed the experience immensely and in addition to having a really very pleasant evening  I have also learned about some of the things that people who are relatively new to plant-based cooking wonder and care about.

For example, I had several conversations about vegan breakfast items and whether it is possible to make vegan pancakes (yes!) and vegan crêpes (also yes!). And based on many conversations online, people are just having hard time figuring out what their plant-based breakfast options are.

What’s for vegan breakfast?

Breakfast is not as limited as people usually think. After all oatmeal, cereal with nut milk, fruits, vegetables, toast (including with avocado), smoothies, muffins, cauliflower tofu burritos, vegan “scrambled eggs”, and many, many more options are currently available. Some require a bit more hands on preparation but the offerings are as diverse as for people that eat meat, eggs and cheese. For me, a roasted sweet potato is a great breakfast that keeps me going well into the afternoon!

How about vegan baked breakfast treats?

Of course the number of options increases vastly on those days when you find yourself with extra time to do some baking. Vegan baking is actually not all that difficult. There are quite a few vegan options when it comes to replacing eggs, and nut milks usually work just as well as dairy. Plus: there are now a couple of vegan butters on the market so if the recipe asks for butter there are now alternatives to be used (including the dreaded margarine, but I don’t recommend you go there!)

Are gluten-free vegan treats possible?

Having said all that, if you are trying to be vegan and gluten-free you may be out of luck. In gluten-free baking, gluten, a protein that makes some people unhappy yet provides baked goods with their lovely structure, is usually replaced by extra eggs to keep the levels of protein high. Unfortunately, finding a plant-based replacement for eggs in this context is not easy because most options, like flax meal, bananas, apple sauce, and various starches are not protein rich; they are mostly carb heavy.

Chia seeds as an egg replacer for gluten-free vegan baking

Enter chia seeds! These little seeds are one of my current favorites. Chia seeds can be made into a pudding and they are an excellent binding agent for making seed crackers – and in this category nothing compares to Oh She Glows Endurance Crackers, so give them a try! Amazingly, they also work in these super easy and quick scones. A critical step in this recipe is soaking chia seeds for 15-30 minutes in some warm water. This will transform them into a gel like substance that will keep your scone batter together. And that’s more than half a battle won! The rest is all about mixing things together, adding the right leavening agents to helps things rise high, and some flavors in.

Vegan buttermilk trick

A common way to help a leavening agent like baking powder and baking soda is to add some buttermilk. Acidity is what makes buttermilk so special, and what provides an extra push for the baking powder and baking soda. The easiest way to make a vegan buttermilk is to add some lemon juice or lime juice to your plant-based milk, mix it together and let it stand for 5 minutes or so. And, if you don’t have any sour citrus on hand, you can also use some apple cider vinegar as well. If you are using milk with lots of protein, like soy or pea protein milk, you may see quite a bit of curdling – that’s normal.

These delicious scone will please your entire household – so you may want to make a double batch. So, next time when someone asks you what’s for breakfast you can tell them: freshly baked scones. Enjoy!


Gluten-free and Vegan Scones with Chia and Coconut

What you’ll need:

3 tablespoon chia seeds
6 tablespoon warm water

1/3 cup almond milk, unsweetened (vanilla flavor or plain)
1 teaspoon lime juice

1 cup brown rice flour
1/3 cup corn starch
1/3 cup almond flour
1/3 cup shredded coconut unsweetened
1/6 cup tapioca starch
1 teaspoon psyllium powder
1 teaspoon baking soda
1 teaspoon baking powder
1/4 teaspoon salt
1/3 cup agave syrup
1/3 cup coconut oil, melted
Unsweetened coconut flakes and raw sugar, for sprinkling on top

ChiaSeedsCoconutScones_2018


What you’ll do:

  1. Preheat the oven to 375 F (190 C).
  2. Mix chia seeds and warm water together and set it aside for 15-30 minutes until a sticky gel-like substance forms.
  3. Measure out the almond milk and add the lime juice to it. Let that stand for 5 minutes before using.
  4. In a large mixing bowl measure out and mix all your dry ingredients.
  5. Mix your wet ingredients (almond buttermilk, agave syrup, soaked chia seeds, and melted coconut oil), then add to your dry ingredients. Combine everything together. The batter will be sticky but not falling apart.
  6. Line a large baking sheet with some parchment paper. Place your batter in the middle of the sheet, and form a round, domed structure. Using a thin and sharp knife, cut your dough into six even pieces. Use your knife to separate the cur pieces out just a bit, but you don’t need to pull them apart. The scones will bake well and break of easily when they are done.
  7. Top the scones with some extra coconut flakes and sugar, then place in the oven for 20-25 minutes. Let the scones cool for 15 minutes or so before serving, then enjoy with some butter and/or jam, like his 10 minute, no sugar added blueberry jam I shared some time ago.

Copyright © Eat the Vegan Rainbow, 2018

White Bean Burger with Chia Seeds

img_3284-1
White Bean Burgers with Chia Seeds, via Eat the Vegan Rainbow

Another veggie burger, another sensation (if you like to see some past examples, there are here, here, here, and here)! And you don’t need to take my word for it, just go ahead and make a batch of these. First of all, they are ultra-cheap. I use dry beans and one pound, approximately half a kilo, of dry beans will make a huge pile of these burgers. At the end, I think my yield from this recipe was about 15 burgers. The burgers store well in the tightly sealed container in a fridge – you can keep them for a week – and reheat easily in the microwave oven, toaster oven or on the stove top. I am not entirely sure they freeze well, but you can try. If you do decide to freeze a batch, I recommend cooking them through, letting them cool, then separating individual burgers with some wax paper, then freezing. In that way you can grab a burger any time you need it!

Chia seeds are the magic ingredient here. I’ve used chia seeds in the past to make puddings, but here I use them as the main binding agent, the same way you would use egg or a flax “egg”. To make chia “egg”  all you need to do is soak chia seeds in some water for about 30 minutes or so. By the time half an hour is up you should have a very thick and gooey mixture that looks quite slimy and that is a good sign. It means your chia seeds are ready to use. Chia seeds add not only the cohesiveness to this recipe, but bump up the nutritional value of your burgers because they are rich in polyunsaturated fatty acids.

I used to be afraid of cooking the beans and would get canned ones only. But, I recently started using a pressure cooker and I love it! I soak the beans overnight to speed things up, although I did make the beans without soaking and that works as well – you just need to cook them for a longer time. Once ready for the pressure cooker, I rinse the beans, place them in the pot and cover with water. I use an electric pressure cooker and use a preset bean program which takes about fifteen minutes of pressuraized cooking. Once the program is done and the pressure cooker is safe to open, I drain the beans and use without rinsing. You can save the liquid too, and make it into a soup if you like.

Note: if you are cooking dry chickpeas this water is the actual aquafaba that everybody is raving about, so do keep it and use it as the egg white substitute. I recently made aquafaba meringue and topped my Butter Squash and Cranberry Pie with Praline and Meringue Topping.

Once you have your chia egg and your cooked beans the rest is easy. All the ingredients so into a large mixing bowl or a food processor and get processed together. Once formed, the burger patties need to sit in the fridge or on the kitchen counter for about half an hour to an hour to firm up, and they are ready to go. I made my batch in a non-stick pan sprayed with some cooking spray, but you can grill them or even put them in the oven. They don’t need much cooking really since all the ingredients have already been cooked, so what you are really looking to do is brown the patties nicely on both side and heat them through.

You can serve these veggie burgers through the year and with any condiments you enjoy. I can recommend a piece or two of avocados and a spoonful of Macadamia Nut Queso Fresco with just a spring of cilantro. That out to do the trick!


White Bean Burgers with Chia Seeds

What you’ll need:

1 lbs (450 g) white beans, dry

1/2 cup red pepper paste (or tomato paste, if you don’t have red pepper paste)

2 tablespoons chia seeds

6 oz (3/4 cup) water

1 cup coarse corn meal

1/2 cup fine corn meal

2 tablespoons stake sauce

1 teaspoon cumin powder

1 teaspoon chili lime powder (or regular chili powder)

Cooking spray

What you’ll need: 

  1. Cover the beans with water and soak overnight at room temperature.
  2. Rinse the beans before cooking, then cook them in a fresh batch of water until done. If you are using a pressure cooker the total cooking time will likely be about 30 minutes. If you are cooking them in a regular pot they will probably need an hour or an hour and a half. You can also use the canned beans and you probably need 3-4 15 oz (425 g) cans to get the amount equivalent to what you get from a pound of dry beans.
  3. While beans are cooling, start soaking chia seeds in 3/4 cup of water. This will take 30 minutes or so.
  4. By the time chia seeds are ready to use, your beans will be cool. Place the beans, chia seeds, and the rest of the ingredients into a large mixing bowl and process everything together with a stick blender. You can also use a food processor for this step.
  5. For the burger patties and leave them to firm up for about 30 minutes. You can leave them on the kitchen counter or in the fridge. You can also make them a day ahead and leave them in a fridge and finish cooking them the next day.
  6. Preheat the grill, grill pan or a non-stick frying pan to medium-high. I recommend using some cooking spray to help the burgers brown and get them going, but if you do have a good non-stick pan you can probably get away with not using any oil or cooking spray. The burgers need 3-4 minutes per side.
  7. Serve them fresh from the grill/out of the pan and enjoy with your favorite toppings and condiments!

Copyright © Eat the Vegan Rainbow, 2018