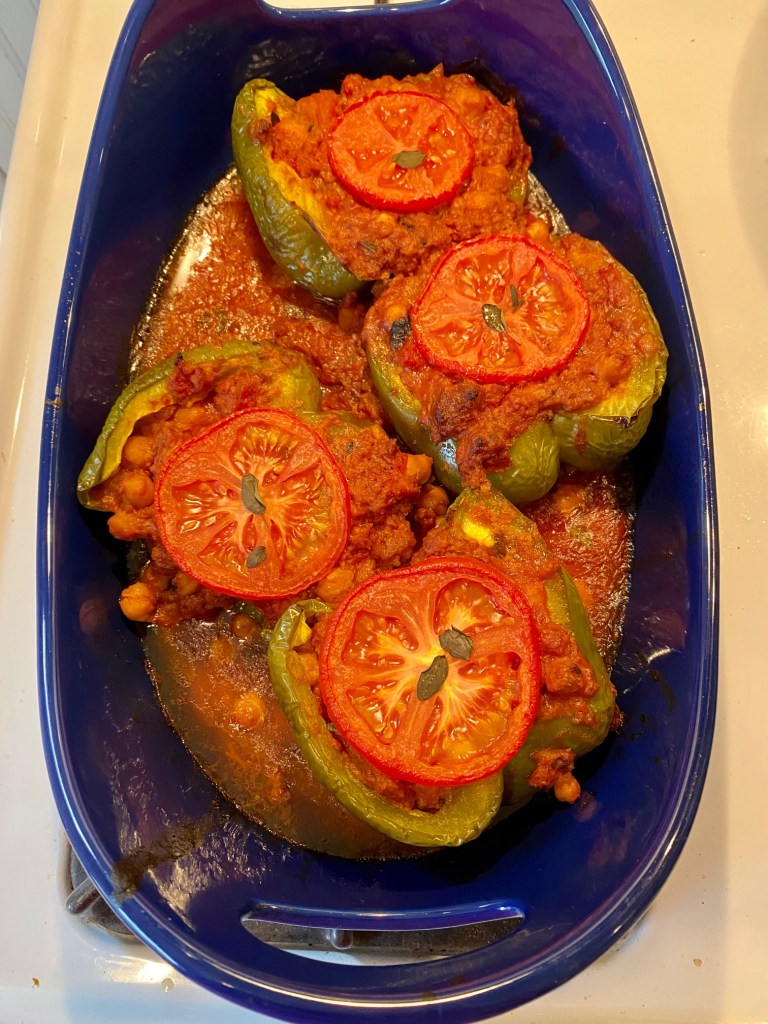
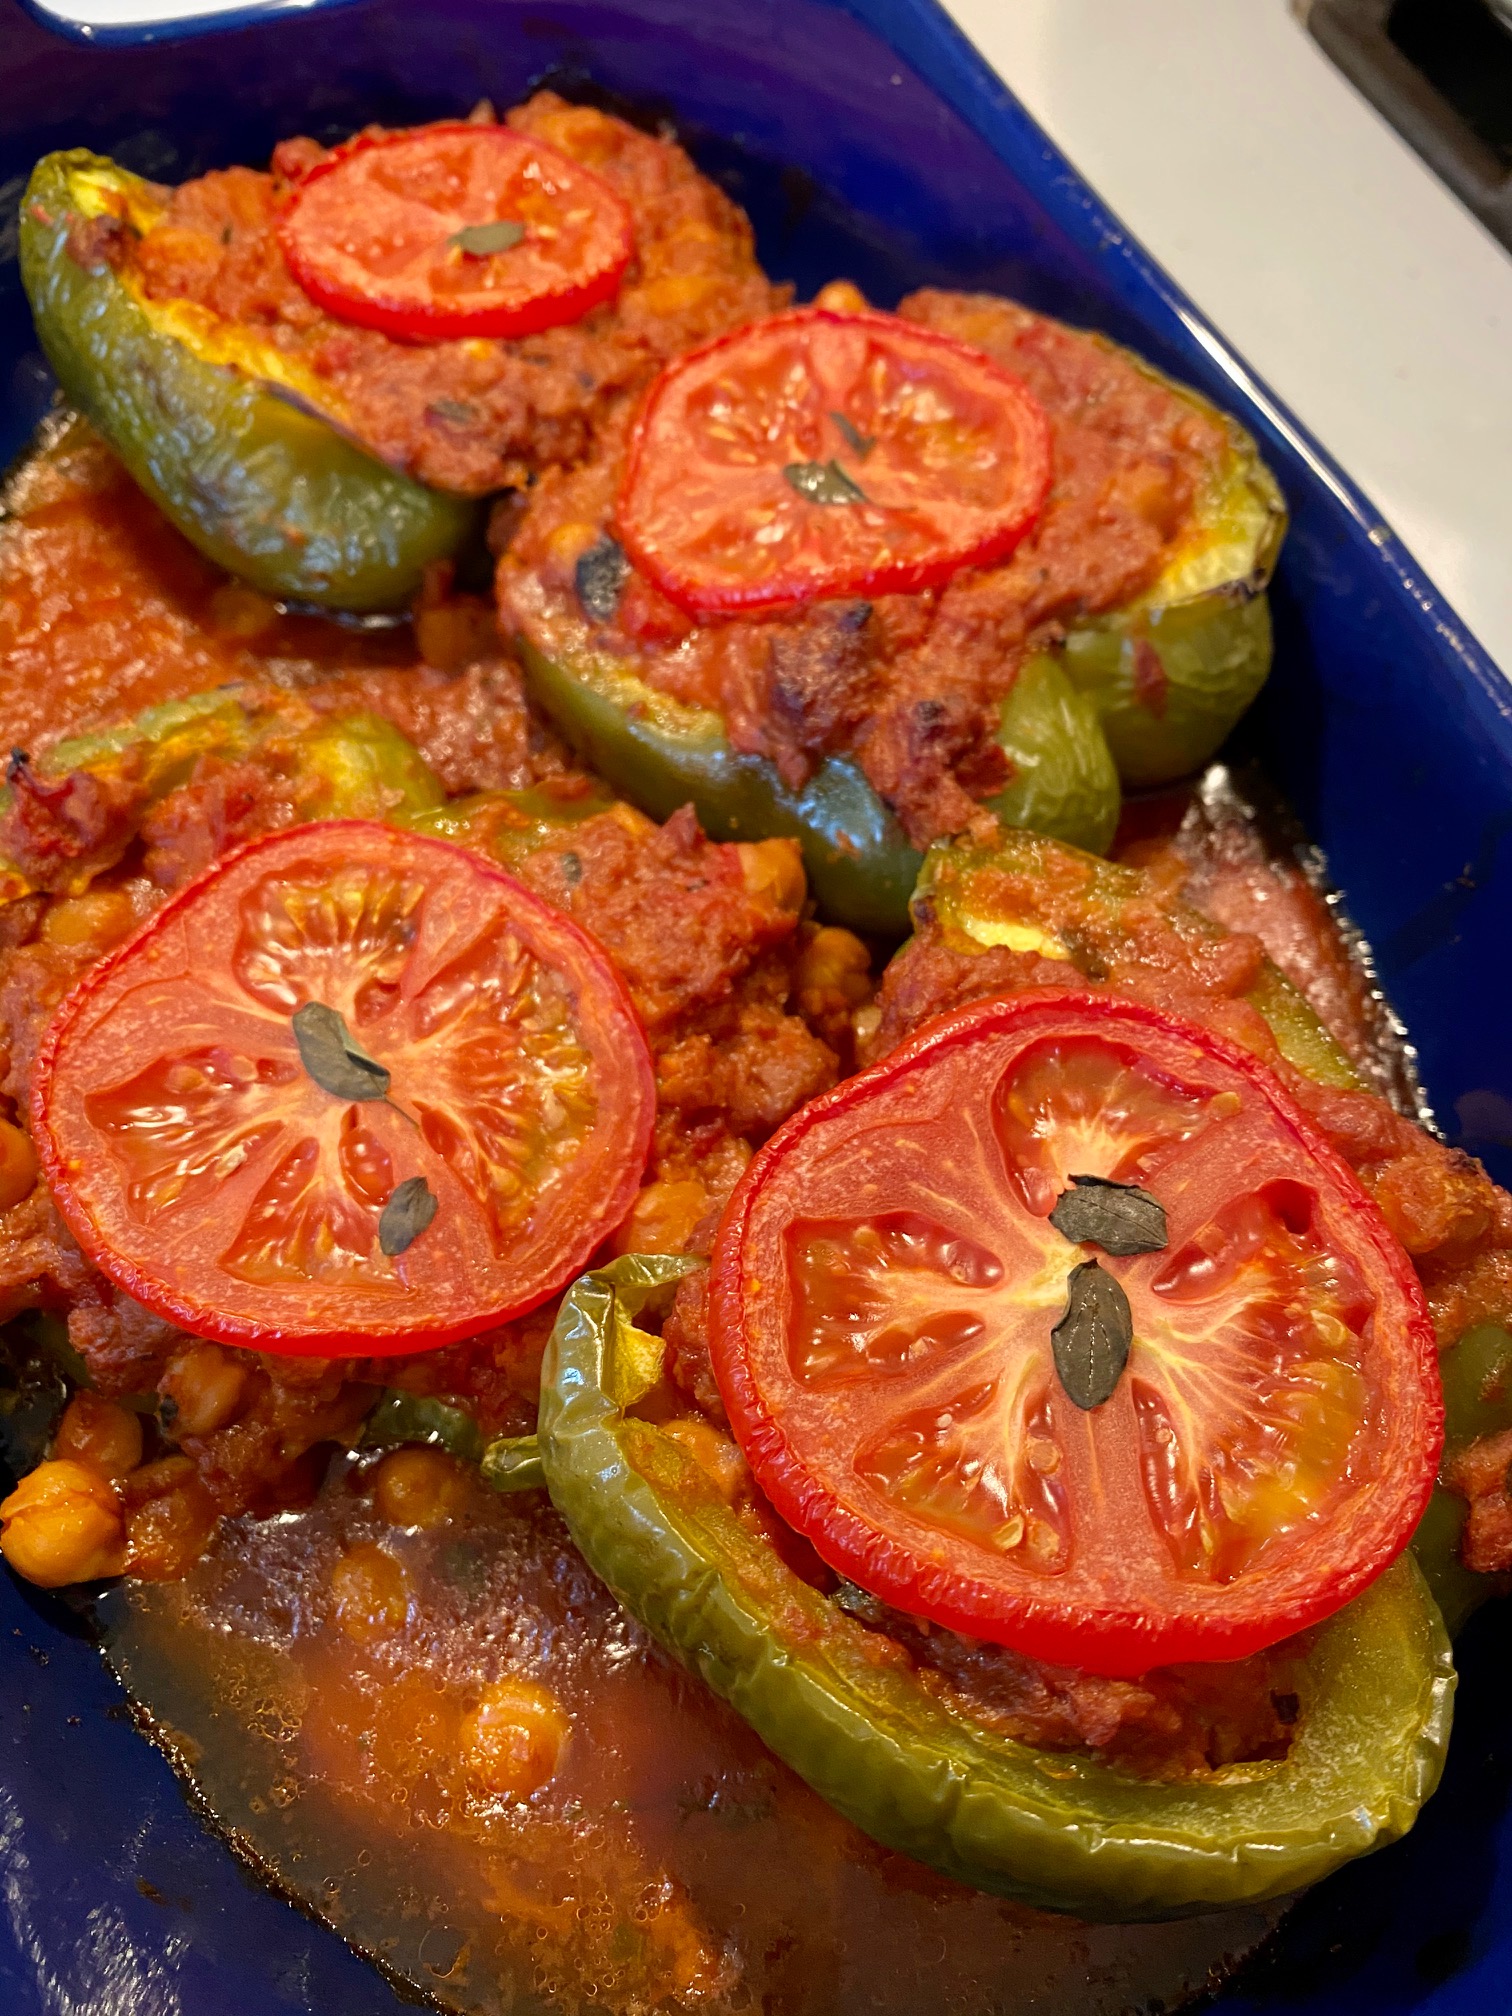
Ground “Beef” and Chickpea Stuffed Peppers, via Eat the Vegan Rainbow
Give these stuffed peppers a try – they are easy and simple to make, and very satisfying. I can’t promise that the youngsters in your live will will be thrilled with them, but I hope you’
Ground “Beef” and Chickpea Stuffed Peppers
(serves 2-4)
What you’ll need:
2 large stuffing peppers, split lengthwise, seeds removed
1/2 lbs (225 g) ground beef substitute (store bought or home made)
2 tablespoons tomato paste
1 14.5 oz (411 g) can stewed tomatoes (or diced tomatoes)
Wash the peppers and split them lengthwise. Remove the seeds and devein the halves, then place in the oven safe baking dish, cut side down. Roast for 10-15 minutes until soft. Edges will be slightly browned. Take out of the oven and let cool just slightly to allow you to handle them.
Lower the heat in the oven to 375 F (190 C).
While the peppers are roasting, place a large pan (cast iron pan preferred but not required) over the medium high heat. Add the oil and the ground beef substitute. Brown the “beef” for 8-10 minutes.
When the “beef” is browned, add the tomato paste, stewed tomatoes, and the chickpeas. Mix well, lower the heat to medium-low and sauté for another 5-10 minutes.
Turn the heat off, then add the chopped oregano and basil, and mix well.
Flip the roasted peppers over, and fill them generously with the ground “beef” and chickpea stuffing. Add any leftover stuffing and the water to the bottom of the baking dish.
Optional: top each pepper with a slice of fresh tomato and perhaps a fresh oregano and/or basil.
Optional: drizzle olive oil on top.
Place the peppers back into a 375 F (190 C) oven and bake for 30-40 minutes, or until the peppers are softened and the top of the stuffing is nice and deeply browned.
Take the stuffed peppers out, let them rest for 10 minutes before serving with your favorite salad, maybe some freshly baked bread, a dollop of sour cream or yogurt… Enjoy!
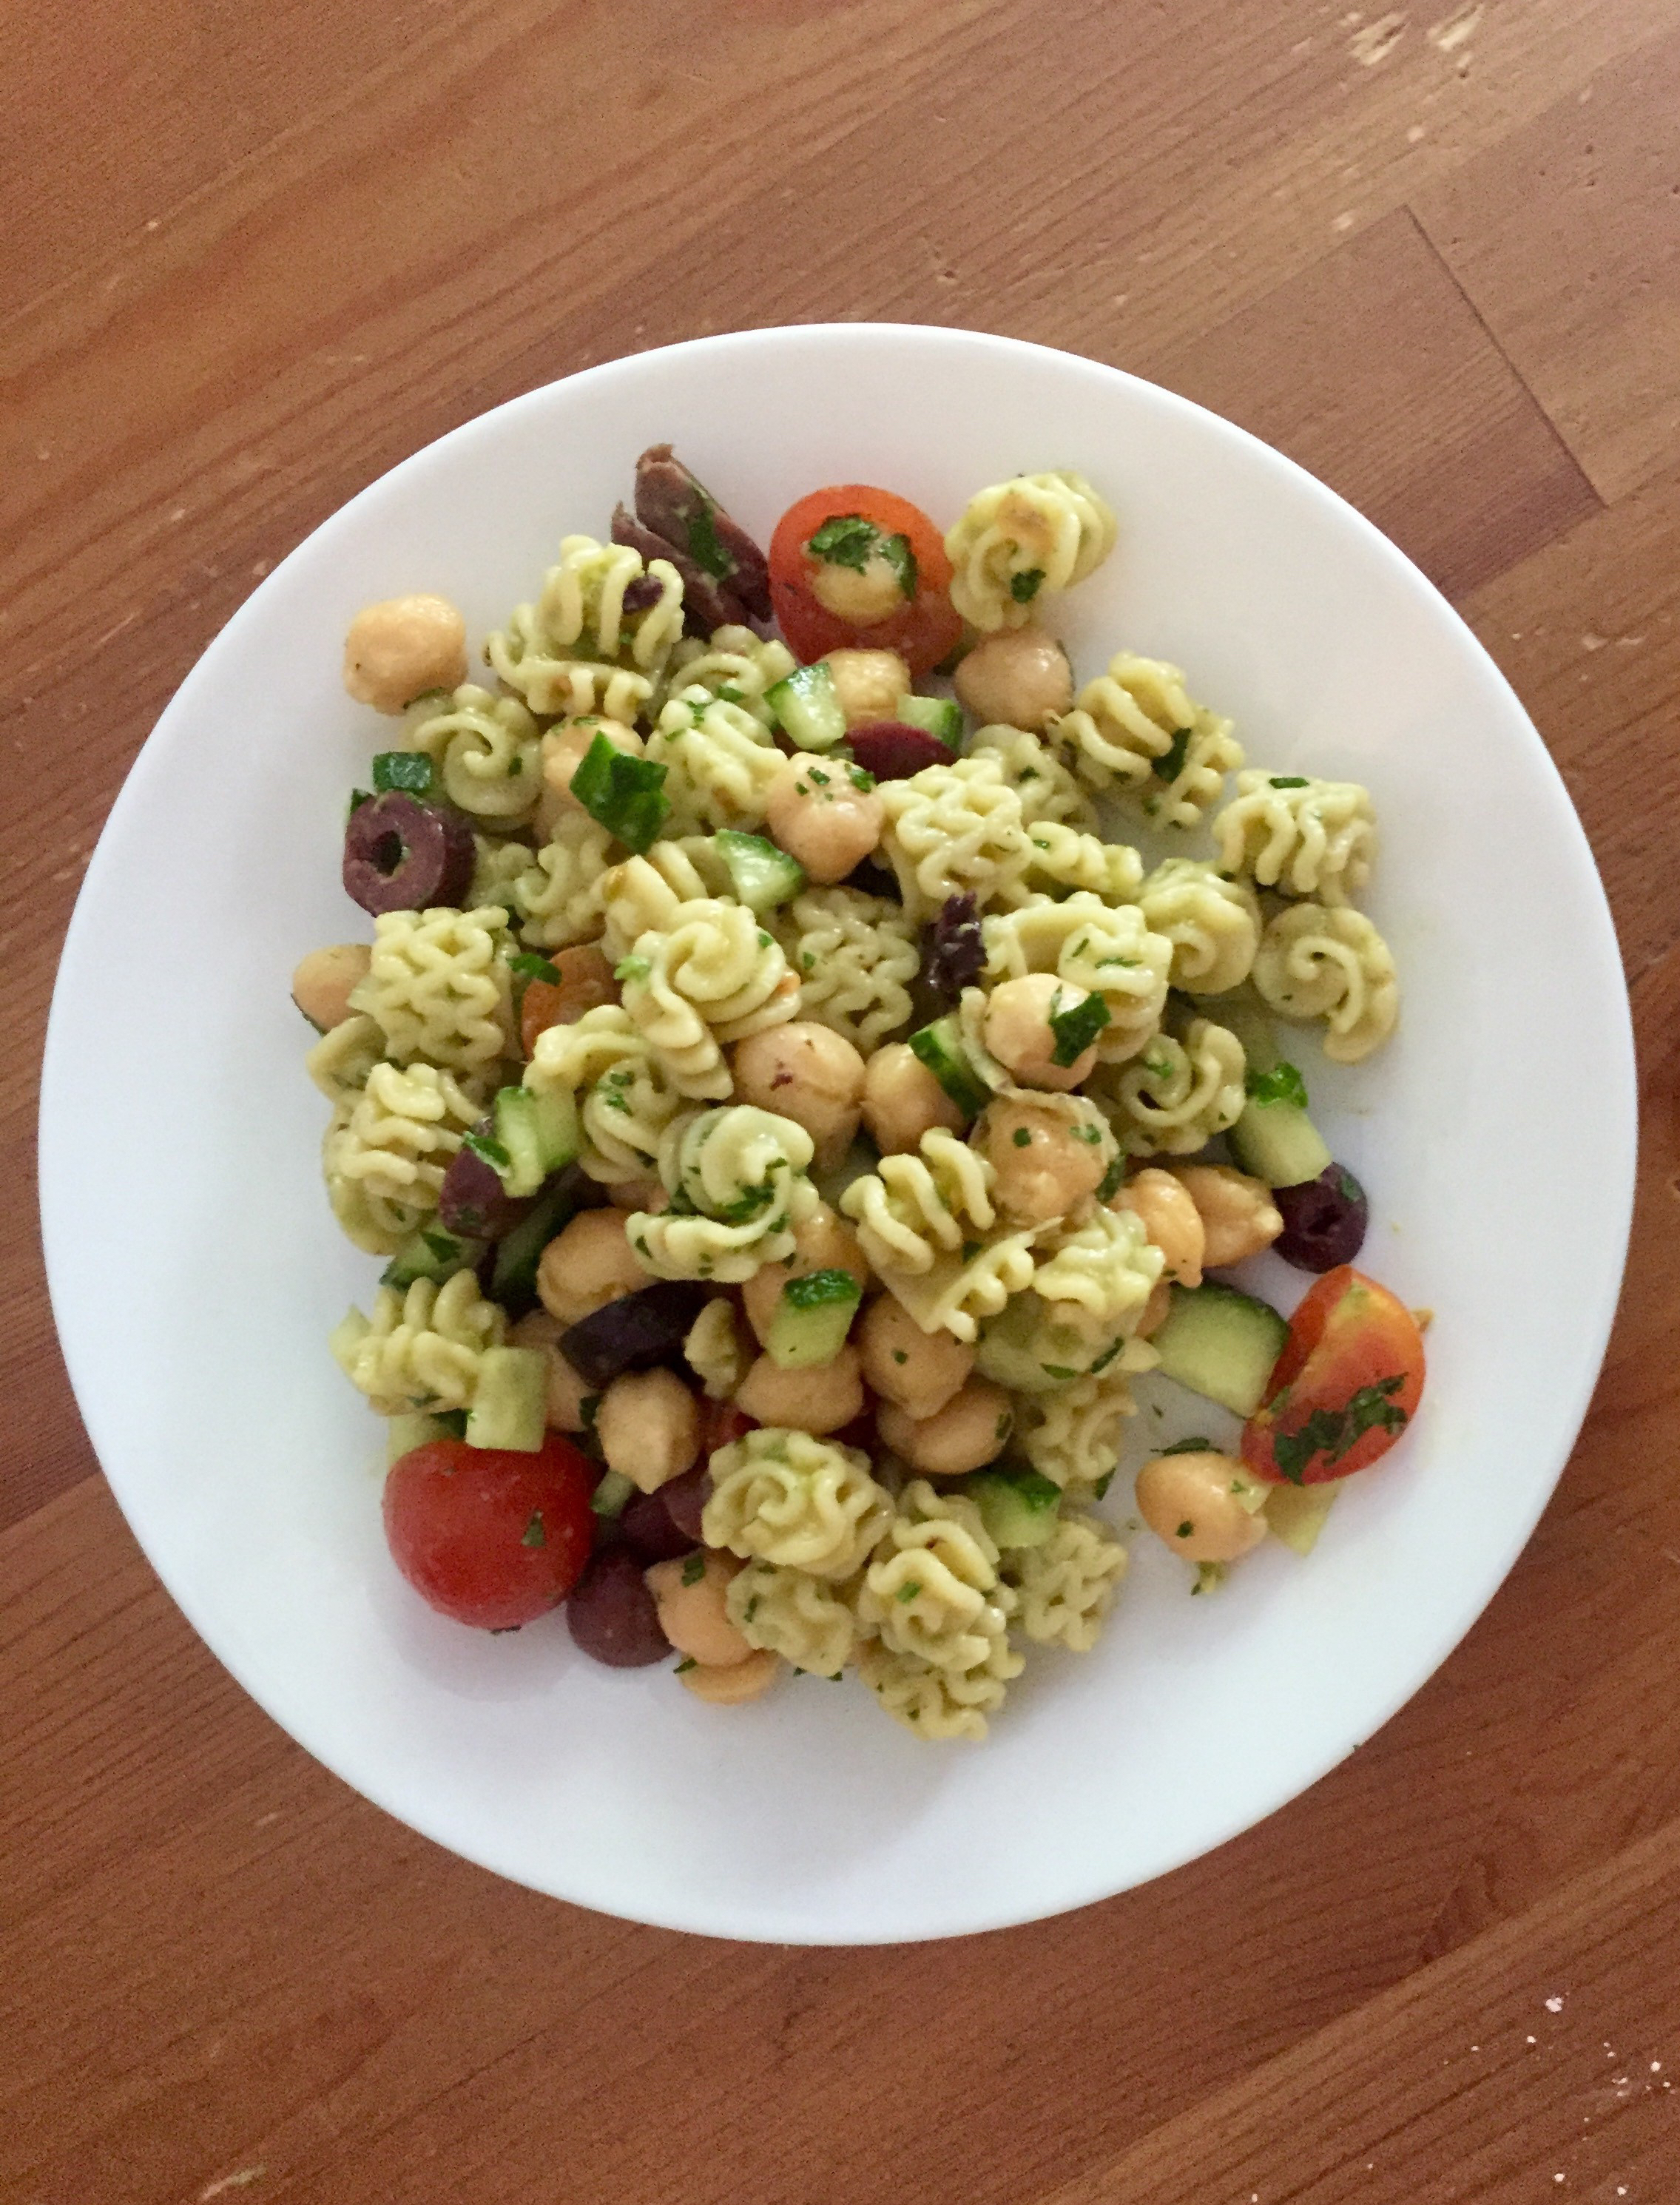
Easy Mediterranean Pasta Salad, via Eat the Vegan Rainbow
Looking for a great pasta salad recipe? Look no further – this is a pasta salad that even your picky eaters will adore. Just don’t tell them what’s in it, especially if you know that they’ll refuse to eat anything with avocados or chickpeas or cucumbers or olives…
A good choice of pasta will make all the difference to a pasta salad. The best kinds of pastas for salads are short and stout, with lots of nooks and crannies, twists and turns for the dressing to get into. And when it comes to nooks and crannies in the pasta world nothing comes close to radiatori – those little pastas that look like accordions or radiators. You should also cook your pasta al dente (firm to bite) or it will be too mushy, and you should toss the freshly cooked and drained pasta with some olive oil to prevent it from sticking.
While the pasta is cooking you can chop all the vegetables: baby tomatoes, English cucumber, and Kalamata olives. Slice them and dice them any way you prefer. As you can tell from the picture, I usually just split baby tomatoes in half, slice the olives, and dice the cucumber without peeling it. You can adjust and customize, depending how rustic you like your salad to be.
One note on olives. If you can’t get Kalamata olives, you can replace them with any type of olive you can find. I recommend darker ones because they tend to have a stronger, and a bit more bitter, flavor which works well in a salad like this, but green ones will work too.
The very last thing that you will do once the cooked pasta is mixed with diced vegetables, chopped parsley and cooked (or canned) chickpeas, is to mix some dressing. In this case, the dressing is rich, smooth and green – it’s pretty much avocado blended with lots of lemon juice and some mustard.
Toss everything and you are done. This salad is great fresh, but I do recommend that you chill it for an hour or so before serving. Looking for more great pasta ideas? Check this simpler pasta salad, or a real fall (autumn) treat – Radish Salad with Apples, Carrots and Toasted Walnuts. Enjoy!
Easy Mediterranean Pasta Salad
What you’ll need:
1 lbs (454 g) radiattore pasta
1-2 tablespoons of olive oil (to prevent pasta from sticking)
1 pint (1 1/2 to 2cups) cherry tomatoes, chopped in half of quarters, depending on size
1 large English cucumber, diced
1-2 cups Kalamata olives, sliced
1 15.5oz (439g) can chickpeas, drained, rinsed and pat dried
1/4 cup flat leaf parsley, finely chopped
DRESSING
1 avocado
1 lemon, juice only
1 teaspoon dijon mustard
What you’ll do:
Cook the pasta in salted water using the instructions on the box and subtracting a minute or so. You want the pasta to be al dente. Drain and rinse the pasta, then place into a large mixing bowl and toss with olive oil.
While pasta is cooking, chop the tomatoes, cucumber and olives. Add to cooked pasta together with the chickpeas and parsley. If you are using canned chickpeas make sure they are drained, rinsed and dried to avoid adding access water/liquid into your salad.
In a blender, combine lemon juice, avocado and mustard. Blend until silky and smooth.
Pour the dressing over the salad, toss to combine and coat, and chill for an hour or so before serving. Enjoy!
Fish-like Cakes with Chickpeas and Artichoke Hearts, via Eat the Vegan Rainbow
I was debating whether I should call these crab cakes or fish cakes – I suppose at the end of the day the name does not matter as much as the flavor. And the flavor here is fresh, citrusy, and the texture is flaky. So, to me these are more like fish cakes than crab cakes, but not matter what you decide to call them these will be your new favorites.
These are fantastic appetizer bites, suitable for any party, and they come together in no time at all. All you need is two cans of artichoke hearts and a can of chickpeas, plus a bit of seasoning and filler stuff (like breadcrumbs and/or corn meal), and a healthy amount of lemon – and you will be cruising.
The recipe is also flexible – if you don’t like corn meal you can just double the panko (but I do suggest you give corn meal a try because the flavors are just a bit different and more nutty, and the surface gets a bit crustier). And if you need to keep things gluten-free, go with gluten-free panko that now seems to be widely available in grocery stores.
I used Old Bay Seasoning as the main flavoring ingredient because I associate it with seafood and fish – but you can use other spices, like dill (fresh or dried), celery seed powder (or celery salt), and customize according to your preferences. I also added a bit of mild heat by using a small can of fire roasted green chili peppers. Here, you also have an option to replace with jalapeños, for more heat, or skip heat altogether and add a bit of sweet roasted red peppers. What ever you decide to do, you only need a small amount of it – you are going for just a bit of a surprise here; otherwise flavors can get overwhelming quickly.
If you are counting calories and fat, you can also skip the mayo. I use it as a binder, but a spoonful of mustard or a spoonful of unsweetened plain nut milk or yogurt, or even water will do the trick as well.
So, by now you are thinking that you can probably replace absolutely everything and still be OK. Well, you should not, and I repeat not, compromise on lemon. Lemon juice and especially the lemon zest will add so much to these cakes that you must include them.
Another two things that you must do is mash the chickpeas with your hands or the potato masher (but do leave some whole), and then, when all the ingredients are in, let the mix rest for a while. This will help all the flavors come together, as well as the mix bind, so you will be able to make the cakes more easily.
Why use sliced artichoke hearts? That gives the whole thing the flaky texture (you can use jackfruit here, as well as banana blossom – but I bet that for most of you artichoke hearts are much easier to find!). Why use chickpeas? To add structure and protein, so if you don’t like chickpeas you could use white beans. In that case you probably will not need to add extra mayo as suggested in the recipe, since beans tend to add more moisture.
With all these options, and dos and don’ts, hopefully the last part will be easy. The rest is easy – make the cakes by using about a quarter of a cup at a time, and brown nicely in some oil or cooking spray. If you have an exceptionally good non-stick pan, you may get away without using any oil, but these are still delicate fish cakes, so they need to be handled with care.
The best way to enjoy them is with a spoonful of tartar sauce, or just pickle relish, or chopped fresh parsley.
Fish-like Cakes with Chickpeas and Artichoke Hearts, via Eat the Vegan Rainbow
“Fish” Cakes with Chickpeas and Artichoke Hearts, via Eat the Vegan Rainbow
Fish-like Cakes with Chickpeas and Artichoke Hearts
What you’ll need:
2 14.1 oz (400 g) cans of artichoke hearts, drained and sliced
1 15.5 oz (440 g) chickpeas, drained and rinsed
3 scallions, white and green sections, thinly sliced
1 teaspoon Old Bay Seasoning
1 teaspoon celery powder
1 cup corn meal
1 cup panko Japanese-style bread crumbs (gluten-free if desired)
1/4 cup vegan mayo
1 4 oz (113 g) can fire roasted green chiles, completely drained
1/2 lemon, juice and zest
Cooking spray
What you’ll do:
Drain the artichoke hearts, squeeze the excess liquid out of them, then slice thinly.
Place chickpeas into a large mixing bowl and mash until most of the chickpeas are fully smashed.
Add sliced artichoke hearts, sliced scallions, and the rest of the ingredients and mix well until everything is well combined. Leave the mixture to soak for 30-45 minutes.
Using your hands, scoop about 1/3 cup of the mixture and make it into a patty, about 1/2 in (1 cm) thick. Place the patties on a plate – this mixture makes about 10-12 patties.
Place a large pan over high heat, spray with cooking spray and add 4-5 patties at a time. Cook for about 4-5 minutes per side, until golden brown.
Serve with some lemon juice, vegan tartar sauce, and/or fresh parsley!
Version note: this post has been updated to correct some spelling/writing errors. One of the readers noted that in several instances word “panko” was autocorrected into the word “panic”. And although some panic while cooking is unavoidable, I have now corrected this mistake. Cheers!
Beans are an essential staple of every vegan kitchen. Beans are rich in fiber, especially soluble fiber, which is taught to lower bad cholesterol, folate, good carbohydrates, and plant protein. That’s what makes beans an essential component of plant-based eating.
Beans come in many different colors and sizes – they can be white, like northern, lima, and navy beans, pink to dark red almost brown, like light and dark red kidney beans, black, like black beans, or multicolor, like black-eyed peas (which are actually beans) and pinto beans. All these varieties have slight differences – different cooking times, texture and flavor, not to mention appearance.
For example, if you are looking to make a mild dish that is smooth and buttery, you may want to go with navy beans or cannellini, which both work in a dish like this Tuscan-Style cassoulet, and if you are looking for a playful dish, like this Cowboy Caviar, you may want to reach for black-eyed peas.
I use beans all the time, and use both dry beans and canned beans. Canned beans are super quick and convenient, while dry beans are a bit cheaper, plus give you complete control over the amount of salt that goes in. But: dry beans do take a bit of time to make if you are using a traditional, pot on the stovetop method. Even with soaking the beans overnight, it will still take about 2 hours of cooking time to soften the beans. My preferred way to prepare dry beans is to soak them overnight, then cook them in a pressure cooker until done, and then incorporate them into whatever you are making. And although some claim that the pressure cooker will cook your beans quickly even if they have not been soaked, I have not tried this yet, so can’t advise on this here. An alternative is to use a slow cooker – overnight soaked beans should take about 6-8 hours.
Recently, while browsing around in a grocery store, I discovered something new: Hurst Hambeens 15 Bean Soup Mix. This bag included a mix of 15 different legumes: beans (northern, pinto, large lima, blackeye, baby lima, kidney, cranberry, small white, pink, small red, white kidney, black), as well as lentils, yellow split, and green split peas, and chickpeas. And, of course, I had to give this mix a try!
Apparently, this mix is traditionally used for a ham soup and comes with a bag of seasoning included. I decided to take the mix in a different direction and go for a chili. Chili is a rich and thick bean stew, full of smokey flavors, and a bit of heat. It’s usually made small red beans, but I figured the more could be the merrier, so I went for it!
The recipe below uses stovetop cooking method, but you can definitely make this in a slow cooker (crock pot). And if you don’t have this specific bean mix, you can make one yourself by measuring about 1/4 cup of dry pinto, black, red kidney, black-eyed and navy (white) beans, as well as lentils, chickpeas and yellow and green split peas. Although not the full 15 bean range, there is enough variety in this mix that you will still get all the benefits of flavors and textures. Have fun!
Rinse the beans, then cover them with water and soak overnight. If you are in a hurry you can also do a quick soak by: rinsing the beans, placing them in a pot, making sure they are fully covered with water, brining the water to boil, boiling for 5-10 minutes, turning the heat off and leaving the beans in hot water for an hour.
After the beans are done soaking (either overnight or using a quick method) rinse them well and set aside.
Place a large Dutch oven or another sturdy pot over medium high heat, add 1 tablespoon of oil, and onions, garlic and carrots. Let these caramelize, which can take up to 15 minutes. Don’t stir to frequently as you want to let the vegetables get slightly burnt and charred – that will add deeper flavors to the chili.
Add the tomato paste, cumin and chili powder, coat everything well and cook for another 2-3 minutes.
Place 1 cup of vegetable stock into a blender, then add the onion, garlic, carrot and spice mix, and 1 cup of soaked beans. Blend everything until smooth and take care not to burn yourself as the mix will be hot.
Add the rest of the oil to your Dutch oven, pour the mixture from the blender back in, add the rest of the bean mix, another cup of vegetable stock and bay leaves. Mix to combine and bring to boil. Place the lid on, lower the heat to steady low level boil, a bit more than a simmer, and cook for 2 hours, stirring occasionally. Check after about an hour, as you may need to add more vegetable stock.
Serve with some shredded cheese, sour cream, or diced avocados, and definitely with some corn bread, like this basic gluten-free version (nice and crumbly, perfect for chilis), very corn-y corn bread, or the more flavorful corn bread muffins.
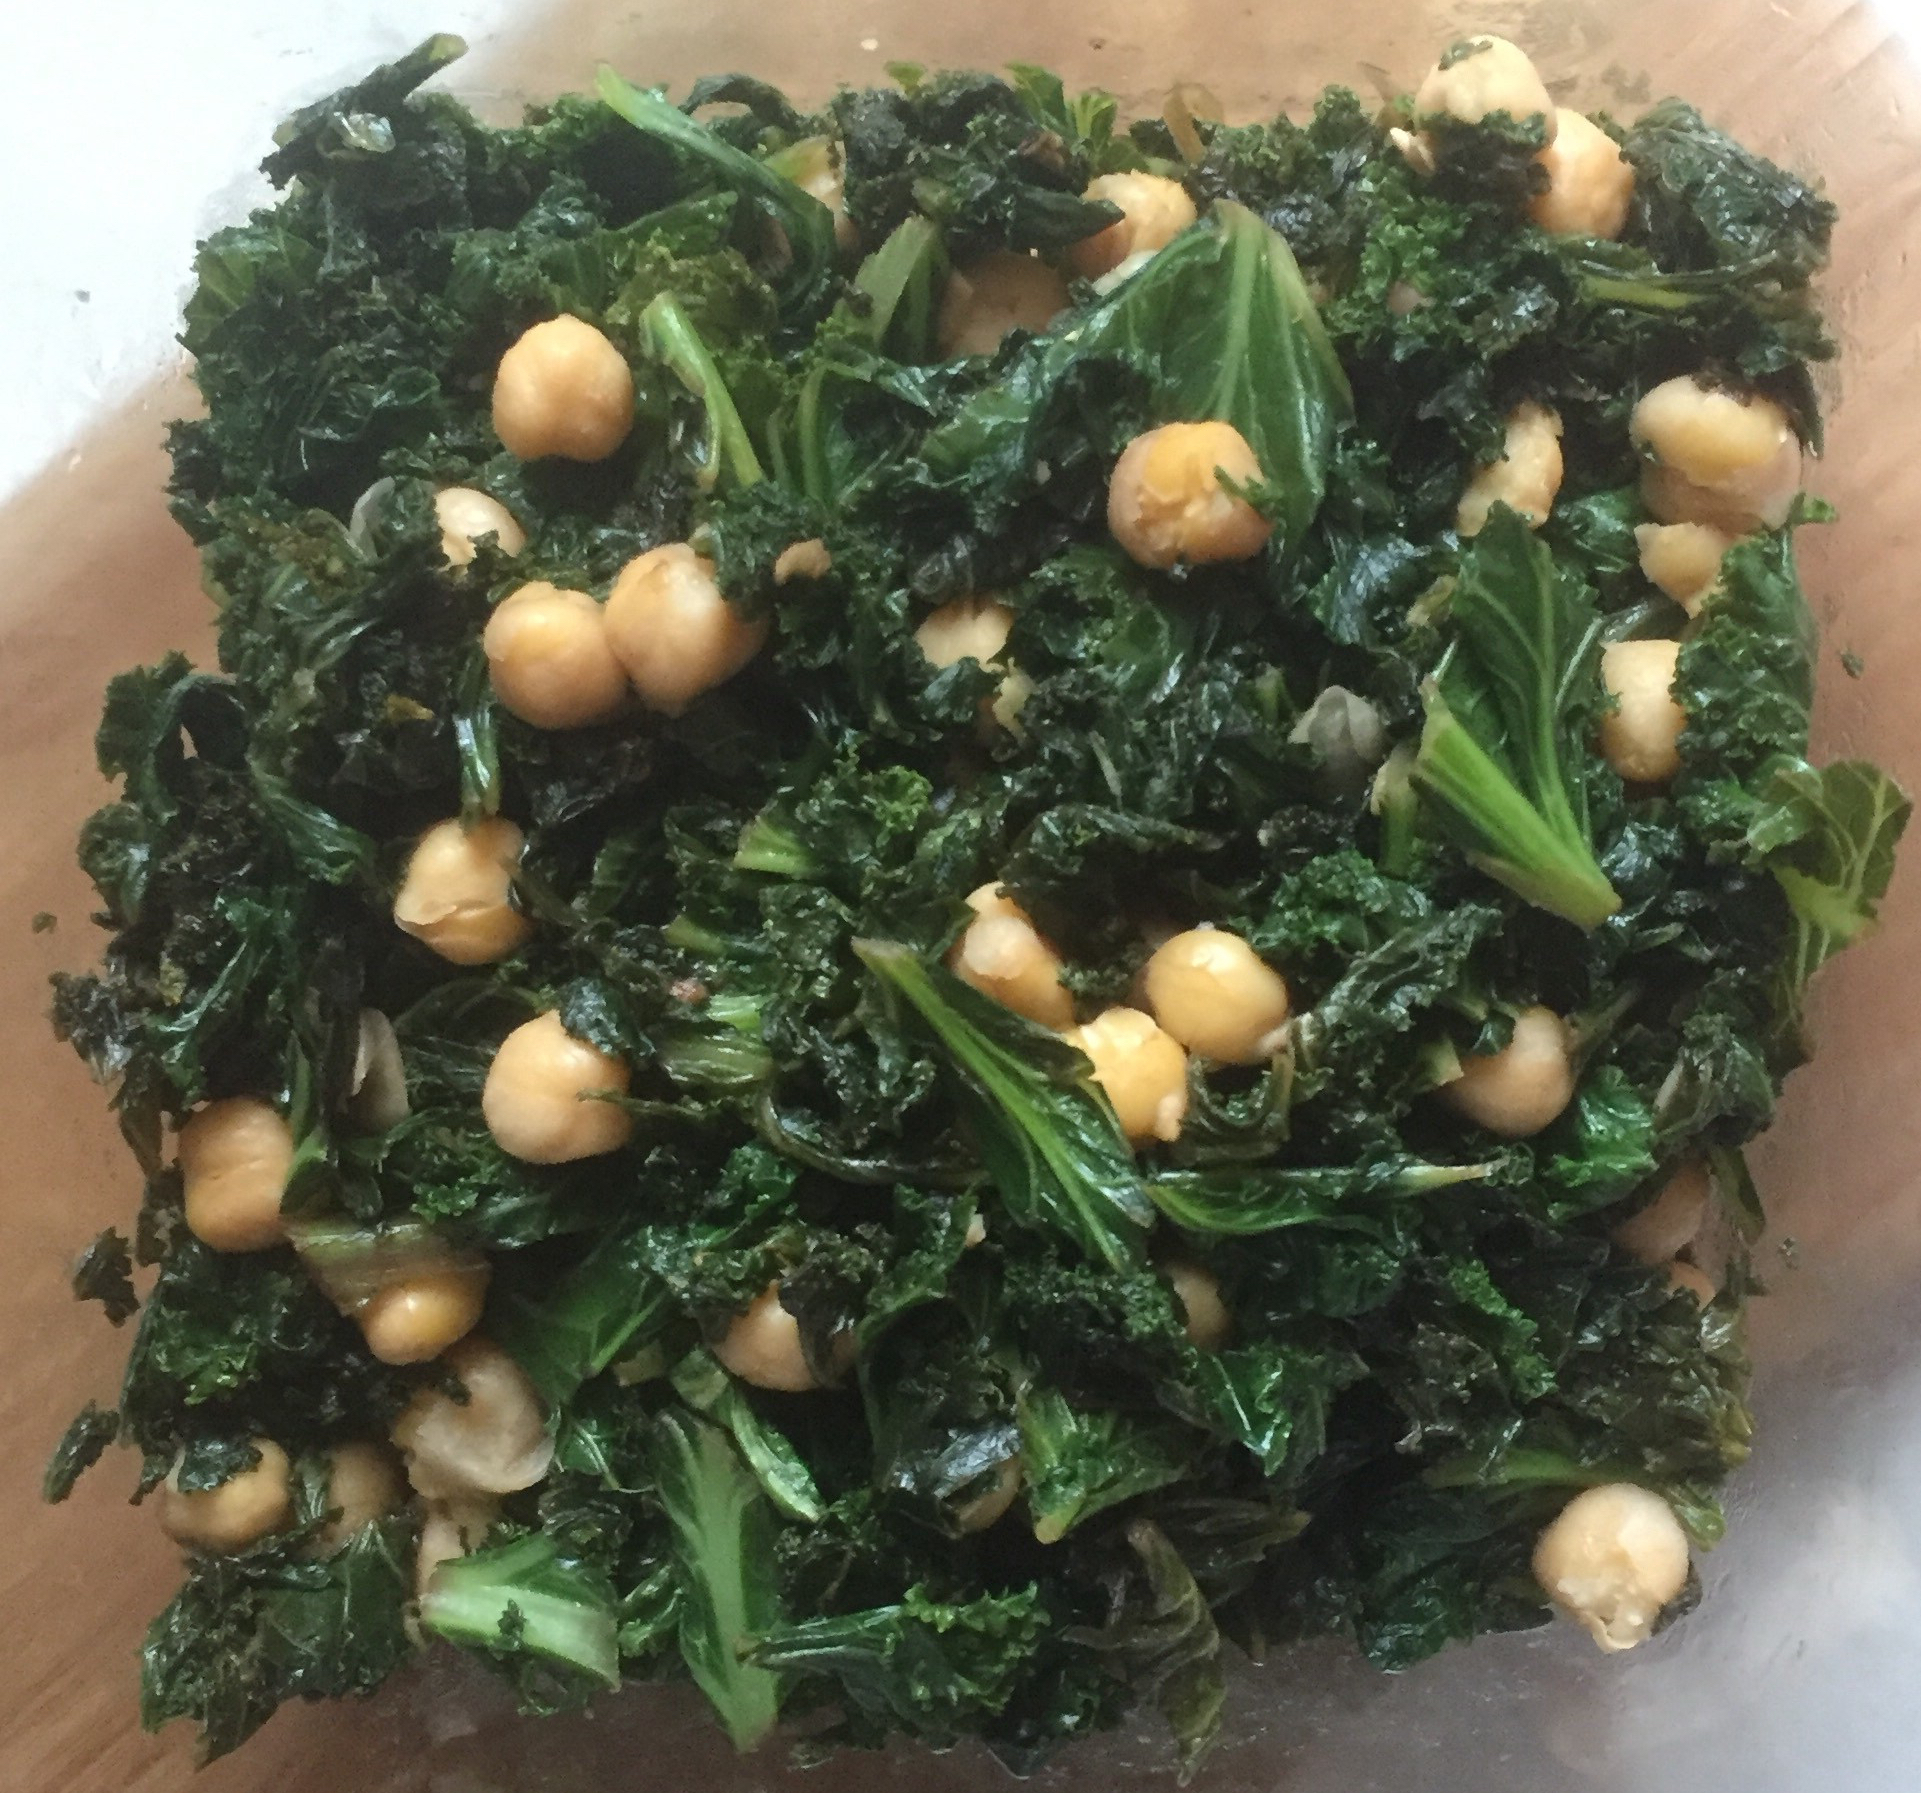
Warm Kale and Chickpea Salad, via Eat the Vegan Rainbow
Everybody is raving about kale. It’s a must-have super food and I’ve seen so many requests from people asking for suggestions and ideas on what to do with it. An obvious choice for kale is a soup, where the earthiness of kale and it’s sturdy structure add an interesting bite to it. Many also recommend using kale in smoothies, which I am not really all that interested in doing.
Another obvious choice is to use kale in salads. Unfortunately, kale is really sturdy and the only option you have for using it in salads is to go with baby kale. I used baby kale in the past, like in this salad full of great flavors of roasted beets, leeks, baby kale, and lemon vinaigrette.
But, recently I started playing around with ways to make kale work in a salad form, and discovered that the best way to do it is to sauté the kale to soften it. Also important is to remove all the big stems first – they are tough and chewy, so best removed before cooking. This makes the prepping process a bit tedious – you need to take a bunch of kale, wash it, remove the stems, and chop it – and very often I don’t really feel like doing it. You can buy chopped kale these days; however, most brands don’t do a great job at removing the pesky stems, so you will still need to inspect the kale carefully and ensure that all stem bits are out.
So, is this salad worth the fuss? Perhaps the best way to determine is to try it once and see what you think. I recommend serving it warm, just a bit above the body temperature, but cold works too!
Warm Kale and Chickpea Salad
What you’ll need:
1 lbs (454 g – call it 500 g) stemmed and chopped kale
4 cloves of garlic, thinly sliced
2 tablespoons balsamic vinegar
1 cup cooked chickpeas (from the can or homemade)
1 tablespoon olive oil
Salt and freshly ground black pepper to taste
What you’ll do:
De-stem kale with care, and chop roughly.
Place a large frying or sauté pan over a medium heat and add the olive oil.
Next, add the sliced garlic and let it sauté for just a minute.
Add the kale and mix well to incorporate all the garlic. Let the kale sauté for 8-10 minutes. The kale should be fully cooked!
Add balsamic vinegar, mix well and keep the heat on for 1-2 more minutes.
Turn the heat off, add the chickpeas, and salt and pepper (if using) and mix well.
Transfer the salad into a serving dish, and let it stand until just warm. The leftovers will store well in the fridge for 2-3 days, and you can enjoy this salad without reheating. Makes a great stuffing for a pita bread sandwich!