Unbelievably Creamy Oatmeal

Unbelievably Creamy Oatmeal
Unbelievably Creamy Oatmeal, via Eat the Vegan Rainbow

Water or milk? Apparently, when it comes to oatmeal there are two warring ideologies out there, with one side proclaiming that oatmeal can only be made with water and the other declaring that oatmeal with milk is the only way to be. Although I understand why people may prefer milk, I put myself firmly in the water camp on this one. And I am not alone: even bon appétit, a renowned food magazine, seems to agree that if you want to some creamy and delicious oatmeal, cooking it with water is the way to go!

Having said that, I recently discovered to way to kick it up a notch and create an incredibly creamy oatmeal, that’s silky, smooth, rich, and packed with protein. The secret to my newfound success is adding some protein powder to the oats.

I use quick cooking oats, those are oats that have been specially processed to decrease the cooking time. I prepare them in the microwave and they are done in about 2 minutes. But: if you prefer steel-cut oats, or rolled oats – go for it! The recipe below will work with any oat variety, and you don’t need to change anything about how you normally cook your oatmeal. All you need to do is mix in one scoop of your favorite protein powder with your oats before adding water (1/4 cup more than you would otherwise) and then cook the way you usually do.

This small amount of protein powder will add incredible creaminess and smooth texture. As I said, you can add any protein powder you like. I used unsweetened, unflavored pea protein powder, but vanilla flavored varieties will work, as will peanut butter protein powder – although in that case you better like peanut butter flavored oatmeal!

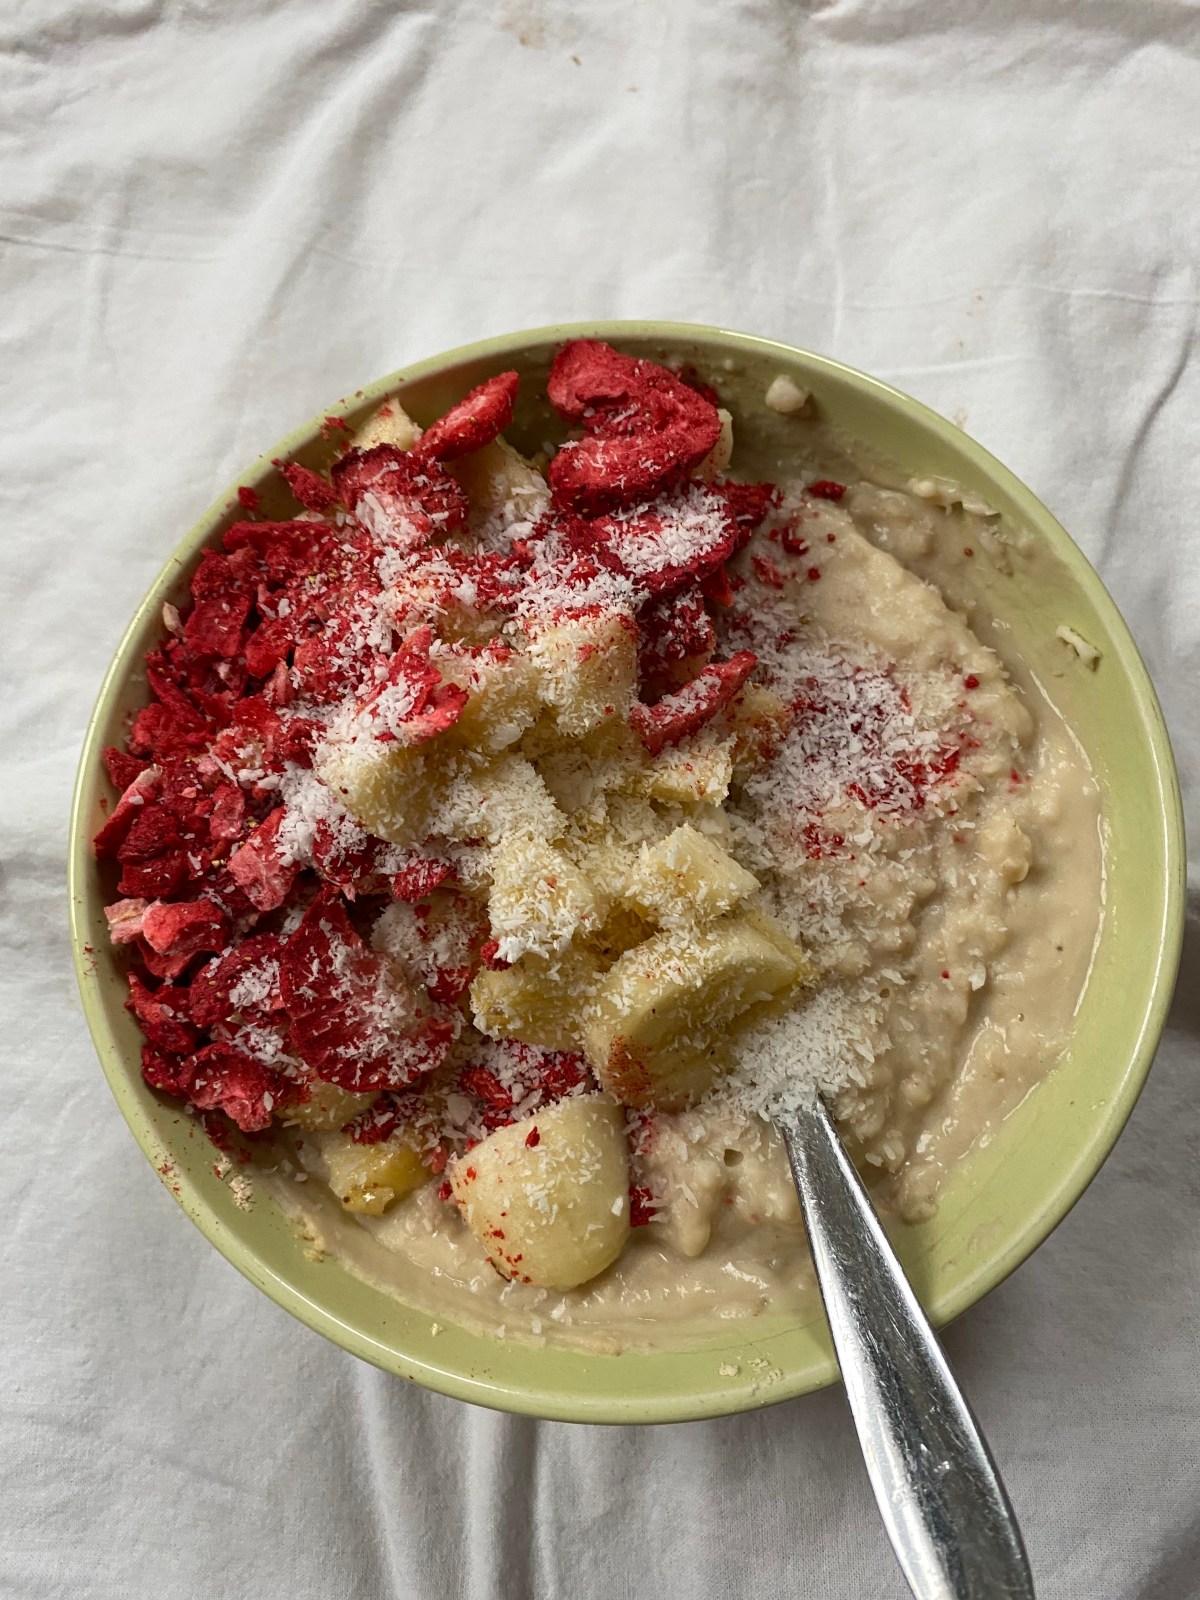
Lastly, don’t forget the toppings – you can use anything you have on hand. In the case of my recent breakfast, I had some bananas, coconut flakes and freeze dried strawberries. Some others topping you may want to try are raisins, or other dried fruit, chopped walnuts, slivered almonds, brown sugar, maple syrup, fresh fruit of any kind (well, maybe not citrus fruit, but you get the idea), some spices, like cinnamon or cardamom…

Or, if you are feeling adventurous (and you used unsweetened and unflavored protein powder) you may want to try savory oatmeal and add sour cream, perhaps some hummus, or some diced olives and similar types of toppings. I can see how this may sound strange, but oatmeal is really almost like polenta or grits, so it’s worth playing around with savory side of oatmeal as well.

Enjoy!

Unbelievably Creamy Oatmeal

Note: serves 1

What you’ll need:

  • 1/2 cup quick cooking oats (or any other type of oats you like)
  • 1 scoop pea protein powder (or any other type of protein powder you enjoy)
  • 1 1/4 cup water (use the amount of water you usually use to cook oatmeal + 1/4 cup extra)
  • optional: toppings of any kind you prefer (fresh fruit (bananas, berries…), dried fruit (raisins, chopped dates…), nuts (chopped walnuts, slivered almonds…), sweeteners (maple syrup, brown sugar…), coconut flakes, spices (cinnamon, vanilla, cardamom….)

What you’ll do:

  1. Note: this is a recipe for quick cooking oats prepared in the microwave. You will need to make adjustments if you are using other types of oats or other cooking methods. In a microwave safe bowl, mix the oats and protein powder. Pour the water in, and mix again. Cook on high for 2 to 3 minutes (this will depend on your microwave so stick to the time you usually use; if this is your first time making oatmeal, please note that oatmeal has a tendency to boil over very quickly and make a sticky mess that’s pain to clean. I recommend you place your ingredients in a deep bowl to avoid spills. Also: place a paper towel or something similar under the bowl, to help soak up the mess in case the spill over happens). Mix the oatmeal and return to the microwave for another 20-30 seconds.
  2. Serve the hot oatmeal with as many of your favorite toppings as you like. Keep it simple or go wild – you can’t go wrong with oatmeal!
COPYRIGHT © EAT THE VEGAN RAINBOW, 2020


Roasted Turnips Recipe

Roasted Turnip Recipe
Roasted Turnip Recipe, via Eat the Vegan Rainbow

Turnips are one of those neglected vegetables – or at least I tend to neglect them. If you are not familiar with turnips they look like really really big radishes bleached by sun expect perhaps a bit of purple left on top. Their texture is in between potatoes and radish, not as dense as a potato and not as airy as a radish. Their taste is also somewhere in between those two – a bit starchy and a bit bite-y! They have quite a bit of vitamins A and K, so great to include into your cooking rota. Plus: they are a low-waste food – meaning that they need to be peeled only lightly and if you buy them with their greens still on, you can use turnip greens the same way you would beet greens or spinach.

My first experience with them was really all thanks to our summer CSA (Community Supported Agriculture) share, resulting in this favorite, Balsamic Vinegar Glazed Beets and Turnips recipe. They are also delicious roasted, as in the recipe below. Enjoy!


Roasted Turnip Recipe

What you’ll need:

  • 1 bunch of purple top turnips (if you can’t find purple top turnips, you can use a bunch of any other type of turnip that’s available where you are, or 4 turnips or so, if not in a bunch. Note: rutabaga is not turnip, although they are closely related. Confusingly, rutabaga is commonly labeled as turnip in the US stores and can be found next to potatoes. The big clue that what you are looking at is not a turnip but a rutabaga is that rutabaga will be pretty large and a bit waxy on the surface (and very hard to peel if you do buy it). Don’t get that one for this recipe, but feel free to explore it for other things as it is delicious as well.
  • 2 tablespoons canola (or other vegetable) oil, divided
  • 1 tablespoon BBQ spice mix, store bought or homemade (this is the one I like, to make you own you need a 1/4 teaspoon smoked paprika, 1/4 teaspoon chili powder, 1/4 teaspoon salt, 1/4 teaspoon brown sugar, 1 teaspoon onion powder (or onion flakes if you have them), and 1 teaspoon garlic powder (or fresh crushed garlic))

What you’ll do:

  1. Wash and peel the turnips. Slice them into thin round slices – about 1/8 in (2-3 mm) thickness works well.
  2. Spread 1 tablespoon of oil over your cast iron pan or another heavy and oven safe pan) bottom.
  3. Arrange sliced turnip in a circle, almost as if you were building a rose using turnip slices as petals.
  4. Sprinkle another tablespoon of oil over the top and sprinkle the spices.
  5. Preheat the oven to 425 F (220 C).
  6. While oven is preheating, place the cast iron pan over high heat to sear the turnip. Let the bottom edge of the turnip slices brown, and get slightly crunchy. This should take only a couple of minutes.
  7. Decrease the heat and, working with kitchen tongs, turn the turnip slices upside down, 4-5 at the time, until they are all flipped and ready to sear on the other edge.
  8. Increase the heat and sear the second edge. Once that’s done, turnips are ready for roasting.
  9. Place them into the oven and roast for 20-30 minutes. – note: if you don’t have a cast iron pan, you can use any other heavy pan that is oven safe.
  10. Take the turnips out, cool slightly and enjoy!
COPYRIGHT © EAT THE VEGAN RAINBOW, 2020

Easy Gluten-free and Vegan Corn Bread

IMG_6216
Easy Gluten-free and Vegan Corn Bread, via Eat the Vegan Rainbow

What you will learn from this recipe is how to make corn bread that needs only seven ingredients (that’s including baking powder, baking soda, salt, and oil), is completely gluten-free, and entirely vegan! It is also simple, yet delicious, without extra sugar and other funky stuff that many recipes include.

I grew up eating plenty of corn bread, especially during winter months. I’ve also shared a recipe or two, providing different variations on the theme. Here, I wanted to share a recipe that strips away all the complexity and uses corn meal, corn starch and oil, together with leavening agents and carbonated (sparkling) water to create a nutty and mealy corn bread.

The bread is a bit on a crumbly side and it is best used with hearty stews, chilis and soups, those types of dishes that need a bit of bread to mix it in. For example, it would pair well with a cabbage and bean stew, or a bean soup with chorizo, or 15 bean chili!

The down side of this corn bread is that it does not store well, and it is really at its prime when it is fresh from the oven. So, if you feel that you may not need this much corn bread, make a smaller batch. It is so easy to make that you can whisk it all together as needed. If you are bothered by crumbliness, you can add some flax egg to the batter or chia egg.

Easy Gluten-free and Vegan Corn Bread

What you’ll need:

  • 3 cups of yellow corn meal
  • 1 cup of corn starch
  • 1/3 cup canola (or other vegetable or olive) oil
  • 1 teaspoon baking powder
  • 1 teaspoon baking soda
  • 1/4 teaspoon salt
  • 2 cups sparkling (carbonated) water
  • Cooking spray


What you’ll do:

  1. Preheat oven to 425 F (220 C).
  2. In a large mixing bowl, combine cron meal, corn starch, baking soda, baking powder and salt. Mix well, then add oil and combine. Batter will be soft (see picture above).
  3. Let the batter stand for 10 minutes or so.
  4. Spray the bottom and the sides of the 8 in x 8 in (20 cm x 20 cm) baking dish. Pour the batter in, smooth the top, then place in the preheated oven to bake at high temperature for 10 minutes.
  5. Lower the temperature to 350 F (175 C) and continue baking for another 20 minutes.
  6. Let the corn bread cool for 15 minutes or so, then cut and serve. Please note that this bread will not be asa great the next day so I suggest that you enjoy it fresh!


Copyright © Eat the Vegan Rainbow, 2019

Basic Lentil Bolognese

img_5633
Basic Lentil Bolognese, via Eat the Vegan Rainbow

When I was a college student, one of the most despised items served in the campus cafeteria was lentil stew. I can’t even remember the flavor now, but I remember that nobody really liked it so there was always plenty of it left over. So, every time I would run late from a class to lunch, I would end up with a bowl of lentil stew!

Things have, of course, changed quite dramatically since my college days, and I now make lentils almost every week and really enjoy them as a healthy, cheap and tasty ingredient. They are a great source of protein and they are versatile. Once cooked, they can be made into soups, burgers, or delicious Shepherd’s Pie, which I recommend you make and serve to everyone questioning your plant-based (vegan) diet and lamenting that they would never be able to give up meat!

Because of their texture and size, they are often used as a substitute for minced meat. That’s why they work really well in this simple Lentil Bolognese sauce. I hope you enjoy it and share with friends and family, neighbors and the world!!!

Basic Lentil Bolognese

What you’ll need:

200 g brown lentils, cooked

4 carrots, grated

1 yellow onion, diced

4 cloves garlic, thinly sliced

1 can (14.5 oz; 411 g) diced tomatoes

1 tablespoon dried basil

1 tablespoon dried oregano

1/4 cup fresh Italian (flat leaf) parsley, chopped

Freshly ground black pepper to taste

Salt to taste (optional)

Regular or gluten-free pasta to serve, cooked according to the instructions on the packaging

What you’ll do:

  1. Wash the lentils and check them for any non-lentil bits – sometimes little stones and bits can end up in the lentil bag so it is always a good idea to check. Place lentils into a pressure cooker, cover with water, and cook for 10-25 minutes once the pot is fully pressurized. Please note that the time may vary depending on your pressure cooker and you actually can cook your lentils in a pot and skip the pressure cooker all together. You are aiming for lentils that are soft but not mushy.
  2. Place a large pot over medium high heat, add oil, grated carrots, diced onions, and sliced garlic and cook for 5-8 minutes, mixing frequently. Next add the cooked lentils, basil and oregano, and finally diced tomatoes. Lower the heat down to low and let the sauce simmer for 15 minutes or so.
  3. Turn the heat off, then mix in fresh parsley, freshly ground pepper and salt to taste. Serve over pasta or over mashed potatoes!

Copyright © Eat the Vegan Rainbow, 2018

SaveSave

Sweet Corn and Sesame Seed Salad

img_4780
Sweet Corn and Sesame Seed Salad, via Eat the Vegan Rainbow

Sometimes salads are complex, feel elaborate and deep, mature and intense. I’ve made couple of those in my life, like this incredible roasted beets and leeks salad with baby kale and the most amazing lemon vinaigrette. I also made salads that are just for fun, with a bit of this and a bit of that, by combining fruits, vegetables and nuts.

But during summer, I like my salads to be simple, yet out of the ordinary. Last summer I went nuts for a pasta salad that used only a handful of ingredients but which I could not stop making over and over again. I think we are at that point in summer when it’s time for another easy, yet amazing salad, with no greens allowed (I love the greens but there is sometimes scope to be just a bit different!).

This corn salad is it – and it’s absolutely a fabulous accompaniment to any grilled food feast. All you need are four simple ingredients and 10-15 minutes. If you have that – boom, boom, boom and you are done.

The corn I use most often is frozen sweet corn, but you could grill your corn and cut the kernels out and use that instead. I bet the grilled/charred corn flavor would be fantastic.


Sweet Corn and Sesame Seed Salad

What you’ll need:

1 lbs (454 g) frozen sweet corn

1/2 cup sesame seeds

2 tablespoon olive oil

2 teaspoons steak spice (I recommend McCormick Grill Mates Montreal Steak Seasoning)


What you’ll do:

  1. Place a large frying pan over medium high to high heat. Add olive oil and frozen corn. Let the corn brown as it defrosts. Mix frequently but do let the corn get some surface caramelization.
  2. While the corn is cooking, toast your sesame seeds. You can do this in a toaster oven or using a stove top. Keep a close eye on your sesame seeds as they toast because they do from nicely toasted to completely burned in a matter of seconds!
  3. Add the toasted sesame seeds to your corn, as well as the steak spice and mix well. The salad is best served room temperature, but you can serve it warm as well. Enjoy!

Copyright © Eat the Vegan Rainbow, 2018

Super Summer Soup Supper – CSA Week 8

Super Summer Soup with Italian Flat Beans, via Eat the Vegan Rainbow

The adventures of the CSA share continue! This is our week 8 share and the eggplant, zucchini, and cucumbers are in full swing. If you need some zucchini inspiration, check out my stuffed zucchini boat recipe from last week. There are also some new items this week, and that’s my focus here: corn, green peppers, and flat (romano beans)! And this is what makes taking part in a CSA (Community Supported Agriculture) program so great – finding surprise ingredients that your local supermarket may not carry, and figuring our what to do with them.

The credit for this soup goes entirely to my 7 year old who suggested we use flat beans for a soup, add corn to it, plus one tablespoon each of dried dill, dried basil and onion powder. Oh, and garlic and vegetable broth! Then I stepped in with some carrots, bay leaves, and green pepper (also courtesy of the CSA share this week). The rest is history and the recipe below!

What are flat beans?

Flat_beans_raw
Flat Beans, Raw – By Andrewa, from Wikimedia Commons

Before we dive into cooking, let me just share what flat beans are. I don’t think I ran into them before, and I am guessing many of you are in the same boat! These beans are also known as romano beans, and also Italian flat green beans. They are similar to green beans, but much broader – about one inch (2.5 cm) or so, and they are quite long too. They have a good bite to them, although my seven year old helper did not like their taste when raw. These beans are meaty and that’s another reason why putting them into a stew or a hearty soup makes a lot of sense as they need a bit of time to cook, and I don’t think steaming them would work. So, if you like to try a green bean variety with a bit more meat and bite to it, these are a great option.

Super Summer Soup with Italian Flat Beans

What you’ll need:

1 lbs (about 500 g) flat beans (romano beans), trimmed and cut into 1 in (2.5 cm) pieces

2 cups grilled corn, just kernels (frozen or canned whole kernel corn would work too!)

2 large carrots, chopped very finely using a food processor

1 green pepper, diced to small pieces

4 cups (about 1 L) vegetable broth

4 cloves garlic, thinly sliced or crushed

1 tablespoon onion powder

1 tablespoon dried dill

1 tablespoon dried basil

4 dried bay leaves

2 tablespoons olive oil

Squeeze of lemon for serving (optional)

What you’ll do:

  1. Place a large pot over the medium-high heat. Add oil then garlic and let the garlic brown just slightly for 1-2 minutes.
  2. Next, add diced green peppers and sauté for 2-3 minutes, with occasional stirring.
  3. Add finely chopped carrots, mix well and cook for another 2-3 minutes.
  4. When the peppers have softened and the carrot pulp starts to brown, add the beans, corn and all the spices and sauté for another 5 minutes, then pour in the vegetable stock, bring to boil, lower the heat to simmer, put the lid on and leave it for 15 minutes.
  5. Serve this soup as a light supper, lunch, or pair with a salad and some bread for a meal!

Copyright © Eat the Vegan Rainbow, 2018

Unbelievably Easy Baked Polenta Sticks

img_3352
Baked Polenta Sticks, via Eat the Vegan Rainbow

I was raised eating polenta with milk and sugar for breakfast. As I grew up and started experimenting with my food, I would add sour cream and even ajvar, the roasted red pepper and eggplant spread many associated with Bulgaria and the South East Balkans. But even with these add-ons, polenta remained a breakfast food.

So, I was quite surprised to discover that fancy Italian restaurants include polenta on their dinner menus. Of course I had to try it, and I liked it! I actually never met a polenta I did not like. And as a cook it’s something that you can whip together in minutes!

Polenta is basically boiled coarse corn meal, so it is in the same food family as grits. And, practically speaking it is as easy as it sounds – you bring a pot of water to boil and you add some corn meal to it while stirring constantly and furiously to prevent clumping. You let the pot boil for five minutes with constant stirring and the polenta is done.

The recipe here is two steps removed from the basic polenta. First, after you make the polenta according to the instructions on the box, you will need to pour it into a deep baking dish which is either lined with some parchment paper or well sprayed with the cooking spray. Spread the polenta into one even and smooth layer and let it set for at least an hour.

Once the polenta has set and hardened you will be able to slide it out of the dish and onto the cutting board. Slice polenta into 1 x 2 in (2.5 x 5 cm) sticks and arrange them on a baking sheet. Spray the tops with a cooking spray.

From here you can take your polenta in any direction you like. You can add fresh or dry spices, nutritional yeast, small bits of cheese or vegan butter that melt well, or sprinkle sugar and cinnamon if you want to make the baked polenta sticks into a dessert. Here, I decided to go two ways and top one set of polenta sticks with some cumin powder, dry basil and oregano. The second batch I spiced up a bit with freshly ground black pepper as well as smokey red pepper flakes. The topped polenta stick are then baked until their surface is nicely browned.

I served the Baked Polenta Sticks with vegan bolognese sauce but you can eat them as is, or serve them with a wide range of dishes. The flavor of polenta sticks is mild, slightly nutty, and depends on the spice combination you used. In general, Baked Polenta Sticks are great with any dish you would serve with corn bread, like chili, Jackfruit Barbacoa, or Bean and Leek Soup. They can also be used as an appetizer, served along side simple marinara dipping sauce and some olives.


Baked Polenta Sticks

What you’ll need:

2 cups polenta (or corn meal)

4 cups water

1/4 teaspoon salt (adjust salt to taste)

Cooking spray

Dried basil

Dried oregano

Cumin powder

Crushed red pepper flakes

(Onion powder, garlic powder, nutritional yeast, freshly ground black pepper, lemon zest,… quite a few toppings will work so feel free to experiment)


What you’ll do:

  1. In a large pot, bring water to boil.
  2. Add the salt and polenta to the boiling water while stirring rapidly to prevent clumps from forming. Decrease the heat to medium/medium low, and keep stirring the polenta for about 5 minutes.
  3. Pour the polenta out into a baking dish that you previously sprayed with cooking spray. I recommend using 9 x 13 in (22 x 33 cm) dish for this amount of polenta – this will give you 1/2 in (1 cm or so) thick sticks – but you can use any other flat bottom container you have on hand. Just note that the thickness of the sticks will vary depending on what you use.
  4. Let the polenta cool and set for at least an hour. The thicker your polenta layer, the longer it will take.
  5. Slide the polenta slab out onto a cutting board. Cut into sticks of regular size.
  6. Arrange your polenta sticks on a parchment paper lined baking sheet. Do leave some space between the stick so they can bake evenly, which means you may need to use two baking sheets or bake in two batches.
  7. Spray the top with some cooking spray and sprinkle the toppings/spices of your choice liberally.
  8. Place into the oven that was preheated to 400 F (205 C). Bake for 15 minutes or until the sticks are golden brown.
  9. Serve as a side dish with a soup, or as an appetizer with marinara sauce, or simply munch on these any time. They are best served fresh from the proven, but couple of minutes in a toaster oven will help the next day!

Copyright © Eat the Vegan Rainbow, 2018

Radish Salad with Apples, Carrots and Toasted Walnuts

img_3783
Radish salad with Carrots, Apples and Toasted Walnuts, via Eat the Vegan Rainbow

Who said salads have to be green? Or soaked in heavy dressing? Salads come in many different shapes and forms, and this is my contribution to the pantheons of salads – a mix of sliced radishes, shredded carrots and apples, toasted walnuts and freshly squeezed lemon juice. I used lemon zest and some cracked black pepper for garnish, and that’s that. With a little help from a food processor with couple of different blades everything came together in less than ten minutes!

img_3780

There isn’t much more to this Salad story. Perhaps a slice of hearty bread, some of the lovely Baked Sunflower Seed Cheese, and you’re done. This salad is so fragrant, full of colors, different shapes and textures with a nice crunch that it is absolutely fit for any winter holiday table. Enjoy!!!

img_3782

Radish Salad with Apples, Carrots and Toasted Walnuts

What you’ll need (for 2-4 servings)

1 bunch red radishes (7-8 large ones), washed

1 Granny Smith or another tart apple, washed

4 carrots, washed and peeled

1/2 cup chopped walnuts, toasted

1 lemon, juice and zest

1/4 teaspoon cracked black pepper (or to taste)


What you’ll do:

  1. Wash the radishes and slice them into thin discs. You can do this by hand by I recommend using a food processor if it has a slicing blade. My food processor has an adjustable slicing blade and I dialed the thickness way down.
  2. Without taking the sliced radishes out, replace the slicing blade with the fine grating blade and grate the carrots.
  3. Using a coarser grating blade, grate the apple. Transfer everything into a large mixing bowl.
  4. Add the juice of one lemon, lemon zest, cracked black pepper, and toasted walnuts and toss to combine.
  5. Serve immediately with a slice of hearty bread, and a side of cheese as a light lunch, a salad course, or as a part of a more elaborate appetizer spread.

Copyright © Eat the Vegan Rainbow, 2017

Zucchini Noodles with Cherry Tomatoes and Corn

img_3483
Zucchini Noodles with Cherry Tomatoes and Corn, via Eat the Vegan Rainbow

Who ever invented a spiralizer deserves one of those Breakthrough Technology prizes – future generations of parents will not know the painful process of getting kids to eat zucchini or summer squash, or even beets because with this magical machine all kids will be diving into is spaghetti, and who doesn’t love that!!!

What I like about zucchini noodles is that they cook really fast, they have a lovely texture, and a bit of chew to them – very similar to a broader noodle pasta variety, like fettuccine. The recipe here combines only a handful of ingredients and, once you have your zucchini noodles ready, it only takes 15 minutes from start to finish. So, it is ideal for a quick lunch, or a healthy dinner after a very, very busy day. It looks very glamorous, it tastes crisp and delicious, and you will get all your recommended daily servings of vegetables in one plate – but, hey, who’s counting those, right?

The easiest way to get zucchini noodles, or many other kinds of noodles, is to buy them from a grocery stores. Almost all I go to carry those, so grab them and try them. If you like them, stop grabbing them from the store and buy yourself a spiralizer. The gadget is going to pay iteself off after 5-10 times of use, depending on how much you spend, because buying zucchini and doing the spiralizing yourself is much, much cheaper – I did the math and came up with the number 5. It will cost you five times more to buy pre-spiralized veggies than to do it yourself… Plus, once you have a spiralizer you can do all sorts of fun stuff with it, like these Spiralized Oven Fries.

Hope you give this recipe a try!

Zucchini Noodles with Cherry Tomatoes and Corn

What you’ll need:

4 pieces of zucchini, medium sized, spiralized

1 onion, finely diced

10 oz (275 g) cherry tomatoes, washed and halved

1 1/2 cup frozen corn

Cooking spray

Fresh parsley, nutritional yeast, fresh or dry oregano, fresh or dry basil – these are all possible toppings for you to consider.


What you’ll do:

  1. Spray the bottom of a large and deep frying pan, or even a wok, with cooking spray and put over the medium high heat.
  2. Add the diced onions and brown for 3-4 minutes, until soft, slightly browned and translucent.
  3. Add the tomatoes and let them sauté for 3-4 minutes.
  4. Once the tomatoes are soft, add the corn and let it thaw as it cooks. No need to thaw it ahead of time. It will take about 5 minutes for corn to be ready for the next step.
  5. Add the zucchini noodles, mix everything gently together, and sauté for another 5 minutes. Serve immediately with a dash of fresh basil or a sprinkle of nutritional yeast on top!

Copyright © Eat the Vegan Rainbow, 2017


Dark Chocolate Almond Butter Cups

img_2692
Dark Chocolate Almond Butter Cups, via Eat the Vegan Rainbow
Halloween is almost upon us, which means that piles and piles of candy are everywhere!!! Most of the store bought stuff is, of course, not very good for you. Don’t get me wrong – sweets and candy have their time and place, and a little bit of chocolate at the right moment can go a long way towards restoring harmony in the universe. But finding a vegan-friendly treat that’s rich in flavor yet light in calories, that’s healthy yet decadent, is not easy.

Since transitioning into plant-based, low fat, salt and sugar eating and cooking, I’ve been satisfying my sweet tooth with lots of fruit and lots of smoothiescookies, apple crumbles, muffins, and even chocolate cake that use tons of fruits and sweet veggies (like carrots, bananas, apples, raisins…) to build sweetness without extra sugar. But, there comes a point in everyone’s life when chocolate becomes a necessity, and here’s my answer for those cravings – Dark Chocolate Almond Butter Cups.

These treats are no-bake and super easy to make. You will need some specialized equipment, like a mini muffin pan, the one with 24 muffin holes, and some mini muffin liners, the same kind you would use to line the pan if you were baking muffins. The liners help hold the cups as well as give them the traditional shapes edges.

When it comes to chocolate, you can use any kind you like. My recipe does not use any additional sweeteners, so all the sweetness comes from the chocolate and from the natural sweetness of the almond butter. That’s why I recommend using semi-sweet dark chocolate that does have some sugar added to it. Alternatively, you can add some maple syrup to the almond butter filling and that will elevate the sweetness level. Having said that, I hope you give my original recipe a try before making adjustments because I thought these Dark Chocolate Almond Butter cups turned out just right!

The recipe could not be simpler. You will need to line the mini muffin pan with liners, melt the chocolate using either a double boiler, which you can make yourself, or a microwave, soften the almond butter and mix it with almond meal and maple syrup extract and then work fast to place a tablespoon of melted chocolate in each mini muffin cup, then place a half tablespoon of almond butter filling, which you will need to shape with your fingers into a tiny patty, on top of each chocolate layer, and finally top the almond butter filling with more melted chocolate.

Assembling these Dark Chocolate Almond Butter Cups is a bit of a mad dash but it’s also a lot of fun, with melted chocolate dripping and the aroma of almond butter filling. If you are wondering why I decided to add artificial maple syrup flavor instead of the real thing the answer is simple: calories! The flavoring agent adds just enough warmth to the filling and contributes no calories to the final treat. If you bothered by the idea of an artificial ingredient, skip it or replace it with a dash of cinnamon and/or splash of vanilla extract.

Once filled, Dark Chocolate Almond Butter Cups go into a refrigerator for 30 minutes or so, which will help them firm up. You should leave them out at room temperature for about the same amount of time before serving and you’ll have melt-in-your-mouth, rich and decadent, yet good for you, treat to share (or not!).

Dark Chocolate Almond Butter Cups

What you’ll need:

2 cups dark chocolate chips or baking dark chocolate chip chunks

1 cup almond butter (unsalted, smooth)

3/4 cup almond meal

1 teaspoon imitation maple syrup (or cinnamon, and/or vanilla extract)


What you’ll do:

  1. Line the 24-hole mini muffin pan with baking liners.
  2. Put your chocolate chunks, pieces or chips, into either a double boiler or a microwave safe dish. If you are using a double boiler make sure you start mixing the chocolate continusouly until melted and smooth. If you are using a microwave I recommend going at 50% power and letting the chocolate go for 1-2 minutes at first and then check it at 30 second intervals. It is usually a good idea to pull the chocolate out when it is about 80% melted and then mix for a minute or two and use the heat of the chocolate to melt the rest.
  3. Place the almond butter in a different bowl and microwave for about 30 seconds. The almond butter should be soft but not runny. Add the almond meal and the flavoring agent of choice. Mix well.
  4. Pour a tablespoon of melted chocolate in each muffin hole.
  5. Use half a tablespoon of the almond butter filling and make a small patty with your fingers. Place the patty on top of the chocolate.
  6. Pour another half a tablespoon to a tablespoon of melted chocolate on top of the almond butter filling.
  7. Place the Dark Chocolate Almond Butter Cups into a refrigerator for 30 minutes or until firm and solid.
  8. Take the cups out of the mini muffin pan, and let them come to room temperature before enjoying. You can leave the paper liner on, or remove it – it’s up to you. Those  liners come in many different designs so you can have lots of fun with those as well.
  9. Enjoy!

Copyright © Eat the Vegan Rainbow, 2017


Tapioca Pearls with Spicy Almonds and Toasted Coconut

img_2521.jpg
Tapioca Pearls (Sabudana) with Spicy Almonds and Toasted Coconut, via Eat the Vegan Rainbow

Most people probably think “bubble tea” when they hear “tapioca pearls”. But these delicious little pearls are definitely worth getting to know more intimately, especially in the context of gluten free cooking. They are inexpensive and very simple to make. They actually require no cooking – just soaking – so although no cooking skills are required, some level of patience (and a good amount of time) is.

Before we go any further lets try to answer this questions first: “What are tapioca pearls?”. They can come in different sizes and colors. The ones I will focus here are white and small, close to the size of Israeli couscous. But unlike the couscous, which is made with wheat and thus off limits for those watching their gluten intake, tapioca pearls are made from starch extracted from cassava root. So, they are little starch balls when all is said and done. Think micro potatoes that don’t need peeling!

If you are into Indian food, you have likely already had some tapioca pearls because they are often used to make desserts, like kheer pudding. Earlier this summer I had some homemade Sabudana Khichdi and I loved it. Sabudana Khichdi is a traditional dish and usually consumed during Hindu fast days. The dish includes tapioca pearls, finely chopped, cooked potatoes, finely chopped peanuts, finely grated coconut flakes, and a nice combination of spices (curry leaf, cumin seeds and green chilis). There are some variations on the recipe and the ingredients may vary depending on whethe Sabudana Khichdi is served during the fast or outside the fasting days, and my friend who made the dish for us also mentioned that a more protein-rich version of Sabudana Khichdi can be made using quinoa, and she suggested I check a blog by another friend of hers called Indfused, which I did and so should you, especially if you are interested in creative Indian/American fusion cooking (FYI: Infused is not a vegan blog, so keep that in mind).

Back to the the version of Sabudana Khichdi I had – it was a delicious addition to our summer cook out and prompted me to get some tapioca pearls of my own and start experimenting. The recipe below is the second iteration and deviates from the original recipe quite a bit. I took some liberties so my Tapioca Pearl Salad is Sabudana Khichdi inspired, but not meant to be “traditional” in any way. First point of difference is that I left the potatoes out. In my view, leaving potatoes out does not affect the taste nor the nutritional profile of the dish, yet saves some time and effort. I also left the peanuts out and replaces them with slivered almonds. I used slightly different spice mix, to make the dish a bit more fragrant. Finally, I toasted my coconut flakes, because in my mind coconut is just better toasted!

The key to making tapioca pearls is patience. All you need to do is rinse the pearls in cold water, then soak them in enough cold water, usually in 1:2 ratio (for example 1 cup pearls and 2 cups water), for 2-3 hours. How do you know they are ready? They should feel loose, not stuck together, and soft, yet slightly chewy, to bite – think pasta al dente. You can go a bit further if you prefer softer texture, but you do want your pearls to remain pearly, not mushy, so don’t overdo it.

Now a key to make the dish really flavorful and spices vibrant, is toasting the spices. I use a frying pan here, and, although you can dry toast the spices, I do add a bit of oil in this case and let the spices toast for one to two minutes before adding the almonds to finish it off. I pour the toasted spice and almond mix over the drained tapioca pearls, instead the other way round, but that’s more of a personal preference I suppose. The toasted coconut flakes come next, and the chopped fresh cilantro is the final touch. You can serve this dish immediately, you can heat it up more and serve hot, or you can leave it in the refrigerator overnight and serve it cold. It actually works across the range of temperatures so it could work as a surprising pasta salad at your next picnic. It is a great, easy and inexpensive dish to make for your next pot luck or any other get together!

img_2525
Tapioca Pearls with Spicy Almonds and Toasted Coconut, via Eat the Vegan Rainbow

 Tapioca Pearls with Almonds and Toasted Coconut Flakes

What you’ll need:

2 cups tapioca pearl

4 cups water

1 cup slivered almonds

1/2 cup coconut flakes or shreds, unsweetened

2 tablespoon vegetable (or canola) oil

1 teaspoon cumin powder

1 teaspoon curry powder

1/2 teaspoon turmeric

2 tablespoon fresh cilantro, chopped


What you’ll do:

  1. Rinse the tapioca pearls under cold water and place into a large bowl. Cover with water and let stand for 2 to 3 hours. The pearls will absorb water and they should become soft and al dente.
  2. Drain the pearls well, pat dry with a paper towel and put into a large mixing bowl that you will use for serving as well. You can use the same bowl you used for soaking just remember to dry it well in the meantime.
  3. Heat the oil over medium high in a large frying pan. Add the dry spices (cumin, curry and turmeric powder) and toast in oil for 1 minute.
  4. Add slivered almonds and toast for another 2 to 3 minutes, until almonds start to brown.
  5. Pour the hot almond and spice mix over tapioca pearls and mix well.
  6. Toast coconut flakes in a toaster oven or a frying pan for 2-3 minutes. You need to keep an eye on your coconut flakes as they go from beautifully toasted to inedible in a blink of an eye! If you are using the frying pan, you can use the same pan you just used for almonds and spices, just don’t add extra oil as coconut flakes should be fatty enough.
  7. Add hot, toasted coconut flakes to your tapioca pearls and mix well.
  8. Let the mix stand for couple minutes and while those flavors are combining, wash and chop fresh cilantro.
  9. Sprinkle the cilantro over your tapioca pearls, mix again and serve!

Copyright ©Eat the Vegan Rainbow, 2017

Fancy Faux-Lobster Roll

Fancy Vegan
Fancy Faux-Lobster Roll, via Eat the Vegan Rainbow
During long, winter months when days are short, snow piles up high and it does not get above freezing for weeks on end, New Englander likes to enjoy things like pots and pots of piping hot New England Clam Chowder, a creamy and rich seafood based soup. This winter I did something that just a year ago would have sound like a total science fiction and impossibility. I made completely plant-based, clam-free New England “Clam” Chowder.

Now that we are approaching the high summer, I felt ready to tackles another recipe that New England self-identifies with, the Lobster Roll! If you’ve never tasted or seen a Lobster Roll let me quickly describe how it’s made. You take a hot dog bun, steam it or toast it and fill it with chunk so of cooked lobster meat tossed with some mayonnaise and chopped celery. The main flavor you get is usually the combination of mayo and celery, and you may get some citrus overtones since the roll is often served with a lemon wedge.

So far, jackfruit was my go-to seafood replacement. Jackfruit works really well in crab-less Jackfruit “Crab” Cakes, in Clam-free “Clam” Sauce, and in vegan New England “Clam” Chowder, but for the lobster rolls I wanted a different texture and milder flavor as canned jackfruit that I have access to is usually a bit salty and sour. So I did a little bit of research and discovered that heart of palm seems to be everybody’s favorite lobster stand-in. I have not really used heart of palm before so I was not sure what exactly to expect.

Luckily for me, my local Trader Joe’s carries 14 oz. jars of heart of palm in brine, so I decided to go for it. This amount of hearts of palm is enough to make four generous rolls using a standard size hot dog bun. The rolls come together in less than ten minutes and definitely qualify as a quick lunch or dinner. I recommend rinsing the heart of palm well and chopping it into relatively small piece. I know that chunks of lobster in some of the most revered lobster rolls out there are pretty large but in this case I do think that making celery and heart of palm pieces about the same size works better to integrate the flavors. Plus it makes for more manageable bites. So, get a large mixing bowl out and lets make a much lighter, cheaper, safer and, lets face it, tastier and kinder lobster roll.

Fancy Faux-Lobster Rolls
Fancy Faux-Lobster Rolls, kinder and safer, via Eat the Vegan Rainbow

Fancy Faux-lobster Roll

What you’ll need (for 4 servings):

1 14 oz (400 g) jar heart of palm
6 stalks celery
1/2 cup vegan Mayo (store bought or homemade)
1 tablespoon lemon juice
1 teaspoon old bay seasoning
1 teaspoon Dijon mustard
3-4 springs of fresh dill, chopped
4 hot dog buns


What you’ll do:

  1. Drain and rinse heart of palm. Pat dry and cut in half lengthwise and then across into 1/2 in (1 to 1.5 cm) pieces. Place into a large mixing bowl.
  2. Chop celery into thin slices, approximately matching the size of the heart of palm pieces. Add to the mixing bowl.
  3. Add the rest of the ingredients and mix well. Let rest for 30 minutes.
  4. Toast four hot dog rolls then top them with generous amount of faux-lobster filling. Sprinkle more dill on, if you like, and enjoy! The flavor is so fresh and satisfying that you will not want to add anything to this, but just in case you are wondering what to pair Fancy Faux-Lobster Roll with, you can try boiled or baked potatoes with just a splash of olive oil. That ought to do it!

Copyright ©Eat the Vegan Rainbow, 2017