Rich Risotto with Roasted Winter Squash

Rich Risotto with Roasted Winter Squash, via Eat the Vegan Rainbow

Winter squash – they come in what seems to be an endless number of varieties. If you ever find yourself wondering whether you have a summer or a winter squash, all you have to do is take a look at the seeds. All summer squash are picked before their seeds are fully formed and mature, while the winter squash is left on a vine to ripen until seeds are fully formed. So when you cut winer squash, you will find a bunch of seeds that you can often enjoy in their own right, usually roasted.

The types of squash that I can easily find in New England (USA) are acorn, butternut, buttercup, hubbard, and spaghetti squash, which makes lovely Pad Thai among other things. And, of course, pumpkin, which reigns supreme among others in terms of availability and easy of use given that I go straight for the can. Canned pumpkin purée (note: not the pie filling!), is a nice addition to many recipes, including meatloaf, as well as truffles. Actually, all winter squash are quite versatile and can be made into both savory dishes and main courses, as well as dessert.

winter-squash-3729094_1920
Winter Squash, image via Pixabay

One of my favorite way to prepare winter squash is roasting. Roasted squash is delicious, and does not require much work to get the roasting going. After it cools, you can enjoy roasted squash as is, or cube it, or purée it for use in number of different recipes, including the risotto below.

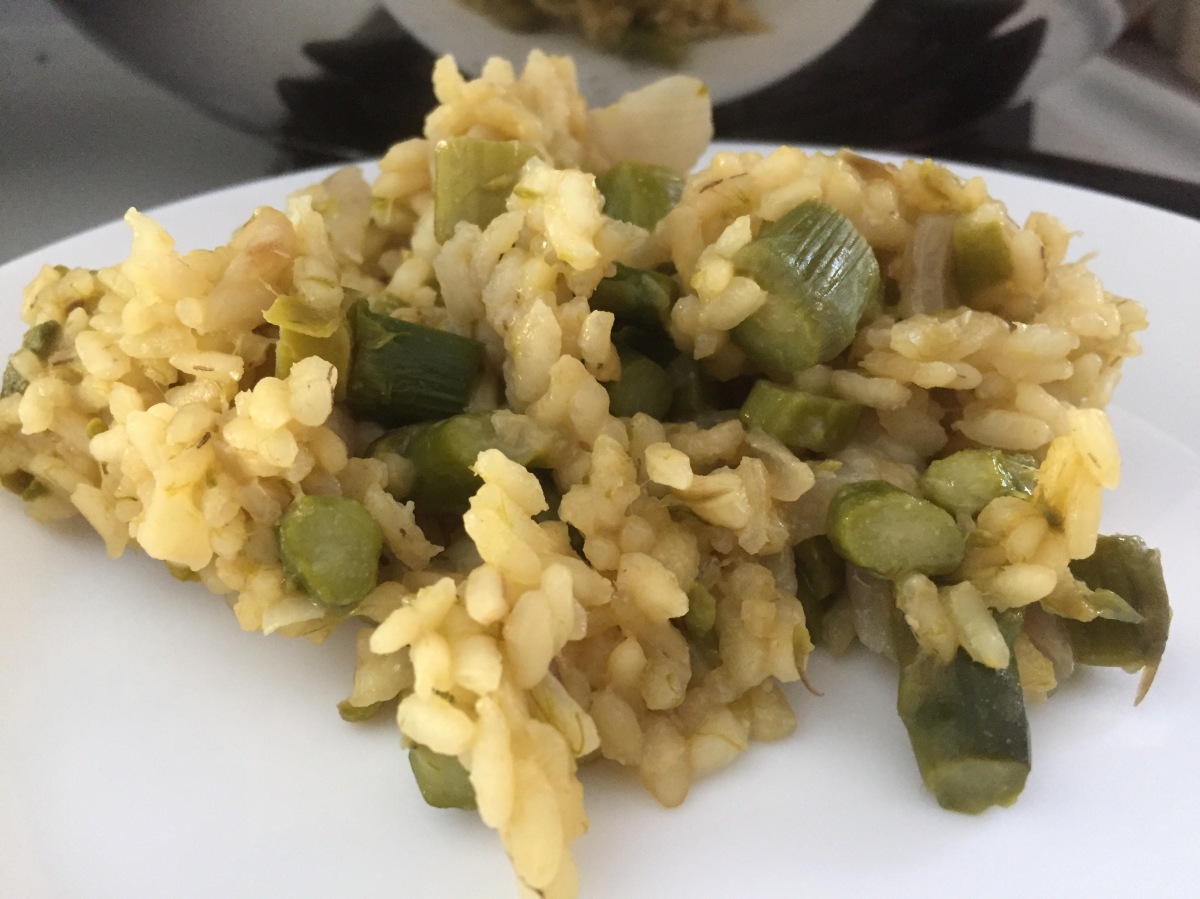
The inspiration for this risotto came from my search for ultimate comfort food. It struck me that combining soft and creamy rice, like the one you get in a well-cooked risotto, with slightly sweet and earthy winter squash is likely to deliver. And: I was right! What helps this risotto come together is nutritional yeast, which I use quite liberally, and bay leaf and thyme, two herbs that infuse the risotto with flavor. Here, I used vegetable stock, but you could use water, or mushroom stock if you like. The texture will not change, but the flavors will. Also: the recipe below does not include salt, so use as much or as little as you like.

The most important thing you need when cooking the risotto is patience, and adding the cooking liquid gradually and in small increments to allow the rice to absorb all the liquid bit by bit. At the end, I always find that risotto uses more liquid then what I expect, so here I recommend having a quart (about 1 L) of stock ready, but add it in small increments. Another thing that a good risotto needs is lots of stirring, so get ready!


Rich Risotto with Roasted Winter Squash

What you’ll need:

1 onion, finely diced

4 stalks celery, diced

2 cups winter squash (or pumpkin) purée (see below)

1 cup medium or short grain rice (for example Arborio)

1/3 cup nutritional yeast

up to 4 cups (1 L) vegetable stock, divided

4 bay leaves

6-8 springs of thyme, laves only

1 tablespoon olive oil


What you’ll do:

  1. I recommend using homemade roasted winter squash for this and any other recipes. Which means that your first step would be to clean and roast the squash until soft and fully roasted. This usually takes about 45-60 minutes at 425F (220 C) oven. You only need 2 cups of puréed squash for this risotto, so you will have some leftover for other things, like soups, pies or even hummus. If you are short on time but still want to enjoy this risotto, go for canned pumpkin. One 15 oz (425g) can of plain pumpkin (NOT pumpkin pie filling!) will do the trick here.
  2. Place a large high-sided skillet over medium to medium-high heat. Add oil, diced onion and celery and let sauté for 5-8 minutes until done. Add puréed squash, mix well and sauté for another 3-4 minutes.
  3. Add the rice (without rinsing it, so that you retain all the sticky starch that will make the final risotto extra creamy), mix well and let the rice brown just a little bit on its own, for about 3 minutes.
  4. Add 2 cups of vegetable stock, bay leaves and thyme leaves and mix well. Bring the risotto to boil then lower the heat down to simmer. Check every 3-5 minutes, mix again and add more stock in 1/2 cup intervals as needed.
  5. After about 15 minutes, mix in all the nutritional yeast, and continue to simmer. Continue to check every 3-5 minutes and add more stock gradually. Any risotto needs lots of attention, and adding the liquid in small increments. So, be patient! The rice should be fully cooked in about 25-30 minutes (fully cooked here means that the rice will not be completely mushy and give sort of al dente resistance when you bite into it.
  6. Serve your risotto warm and enjoy with a nice glass of wine, some olives, or perhaps some nice Giardiniera (Italian pickled vegetables), which I love. That little bit of nice acidity complements the creaminess of this risotto really well.

Copyright © Eat the Vegan Rainbow, 2018

Baked Spaghetti Marinara

Baked Spaghetti Marinara
Baked Spaghetti Marinara, via Eat the Vegan Rainbow

What can be better than spaghetti tossed with a simple tomato sauce, and sprinkled with some parmesan cheese, olive oil and fresh basil? For me, pasta, and especially spaghetti, have been a huge go to food because they are (a) easy, quick and cheap to make, and (b) absolutely delicious!

Marinara sauce for all seasons

In my view, simple marinara sauce is the best sauce for dressing the spaghetti. Yes, sure, bolognese is also pretty good, especially this amazing lentil and mushroom bolognese sauce, or this ragù made with lentils and walnuts. Marinara sauce is the type of simplicity that can only be described as pure genius. The sauce is tomato based and usually includes only a couple of additional ingredients, like olive oil, garlic, onions, and herbs, like oregano and basil.

Homemade marinara sauce to the rescue

Although I have been known to reach for a jar of store-bought marinara sauce from time to time, I do prefer to make this sauce myself. It’s actually one of the easiest things to make as all you need is some olive oil, garlic, tomato sauce, and dried oregano and/or basil. The sauce is done in less than 15 minutes, which is probably less time than it will take you to boil the spaghetti given that getting a large pot of water to boil does take forever, and your dinner will be ready and on the table in a blink of an eye.

From quick pasta to baked pasta

However, if you do have a bit more time and don’t have to rush I recommend that you give the recipe below a try. It is essentially the same recipe, just elevated to a bit more gourmet experience. The sauce is made with fresh and canned tomatoes, and includes nutritional yeast that boosts the “cheesy” flavors. The spaghetti and sauce are mixed together then baked to create a nice balance of smooth, soft, and just slightly crunchy. Given some gluten sensitivity, my recipe here was made using gluten-free pasta, but you can use any spaghetti you like. I recommend that you cook spaghetti only 80% through as they will continue to cook in the sauce as they bake. I also recommend that you use an ovenproof pot, such as a Dutch oven I used below, in order to go from the stove top directly into the oven.

Don’t forget fresh basil

Finally, don’t forget to top your pasta with some fresh basil. We all know what that will do of you, so let’s not belabor the point. Trust me, this Baked Spaghetti Marinara will quickly become your favorite!


Baked Spaghetti Marinara

What you’ll need:

1 lbs (454 g) box spaghetti (regular or gluten free), cooked al dente

4 cloves garlic, finely sliced

1 pint (10 oz, about 300 g) cherry or grape tomatoes, halved

1 28 oz (794 g) can of chunky crushed tomatoes

1/2 cup nutritional yeast

2 teaspoons dried oregano

2 teaspoons dried basil

2 tablespoons olive oil

Fresh basil

A pinch of salt

What you’ll do:

  1. Preheat the oven to 350 F (175 C).
  2. Bring a large pot of water to boil. Add a pinch of salt, then place spaghetti gently into the boiling water until fully submerged. Cook about 1 minute less than what the instructions on the box suggest. The spaghetti should be al dente, meaning still a bit underdone.
  3. Simultaneously with making the spaghetti, start working on your sauce. Add the oil to a large, ovenproof pot. I used my Dutch oven for this one, and it worked well. Place the pot over the medium heat, and add the sliced garlic. Let the garlic brown for 1-2 minutes.
  4. Once the garlic starts to release its aroma, add the halved cherry (or grape) tomatoes, and sauté until tomatoes are softened. This will take about 5 minutes.
  5. Add the nutritional yeast and let it brown for only a minute.
  6. Next, add the crushed tomatoes and mix well. When the sauce starts to bubble, add dried herbs, cover with a lid and simmer for 5 to 10 minutes.
  7. Turn the heat off, and add the cooked spaghetti to the sauce. Mix well until spaghetti are evenly distributed and fully covered. Place the pot into the oven and bake for 20 minutes or so, until the edges and the top are nicely browned.
  8. Serve with fresh basil and enjoy!

Copyright © Eat the Vegan Rainbow, 2018

SaveSave

SaveSave

SaveSave

SaveSave

Baked New Potatoes with Cheesy Basil Sauce, CSA Week 5

Baked New Potatoes with Cheesy Basil Sauce, via Eat the Vegan Rainbow

This summer is just flying by! I can’t believe we are already on Week 5 of our CSA – Community Supported Agriculture program. This week’s shares from our local farm, Upswing Farm, included one of my very favorite vegetables – new potatoes.

What are new potatoes?

New potatoes are, well, new! They are the first, early harvest of a potato crop, and growing up these types of potatoes were always a treat and a sign that school was out for summer and the fun was kicking into high gear. Since all the produce I ate growing up came from a farmer’s market, these new potatoes were available for couple of weeks only, making them even more special!!! Another thing that makes them special is that they are sweater than fully grown spuds, and that’s because they have higher sugar content than mature spuds, where most of their sugar has been converted into starch and stored away.

How to skin new potatoes?

New potatoes have very soft skin, and they really don’t need much peeling. What I like to do is take a peeling knife and gently go over the surface of the potato to remove only the thin outer skin without cutting in. This also helps remove any specks of dirt that are left over after the washing. An alternative way of skinning new potatoes is to place washed potatoes on a kitchen towel, sprinkle with some kosher salt and then wrap and gently roll. This will serve to exfoliate the potatoes. It may not remove all the skin but it will get rid of most of it. However, I should point out that none of this is really needed and it I purely cosmetic. New potatoes have such a soft and thin skin that you may decide to just leave it and cook them as is!

What to do with new potatoes?

These little suds are very versatile and easy to deal with. Because they are nicely sweet and soft, it is best to let them shine through. Simple boiling, roasting, or pan frying in very little oil will give you really great results (see here for details). But, you can go as wild as you like and new potatoes can be made into a potato salad, or a potato mash. Although I have not tried this yet, you can also put your new potatoes on the grill. In the recipe below I decided to go a bit wild and over the top. I baked new potatoes with some spring onions – those onions that are in between scallions and onions, with their greens still on but with a nice onion bulb now fully formed, which also came in our CSA share, and then topped them with an amazing sauce.

Easy and cheesy basil sauce

The inspiration for the sauce was another ingredient that came home in this week’s CSA share – a large bunch of fresh basil. The sauce is a simple mix of fresh basil, nutritional yeast and olive oil, and is added to the baked potatoes at the very end. The freshness of basil and the cheesy flavors of nutritional yeast make these baked new potatoes really amazing! I could eat this dish all day long – it does not need anything else really other than a cold glass of lemonade and it tastes good hot as well as cold. And if you have a summer pot luck, or a back yard barbecue, this is a great alternative to an old fashioned potato salad that you may want to try.


Baked New Potatoes with Cheesy Basil Sauce

What you’ll need:

1.5 to 2 lb (750g to 1 kg) new potatoes

4 spring onions, roughly diced

1 large bunch of fresh basil (about 2-3 cups, leaves only)

1/3 cup nutritional yeast

1/4 cup + 2 tablespoons olive oil, divided

Kosher salt to taste


What you’ll do:

  1. Preheat the oven to 350 F (175 C).
  2. Wash the new potatoes and gently remove their outermost skin (or leave the skin on if you prefer). Slice them into 1/4 in (5 mm) thick slices. If your new potatoes are really tiny you may only need to half them, or even leave the intact.
  3. Slice your spring onions any way you like. I quartered my bulbs then sliced them across.
  4. Combine your potatoes, spring onions, a pinch of salt (the amount of salt is up to you!) and 2 tablespoons of olive oil. Mix well, then pour into a deep baking dish.
  5. Bake the potatoes for 45 minutes.
  6. Place the basil into a food processor that can comfortably hold this amount of basil. Pulse until the basil is finely chopped.
  7. Add nutritional yeast, and pulse 2-3 times. Then pour in oil gradually while pulsing. Pour the sauce over the hot potatoes, mix well and return to the oven for another 15 minutes.
  8. Serve hot! You can store the leftovers in a fridge for 5-7 days and enjoy cold or reheated.

Copyright © Eat the Vegan Rainbow, 2018

SaveSaveSaveSave

SaveSave

Oven-fried Jalapeño Tapioca Pearl Fritters with Yogurt Sauce

img_3423
Oven-fried Jalapeño Tapioca Pearls Fritters with Yogurt Sauce, via Eat the Vegan Rainbow

You are probably thinking to yourself “Baked Jalapeño Tapioca Pearl Fritters!? What on Earth is that? And why would anyone want to try it?”. Well, I can’t blame you for feeling that way. I would not have made these ever has it not been for a huge kitchen mistake. What I wanted to do was make a batch of Sabudana Khichdi, but my mind was on autopilot and instead of using cold water, I soaked the tapioca pearls in hot water. Unfortunately, this resulted in a pile of messy and sticky tapioca pearls, definitely not fit for Sabudana Khichdi.

It seemed such a waste to just dump everything out, so I threw in some roasted jalapeño peppers, roasted green chilis, coarse corn meal and some nutritional yeast, with a dash of oregano and garlic, and created little fritters. These went into the oven – no deep frying in my house – and came out fragrant, crunchy and delicious.

They had quite a bit of heat and punch, so I paired them with a yogurt sauce to take the edge off. If you prefer less heat in your food, dial back on the amount of jalapeños you use, or just use more yogurt sauce which has a gentle, soothing effect on the overheated taste buds. Enjoy with the side of a salad for a light meal, or serve as an appetizer with a punch.

66DBC493-49E1-4E11-A444-8BA5EB327C2E

Oven-fried Jalapeño Tapioca Pearl Fritters with Yogurt Sauce

What you’ll need:

2 cups tapioca pearls

4 cups hot water

3 tablespoon nutritional yeast

1 can chilies

1 can jalapeño

1 tablespoon oregano

2 teaspoon garlic

1 cup coarse corn meal

1 cup almond or cashew yogurt

1 tablespoon chopped cilantro

1 tablespoon lime juice

Cooking spray

What you’ll do:

  1. Start by soaking tapioca pearls in hot water for 2-3 hours. The pearls should absorb all the water and be very sticky.
  2. Add all the rest of the ingredients except yogurt, cilantro and lime juice and mix everything well together.
  3. Using your hands, form tapioca pearl balls that are about 2 in (4-5 cm) in diameter and arrange them on a baking sheet lined up with parchment paper. Spray the fritters with some cooking spray and place in the oven that has been preheated to 350 F (175 F). Bake for 20 minutes or so, until the fritters get that nice golden-brown look.
  4. Let the fritters cool before serving, and while they are cooling whisk together the yogurt sauce by mixing yogurt, cilantro and lime juice together. Serve drizzelded over the fritters or as a dipping sauce.

Copyright ©Eat the Vegan Rainbow, 2018

Zucchini Lasagna with Walnut and Brown Lentil Ragù

Zucchini Lasagna with Walnut and Brown Lentil Ragù, via Eat the Vegan Rainbow

Let’s cut to the chase and be honest here – although we can pretend otherwise, we are all as obsessed with lasagnas as Garfield is! The layers of soft noodles, amazing sauce, fresh herbs, and most commonly lots and lots of ground meat and soft cheese. All this means that lasagnas are not the healthiest thing on the menu. Having said that, there is no reason to ban lasagnas from your plate; you just need to learn how to keep it healthy and plant-based, and I think I can help you to troubleshoot both of those problems.

Keeping lasagnas meat-free seems to be the problem many have tackled, usually by overloading lasagna with cheese, cheese and eggs, or cheese and a selection of vegetables, like mushrooms, and increasing the amount of tomato sauce and making it chunkier. But, really the most prominent ingredient in majority of meatless lasagna recipes is the cheese. When I was developing this lasagna recipe I did not want to give up on idea of “meat”, so what I came up with is a hearty, meaty, and flavorful walnut and brown lentil “meat” ragù base. My thinking was inspired by my previous, wildly successful Meatless Shepherd’s Pie, which I served for Easter this year as a substitute for a more traditional, lamb-based dish. In that recipe, lentils, mixed with ground mushrooms and cooked with rosemary and thyme, made for an amazing feast.

Here, I wanted to recreate the traditional meat ragù and went for a combination of chopped walnuts and dark lentils. The trick is too cook the lentils separately and add them to the rest of the ragù when they are fully cooked. Also, chop your walnuts into pieces that are about the size of what ground meat pieces may look like. I chopped the walnuts by hand, just by going over walnut pieces with a knife few times, back and forth. You can buy whole walnuts, or walnut halves in store and start from there, but for this a bag of walnut pieces will make your life easier and make the dish cheaper. Walnuts work really well in this lasagna, because they add some of their natural crunchy texture, protein, and a bit of fattiness to the otherwise very lean recipe. Worried about this extra fat? Walnuts are known for having a lot of unsaturated fat, which is the good kind, so don’t skip it! The meatiness of the ragù is further enhanced by a good amount of tomato paste and crushed tomatoes and letting the ragù simmer for a while.

img_2532
Walnut and Brown Lentil Ragù, via Eat the Vegan Rainbow

The preparation of any lasagna happens in several stages and this one is no different. In order to make the process more efficient I recommend that you start roasting the zucchini at the same time you start making the ragù, and then start boiling the lasagna noodles when zucchini is just about done. In that way you don’t even need to turn the oven off, you can just lower the temperature from roasting to baking and be ready for lasagna to go in immediately. Please note that I don’t use zucchini as a complete lasagna noodle replacement. I suppose you could, but then you’ll end up in a more of a Zucchini Mousaka territory than lasagna paradise. If you are concerned about gluten, there are now many gluten-free lasagna noodle options for you to choose from and most of them work perfectly.

The final touch on this lasagna is the Béchamel sauce (besciamella), which is a white sauce traditionally made with milk, butter and flour. In this case, the quick white sauce I put together requires only a blender, some soft, silken tofu, a squeeze of a lemon, and a bit of nutritional yeast. It is very much the blend-and-pour type of sauce, so you can do it a in a blink of an eye. The sauce adds a nice, slightly cheesy flavor to this very rich lasagna, and makes for a nice, almost golden glaze.

Zucchini Lasagna with Walnut and Brown Lentil Ragù

What you’ll need (for 9 x 13 in (23 x 33 cm) baking dish):

8-10 lasagna noodles, gluten-free if preferred

1 lbs (450 g) brown lentils

3 zucchinis, cut lengthwise into long strips

2 large carrots, diced

3 stalks celery, diced

1 cup raw walnut pieces, chopped

1/2 yellow onion, diced

1 can (28 oz, 800 g) crushed tomatoes

2 tablespoon tomato paste

1 tablespoon crushed garlic

1 teaspoon dried oregano

1 teaspoon dried basil

3 tablespoons fresh Italian (flat leaf) parsley

1 lbs (450 g) silken tofu

2 tablespoons lemon juice, freshly squeezed

1 tablespoon nutritional yeast

Cooking oil spray

What you’ll do:

  1. Preheat oven to 425 F (220 C).
  2. Prepare the lentils according to the instructions on the bag. Basically, bring 4 cups of water to boil and add the lentils that have been washed and picked over to remove any impurities that may have made their way to the lentils. Bring the lentils back to boil than lower the heat to a gentle simmer, and cook for 20 minutes or so, until lentils are completely cooked. Drain the lentils from excess water and set aside to cool.
  3. While the oven is preheating, and lentils are cooking, prep your veggies. Peel, wash, and dice the onions and carrots, and wash and dice the celery. Wash the zucchini well, remove the ends, then cut into long, thin strips. You can use a mandolin slicer for this, but cutting by hand also works. The zucchini slices should be as close to the thickness of the lasagna noodles as possible, but you don’t need to go crazy here – just keep in mind that a bit thinner is better.
  4. Line a baking sheet with parchment paper, place the zucchini slices on and spray with cooking spray. You may need to use two baking sheets, since you may discover that you can’t manage to have all your zucchini slices arranged in a single layer. Don’t pile the zucchini on top of each other and do roast in batches if needed. Place the zucchini “lasagna noodles” into the oven to roast. The roasting will take anywhere between 15 and 25 minutes and will depend on the thickness of your zucchini. Keep an eye on the oven and if you are roasting two pans of the zucchini at the same time do rotate the pans mid way through the roasting. You will know that the zucchini is done when the edges are slightly brown and the middle is golden. Once you take the zucchini out, decrease the oven temperature to 350 F (175 C).
  5. While the zucchini is roasting, start your the ragù. Spray the bottom of a Dutch oven, or another type of heavy pan, with cooking spray and heat up over the medium to medium high heat. Add carrots, onions and celery and let them brown for 10 minutes. Add chopped walnuts and let them pan roast for about 2 to 3 minutes. Add garlic, oregano, and basil, and let the flavors develop for a minute. Next comes tomato paste – add it to the pan, mix well and let brown just slightly. This takes about 2 minutes or so. Add the cooked lentils and the crushed tomatoes, and mix well. Let the ragù simmer for 10 to 15 minutes. Turn the heat off, add the fresh parsley and mix well to combine.
  6. Once the ragù is simmering, it’s time to start cooking your lasagna noodles. Most varieties ask for a large pot of boiling water and about 10 minutes of boiling time. The noodles don’t need to be cooked all the way through as they will continue to cook in the oven but they do need to soften quite a bit, so 8 to 10 minutes should be enough to achieve that. Drain the noodles and use immediately.
  7. Combine tofu, lemon juice and nutritional yeast in a blender and blend until smooth. Set the besciamella to the side.
  8. Spray the bottom and sides of your 9 x 13 in (23 x 33 cm) pan with some cooking spray. Cover the bottom liberally with the ragù (use about a half of the amount you made), layer the first set of noodles (for me that came to about 5 noodles per layer), then layer the zucchini in a single layer, pour the rest of the ragù, and top with the remaining noodles. Pour the besciamella over and cover with foil.
  9. Place the covered lasagna into the 350 F (175 C) oven and let bake for 30 minutes covered and then about 10 minutes uncovered. Let the lasagna sit for about 10 minutes before serving. I like to add some freshly ground black pepper or a mix of black pepper and red pepper flakes to my lasagna just before enjoying, but you can also sprinkle some fresh parsley, or fresh basil. Have fun!

Copyright © Eat the Vegan Rainbow, 2017

Quick Quiche with Caramelized Onions, Mushrooms and Tofu

Quick Quiche with Tofu and Mushrooms
Quick Quiche with Tofu and Mushrooms, via Eat the Vegan Rainbow

Eating pie for lunch sounds so decadent, doesn’t it? And that’s what makes quiche so appealing. I usually stay away from making quiche because I can’t deal with making my own crust. The crust takes time and effort that is beyond my capacity. Luckily for me, and I am guessing many of you, stores carry pre-made pie crusts that are ready to use.

My quiche recipe uses one of those and that really makes it come together relatively quickly. One tip when using the store bought frozen pie crust is to bake the crust by itself first for ten to fifteen minutes while you are mixing and preparing the other ingredients. This pre-baking will help make the crust nice and crunchy and help it hold the filling.

Filling is definitely the star of any quiche and it is traditionally made of eggs and cheese, often with mushrooms, ham, spinach, artichokes or other meat and vegetable components thrown into it. So, the result is usually light in texture but heavy on your stomach and very calorie dense.

In my first attempt to veganize quiche I decided to keep it simple and start with mushrooms, red onions and tofu as main ingredients. Most of the cooking actually takes place in a pan on the stove top as both red onions and mushrooms need to be fully cooked before they hit the pie crust. I recommend taking the time to caramelize the onions nice and slow, as well as let the mushrooms cook most of the way before adding tofu. In this case, the tofu needs to be drained and crumbled but you can skip the “pressing tofu” step that almost all tofu recipes have making this a really quick dish!

Quick Quiche with Caramelized Onions, Mushrooms and Tofu

What you’ll need:

1 store bought pie crust, vegan

1 red onion

10 oz (300 g) white mushrooms

14 oz (400 g) extra firm tofu, drained

2 tablespoons nutritional yeast

1 tablespoon corn starch

1 teaspoon dry basil leaves

1 teaspoon dry oregano leaves

Cooking spray

What you’ll do:

    1. Preheat oven to 350 F (180 C). Once ready, put the pie crust in to pre-bake for 15 minutes.
    2. Cut the onion into fine, thin slices.
    3. Spray the bottom and sides of a frying pan with cooking spray and place it over medium high heat. Add the onion and let caramelize for 5 to 10 minutes. The onion should be nicely browned and soft.
    4. While the onion is caramelizing, clean and slice the mushrooms, or you can always buy sliced mushrooms and skip this step.
    5. Add sliced mushrooms to the onion mix and cook until mushrooms soften, which will take another 5 minutes or so.
    6. Drain tofu and crumble it into small crumbles with a fork or with your hand. The size of the crumbles should be similar to scrambled egg.
    7. Add crumbled tofu, nutritional yeast, corn starch, basil and oregano. Stir well the quiche filling, let brown for another 1 to 2 minutes, then turn the heat off and let sit until your pie crust is done pre-baking.
    8. Pour the filling into the crust, spray the top with some cooking spray and return to oven for another 20 to 25 minutes, until the top is golden brown.
    9. Take the quiche out, let stand for 5 minutes then serve with your favorite salad or top with some sun dried tomato shreds like I did on this occasion.

Copyright © Eat the Vegan Rainbow, 2017

Healthy Asparagus Risotto

Asparagus Risotto, via Eat the Vegan Rainbow
Healthy Asparagus Risotto, via Eat the Vegan Rainbow
Spring is in the air, although perhaps not yet on the ground, and when it comes to spring vegetables asparagus is it! If you haven’t enjoyed asparagus before, do give it a try. Asparagus is very easy to make as it tastes really good roasted, or in a soup. It is also one of those risotto-friendly ingredients that blends well with creamy rice to add crunch and earthy flavor.

The path to a really lovely risotto goes through picking the right rice and cooking it with patience and with a lot of stirring. My go-to rice for risottos, as well as for sushi and other rice dishes that need a stickier rice variety, is medium grain rice. This is a point of difference with most risotto recipes out there as they recommend using short grain rice variety called arborio rice. Arborio rice will work really well in this recipe too, so if you have it on hand go for it. The kinds of rice that may not work well here are the long grain variety, like Jasmine or Basmati rice.

Cooking risotto does require lots of stirring, and one trick that I use is to add the liquid in batches to let the rice absorb it before adding more. It takes time, but at the end your risotto will be rich and creamy without needing any butter, cream or parmesan, all common risotto ingredients.

My risotto recipe does use on less-common ingredient, nutritional yeast. If you will be preparing vegan recipes often nutritional yeast is definitely worth getting because it is a common add-on that mimics dairy. In the case of this risotto nutritional yeast acts as a substitute for parmesan cheese.

Healthy Asparagus Risotto

What you’ll need:

1 pound (500 g) green asparagus, chopped

1 yellow onion, diced

1 cup medium grain or short grain rice

2 tablespoons nutritional yeast

2-3 cups vegetable stock or water

Cooking spray

Lemon zest, lemon juice (optional)

What you’ll do:

  1. Wash and trim the asparagus. I don’t peel it because I try to get spears that are thin and less woody, but if your asparagus is thick it will need peeling. Cut into approximately 1/2 in (1 to 1.5 cm) bits. You don’t need to be precise here but just think about what your final spoonful will look like and make sure your asparagus bits are small enough to be in harmony with the rice.
  2. Dice the onion into fine dice.
  3. Spray the bottom of a wide and shallow pan with cooking spray. Turn the heat to medium high. Add onions and cook until they soften and start to brown. This will take 4-5 minutes.
  4. Add asparagus and let cook for another 4-5 minutes with occasional stirring.
  5. Add the rice and stir well. Let cook for 1-2 minutes.
  6. Lower the heat down to medium low. Add 1 cup of liquid. Stir well and let the rice soak up the liquid. Give it time and repeat with more liquid. Risotto is definitely one of those dishes that people fear to approach and many articles and posts have been written about how to get to the perfect bowl of risotto and avoid mistakes. Fear not, because all you really need to do is hang around your pot, watch your rice and add the liquid when the rice tells you its thirsty. The amount of rice in this recipe can take anywhere between 2 and 4 cups of liquid. You also might want to start by adding one cup at a time for first 2 cups and then decrease to 1/4 cup of liquid at a time. Keep going until the rice is soft but not mushy, a shade softer than al dente.
  7. Turn the heat off and sprinkle with nutritional yeast. Mix everything together and let stand for 5 minutes.
  8. Sprinkle with lemon zest and a dash of lemon juice just before serving!
  9. Copyright © Eat the Vegan Rainbow, 2017