Vegan Chocolate Mousse Pie

Vegan Chocolate Mousse Pie
Vegan Chocolate Mousse Pie, via Eat the Vegan Rainbow

It’s OK to indulge and be decadent from time to time, and in my book the best way to feel indulgent and decadent is to go for some chocolate. Vegan chocolate is not hard to find. Almost any dark chocolate with high cocoa content is likely to be acceptable, so there are no reasons to stay away from chocolate treats. Having said that, if you are trying to drop a few pounds, the recipe below is not for you and most of chocolate treats is probably off limits.

The amazing thing about my chocolate mousse pie recipe below is that it uses roasted sweet potatoes. Roasted sweet potatoes are my favorite snack, often even breakfast , and definitely one of my favorite ways to reduce the amount of sugar that I use in my recipes. Roasting helps the natural sweetness of the potatoes come through, and what you end up with is super sweet and super soft root vegetable ready for puréeing and use in things like pancakes and even ice cream! If you are looking for instructions on how to roast sweet potatoes, you may want to check my post on Sweet Potato Butter for details.

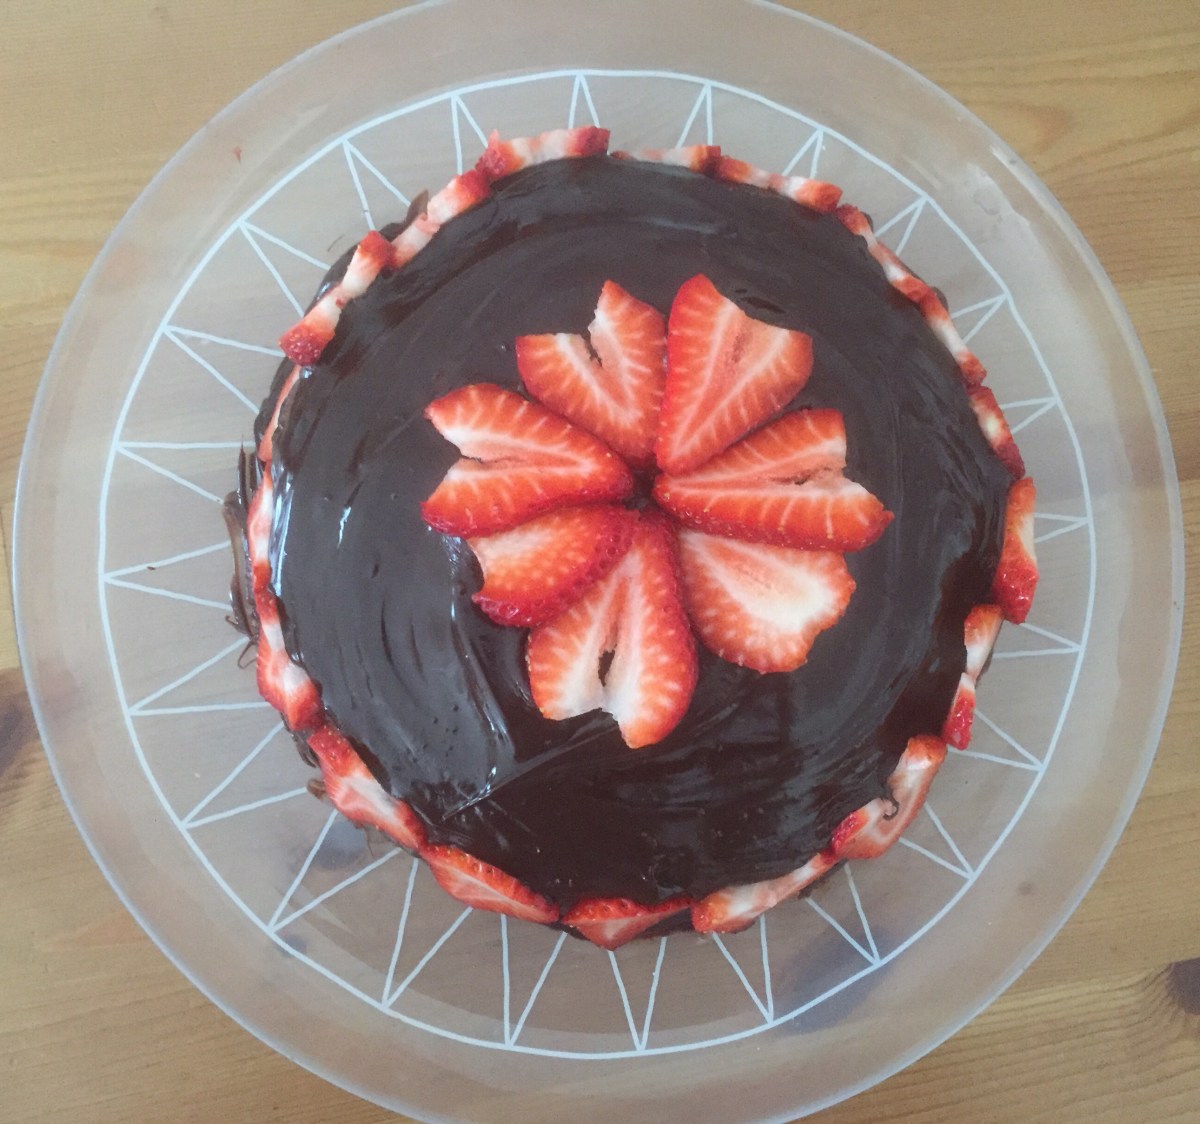
My Chocolate Mousse Pie is as easy as a pie – really! There is no baking involved and all you really need to do is melt lots of chocolate and not shy away from using some butter to help things along. My favorite brand of vegan butter sticks is Melt – the price may be higher than other butters out there, and especially the margarine which is plant-based but just not that good for you because of all those hydrogenated trans fat acids, but I recommend you use it only on special occasions and in small quantities. This means that the pound (half a kilo) of butter will last you a long time!

Final note is that you should feel to customize the frosting to feature your favorite nut butter, or to include cocoa powder for example. I personally love almond butter and also think that almond butter mousse frosting works really well to bring the pie together, by connecting the crust flavors with the frosting. In this way, every single mouthful has harmonized flavors, from the beginning to the end.


Vegan Chocolate Mousse Pie

What you’ll need:

FOR THE CRUST

4-6 large madjool dates

1 tablespoon vegan butter, melted

1 cup raw almonds (unsalted)

FOR THE FILLING

10 oz silken tofu

2 roasted sweet potatoes

2 cups melted chocolate

1 teaspoon cinnamon

1/4 teaspoon nutmeg

2 tablespoon unsweetened, plain rice milk (or any other plant-based milk)

FOR THE FROSTING

1 stick vegan butter

1/2 cup almond butter

2 tablespoons agave syrup
What you’ll do:
  1. To prepare the crust, melt the butter in a microwave (1-2 minutes in 30 second increments until fully melted), then added it to a food processor with dates and almonds. Pulse for 8-10 times, until everything is finely chopped and combined. When the crust is smooth and sticks together well, transfer it into a springform pan, the pan you would normally use to make cheesecake. Using your fingers, press the crust into the bottom, until firmly packed. Place the pan into a refrigerator for 15-20 minutes to allow the crust to firm up.
  2. While the crust is firming up add the drained tofu and chopped roasted sweet potatoes into a large food processor and process for 30-45 seconds. Add the melted chocolate and process for another minute. To melt your chocolate, you can use a double boiler method or a microwave method. At the end, add the spices and plant-based milk and processes until the mixture is smooth.
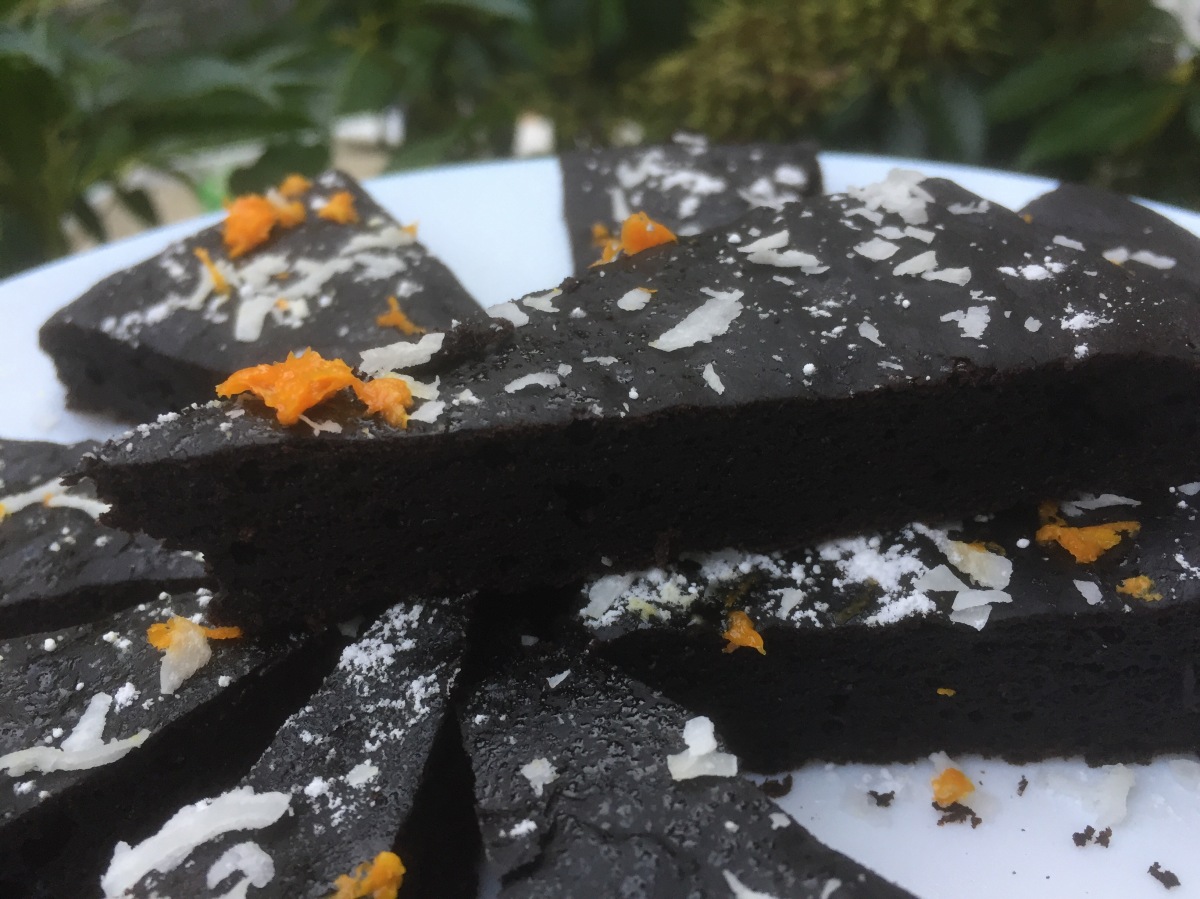
  3. Pour the filling into the springform pan and even out the surface. Sometimes banging the pan on the kitchen counter helps the filling set, and prevents random empty space areas from forming. Leave the chocolate mousse pie in the fridge for at least 4 hours to firm up. I recommend leaving the pie in the fridge overnight and finishing the frosting the next day.
  4. To mix the frosting, combine the almond butter, butter and agave syrup (or another sweetener like maple syrup) into a bowl and mix until smooth and combined using a hand held mixer. You can also do this using a standing mixer. Apply the frosting any way you prefer. I usually place the frosting into a zip lock bag, and then snip of a corner with scissors to make a hole of a desired size. Holding the top of the bag firmly in my left hand (I am right handed), I then use my right hand to guide the piping bag and create frosting patterns I like. In this case, I went for a flower in the middle, but you can really do anything you like.
  5. After you frosted the pie, pop it back into the fridge for 30-60 minutes. This should be enough time for the frosting to firm, and once that’s done you are ready to pull the pie out. I recommend leaving the pie at room temperature for 15 minutes before serving, and then dig in!

Copyright © Eat the Vegan Rainbow, 2018

Heavenly Crispy Dark Chocolate and Fruit Bar

58f2b064-adab-44db-ab2d-5d0ceb3e4513
Heavenly Crispy Dark Chocolate and Fruit Bar, via Eat the Vegan Rainbow

Behind every recipe there has to be a story. And behind this one there really is not much to tell. I was craving something sweet and chocolaty, and debating what to make, when I came across a recipe for vegan fudge that comes together in a bowl with no baking or complicated steps required.

I love these types of recipes where the most “cooking” or “baking” you have to do is melt some chocolate. My go to recipes are different types of balls, or bon bons if you like, and I made some using pumpkin for a nice Thanksgiving treat, some using apples, walnuts, and dates, and a recipe that made them taste like chocolate chip cookie dough.

This recipe takes me back to my childhood and reminds me of chocolates with chewy fruit and crunchy nuts that were so much fun to eat. For those of you who like your chocolate smooth, this may seem too weird, do keep en open mind. These bars have just the right balance of crunch, chewiness, coconut flavors, and chocolate that they will put a smile on your face in single bite. Plus: they have no added sugar, as they get plenty of sweetness from golden raisins.

For the  crunch you could use any mild tasting breakfast cereal, like crispy rice, corn flakes, or something like Cheerios. You can also skip cereal all together and go for some nuts. Chopped walnuts, hazelnuts or pecans would work really well in these bars; while cashews, peanuts or macademia nuts are probably not going to give you what you are looking for in terms of the flavor.

For the chewy fruit component, golden raisins work really well, but you could use dark raisins or dried cranberries. No matter which one you decide to go with, before you use the dried fruit, soak them in hot water for at least an hour. The raisins will be plump and juicy after soaking, so you will need to drain them, pat them dry, and they are ready to go.

If you are wondering how to melt the chocolate, you have two options: double boiler ad microwave oven. I use the microwave method where I combine the chocolate with a bit of cream or milk and microwave on high for 30 seconds. I take the bowl out, mix well, and put back for another 30 seconds. Mix again and repeat until most but not all (about 75-80%) of the chocolate has been melted. At that point the mixture has enough internal heat to melt the rest of the chocolate chips with constant mixing. This will give you smooth and well melted chocolate. If you are using a double boiler you will have to continuously mix the chocolate as it melts – don’t walk away! Having the chocolate go too far is not fun!

The bars are really mix, pour and let it set type of treat. I recommend that you line your deep dish with some parchment or wax paper, and that you let these bars set at room temperature, which will take a bit longer than if you put them in the fridge. You should store them in the fridge, in a container with a tight lid, but for the best burst of flavor do let them warm up just a bit before biting in. Yummy!

Crispy Dark Chocolate & Fruit Bar

What you’ll need:

10 oz. (283 g) vegan dark chocolate chips (I used Enjoy Life mini chips)

1 cup crispy rice cereal (like Nature’s Path)

1 cup golden raisins, soaked in water, drained and pat dried

1 cup unsweetened coconut flakes

1/4 cup coconut oil, melted

2 tablespoons coconut milk, cream or any vegan half & half (I used ripple, plain & unsweetened)

What you’ll do:

  1. Soak golden raisins in some hot water for at least an hour. You want them to be nice and plump. Drain them, and pat dry them add to s large mixing bowl.
  2. Add rice crispies, melted coconut oil, and unsweetened coconut flakes. Mix well.
  3. Line an 8 x 8 (20 cm x 20 cm) baking pan with some parchment paper. Set aside.
  4. In a microwave safe bowl (or a double boiler) mix the chocolate chips with coconut cream (or milk or half & half), and melt the chocolate slowly. If using a microwave, check and mix your chocolate every 30 seconds. Pull the chocolate out when 75% is melted. Keep stirring and the residual heat will melt the rest of the chocolate chips.
  5. Pour the melted chocolate over the rice crispies, raisins and coconut flakes. Mix well.
  6. Pour the chocolate mixture into the pan, even it out, and leave in on the kitchen counter for at least an hour. This will allow for the chocolate to harden and settle. If you are in a hurry you can use the refrigerator – in that case the bars will be ready in about 15 minutes depending on how thick you made them.
  7. Take the chocolate out and let it come to room temperature before cutting and serving. These little treats are great on the go bites as well, so you may want to make a double batch!

Copyright © Eat the Vegan Rainbow, 2018

Gluten-free Chocolate Crêpe Cake

img_4830
Gluten-free chocolate crêpe cake, via Eat the Vegan Rainbow

Crêpes are great – and if you ever hear anyone say otherwise you can safely assume that they don’t know what they are talking about or perhaps did not have an opportunity to try some. Perhaps they don’t know that plant-based, 100% vegan crêpes are easy to make, or perhaps they don’t or can’t consume gluten and are unaware that gluten-free crêpes are within their reach. Or, and this is the final myth that I will dispel, they think that only highly skilled and trained chefs can embark on crêpe making, which is far from reality.

If you own a flat frying pan, and have a whisk that you are willing to use (or a blender!), you can make crêpes. These light, thin, flat pancakes are versatile and can be made into a savory dish, like these Scallion Crêpes, or topped with a range of sweet toppings for a quick and easy breakfast or dessert.

But, there is more to crêpes than that and I recently discovered that you can use them to make multilayered cakes! It usually takes 10-12 crêpes, nice, relatively firm filing, and topping of choice and you’ll have an impressive looking no-bake cake on your hands.

I wanted to make my crêpe cake gluten-free as well, so I followed a crêpe recipe that uses chickpea flour since that was the the type of flour I had on hand (I found the recipe in The Chickpea Flour Cookbook by Camilla Saulsbury and I recommend you check this cookbook out because it does offer lots of gluten-free recipes with helpful comments on how to make each recipe vegan!). The recipe below is a slight modification from the original as I added more almond milk and some vanilla extract, and you should feel free to customize the flavors further or replace some of the flour with cocoa powder if you want your cake to be all chocolate all the way. Additionally, if you prefer to omit oil you can do that as well – here is another excellent and very simple recipe.

The cake is easy to assemble and looks fantastic! If you are not sure you like chickpea flour you can use any gluten-free pancake mix and make a batter that is less dense than your standard pancakes. One way to test whether your batter is the way it’s supposed to be is to pour 1/2 cup in the middle of the pan and then swirl it around until the entire bottom is well covered. If your batter can do this you are all set, if not perhaps you need to add just a bit more water. Go slowly and test frequently, because you don’t want to end up with unusable slurry either.

If you would like to add some sweetness to the crêpes, feel free to add a bit of maple syrup, agave nectar, or other sweetener you like. The chocolate filling and the ganache are quite sweet so you may not need this extra sugar.

Making the chocolate filling is also simple – if you ever made pudding you will know what to do. The filling requires some simmering almond milk, starch and agar, as well we some dark cocoa and maple syrup, and needs to cook over low heat until dense. What  kicks the filling up a notch is orange zest which adds citrus tones to the entire cake.

You will need to let your crêpes cool then put the cake together by layering a crêpe then covering it with a tablespoon or two of the chocolate filling, then placing another crêpe on top, the the filling and so on and so forth until all the filling is used up.

The last touch is chocolate ganache which you can make in the microwave, and pour all over the cake to completely cover the layers. You can decorate the cake with freshly cut strawberries, blueberries, toasted almonds, or some whip cream. Use your imagination to make it unique and incredible!


Gluten-free Chocolate Crêpe Cake

What you’ll need:

FOR THE CREPES:

2 cups chickpea flour

6 tablespoons egg replacer (I used Bob’s Red Mill Gluten-free Egg Replacer)

12 tablespoons water (to prep the egg replacer)

6 tablespoons olive oil

2 1/2 cups almond milk

1 teaspoon vanilla extract

Vegetable oil for the pan

FOR THE FILLING:

1 cup almond milk, unsweetened, preferably vanilla flavor

2 tablespoons tapioca starch

1/2 teaspoon agar agar powder

4 tablespoons maple syrup

2 tablespoons dark cocoa

1 teaspoon vanilla extract (add more if using plain almond milk)

Zest of one orange

FOR DARK CHOCOLATE GANACHE:

2 cups dark semi-sweet chocolate chips (vegan, like Enjoy Life)

4 tablespoons vegan cream or half’n’half (I used ripple; you can also use any plant-based milk as well, but decrease the amount to 2-3 tablespoons)

4-5 large strawberries, sliced – for decoration (optional)


What you’ll do:

  1. Prepare egg replacer according to instructions. If using flax meal based egg replacer or similar the preparations may require soaking the flax meal in hot water for 5-10 minutes usually by mixing the dry ingredients with water in 1:2 ration (in this case 6 tablespoons egg replacer and 12 tablespoons water).
  2. Mix all the crêpe ingredients (except oil for the pan) using a blender, a mixer or a whisk. The batter should be smooth and clump free.
  3. Place a large frying pan over high heat. Use a brush to brush the oil across the hot surface of the frying pan, then pour in 1/3-1/2 cup of batter and twirl the pan around until all the bottom if covered with a uniform layer of the batter.
  4. Leave the pan over medium-high heat until the surface is completely dry, then flip the crêpe over and continue cooking for 2-3 minutes on the other side. Continue until all the batter is used up, and leave the crêpes to cool.
  5. For the filling start from cold ingredients and bring the almond milk to a gentle boil. Mix tapioca starch and agar powder into the hot milk and continue cooking over low hear until the mix firms up. Leave the mix to cool, which make take some time. You could make both the crêpes and the filling a day ahead and assemble the cake couple of hours before serving.
  6. To assemble this cake, please use a large plate or a cake stand and start by placing a crêpe on the bottom, then the filling (1-2 tablespoons), then another crêpe and more cake filling until no filling is left!
  7. To prepare a ganache, place the chocolate chips and milk, cream or half’n’ half into a microwave safe bowl and microwave on high for 30 seconds. Mix and microwave again, check and repeat until chocolate is about 60% melted. Take the bowl out and start mixing to help finish the melting process.
  8. Pour the melted chocolate ganache over the top and spread as evenly as possible over the top and around the sides. Decorate with fresh strawberries, set aside for 2-3 hours then dive in!

Copyright © Eat the Vegan Rainbow, 2018

Homemade 1-Minute Peanut Butter Nutella

IMG_4367
Homemade 1-minute Peanut Butter Nutella, via Eat the Vegan Rainbow

Believe it or not, you can now make your own Nutella-like spread in less than a minute. Yes, you read that right – and it is not a question of gimmicky gadgets or anything like that. It’s really all about having three ingredients at hand and readily available. The trifecta in this case consists of peanut butter powder, cocoa powder and stevia.

Peanut butter powder is my newest discovery so let me rave about it for few minutes. I believe that you can now get peanut butter powder in any US-based grocery store. Even the peanut butter behemoth, Jif, has its own version of this product, which I have not tried yet so can’t really comment on whether that specific brand is any good and how it compares to others.

Peanut butter powder is mostly protein left over after you remove most of the fat (and thus lots of calories), so it is an ideal addition to smoothies, oatmeal, baking, even desserts like Dark Chocolate Almond Butter Cups (as a substitute for almond butter), and even Pad Thai or other dishes that ask for peanut butter. The powder adds creaminess and packs all of that peanut flavor so a little usually goes quite a long way.

Plus, as a bonus, it transforms into a peanut butter-like spread when mixed with some water!

There are couple of different peanut butter powder “formulations” out there so check the ingredients list first in order to make an informed decision. My first excursion into the peanut butter powder land involved a product that contained added sugar, and that was not what I was looking for. So, I currently use peanut butter powder that lists only one ingredient: peanuts! Needless to say, if you do have a peanut allergy, this is not for you!!!

The recipe below is my new go-to, quick fix bread spread which has less calories, is low-fat and low-sugar so completely vegan, paleo-friendly, and done in a minute. I call it Homemade Peanut Butter Nutella because it combines that rich darkness of cocoa with the peanut aromas into a creamy spread. The recipe below makes one serving – I’ve no clue whether this would store well because I make one single serving at a time, so I recommend you start off using it in this way as well.

Homemade 1-Minute Peanut Butter Nutella

What you’ll need:

2 tablespoons peanut butter powder (no sugar added)

2 tablespoons dark cocoa powder

1 packet stevia powder (or your sweetener of choice)

2-3 tablespoons hot water

What you’ll do:

  1. Combine the dry ingredients (peanut butter powder, cocoa powder and stevia) in a mixing bowl.
  2. Add hot water, one tablespoon at a time, and mix well with a spoon until you get the smooth and spreadable consistency.
  3. Enjoy on toast, fruit, or in any other way you would normally use a spread like Nutella for!!!

Copyright © Eat the Vegan Rainbow, 2018

A “Thank You” Cake, for All of You!

Dark Chocolate Brownie “Thank You” Cake, via Eat the Vegan Rainbow

10000 views… I can’t believe that my tiny,  homemade, low key, experimental, and very much just for fun blog recently hit a phenomenal milestone: 10000 views!

I am still in a bit of disbelief about it all, to be quite honest and totally humbled, yet thrilled.

Although I can’t explain how I went from my very first posted to 10000 views in less than 6 months, I’m guessing that this is a sign that there are many of you out there who are looking for guidance, inspiration and help in transitioning to 100% plant-based eating and cooking, while at the same time staying within a reasonable budget.

I can only hope that at least some of you have found my recipes to be yummy, homey, inviting, creative, entertaining and pure fun, which is what this entire transition to vegan cooking has been for me. Thank you for joining me on this journey and for helping me along the way with your kind comments, suggestions and many, many engagements.

And… this being a vegan, plant-based, healthy cooking type of a blog I thought that it would be cool to say a huge “Thank You, All” with some cake. So, thanks everyone – I hope you enjoy this Dark Chocolate Brownie “Thank you!” Cake, and come back again for seconds!!!

The recipe is super simple and uses ripe bananas as an egg replacement, and lots of dark, Dutch process cocoa. It also uses a simple trick to transform almond milk into almond butter milk by adding a tiny amount of cider vinegar to almond milk and letting it stand for fifteen minutes at room temperature before using. Finally, to help the dark cocoa release its color you will need to use some hot water.

Putting all this together, you will start by mixing dry ingredients in a large mixer bowl separately from wet ingredients (all except water), combine them together and then add the hot water gradually as you mix, keeping a close eye on consistency. You want your batter to be smooth and fluid, but not completely liquid. The recipe below makes two 8 in (20 cm) round brownie cakes, or one 9 x 13 in (23 x 33 cm) rectangular cake. I recommend lining the bottom of your baking pan with some parchment paper, as this helps get the cake out. In principle you could bake this cake in a springform pan, and it should pop right out.

The cake tastes rich and decadent, yet it’s relatively light in terms of the ingredients and especially in terms of added sugar. The bananas help not only hold the cake together, but add natural sweetness to it, so you can use 1/3 amount of sugar that a cake of this size would normally use. Of course, you are not limited to sugar and can use a sweetener of your choice, including artificial sweeteners if that’s what you like or need to use.

Dark Chocolate Brownie “Thank You” Cake

What you’ll need:

1 1/2 cup all purpose flour

3/4 cup cocoa, Dutch-processed

2 teaspoons baking soda

1 1/2 teaspoon baking powder

3/4 cup almond milk, unsweetened

3/4 teaspoon apple cider vinegar

1/4 cup canola oil

2 bananas, pretty ripe, brown ok

1/2 cup powdered sugar, vegan (+ 1 tablespoon for dusting)

1 tablespoon vanilla extract

1/2 cup hot water

2 tablespoons coconut flakes, unsweetened (optional)

Zest of one orange (optional)

What you you’ll do:

  1. Preheat oven to 350 F (180 C).
  2. Mix the almond milk with apple cider vinegar (or lemon juice) and let stand for 10 to 15 minutes. This will be your almond buttermilk.
  3. In a large mixing bowl, or the bowl of your standing mixer, combine all your dry ingredients (flour, cocoa powder, baking soda, and baking powder).
  4. In a separate bowl, combine all wet ingredients except the hot water. Note that powdered sugar and the bananas count as a wet ingredients. I recommend that you use a blender to cream your bananas, although you could simply mush them with a fork. Either way, make sure that your wet ingredients are fully mixed together and as smooth as possible.
  5. Next, slowly add your wet ingredients into the dry ones. For this, I keep my standing mixer runing on low, and pour the wet ingredients in, bit by bit.
  6. Let everything combine before adding the hot water. I recommend adding 1/4 cup water at a time, slowly so that you are in full control over the consistency of your batter. It should be smooth and pour out with ease.
  7. Line two 8 in (20 cm) round cake pans with parchment paper and pour the batter in.
  8. Put in the oven for 25 to 30 minutes.
  9. Take the cake out, flip it out of the pan, and leave it to cool for 1-2 hours.
  10. Cut into wedges and sprinkle with powdered sugar, coconut flakes and orange zest. Serve and enjoy!!!
img_2724
Saying “Thank You!” with a Cake, via Eat the Vegan Rainbow

Copyright ©Eat the Vegan Rainbow, 2017