Baked Sunflower Seed Cheese – Deluxe Edition, via Eat the Vegan Rainbow
Hooray – a plant-based cheese success story!!! Believe me, the three exclamation points are not for nothing as I’ve had my fair share of plant-based cheese disasters. But, let us not dwell on failure and talk about this latest, greatest treasure I discovered. Like my vegan fresh mozzarella experiment that was out of this world delicious, this Baked Sunflower Cheese is fully based on a lovely recipe created by another person. Credit for today’s recipe goes to Sweet Potato Soul, a lovely and so bright and cheerful vegan food blog by Jenné (you can also follow her on Twitter @SweetPotatoSoul).
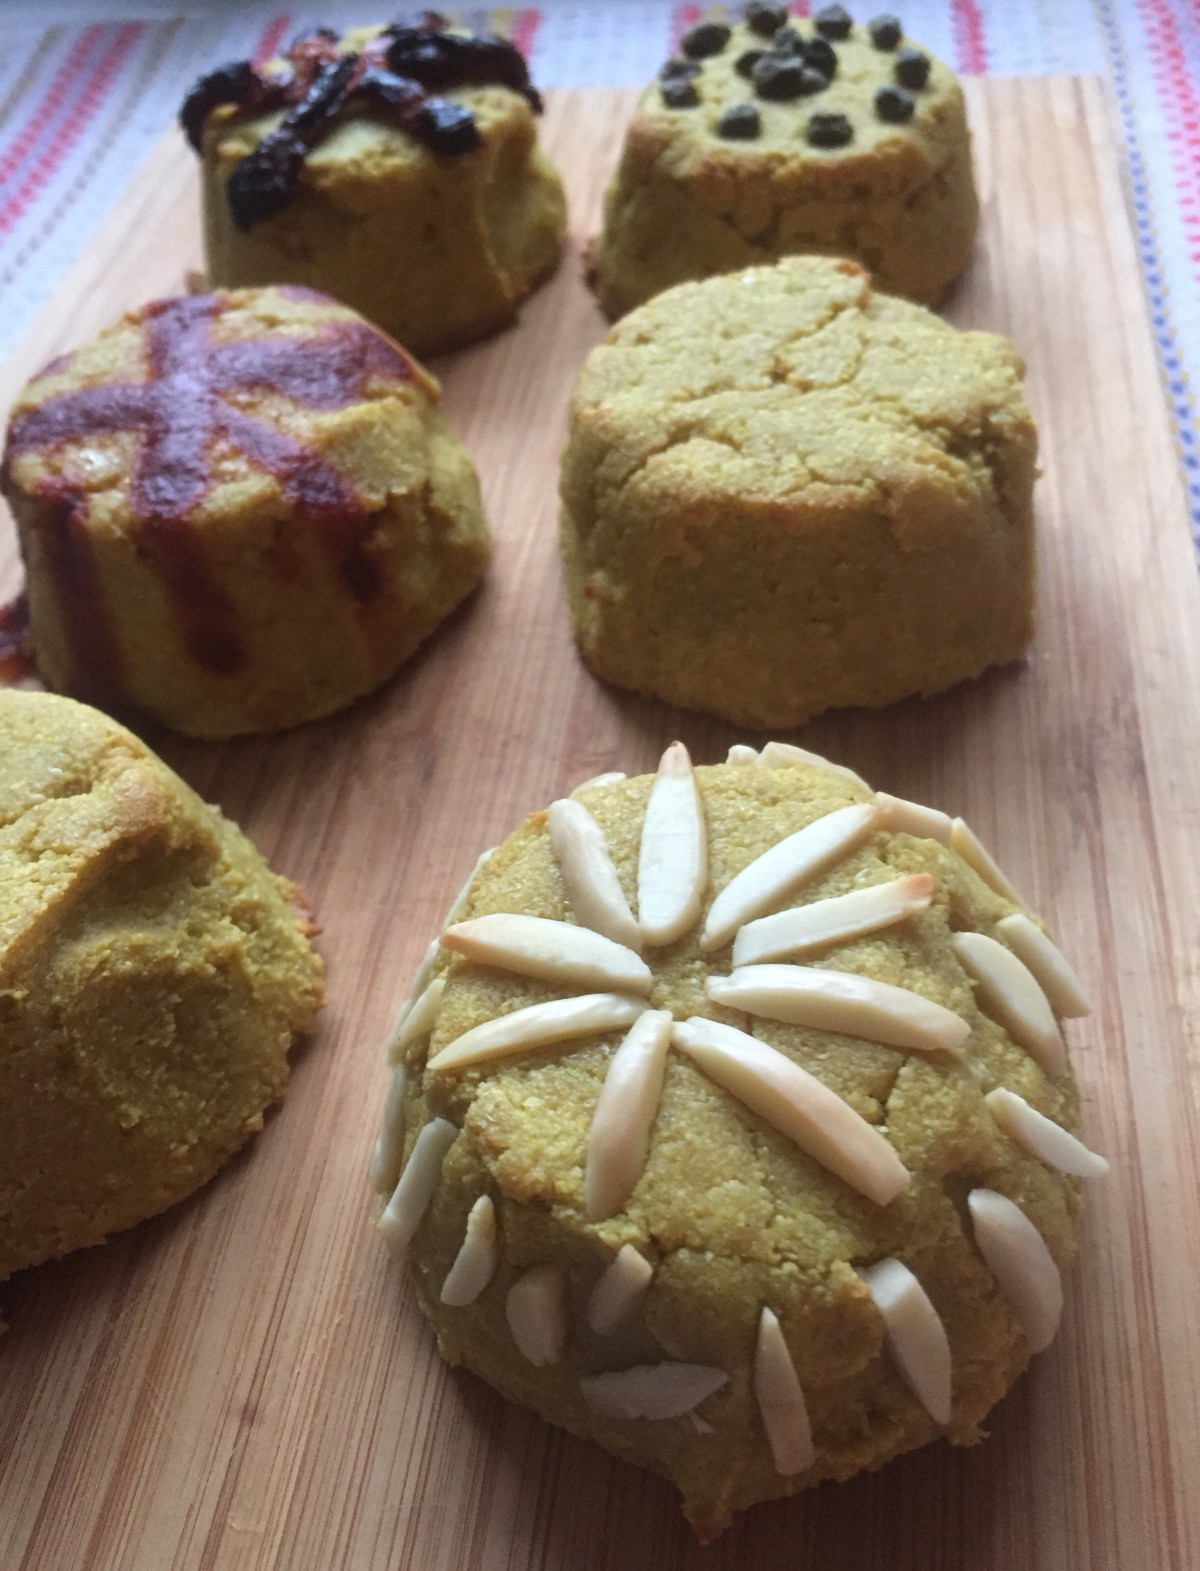
Baked Sunflower Seed Cheese topped with slivered almond, via Eat the Vegan Rainbow
I was looking for something to do with sunflower seeds and this recipe popped up. The recipe is simple and follows the same logic of plant-based cheese making – you soak in this case the seeds but more often the nuts overnight, and then you process them with flavor and umami agents of your choice. Jenné’s recipe uses a nice combination of ingredients that all play well together with the raw sunflower seeds, so other than adjusting the amount of lemon juice and miso paste, I increased both, and dialing down the nutritional yeast, I followed all the rest.
Baked Sunflower Seed Cheese on a cutting board, via Eat the Vegan Rainbow
My main point of departure was at the end. Once I’ve chopped and blended everything in the food processor I used my muffin tin to form small individual cheeses. I sprayed the muffin tins with some olive oil cooking spray, and packed the cheese mix into the molds tightly. I let it firm up in the fridge overnight and the next day I inverted the individual cheeses out, topped them with couple of different toppings (capers, slivered almonds, sun dried tomatoes, and hot sauce), placed them on a parchment paper lined baking sheet, and baked them at 350 F (175 C) for 10-15 minutes, just enough for the individual cheeses to warm up and the topping to caramelize.
Slivered Almonds topped Baked Sunflower Seed Cheese, via Eat the Vegan Rainbow
I served the cheeses at a party, with some crackers (and couple of other goodies), and it was amazing!!! Pictures here tell only half a story, so make thus cheese and see for yourself how the story ends.
Baked Sunflower Seed Cheese topped with capers, via Eat the Vegan Rainbow
Note: I stored the leftover cheese in the fridge and used it the next day to make wonderful sandwiches with roasted red pepper hummus and the cold Baked Sunflower Seed Cheese. Yummy!
Baked Sunflower Seed Cheese on a cutting board, via Eat the Vegan Rainbow
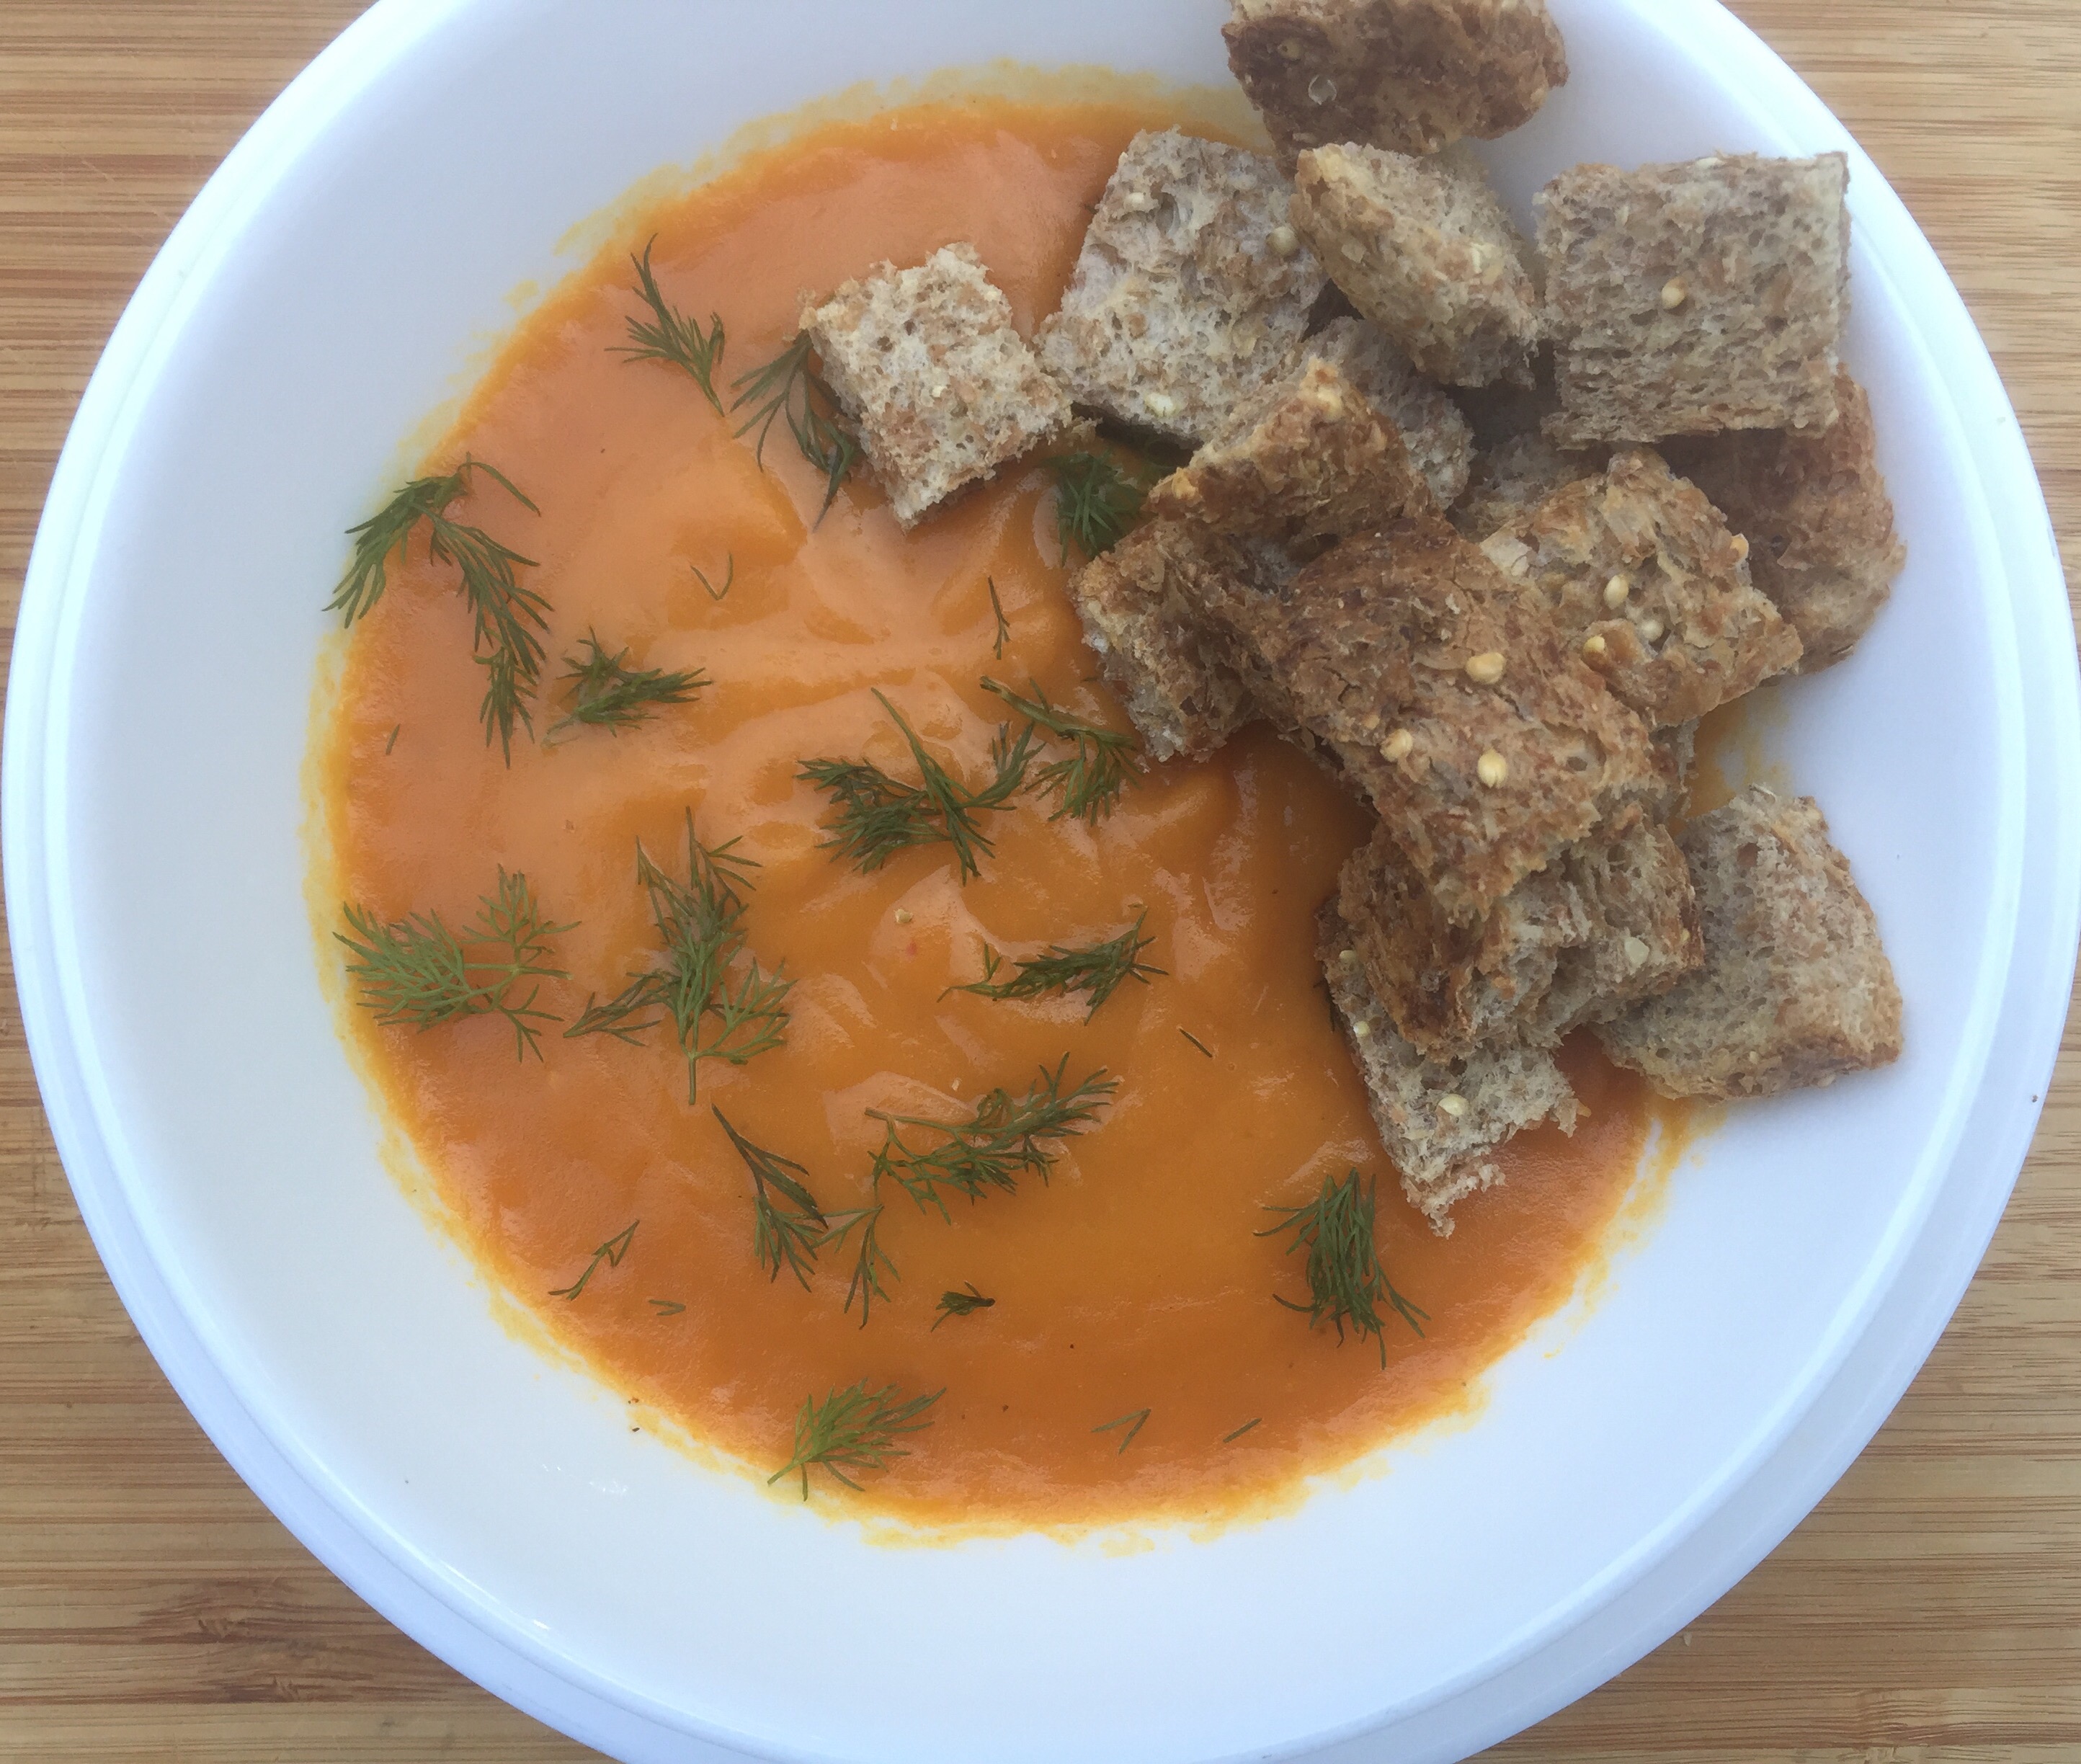
Cream of carrot? How can that be? Well, it can, and it is, and you will not believe how great this soup is. Carrots are the star, to be sure, but what gives the soup its rich creaminess (without any cream) are the white potatoes, and you want to pick nice, starchy potato variety, like the Russets. The starchier the potato, the creamier the final soup. Usually, the really starchy potatoes don’t hold well to boiling and tend to fall apart. In this case that really does not matter because everything will go into a blender at the end. I do recommend you chop your carrots and potatoes into smaller chunks to speed up the cooking process, but they don’t need to be finely diced.
The potatoes and the carrots cook together with flavor agents, like soy sauce and the Worcestershire sauce, and the spices, like smoked paprika or smoked paprika flakes, garlic powder and ground mustard. I also suggest you use vegetable stock and not water, because a really great stock will extend the richness of your flavors, while water will dilute them out. In terms of what stock to use exactly, you’ll have to try it out and see what you like. Reduced sodium options are probably the best starting point, and you can always taste a bit of the stock before dumping it into the pot. If the stock is not pleasant to drink, it will probably not make for a pleasant soup to eat. I would stay away from roasted garlic infused or very heavy on spices stocks and go with mild almost bland stocks that you can build on and that will not interfere with all the other ingredients you are using.
This soup is in many ways an extension of me using carrots for as many things as possible, including the summer hit – carrot dogs – and some of my baking, like cookies and muffins.
What helps put this soup over the top is just a sprinkle of fresh dill at the end, and a handful of freshly toasted croutons. With all that in place all that’s left to do is grab a spoon and dig in!
Cream of Carrot Soup
What you’ll need:
6 large carrots
2 potatoes, Russet or white
2 tablespoon oil
2 teaspoon ground mustard powder
1 tablespoon soy sauce
1 teaspoon Worcestershire sauce (vegan)
1 teaspoon steak sauce
1 teaspoon garlic powder
1 teaspoon smoked paprika flakes
4 cups vegetable stock
2 tablespoons dill, fresh
What you’ll do:
Wash, peel and cube carrots and potatoes. Place in a pot, cover with water and boil for about 15 minutes, until vegetables are just soft but not falling apart.
Drain the vegetables, pat dry to absorb as much of the access water as you can, and place in a large mixing bowl.
Add the oil, spices and sauces and mix well. Let marinade for 30-60 minutes.
Place all the vegetables and the marinade into a blender and add the vegetable stock. Blend until smooth and silky. You can do this step in the mixing bowl with an immersion blender but I think the regular upright blender produces smoother consistency.
Pour back into the pot and bring to simmer. Let the soup simmer gently for 10 to 20 minutes.
While the soup is simmering you can toast some bread, or make some croutons.
Serve the soup with a sprinkle of fresh dill, and some toast, croutons, bread or even tortilla chips on the side. Mmmmm… good!!!
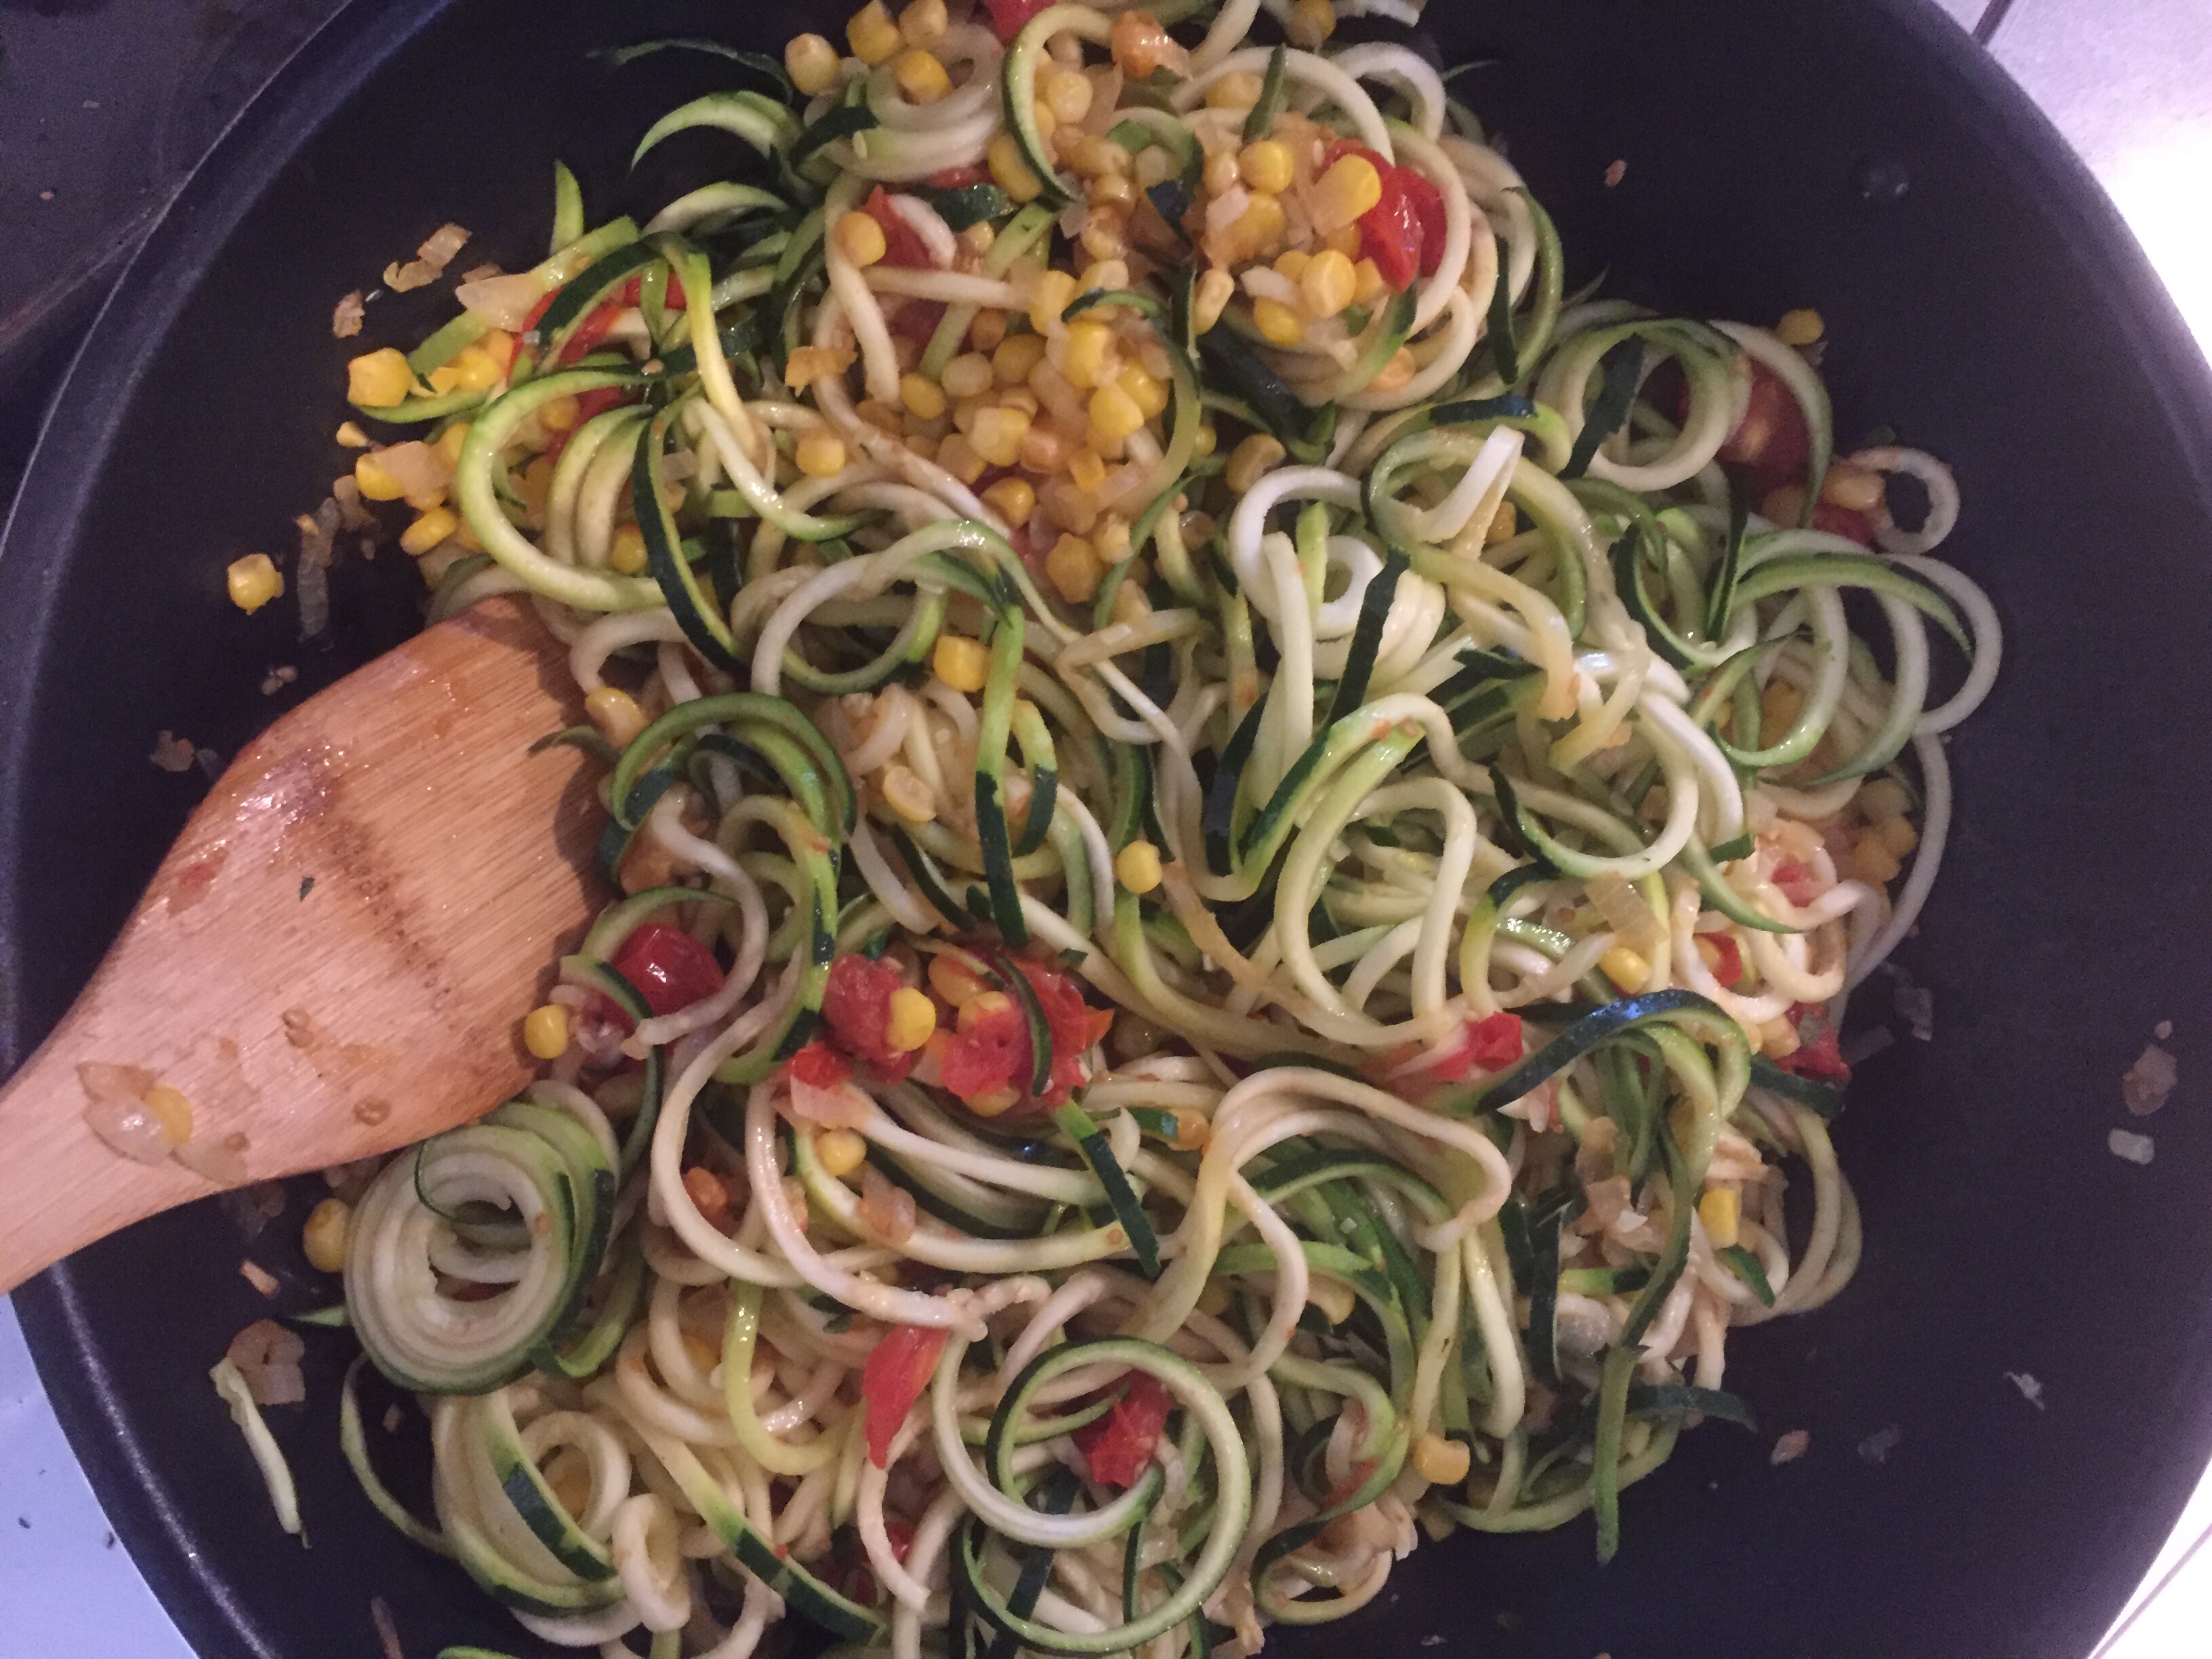
Zucchini Noodles with Cherry Tomatoes and Corn, via Eat the Vegan Rainbow
Who ever invented a spiralizer deserves one of those Breakthrough Technology prizes – future generations of parents will not know the painful process of getting kids to eat zucchini or summer squash, or even beets because with this magical machine all kids will be diving into is spaghetti, and who doesn’t love that!!!
What I like about zucchini noodles is that they cook really fast, they have a lovely texture, and a bit of chew to them – very similar to a broader noodle pasta variety, like fettuccine. The recipe here combines only a handful of ingredients and, once you have your zucchini noodles ready, it only takes 15 minutes from start to finish. So, it is ideal for a quick lunch, or a healthy dinner after a very, very busy day. It looks very glamorous, it tastes crisp and delicious, and you will get all your recommended daily servings of vegetables in one plate – but, hey, who’s counting those, right?
The easiest way to get zucchini noodles, or many other kinds of noodles, is to buy them from a grocery stores. Almost all I go to carry those, so grab them and try them. If you like them, stop grabbing them from the store and buy yourself a spiralizer. The gadget is going to pay iteself off after 5-10 times of use, depending on how much you spend, because buying zucchini and doing the spiralizing yourself is much, much cheaper – I did the math and came up with the number 5. It will cost you five times more to buy pre-spiralized veggies than to do it yourself… Plus, once you have a spiralizer you can do all sorts of fun stuff with it, like these Spiralized Oven Fries.
Hope you give this recipe a try!
Zucchini Noodles with Cherry Tomatoes and Corn
What you’ll need:
4 pieces of zucchini, medium sized, spiralized
1 onion, finely diced
10 oz (275 g) cherry tomatoes, washed and halved
1 1/2 cup frozen corn
Cooking spray
Fresh parsley, nutritional yeast, fresh or dry oregano, fresh or dry basil – these are all possible toppings for you to consider.
What you’ll do:
Spray the bottom of a large and deep frying pan, or even a wok, with cooking spray and put over the medium high heat.
Add the diced onions and brown for 3-4 minutes, until soft, slightly browned and translucent.
Add the tomatoes and let them sauté for 3-4 minutes.
Once the tomatoes are soft, add the corn and let it thaw as it cooks. No need to thaw it ahead of time. It will take about 5 minutes for corn to be ready for the next step.
Add the zucchini noodles, mix everything gently together, and sauté for another 5 minutes. Serve immediately with a dash of fresh basil or a sprinkle of nutritional yeast on top!
Chestnut and Mushroom Stuffing, via Eat the Vegan Rainbow
If you think you can’t live without the traditional Thanksgiving dinner with the roasted turkey, mashed potatoes full of butter, the stuffing made with rich sausage, gravy made from turkey fat, sweet potato casserole topped with marshmallows, corn bread with cheese, pumpkin pie with vanilla ice cream, and so on and so forth, let me reassure you – you can give this all up, and replace it with an amazing and creative plant-based feast that celebrates the season and gives thanks for the bountiful harvest, our friends and families, and our beautiful and extraordinary planet.
I put together this menu as a testament that food can be colorful, flavorful, aromatic, and delicious without major time and money investment. This entire menu will cost you far less than the regular Thanksgiving feast, and instead of leaving you tired and sluggish, it will leave you filling energized and elevated… and ready for whatever Black Friday may bring!
Joking aside, this menu is meant for entertaining and for making a huge impression. As any well-structure feast, my Thanksgiving offerings begin with appetizers. And since the meal is supposed to go on for an hour or more, and includes two dessert options, I am going light with the appetizer spread. My tray includes couple of different types of olives, Roasted Beets Hummus, Baked Almond Feta Cheese, and pita chips. You can make the pita chips by slicing some pita bread into wedges, spraying them with some oil or cooking spray and letting them toast for couple of minutes until golden-brown. Or you can get them at a supermarket, like I did on this occasion.
Baked Almond Feta, via Eat the Vegan Rainbow
Do remind your guests to take it easy with the appetizers, because what’s coming next is the most amazing soup ever, the Creamy Cauliflower Winter Soup that owes it’s creaminess entirely to puréed cauliflower. The soup is white with slight gold overtones, which in my view frames the season perfectly. Plus corn and peas give this soup some substance and fresh thyme sets the stage for herbs to come.
Creamy Cauliflower Winter Soup, via Eat the Vegan Rainbow
Main course is a real harvest celebration, with fireworks of flavors and all the trimmings working together to feed the bodies and the souls. The main dish is a lovely Harvest Roast with cubed sweet potatoes, turnips, carrots, parsnips, apples and squash, lightly oiled and flavored with herbs of the season. Complementing the Harvest Roast is the Chesnut and Mushroom Stuffing (recipe below). Add to that a protein rich Quinoa with Roasted Cranberries and Pistachios and you have your self an amazing feast!
Quinoa with Roasted Cranberries and Pistachios, via Eat the Vegan Rainbow
Last but not the least, the meal ends with a glass of Fizzy Cranberry Mocktail, and two desserts that pay homage to the traditionally served pies, pumpkin and apple. The desserts I feature are Pumpkin Truffles, inspired by the traditional pumpkin pie recipe and spices that go into it, and Pecan Apple Baklava with Orange Maple Syrup, which combines the best of pecan and apple pies into one ultra scrumptious dessert.
Pecan Apple Baklava, via Eat the Vegan Rainbow
Have a thankful, wonderful, healthy and delicious Thanksgiving feast!!!
Chestnut and Mushroom Stuffing
What you’ll need:
1 yellow onion, finely diced
6 stalks celery, finely diced
2 Granny Smith (or another variety of tart) apples, diced
10 oz. (285 g) mushrooms, finely chopped (white, oyster, shiitake, baby bella – any combination of these will work)
10 oz. (285 g) chestnuts, boiled and chopped
4-6 slices of hearty sourdough bread (depending on the size of the slices)
Fresh sage, 4 leaves, chopped
Fresh thyme, 8 springs, pulled
Fresh rosemary, 2 springs, whole
Cooking spray
What you’ll do:
One day prior to making the stuffing cut the bread into medium sized cubes, and leave them uncovered to dry. If you forget to do this a day ahead, don’t worry – you can cube the bread and put it in the oven to roast/toast. 10 minutes at 350 F (175 C) should be enough.
Next day, place a large skillet over the medium-high heat. Add the olive oil, onions, celery and apple. Mix well and let it sauté with occasional stirring for 15 minutes.
Add the mushrooms and two whole springs of rosemary (no need to chop, you’ll pull them out at the end), and continue sautéing for another 5 minutes.
Add the chopped chestnuts, mix well to incorporate, and cook for another 10 minutes.
Add chopped sage and thyme, mix in the bread cubes, and once everything is incorporated well transfer the stuffing to a large baking dish.
Cover the stuffing with foil and bake for 20 minutes at 350 F (175 C), then remove the foil, bring the temperature to 400 F (190 C) and bake for another 10 minutes.
Let the stuffing cool for 5-10 minutes before serving. The leftover stuffing, if you have any, can be an easy lunch on its own!!!
From time to time it’s good to do things just for fun, with no hidden agendas or pretense of deeper meaning attached. This recipe is my example of doing something just for fun and just because.
Few months ago I acquired a spiralizer, one of those machines you hook your vegetables or fruit to and get long, lovely and elegant noodles of various width. I’ve been using it to make great zucchini noodles, and I love it! But, there’s a limit to how much zucchini noodles a person can eat and still remain excited about seeing them on the plate, so I’ve been trying to pace myself and find other things to spiralize. I tried apples – that worked! I tried sweet potatoes and beets – ditto! I tried jicama – thumbs down, and the same goes for celeriac.
One vegetable that did work – meaning it produced a pile of lovely noodles – were baking (Russet) potatoes. So, I decided to have a bit of fun with them and bake them into little piles of potato yarn which we can call Spiralized Oven Fries. All you need to make this recipe happen is a muffin pan, some seasoning of your choice, and a hot oven. What you’ll get is a fun take on oven fries – the fries that look like spaghetti. And that is exactly what I said this post is all about – pure fun!
Spiralized Oven Fries
What you’ll need:
4 medium baking potatoes
Freshly ground black pepper
Freshly ground crushed red pepper flakes
Salt (optional)
Cooking spray, or olive oil
What you’ll do:
Preheat oven to 425 F (220 C).
Wash the potatoes well, and pat them dry.
Spiralize the potatoes without peeling using a fine gauge spiralizer, the same you would use for making zucchini spaghetti.
Season the potato “noodles” with any seasoning you like. I suggested freshly ground black pepper and ground crushed red pepper flakes, making this quite spicy, but you can use any seasoning you like. Let stand for couple of minutes.
Oil the muffin pan with cooking spray or oil.
Take a handful of potato noodles and gently place them into the individual muffin holes. Don’t press them too hard – let the noodles fall where they may, more or less, and try to arrange them so they fit neatly into the space.
Place the muffin pan into the oven and roast for 30 minutes or so, until the tops start to brown. You don’t want them to burn but a bit of browning is nice.
Take the fries out and let them cool for a bit. Then using a fork gently lift them out and plate them. The sort of “muffins” are not really held together by anything so they will fall apart if you are not careful. But if you are you will end up with a serving of fried that had never looked funkier. And that’s worth it!
Chicken-less Tikka Masala, via Eat the Vegan Rainbow
Several months ago I shared the recipe for a Vegan Chicken Tikka Masala that used jackfruit instead of the chicken and came together in a slow cooker. I still think that that’s a great, flavorful and aromatic dish and if you are looking for new ways of making and enjoying jackfruit it is definitely something you should try. Having said that, someone did ask about what the source of protein was in a dish like that, and although jackfruit, as well as all the other fruits and vegetables on the planet, has some protein it is not a protein-rich food.
So, I went looking for ways to increase the protein content in the plant-based Tikka Masala and found soya chunks. Soya chunks are not something that’s easy to find in US grocery stores. I was able to find them in Serbia easily enough and I have now also found them on Amazon and in my local Indian grocery store. If you have an Indian grocery store relatively nearby, it’s absolutely worth the trip. I find that the prices in the Indian grocery store I go to are on average three to four times cheaper than online, and things like rice, soy and chickpea flour, and spices are a fraction of the price when compared to my regular grocery store or health food store. Most Indian stores have a freshly made food section as well, so although not many items on the traditional Indian menu are vegan, I’m sure you will find a couple worth trying out.
Back to soya chunks now. Soya chunks are made from fat-free soy meal, a by-product of soybean oil extraction. The meal is molded into different shapes and textures (soya chunks of different shape and size) and dried out to create a shelf-stable, long lasting products. I use several different size of soya chunks, depending on what I am making. For example, the size of soya chunks I chose for a dish like chicken-less tikka masala matches the size of chicken chunks, which are usually about 1 inch (2.5 cm) cubes. An essential step for almost all soya chunk dishes involves boiling soya chunks in water for five minutes or so to rehydrate them. If you are using very fine soya chunks, like TVP (textured vegetable protein), boiling is usually not required but some soaking will be needed. The only TVP application where I advise against soaking is when making burgers, and you can find out why and how come in my recipe.
For this Chicken-less Tikka Masala to work, you will have to marinade soya chunks in a spice-and-yogurt sauce. Basically, you are following all the same steps as you would if you were making the chicken version of this dish, and by the time you are finished all the marinating and simmering nobody will be able to tell that what they are eating is not the real thing. I recommend marinating soya chunks overnight, but if you are in the hurry starting the marinate in the morning and finishing the dish later the same day will work.
The Chicken-less Tikka Masala is best served with some Basamati Rice, and topped with fresh cilantro. For a full restaurant experience you can add some Naan bread and Cucumber Raita, which you can make easily with some finely sliced cucumber, some yogurt, and a squeeze of lemon juice!
Chicken-less Tikka Masala
What you’ll need:
7 oz (200 g) medium soya chunks
2 tablespoon coriander powder
1 tablespoon paprika
1 tablespoon cayenne
1 tablespoon ground cumin
1 tablespoon garam masala
1/2 tablespoon cardamom powder
1 cup cashew yogurt
1 large onion, diced
6 oz (170 g) tomato paste
1 14.5 oz (411 g) can petite diced tomatoes
2 tablespoon vegetable oil (divided)
Fresh cilantro
What you’ll do:
In a large pot cover soya chunks with water, bring to boil, and let cook for 5 minutes. Remove from the heat and let stand for 30 minutes. Transfer soya chunks into a large strainer, rinse with cold water and gently press any access water out. You want your soya chunks to be soft and moist but not dripping with water.
Place one tablespoon of vegetable oil in a pan and heat until the oil is hot. Reduce the heat to medium and add the spices (coriander, paprika, cayenne, cumin, garam masala, and cardamom). Toast the spices for 1-2 minutes, until fragrant. Place the toasted spices into a large mixing bowl and let cool for few minutes.
Once spices have cooled just a bit, add the yogurt and mix well. Next, add the soya chunks, make sure they are well covered with the marinade, and refrigerate for at least 12 hours. If you are in a rush you can cut down the marinating time to couple of hours – in that case leave everything on the kitchen counter.
In a large and heavy pot, like a Dutch oven, heat 1 tablespoon of oil over the medium high heat. When oil is heated, add the diced onion and let it brown for 5 to 7 minutes.
Once the onion is browned, add the tomato paste, mix well and let the tomato paste brown slightly. This will take 3 to 4 minutes.
Next, add the marinated soy chunks together with all the yogurt marinade. Mix well, and let the soy chunks brown just slightly. You will need to give it an occasional stir, but the idea is to let the soy chunks get a chance to caramelize on the edges just slightly. This will take about 10 minutes.
Add diced tomatoes, mix well, decrease the heat to medium low, and let the Chicken-less Tikka Masala simmer for 15 minutes or so. This simmering will allow all the flavors to come together more completely, and the sauce to thicken slightly. If you discover that your sauce is not as thick as you like it, keep simmering until you reach the consistency you like.
Zucchini Lasagna with Walnut and Brown Lentil Ragù, via Eat the Vegan Rainbow
Let’s cut to the chase and be honest here – although we can pretend otherwise, we are all as obsessed with lasagnas as Garfield is! The layers of soft noodles, amazing sauce, fresh herbs, and most commonly lots and lots of ground meat and soft cheese. All this means that lasagnas are not the healthiest thing on the menu. Having said that, there is no reason to ban lasagnas from your plate; you just need to learn how to keep it healthy and plant-based, and I think I can help you to troubleshoot both of those problems.
Keeping lasagnas meat-free seems to be the problem many have tackled, usually by overloading lasagna with cheese, cheese and eggs, or cheese and a selection of vegetables, like mushrooms, and increasing the amount of tomato sauce and making it chunkier. But, really the most prominent ingredient in majority of meatless lasagna recipes is the cheese. When I was developing this lasagna recipe I did not want to give up on idea of “meat”, so what I came up with is a hearty, meaty, and flavorful walnut and brown lentil “meat” ragù base. My thinking was inspired by my previous, wildly successful Meatless Shepherd’s Pie, which I served for Easter this year as a substitute for a more traditional, lamb-based dish. In that recipe, lentils, mixed with ground mushrooms and cooked with rosemary and thyme, made for an amazing feast.
Here, I wanted to recreate the traditional meat ragù and went for a combination of chopped walnuts and dark lentils. The trick is too cook the lentils separately and add them to the rest of the ragù when they are fully cooked. Also, chop your walnuts into pieces that are about the size of what ground meat pieces may look like. I chopped the walnuts by hand, just by going over walnut pieces with a knife few times, back and forth. You can buy whole walnuts, or walnut halves in store and start from there, but for this a bag of walnut pieces will make your life easier and make the dish cheaper. Walnuts work really well in this lasagna, because they add some of their natural crunchy texture, protein, and a bit of fattiness to the otherwise very lean recipe. Worried about this extra fat? Walnuts are known for having a lot of unsaturated fat, which is the good kind, so don’t skip it! The meatiness of the ragù is further enhanced by a good amount of tomato paste and crushed tomatoes and letting the ragù simmer for a while.
Walnut and Brown Lentil Ragù, via Eat the Vegan Rainbow
The preparation of any lasagna happens in several stages and this one is no different. In order to make the process more efficient I recommend that you start roasting the zucchini at the same time you start making the ragù, and then start boiling the lasagna noodles when zucchini is just about done. In that way you don’t even need to turn the oven off, you can just lower the temperature from roasting to baking and be ready for lasagna to go in immediately. Please note that I don’t use zucchini as a complete lasagna noodle replacement. I suppose you could, but then you’ll end up in a more of a Zucchini Mousaka territory than lasagna paradise. If you are concerned about gluten, there are now many gluten-free lasagna noodle options for you to choose from and most of them work perfectly.
The final touch on this lasagna is the Béchamel sauce (besciamella), which is a white sauce traditionally made with milk, butter and flour. In this case, the quick white sauce I put together requires only a blender, some soft, silken tofu, a squeeze of a lemon, and a bit of nutritional yeast. It is very much the blend-and-pour type of sauce, so you can do it a in a blink of an eye. The sauce adds a nice, slightly cheesy flavor to this very rich lasagna, and makes for a nice, almost golden glaze.
Zucchini Lasagna with Walnut and Brown Lentil Ragù
What you’ll need (for 9 x 13 in (23 x 33 cm) baking dish):
8-10 lasagna noodles, gluten-free if preferred
1 lbs (450 g) brown lentils
3 zucchinis, cut lengthwise into long strips
2 large carrots, diced
3 stalks celery, diced
1 cup raw walnut pieces, chopped
1/2 yellow onion, diced
1 can (28 oz, 800 g) crushed tomatoes
2 tablespoon tomato paste
1 tablespoon crushed garlic
1 teaspoon dried oregano
1 teaspoon dried basil
3 tablespoons fresh Italian (flat leaf) parsley
1 lbs (450 g) silken tofu
2 tablespoons lemon juice, freshly squeezed
1 tablespoon nutritional yeast
Cooking oil spray
What you’ll do:
Preheat oven to 425 F (220 C).
Prepare the lentils according to the instructions on the bag. Basically, bring 4 cups of water to boil and add the lentils that have been washed and picked over to remove any impurities that may have made their way to the lentils. Bring the lentils back to boil than lower the heat to a gentle simmer, and cook for 20 minutes or so, until lentils are completely cooked. Drain the lentils from excess water and set aside to cool.
While the oven is preheating, and lentils are cooking, prep your veggies. Peel, wash, and dice the onions and carrots, and wash and dice the celery. Wash the zucchini well, remove the ends, then cut into long, thin strips. You can use a mandolin slicer for this, but cutting by hand also works. The zucchini slices should be as close to the thickness of the lasagna noodles as possible, but you don’t need to go crazy here – just keep in mind that a bit thinner is better.
Line a baking sheet with parchment paper, place the zucchini slices on and spray with cooking spray. You may need to use two baking sheets, since you may discover that you can’t manage to have all your zucchini slices arranged in a single layer. Don’t pile the zucchini on top of each other and do roast in batches if needed. Place the zucchini “lasagna noodles” into the oven to roast. The roasting will take anywhere between 15 and 25 minutes and will depend on the thickness of your zucchini. Keep an eye on the oven and if you are roasting two pans of the zucchini at the same time do rotate the pans mid way through the roasting. You will know that the zucchini is done when the edges are slightly brown and the middle is golden. Once you take the zucchini out, decrease the oven temperature to 350 F (175 C).
While the zucchini is roasting, start your the ragù. Spray the bottom of a Dutch oven, or another type of heavy pan, with cooking spray and heat up over the medium to medium high heat. Add carrots, onions and celery and let them brown for 10 minutes. Add chopped walnuts and let them pan roast for about 2 to 3 minutes. Add garlic, oregano, and basil, and let the flavors develop for a minute. Next comes tomato paste – add it to the pan, mix well and let brown just slightly. This takes about 2 minutes or so. Add the cooked lentils and the crushed tomatoes, and mix well. Let the ragù simmer for 10 to 15 minutes. Turn the heat off, add the fresh parsley and mix well to combine.
Once the ragù is simmering, it’s time to start cooking your lasagna noodles. Most varieties ask for a large pot of boiling water and about 10 minutes of boiling time. The noodles don’t need to be cooked all the way through as they will continue to cook in the oven but they do need to soften quite a bit, so 8 to 10 minutes should be enough to achieve that. Drain the noodles and use immediately.
Combine tofu, lemon juice and nutritional yeast in a blender and blend until smooth. Set the besciamella to the side.
Spray the bottom and sides of your 9 x 13 in (23 x 33 cm) pan with some cooking spray. Cover the bottom liberally with the ragù (use about a half of the amount you made), layer the first set of noodles (for me that came to about 5 noodles per layer), then layer the zucchini in a single layer, pour the rest of the ragù, and top with the remaining noodles. Pour the besciamella over and cover with foil.
Place the covered lasagna into the 350 F (175 C) oven and let bake for 30 minutes covered and then about 10 minutes uncovered. Let the lasagna sit for about 10 minutes before serving. I like to add some freshly ground black pepper or a mix of black pepper and red pepper flakes to my lasagna just before enjoying, but you can also sprinkle some fresh parsley, or fresh basil. Have fun!
You probably know that veggie burgers are going through somewhat of a revolution, with companies like Beyond Meat and Impossible Foods, leading the way within US in creating plant-based products that taste and look like the real meat. I have not had an Impossible Burger yet, but I can attest to Beyond Burger being everything its creators wanted it to be – a plant-based burger that looks, cooks and tastes like fresh ground beef burger. It is absolutely spot on, thanks to some interesting protein biochemistry and biophysics that transfrorms pea protein into ground beef, as well as the use of plenty of fat for that greasy burger feeling, and a good amount of salt. And fat and salt are likely two components of this burger that, in addition to getting the texture of the protein component just right, make this type of burger so realistic and so delicious and so addictive.
Indulging in one of these burgers as an occasional treat is all fine and good, but making it on a daily basis is almost us unhealthy as eating the beef patty. That’s why I’ve been focusing on creating plant burgers (call them veggie burgers if you like) that can work on a grill or in a grill pan, look very burgery, and taste great without huge amounts of salt and fat. My blog now has the entire section dedicated to Burgers, Hot Dogs & More. Some of the burgers I made taste very much like a beef patty, some less so… At the end, what I discovered is that plant burger needs to pass two tests in order to qualify for being on my plate: it has to hold its shape well and sustain grilling on the grill or in a grill pan, and it has to taste amazing. Any burger that checks those two boxes off deserves to be shared!
The patty I am sharing today has three twists. Twist number one is that I decided to try using avocados as a fat source to add some juiciness to the burgers. Avocados, also known as Alligator Pear – isn’t that awesome? – are not something I ever considered cooking with but we recently had a huge avocado sales in my local grocery store and I got more than I should and there is a limit to how much avocado toasts one can eat in a week, so I was looking for something else to do with them. The idea to try making a burger with avocados was inspired by their high fat content and their creamy consistency (when they are ripe and perfect). I did quite a few internet searchers to see what other have done, but I could not find a single recipe that used avocados inside the actual burger patty. So, off I went to see if Avocado Burgers can be made into reality.
My twist number two is one of my favorite tricks to add umami flavor to just about anything – finely ground mushrooms. They work wonders in a dish like Meatless Shepherd’s Pie, or more generally any time you want to recreate that special “je ne sais quoi” of ground beef.
Final twist to this story is using extra firm tofu that has been frozen for few days than thawed all the way over the course of one to two days in the refrigerator. Freezing and defrosting tofu changes its texture daramatically. The tofu becomes tougher and stronger, and it absorbs the marinades and flavors better. There are no tricks to freezing tofu in my kitchen as I just put the container tofu comes in from the store into the freezer, but if you need a more refined method The Spruce has detailed step by step instructions. Before you use tofu, drain it well and then dig in – use your hands to press and squeeze and get the excess water out. I suppose you could use the tofu press for this or a method where you place tofu slices between paper towels and place a large weight on top for twenty minutes, but because tofu that’s been frozen then defrosted has this tougher and stronger texture, using your hands actually works quite well. Plus, you can easily go from squeezing to crumbling, which is the next step. At the end you will end up with a pile of small tofu crumbles.
To this pile of crumbles you will add mashed avocado, ground mushrooms, tomato paste, and couple of staples when it comes to boosting umami and grilled food flavors: soy sauce or liquid aminos, Worcestershire sauce and liquid smoke. The patties will be soft so it is a good idea to stick them into the fridge or a freezer to firm up before cooking. I felt like pairing only some crispy lattice with this burger but pickles, mustard, ketchup, tomatoes, and all the other common burger fixings will go well with it too!
Avocado Burger, step by step, via Eat the Vegan Rainbow
Avocado Burger
What you’ll need:
1 16 oz. (450 g) block of extra firm tofu, frozen then thawed
8 oz. (225 g) crimini (baby bella) mushrooms
1 large avocado, ripe
2 tablespoon tomato paste
1 tablespoon Worcestershire sauce, vegan
1 tablespoon soy sauce or liquid aminos
1 teaspoon garlic powder
1 teaspoon liquid smoke
Cooking spray (for the pan)
What you’ll do:
Freeze the tofu few days in advance and when completely frozen take it out of the freezer and leave it in refrigerator for a day or two, until completely defrosted. Drain the tofu and using your hands squeeze the water out of tofu. The tofu should feel like a relatively tough sponge soaked with water at the beginning, and at the end it should feel moist but not dripping wet. Crumble the tofu into a large mixing bowl.
Chop the mushrooms using a food processor until they are finely ground. Few chunkier bits here and there will not hurt but try to get the mushrooms to be about the same consistency as your tofu crumbles. Add to the tofu.
Cut and peel the avocado, and scoop out the green flesh into a small bowl and mash with the fork until finely mashed. Ideally the avocado should be as smooth as you can get it, and if you are using a perfectly ripe avocado this should not be a problem. Side note: If you discover that your avocado is tough that means that it is not ripe enough. If your avocado is turning black it means that it is past its prime. Unfortunately, when it comes to avocados only the perfectly ripe, perfectly green and perfectly soft will work, for this or any other recipe. If your avocados are tough to touch it means they need to ripen and you can help them out by putting them in a paper bag, closing it tightly and leaving them on the kitchen counter overnight. That usually helps – and if they are really, really green you can a ripe banana to the bag to help avocados along.
Add the avocado purée to the tofu mix, as well as the rest of ingredients.
Mix well to combine using your hands. You want to work the mix a bit, which means squeezing and mixing at the same time. Once everything is combined together, use your hands to form patties. Place the patties onto a tray lined with wax paper, and put them into the refrigerator for 30-60 minutes or into a freezer for 15 minutes or so.
Heat your grill pan or a cast iron skillet over the medium high heat. Spray with cooking spray and add 2-3 patties at a time. You need to leave enough room around tha patties to be able to flip them so keep that in mind. Cook on one side for 5 minutes then flip over and cook for another 4-5 minutes, until both sides are nice and brown.
Serve on your favorite hamburger bun with your favorite toppings. And in case you have couple of avocados still left over, go wild – slice them up, toss them on top, and have yourself a Double Avocado Burger!
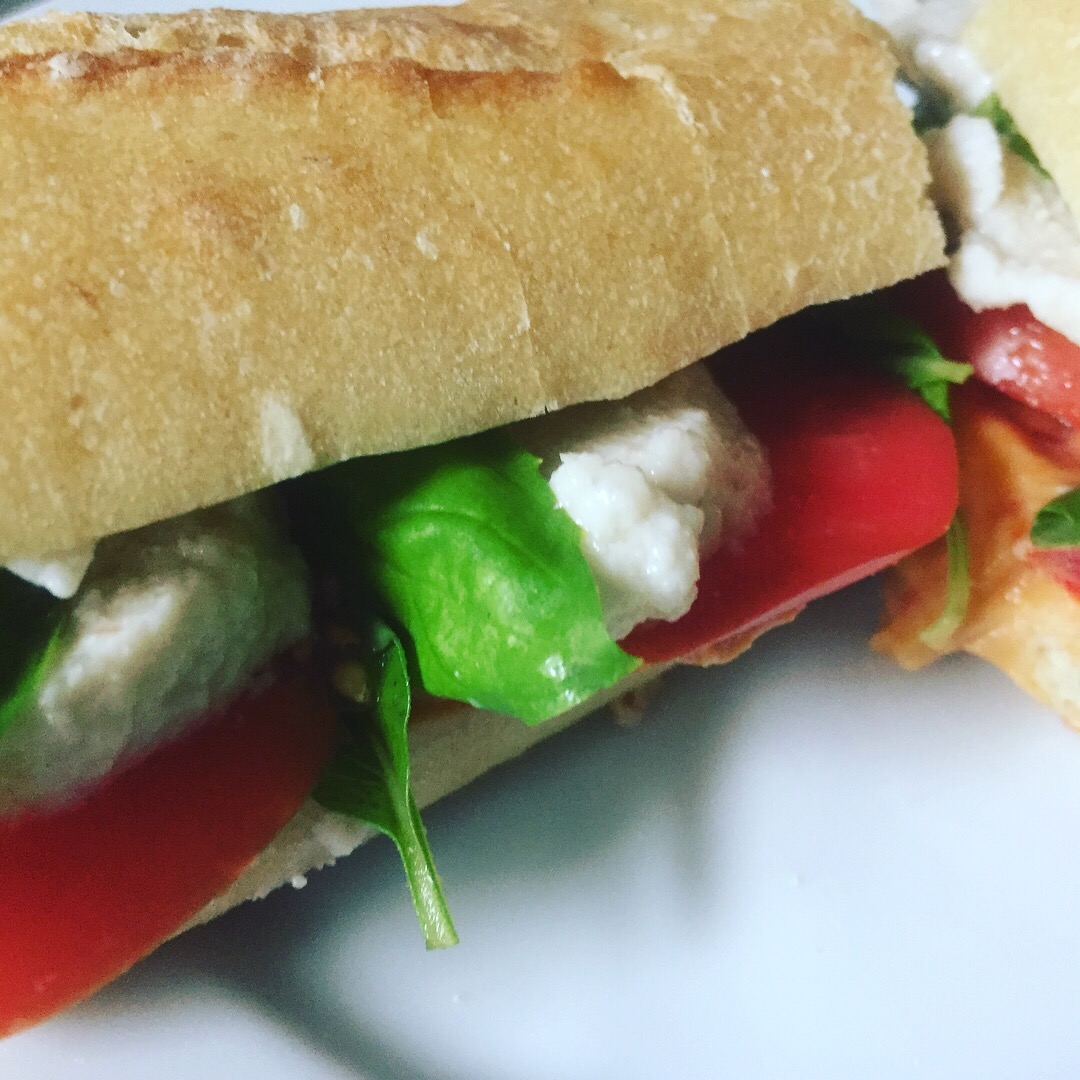
Vegan Caprese Salad in a Sandwich, via Eat the Vegan Rainbow
In my other life, as the editor of two leading journals for chemical and structural biology (I know, sounds intimidating!), I once used Caprese Salad – tomatoes, basil, and fresh mozzarella – as an example of how simple is incredibly powerful, beautiful and irresistible, in an emphatic attempt to convince scientists to implement principles of simplicity when writing their scientific papers.
Here, my interests are purely culinary as I set out to recreate the Caprese salad out of plant based ingredients only. I started from a batch of vegan fresh mozzarella, following a recipe developed by Jules Aron and included in her “Vegan Cheese: Simple, Delicious, Plant-Based Recipes” book.
The path to fabulous vegan fresh mozzarella is long and slippery- meaning that it will take you about two to three days to have ready to eat batch of cheese on your hands, and there are few places along the way where a little mistake can derail your cheese making process. Having said that, I found Jules’s recipe to be clear and helpful, and the final result AMAZING!
I made only some minor adjustments to the recipe, as I used cashew yogurt for fermentation stage of the mozzarella, and agar powder and tapioca starch to firm it up – Jules recommends Kappa carrageenan powder and tapioca flour (which I think is the same thing as tapioca starch but it’s worth mentioning as a point of difference)!
The process starts, as many vegan cheeses do, by soaking some nuts. I usually cover the nuts, in this case cashews, with water and leave them in the fridge overnight. The next step for this cheese is blending the well soaked cashews, that have been drained and rinsed, with some almond milk or water until nice and smooth – I used almond milk.
Then, you add yogurt – here I used an amazing Cashew Yogurt by Forager – cover with cheese cloth and leave on the kitchen counter for a day or so. Make sure that your yogurt contains live cultures as you want the bacteria to start the process of fermentation and acidification, yielding a nice, subtly tangy flavor.
Making of vegan mozzarella, via Eat the Vegan Rainbow
The penultimate step is adding the thickener to the cheese mix, cooking it until it starts to thicken to a consistency of very thick oatmeal, porridge or polenta.
While the cheese was cooking, with frequent stirring, I made the brine. I used tap water and ice cubes, plus a tablespoon of plain kitchen salt since that’s what I had handy, and mixed it all until salt was fully dissolved.
Once the cheese was cooked, I used my measuring spoon (tablespoon size) to measure out cheese balls, formed a bit with hand – watch out here as it may be hot, so you can form the balls using two spoons at the same time. Dump the balls into ice/water/salt mixture, cover with cheese cloth and leave in the fridge overnight. Jules recommends at least 4 hours, so I just left my fresh mozzarella cheese balls to rest until the next day.
Vegan Fresh Mozarella Balls in Brine, via Eat the Vegan Rainbow
Waiting wasn’t easy but it was worth it!!! I got some fresh baguette, fresh basil, a ripe tomato, a drizzle of balsamic vinegar, and my homemade vegan fresh mozzarella, and made myself a phenomenal sandwich for lunch.
I transferred the fresh mozzarella with the brine and all into a container with a tight lid, and stored it in the refrigerator. It lasted for about one week, at which point it was all gone!!! I will be making some more soon, but next one from Jules’s book I want to try is an almond-based baked feta!!!
Since this post is all about another person’s recipe, I am not sharing the notes, but encourage you to go visit Jules’s site, and get her book or better still borrow it from your local public library, which is what I did. I am happy to share what my Caprese Salad in a Sandwich looked like – it’s a real feast for your eyes!!!
Vegan Caprese Salad in a Sandwich lunch, via Eat the Vegan Rainbow
Miso Glazed Grilled Tempeh, via Eat the Vegan Rainbow
If you have not done so already, you should definitely try tempeh. I’ve been hearing about it for some time now, and seeing several different brands and varieties right next to the tofu that I usually get but I only got the first batch of tempeh just the other day. I bought several different varieties to try them out and spent few days reading about what’s tempeh good for and how to best cook with it. Tempeh is related to tofu because both are soy based. But, in terms of flavor and texture (and as far as I can tell in terms of how you actually make the two, based on what Wikipedia says), tofu and tempeh are quite different. Tempeh is firm, much firmer than the firmest tofu, and does not come in liquid. It is actually fermented soy beans mixed with rice [edited after reading comment from Mary S below – thanks Mary S, it’s good to get the facts all squared away. I am still a bit confused since the ingredients’ list of the tempeh I used did include rice; at the end of the day my confusion does not matter change the fact that the food was delicious], so although it is dry, it does feel sticky to touch and just a bit slimy. FYI: I am not saying this to freak you out, rather to forewarn you so that you are not as surprised when you start handling it as I was – I thought my tempeh has gone bad and wanted to throw it out! But, I double-checked the date on the bag, regained my cool and went for it.
I decided to start simple and build from there, so this Miso Glazed Grilled Tempeh is more or less my starting point. The brand of tempeh I got is Lightlife and the two varieties I started with are their Organic Garden Veggie and Organic Soy Tempeh. Each package is half a pound (about 250 g), and the block of tempeh comes in a vacuumed-sealed package, that’s within a sealed plastic bag, so there are two bags to remove! I used both blocks at the same time, since one just did not seem enough to make for the end of the week Friday dinner.
The first thing I did was to fire up the grill. I have a gas grill and it takes it about ten to fifteen minutes to get to be sizzling hot, with burners going at full blast and the lid down. That was just enough time for me to prep the tempeh and the glaze. For tempeh, I placed the pieces into a pan large enough to keep the pieces flat, covered with water, brought to boil and boiled for four to five minutes per side – I did flip the pieces over once since the pan I was using was shallow and the water did not fully cover the tempeh, so if your tempeh is fully covered you will not need to do the flip! After about ten minutes I took the tempeh out, pat dried the pieces, and left them uncovered on some paper towels.
While the tempeh was boiling and the grill was heating up, I mixed together a simple glaze with some soy sauce, Worcestershire sauce, white miso glaze and vegetable oil. I spread the glaze over the tempeh pieces just before placing them on the grill the glazed side down. Then I glazed the top and let it grill for about five to six minutes. By that time the grill marks will be perfect, and the pieces ready to be flipped. I did reglaze both sides again and flipped again, so that at the end each side got two layers of glaze and about eight to ten minutes of grilling, so in total the grilling bit took less than twenty minutes. If you are in a rush, you can definitely skip the reglazing, but if you are outside hanging around the grill with friends and family and enjoying the lovely summer evening, then why not give tempeh extra love, glaze and grill time?
Let grilled tempeh rest for just a second, then slice and serve. You can serve it in a hamburger or a hot dog bun with the usual trimmings, but note that condiments, like mustard and ketchup, are going to overpower the flavor of the grilled tempeh. So, I recommend serving tempeh with a side of coleslaw and baked, or barbecue beans, which is how I had mine. Add to that a glass of cold beverage of choice, and what can be better?
Miso Glazed Grilled Tempeh Sliced, via Eat the Vegan Rainbow
Miso Glazed Grilled Tempeh
What you’ll need:
2 8 oz (227 g) blocks of tempeh (any variety and brand you like)
2 tablespoons soy sauce, reduced sodium
2 tablespoons white miso paste
2 tablespoons vegetable oil
1/2 tablespoon Worcestershire sauce (vegan)
Oil for oiling the grill grates
What you’ll do:
Prepare your grill like you normally do. I recommend getting the grill really hot and letting any bits and pieces from the previous grill session burn off, then scrapping the grates with an appropriate type of a brush (please be careful here because you can really damage your grill grates if you don’t follow the manufactures instructions and recommendations), and then oil them generously with a paper towel dipped in vegetable oil – please use long tongs here to prevent getting burned!
Take tempeh out of the wrapping and palace in a pan large enough to hold it flat and straight. Cover with water, bring to boil and let it boil for 5 to 10 minutes. Make sure you flip the tempeh half way through if your tempeh is not fully submerged in water. If it is, no mid-way flipping is needed!
While tempeh is boiling and the grill is getting hot, mix together the glaze by whisking together soy sauce, vegetable oil, miso paste and Worcestershire sauce. The glaze should be smooth, but even if you have few lumps in there don’t worry about it – it won’t matter at the end.
Place the boiled tempeh onto some paper towels and gently dry.
Using a (silicone) food brush spread the glaze liberally ove the tempeh and place the piece of tempeh glaze side down on the hot grill. Keep the gas grill on medium high heat, or if you are using a charcoal grill keep it as hot as you would when grilling vegetables, veggie burgers, or mushroom or tofu steaks. Grill the glazed tempeh 5 to 6 minutes on one side, and while it is grilling apply the glaze on the other side, flip over, grill for 4 to 5 minutes, glaze, flip, grill, repeat for as long as you like.
Let stand for just a moment or two, slice and serve!!! This Miso Glazed Grilled Tempeh will work as an appetizer, finger food, as well as dinner, especially with some grilled corn, veggies, coleslaw, baked or barbecue beans, or as a salad topping…
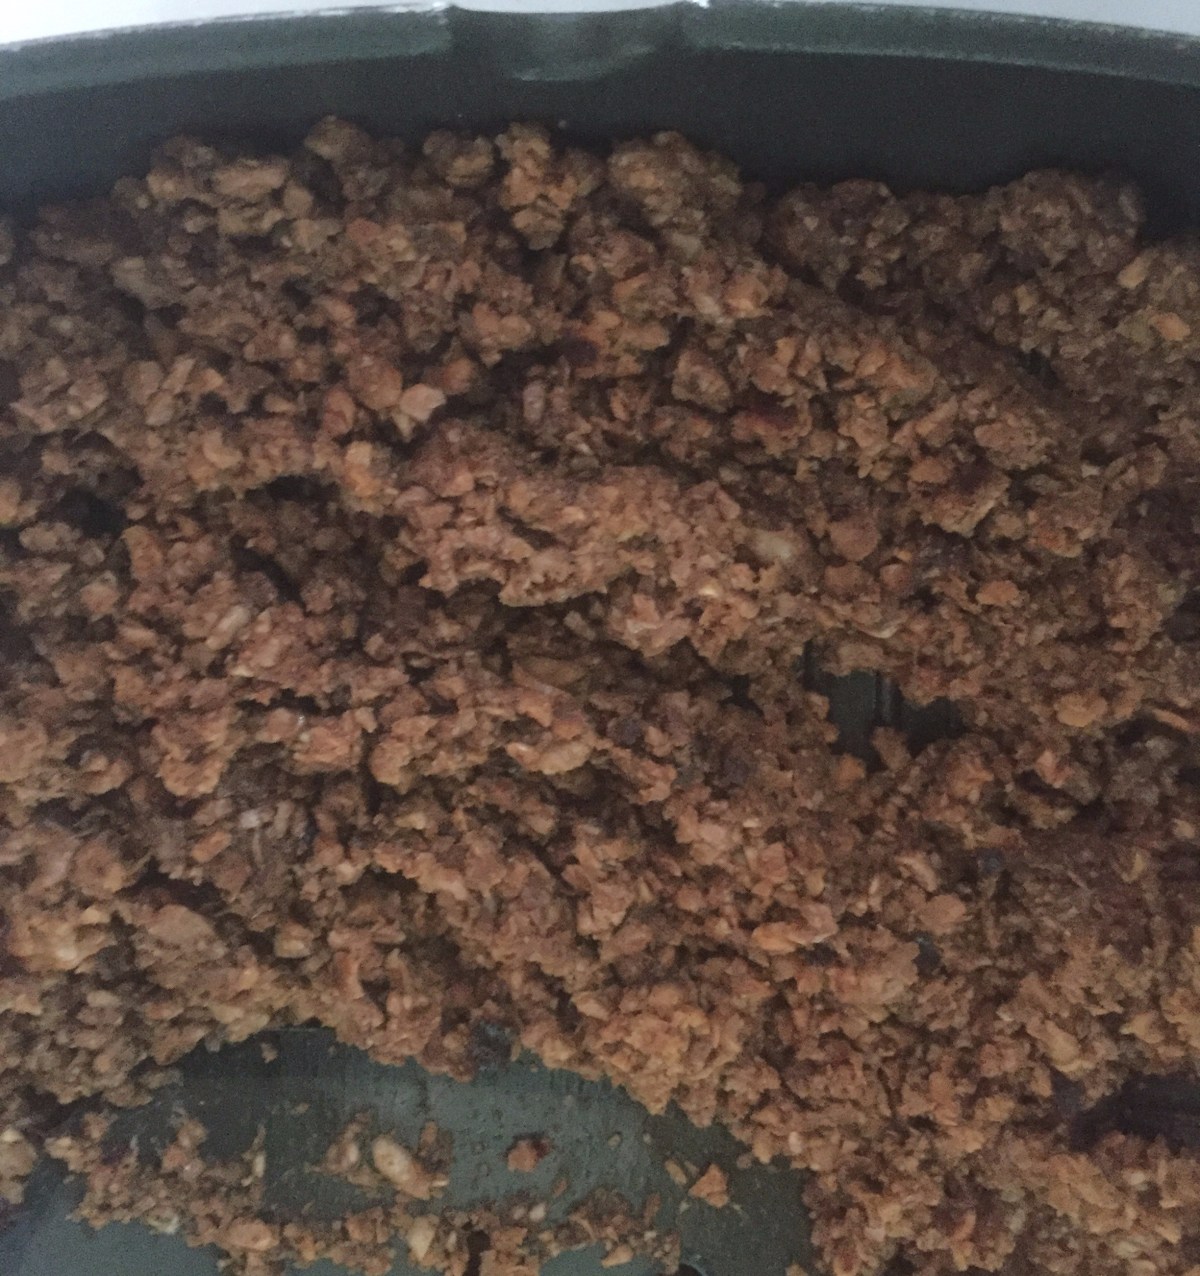
Homemade Ground Beef Substitute, via Eat the Vegan Rainbow
Without a doubt ground beef is one of the staples of American cuisine. And it is also something that many meat substitutes are trying to recreate. This means that you can now go to most supermarkets and get a meatless ground beef product off the shelf. Some are tried are really good, like the Trader Joe’s one or the Beyond Burger, but it’s the price tag that is a bit troublesome plus I am a bit of a control freak and like to know exactly what goes on my plate.
So, I have been making my own meatless beef. I’ve been fairly happy with my burger experiment, and I’ve been also happy with a tofu based ground beef substitute that was created by Glow Kitchen. That ground beef substitute was very influential in my early days of vegan cooking that I recently included it in my list of 5 Must-Try Recipes for Beginner Vegans. It worked really well in applications like stuffed peppers but I wanted to explore ground mushroom and TVP (textured vegetable protein) based versions. I had such an amazing result when I used ground mushrooms, in combination with lentils, as a filling for Shepherd’s Pie, that I just have to figure out a way to fold them into a ground beef substitute.
As a general rule, if you want to recreate a meat dish without using any meat, stick with spices, texture and consistency that evokes the appearance that you are aiming for. Grounding mushrooms was definitely a breakthrough for me, as well as using TVP without pre-soaking! Plus, adding spices like cumin and paprika, as well as coconut aminos or a dash of soy sauce brings out that meat-like flavor. My final touch is just a little bit of tomato paste, for color as well as flavor. When all the components are in, and well mixed, I let the mixture just rest for at least an hour. Thus helps flavors merge and combine and TVP soften.
At the end, what you have after all this mixing, grinding and resting is a mix that looks very much like ground beef yet tastes so much better and richer. You can use the mix to stuff your peppers, in a sauce like Bolognese, or sautée as us and use in tacos, on pizza, or for any other purpose you can think of. You can definitely make meatballs out of it, or even hamburgers. This homemade ground beef substitute is versatile and very budget friendly so you can definitely afford to make batch after batch especially if you get your TVP from jet.com, the cheapest source of this ingredient I could find.
Homemade Ground Beef Substitute
What you’ll need:
10 oz (283 g) white mushrooms
1 1/3 cups TVP (textured vegetable protein)
1 tablespoon liquid smoke
1/3 cup vegetable oil
2 tablespoon tomato paste
1 tablespoon liquid coconut aminos
1 teaspoon cumin
1 teaspoon paprika
1 teaspoon onion powder
1 teaspoon garlic powder
1/4 teaspoon salt
Cooking spray (if the idea is to sautée the mix; for other applications just follow the procedure you would normally follow)
What you’ll do:
Wipe the mushrooms with a paper towel to remove any bits of dirt. Put in the food processor and grind to a fine grind. Pour out into a large mixing bowl.
Add the rest of the ingredients, except cooking spay, mix well and let the mixture rest for at least 1 hour.
Once the mix has rested it is ready to use. The mix browns well and makes for a great taco filling or nacho topping. It can also be used to stuff peppers and to make hamburgers or meatless meatballs, in which case you don’t to brown the mix but ma need to form patties and leave them in the fridge to firm up before cooking.
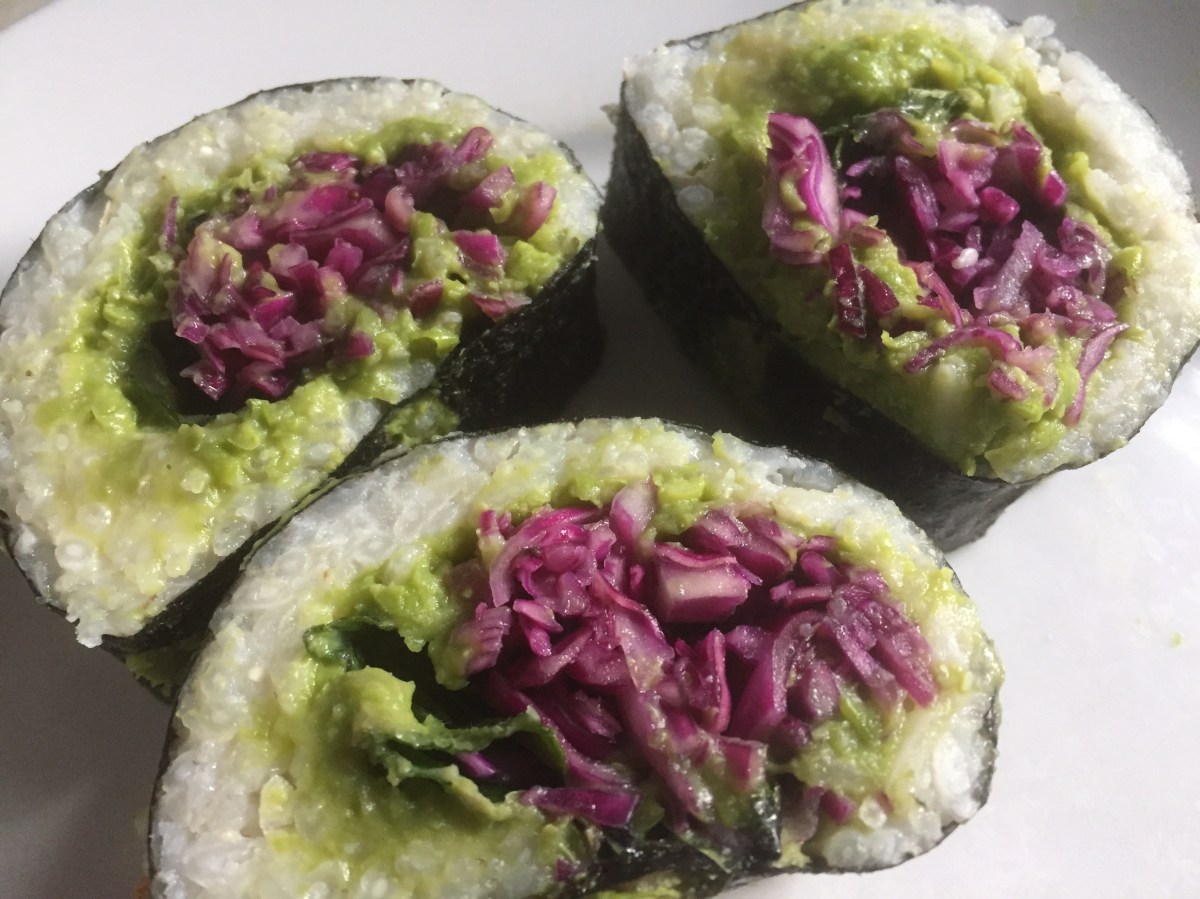
Best DIY Sushi Rolls with Minty Peas & Red Cabbage, via Eat the Vegan Rainbow
If you think that making sushi requires hours of practice, one-on-one instruction from a sushi master chef and special equipment… well, you may be right if your goal is to make sushi that contains fish or seafood, especially given health risks involved. But, if you want to explore the wonderful and delightful world of plant-based sushi, all you need is about an hour or two, and some imagination.
I made my first vegan maki sushi, the kind where filling and rice are wrapped in sea weed, few months ago, and I really enjoyed the process and the flavors. I got inspired to start thinking about what ingredients would work together well, and whether there are any dipping sauces I could use to complement the sushi.
The results of this brainstorming are before you: Green & Orange Sushi Rolls and Peas & Cabbage Sushi Rolls, with Peanut Dipping Sauce and Sour Lemongrass Dipping Sauce.
The basic requirement for a great sushi is plenty of sticky rice. You can get special sushi rice but you can also use any short and medium grain variety of rice. For sushi, I use the same rice I use for risottos. The trick is to add the rice to boiling water, reduce the heat and let the rice gently simmer with occasional mixing.
Finally, leaving the rice to cool will help you handle it as well as help the rice get nice and very sticky. I recommend dipping your hands in water before handling the rice and then keep wetting them as you spread and press the rice.
One other thing you need to pay attention to is what side of seaweed sheet you pile your rice on. It should be the one that feels slightly rough, so that your outside is nice a smooth. What I discovered is that you don’t really need the bamboo sushi rolling mat or any special equipment. The main thing to remember is to go easy on the stuffing so your rolls don’t end up to full. This will make them hard to roll and more likely to rip. I hope you go for these vegan versions of sushi, or create your own. There really is no limit and no rules!
Bring 2 cups of water to boil and add the rice. Lower the heat to gentle simmer and cook the rice, stirring occasionally, until all the water is absorbed, and the grains are soft. Set to the side and let it cool.
In another pot bring 2 cups of water to boil and add frozen peas. Cook until well done for about 15 minutes.
While rice and peas are cooking, put together the dipping sauces. In a medium size bowl, combine all the peanut sauce ingredients, except panko, and mix well to combine. Toast panko in the toaster oven, or in a pan over high heat, for 1-2 minutes. Top the peanut dipping sauce with toasted panko.
In another bowl, combine all the ingredients for the lemongrass dipping sauce and set aside.
Prepare your roll stuffers, like cucumbers, carrots, avocados or anything else you like. The trick is to make your veggie sticks long and thin.
To make the red cabbage, place finely shredded red cabbage in a bowl and add all the rest of the ingredients except mint leaves. Mix everything well using your hands. Squeezing the cabbage as you mix will help soften it and make it absorb flavors better. Let the cabbage “marinate” for 30 to 60 minute.
When peas are fully cooked drain and purée them.
Once the rice is cool it is safe to handle. Place a piece of the seaweed sheet on the flat kitchen surface rough surface up. Place 1/2 cup of sticky rice on the sheet. Spread the rice to cover most of the seaweed sheet using your wet hands. Next, place the topping on 3/4 of the way towards one end of the sheet, and start rolling from that edg, slowly and gently. The roll should come together nicely.Cut the roll into sushi piece. One note on peas and cabbage rolls: spread the pea purée across entire rice and the pickled cabbage and mint leaves in a single line, 2/3 of the way from the edge.
Serve the sushi with the two dipping sauces, some pickled ginger and wasabi paste. Enjoy!