Baked Spaghetti Marinara

Baked Spaghetti Marinara
Baked Spaghetti Marinara, via Eat the Vegan Rainbow

What can be better than spaghetti tossed with a simple tomato sauce, and sprinkled with some parmesan cheese, olive oil and fresh basil? For me, pasta, and especially spaghetti, have been a huge go to food because they are (a) easy, quick and cheap to make, and (b) absolutely delicious!

Marinara sauce for all seasons

In my view, simple marinara sauce is the best sauce for dressing the spaghetti. Yes, sure, bolognese is also pretty good, especially this amazing lentil and mushroom bolognese sauce, or this ragù made with lentils and walnuts. Marinara sauce is the type of simplicity that can only be described as pure genius. The sauce is tomato based and usually includes only a couple of additional ingredients, like olive oil, garlic, onions, and herbs, like oregano and basil.

Homemade marinara sauce to the rescue

Although I have been known to reach for a jar of store-bought marinara sauce from time to time, I do prefer to make this sauce myself. It’s actually one of the easiest things to make as all you need is some olive oil, garlic, tomato sauce, and dried oregano and/or basil. The sauce is done in less than 15 minutes, which is probably less time than it will take you to boil the spaghetti given that getting a large pot of water to boil does take forever, and your dinner will be ready and on the table in a blink of an eye.

From quick pasta to baked pasta

However, if you do have a bit more time and don’t have to rush I recommend that you give the recipe below a try. It is essentially the same recipe, just elevated to a bit more gourmet experience. The sauce is made with fresh and canned tomatoes, and includes nutritional yeast that boosts the “cheesy” flavors. The spaghetti and sauce are mixed together then baked to create a nice balance of smooth, soft, and just slightly crunchy. Given some gluten sensitivity, my recipe here was made using gluten-free pasta, but you can use any spaghetti you like. I recommend that you cook spaghetti only 80% through as they will continue to cook in the sauce as they bake. I also recommend that you use an ovenproof pot, such as a Dutch oven I used below, in order to go from the stove top directly into the oven.

Don’t forget fresh basil

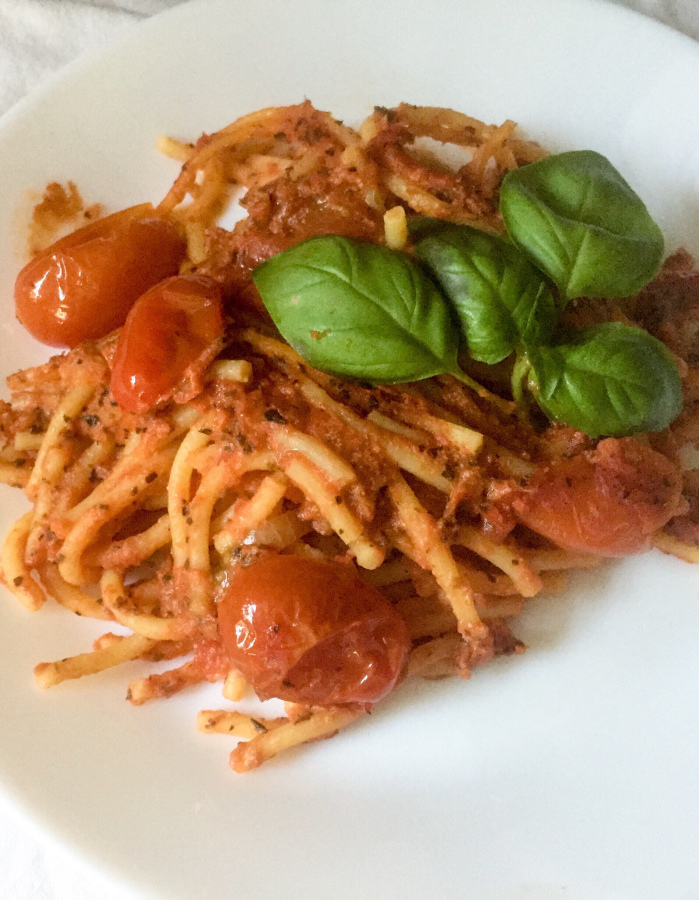
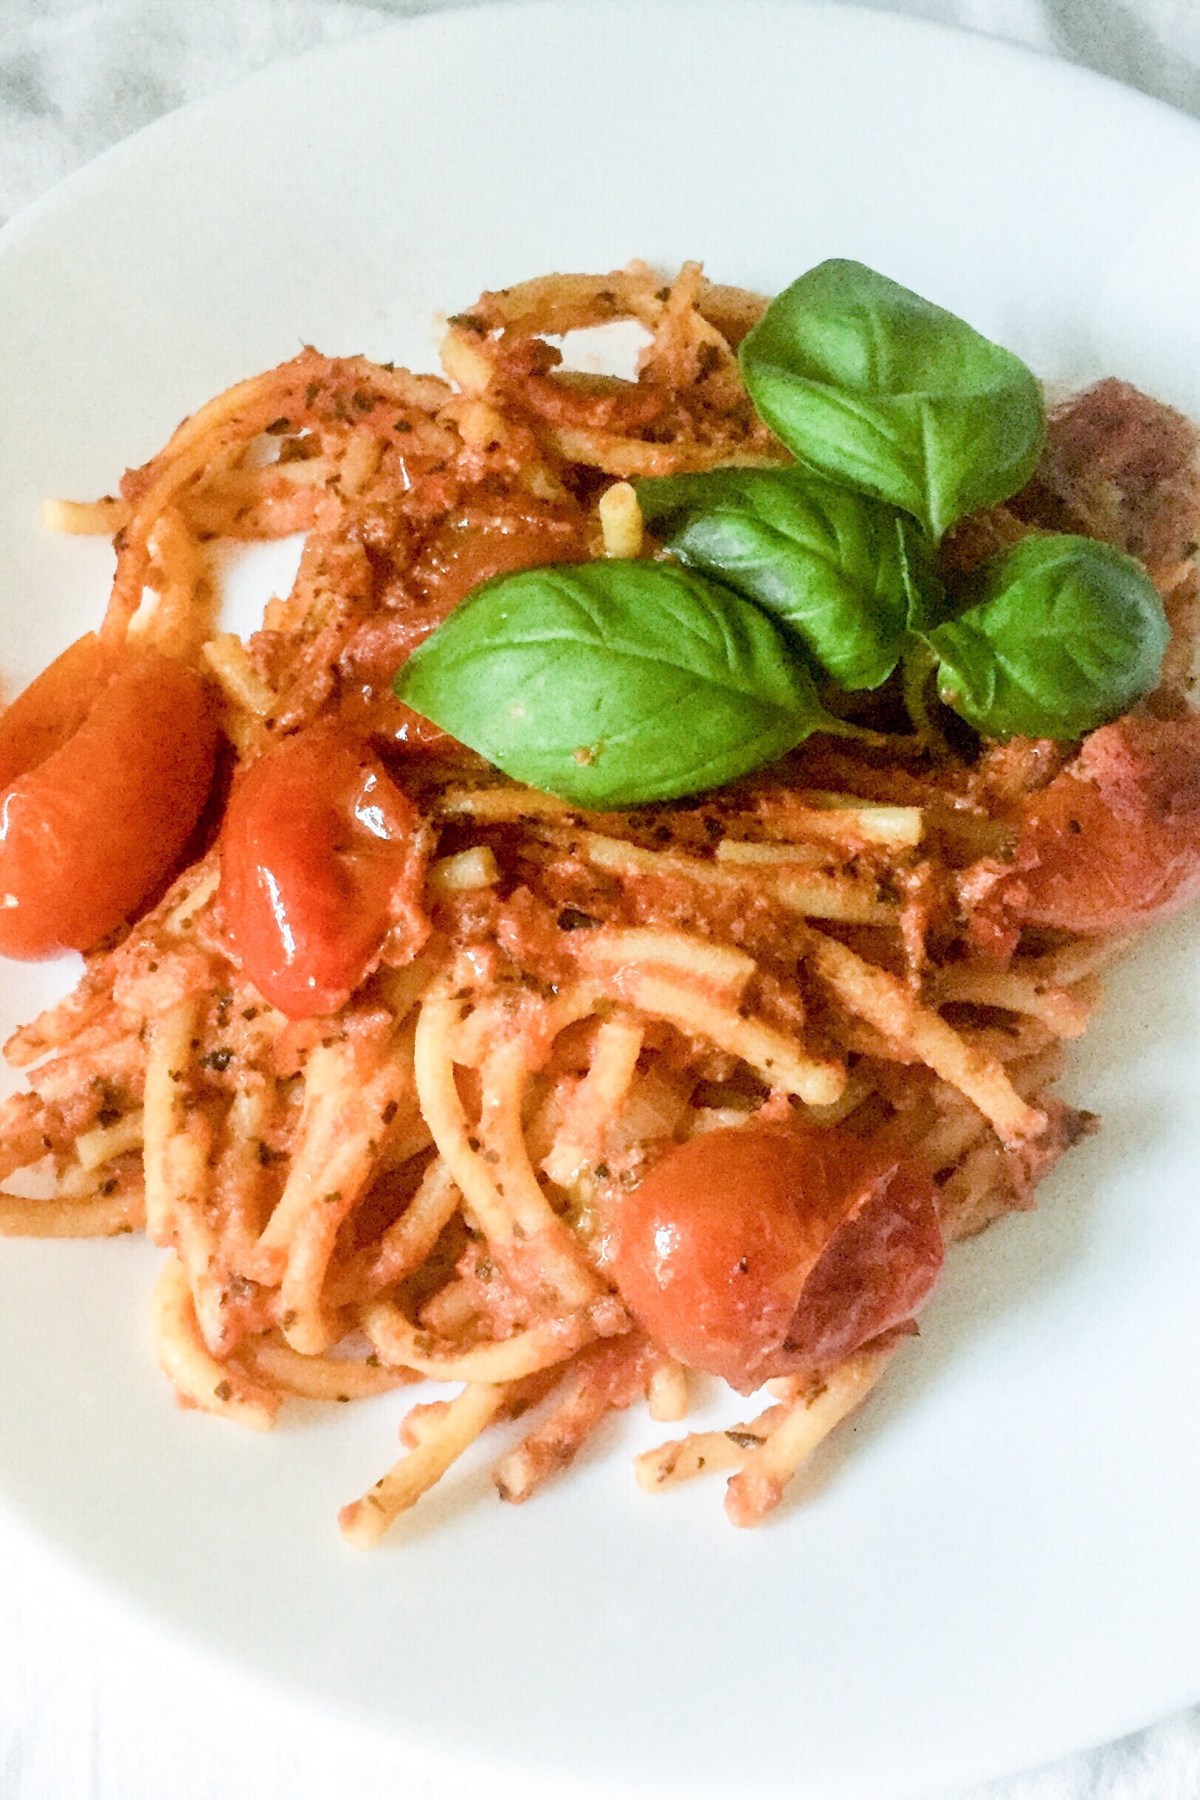
Finally, don’t forget to top your pasta with some fresh basil. We all know what that will do of you, so let’s not belabor the point. Trust me, this Baked Spaghetti Marinara will quickly become your favorite!


Baked Spaghetti Marinara

What you’ll need:

1 lbs (454 g) box spaghetti (regular or gluten free), cooked al dente

4 cloves garlic, finely sliced

1 pint (10 oz, about 300 g) cherry or grape tomatoes, halved

1 28 oz (794 g) can of chunky crushed tomatoes

1/2 cup nutritional yeast

2 teaspoons dried oregano

2 teaspoons dried basil

2 tablespoons olive oil

Fresh basil

A pinch of salt

What you’ll do:

  1. Preheat the oven to 350 F (175 C).
  2. Bring a large pot of water to boil. Add a pinch of salt, then place spaghetti gently into the boiling water until fully submerged. Cook about 1 minute less than what the instructions on the box suggest. The spaghetti should be al dente, meaning still a bit underdone.
  3. Simultaneously with making the spaghetti, start working on your sauce. Add the oil to a large, ovenproof pot. I used my Dutch oven for this one, and it worked well. Place the pot over the medium heat, and add the sliced garlic. Let the garlic brown for 1-2 minutes.
  4. Once the garlic starts to release its aroma, add the halved cherry (or grape) tomatoes, and sauté until tomatoes are softened. This will take about 5 minutes.
  5. Add the nutritional yeast and let it brown for only a minute.
  6. Next, add the crushed tomatoes and mix well. When the sauce starts to bubble, add dried herbs, cover with a lid and simmer for 5 to 10 minutes.
  7. Turn the heat off, and add the cooked spaghetti to the sauce. Mix well until spaghetti are evenly distributed and fully covered. Place the pot into the oven and bake for 20 minutes or so, until the edges and the top are nicely browned.
  8. Serve with fresh basil and enjoy!

Copyright © Eat the Vegan Rainbow, 2018

SaveSave

SaveSave

SaveSave

SaveSave

Vegan and Gluten-free Baked Eggplant Parmesan

Vegan & Gluten-free Baked Eggplant Parmesan, via Eat the Vegan Rainbow

Eggplant Parmesan – the staple of Italian restaurants in our area, and a frequent favorite of many. Unfortunately, it is so easy to overdo this dish and make it almost inedible. For example, frying the breaded eggplant very often results in a mushy piece of oily eggplant that is far from appetizing. So, to compensate for absence of flavor of a soggy eggplant people usually dump in a whole lot of cheese, usually a mix of ricotta and mozzarella. This makes for a goopy mess of a meal that can be easily avoided by following couple of simple rules. Rule 1: bake your eggplant; Rule 2: make your own tomato sauce; and Rule 3: make the dish 100% plant based.

Prepping the eggplant

Eggplant has a bad reputation for being bitter unless prepared a certain way. However, I don’t remember the last time I had one that was bitter when grilled, or made into a stew. Having said that, for the eggplant parmesan I do recommend that you use the trick that’s supposed to draw the bitterness out. You slice the eggplant, sprinkle with salt and then let drain for 15-30 minutes. The way I did it is to place the eggplant on several layers of paper towels, sprinkle salt, cover with more paper towels, put a baking sheet over the top and weigh with some cans. The amount of liquid that eggplant releases is not enormous but the paper towel should be quite damp.

Breading the eggplant, gluten-free and vegan way

The next step towards your Eggplant Parmesan is breading and baking the eggplant. I don’t recommend frying the eggplant – baking at 425 F (220 C) will give you much better results, and nice crispy eggplant.

To get to a gluten-free version of this classic all you need to do is use gluten-free bread crumbs which are now available in most grocery stores. If you don’t have access to gluten-free breadcrumbs you can use stale and/or roasted gluten-free bread to make your own bread crumbs. Or, if that is not available either, you could use corn flakes and make them into the crumbs! And don’t forget to add some dried oregano and basil to your breading – that just makes everything better!!!

For the breading, you will also need an “egg” mix, in this case some vegan mayo mixed with some plant milk. This mixture gives a nice thick consistency, but if you’d rather skip mayo, you could use just plant milk. The main point of the “egg” mix is to make the surface sticky so that the breading adhere to it well.

Eggplant parmesan breading assembly line

So, your breading assembly line will look something like this – pile of eggplant slices, deep fish (soup plate) with the “egg”, a pie dish with the bread crumbs, and the baking sheet lined with parchment paper sprayed with some cooking spray. An eggplant slice would go from the “egg” mix, to the crumbs, to the pan.

After about 15-25 minutes in the oven the eggplant should be nicely golden and crunchy.

Making the perfect marinara tomato sauce

While the eggplant is baking, you can make your very own amazing tomato (marinara) sauce. The sauce starts with some olive oil and garlic, and includes only five ingredients. You will need olive oil, garlic, crushed and whole peeled tomatoes, and dried oregano and basil.

Vegan eggplant parmesan needs some good cheese

The cheese starts with cashews soaked overnight. It includes nutritional yeast, plant milk, lemon juice and that’s it! As with the tomato (marinara) sauce, this cheese is universally applicable to a range of recipes and dishes. The final consistency is that of a ricotta not mozzarella, but in this case that works great.

Putting the eggplant parmesan together

This magnificent eggplant parmesan starts with a layer of marinara sauce on the bottom, then a layer of breaded eggplant, followed by some tomato sauce then cheese, another layer of eggplant, sauce and cheese, and so on. You can keep layering until you run out of ingredients. Once all the layers are in, put your eggplant parmesan in the oven and let the top and the edges brown. Let the baked dish cool for 15 minutes or so, sprinkle some fresh basil and some freshly ground pepper, then serve with a simple salad. Yummy!

Vegan and Gluten-free Baked Eggplant Parmesan

What you’ll need:

FOR BAKED BREADED EGGPLANT

3 large eggplants, cut across into 1/2 in (1-1.5 cm) rounds

1 teaspoon salt

1/2 cup mayo

1/4 cup milk

1 cup bread crumbs (gluten-free or regular depending on your preference)

1 teaspoon dried oregano

2 teaspoons dried basil

Cooking spray


FOR SIMPLE TOMATO (MARINARA) SAUCE

1 can crushed tomatoes

1 can whole peeled tomatoes, crushed by hand

3 cloves garlic, thinly sliced

2 tablespoon olive oil


FOR SIMPLE RICOTTA CHEESE

1 cup cashews, soaked in water for at least 3 hours (overnight in the fridge is fine)

7 oz. silken tofu

1/2 cup almond milk

1/2 lemon, juice

1 tablespoon nutritional yeast

1/4 teaspoon salt

Fresh basil, finely chopped (optional)

Freshly ground black pepper (optional)


What you’ll do:

  1. Cut the eggplant into rounds, arrange on several layers of paper towel, sprinkle with salt, overlay with several more layers of paper towel, then weight down and leave for 15 minutes. This will draw excess moisture out – your towels should be quite damp, so pat the eggplant dry and set it aside.
  2. Preheat the oven to 425 F (220 C).
  3. Line a large baking sheet with parchment paper and spray with the cooking spray.
  4. In a large soup plate combine mayo and plant milk together. Whisk well. Next, in a separate plate combine bread crumbs and dried oregano and basil. Take a piece of eggplant, dip in the mayo/milk, then move to the breadcrumbs, and lay flat on the parchment paper. Repeat until all the eggplant is used up. You may need two baking sheets for this, so have another one on stand by just in case.
  5. Spray the top with a bit more cooking spray, then bake the eggplant for 15 minutes. Flip it once and bake for 10 more minutes. Take the baked breaded eggplant out and let it cool before handling further.
  6. While the eggplant is baking, prepare the sauce and the cheese. To make the marinara sauce, place a large, heavy pot (I use a Dutch oven) over the medium high heat, add the oil and sliced garlic. After 1-2 minutes, add the can of crushed tomatoes and the can of whole peeled tomatoes that you have smushed with your hands. Let the sauce come to a simmer, lower the heat down, and leave the sauce to simmer with a lid one until needed for the next step.
  7. While the sauce is simmering, combine all the ingredients for the ricotta and blend until smooth using a blender. Set aside.
  8. For the final step you will need a deep baking dish, like the 13 x 9 in (33 x 23 cm) dish. Pour in some tomato sauce, and spread around until the bottom is fully covered. Layer in the eggplant. Top with sauce, then cheese, then add another layer of eggplant, then sauce, and finally cheese. Keep layering until you run out of ingredients. Depending on the size of your baking dish, you may have 2 or 3 layers. If you end up with leftover sauce or cheese, you can store them in the fridge and use for 5 days or so.
  9. Bake the eggplant parmesan for 20-25 minutes, until the dish is bubbling and the top is browned. Let the baked eggplant parmesan rest for 15 minutes before serving and enjoy!

Copyright © Eat the Vegan Rainbow, 2018

Oven-fried Jalapeño Tapioca Pearl Fritters with Yogurt Sauce

img_3423
Oven-fried Jalapeño Tapioca Pearls Fritters with Yogurt Sauce, via Eat the Vegan Rainbow

You are probably thinking to yourself “Baked Jalapeño Tapioca Pearl Fritters!? What on Earth is that? And why would anyone want to try it?”. Well, I can’t blame you for feeling that way. I would not have made these ever has it not been for a huge kitchen mistake. What I wanted to do was make a batch of Sabudana Khichdi, but my mind was on autopilot and instead of using cold water, I soaked the tapioca pearls in hot water. Unfortunately, this resulted in a pile of messy and sticky tapioca pearls, definitely not fit for Sabudana Khichdi.

It seemed such a waste to just dump everything out, so I threw in some roasted jalapeño peppers, roasted green chilis, coarse corn meal and some nutritional yeast, with a dash of oregano and garlic, and created little fritters. These went into the oven – no deep frying in my house – and came out fragrant, crunchy and delicious.

They had quite a bit of heat and punch, so I paired them with a yogurt sauce to take the edge off. If you prefer less heat in your food, dial back on the amount of jalapeños you use, or just use more yogurt sauce which has a gentle, soothing effect on the overheated taste buds. Enjoy with the side of a salad for a light meal, or serve as an appetizer with a punch.

66DBC493-49E1-4E11-A444-8BA5EB327C2E

Oven-fried Jalapeño Tapioca Pearl Fritters with Yogurt Sauce

What you’ll need:

2 cups tapioca pearls

4 cups hot water

3 tablespoon nutritional yeast

1 can chilies

1 can jalapeño

1 tablespoon oregano

2 teaspoon garlic

1 cup coarse corn meal

1 cup almond or cashew yogurt

1 tablespoon chopped cilantro

1 tablespoon lime juice

Cooking spray

What you’ll do:

  1. Start by soaking tapioca pearls in hot water for 2-3 hours. The pearls should absorb all the water and be very sticky.
  2. Add all the rest of the ingredients except yogurt, cilantro and lime juice and mix everything well together.
  3. Using your hands, form tapioca pearl balls that are about 2 in (4-5 cm) in diameter and arrange them on a baking sheet lined up with parchment paper. Spray the fritters with some cooking spray and place in the oven that has been preheated to 350 F (175 F). Bake for 20 minutes or so, until the fritters get that nice golden-brown look.
  4. Let the fritters cool before serving, and while they are cooling whisk together the yogurt sauce by mixing yogurt, cilantro and lime juice together. Serve drizzelded over the fritters or as a dipping sauce.

Copyright ©Eat the Vegan Rainbow, 2018

Gluten-free and Vegan Scones with Chia and Coconut

IMG_5069
Gluten-free and Vegan Scone with Chia and Coconut, via Eat the Vegan Rainbow

I recently had a pleasure of teaching an evening plant-based cooking class at our local technical and vocational school. I enjoyed the experience immensely and in addition to having a really very pleasant evening  I have also learned about some of the things that people who are relatively new to plant-based cooking wonder and care about.

For example, I had several conversations about vegan breakfast items and whether it is possible to make vegan pancakes (yes!) and vegan crêpes (also yes!). And based on many conversations online, people are just having hard time figuring out what their plant-based breakfast options are.

What’s for vegan breakfast?

Breakfast is not as limited as people usually think. After all oatmeal, cereal with nut milk, fruits, vegetables, toast (including with avocado), smoothies, muffins, cauliflower tofu burritos, vegan “scrambled eggs”, and many, many more options are currently available. Some require a bit more hands on preparation but the offerings are as diverse as for people that eat meat, eggs and cheese. For me, a roasted sweet potato is a great breakfast that keeps me going well into the afternoon!

How about vegan baked breakfast treats?

Of course the number of options increases vastly on those days when you find yourself with extra time to do some baking. Vegan baking is actually not all that difficult. There are quite a few vegan options when it comes to replacing eggs, and nut milks usually work just as well as dairy. Plus: there are now a couple of vegan butters on the market so if the recipe asks for butter there are now alternatives to be used (including the dreaded margarine, but I don’t recommend you go there!)

Are gluten-free vegan treats possible?

Having said all that, if you are trying to be vegan and gluten-free you may be out of luck. In gluten-free baking, gluten, a protein that makes some people unhappy yet provides baked goods with their lovely structure, is usually replaced by extra eggs to keep the levels of protein high. Unfortunately, finding a plant-based replacement for eggs in this context is not easy because most options, like flax meal, bananas, apple sauce, and various starches are not protein rich; they are mostly carb heavy.

Chia seeds as an egg replacer for gluten-free vegan baking

Enter chia seeds! These little seeds are one of my current favorites. Chia seeds can be made into a pudding and they are an excellent binding agent for making seed crackers – and in this category nothing compares to Oh She Glows Endurance Crackers, so give them a try! Amazingly, they also work in these super easy and quick scones. A critical step in this recipe is soaking chia seeds for 15-30 minutes in some warm water. This will transform them into a gel like substance that will keep your scone batter together. And that’s more than half a battle won! The rest is all about mixing things together, adding the right leavening agents to helps things rise high, and some flavors in.

Vegan buttermilk trick

A common way to help a leavening agent like baking powder and baking soda is to add some buttermilk. Acidity is what makes buttermilk so special, and what provides an extra push for the baking powder and baking soda. The easiest way to make a vegan buttermilk is to add some lemon juice or lime juice to your plant-based milk, mix it together and let it stand for 5 minutes or so. And, if you don’t have any sour citrus on hand, you can also use some apple cider vinegar as well. If you are using milk with lots of protein, like soy or pea protein milk, you may see quite a bit of curdling – that’s normal.

These delicious scone will please your entire household – so you may want to make a double batch. So, next time when someone asks you what’s for breakfast you can tell them: freshly baked scones. Enjoy!


Gluten-free and Vegan Scones with Chia and Coconut

What you’ll need:

3 tablespoon chia seeds
6 tablespoon warm water

1/3 cup almond milk, unsweetened (vanilla flavor or plain)
1 teaspoon lime juice

1 cup brown rice flour
1/3 cup corn starch
1/3 cup almond flour
1/3 cup shredded coconut unsweetened
1/6 cup tapioca starch
1 teaspoon psyllium powder
1 teaspoon baking soda
1 teaspoon baking powder
1/4 teaspoon salt
1/3 cup agave syrup
1/3 cup coconut oil, melted
Unsweetened coconut flakes and raw sugar, for sprinkling on top

ChiaSeedsCoconutScones_2018


What you’ll do:

  1. Preheat the oven to 375 F (190 C).
  2. Mix chia seeds and warm water together and set it aside for 15-30 minutes until a sticky gel-like substance forms.
  3. Measure out the almond milk and add the lime juice to it. Let that stand for 5 minutes before using.
  4. In a large mixing bowl measure out and mix all your dry ingredients.
  5. Mix your wet ingredients (almond buttermilk, agave syrup, soaked chia seeds, and melted coconut oil), then add to your dry ingredients. Combine everything together. The batter will be sticky but not falling apart.
  6. Line a large baking sheet with some parchment paper. Place your batter in the middle of the sheet, and form a round, domed structure. Using a thin and sharp knife, cut your dough into six even pieces. Use your knife to separate the cur pieces out just a bit, but you don’t need to pull them apart. The scones will bake well and break of easily when they are done.
  7. Top the scones with some extra coconut flakes and sugar, then place in the oven for 20-25 minutes. Let the scones cool for 15 minutes or so before serving, then enjoy with some butter and/or jam, like his 10 minute, no sugar added blueberry jam I shared some time ago.

Copyright © Eat the Vegan Rainbow, 2018

Free and Beautiful – Flourless Double Chocolate Brownies with Chickpeas and Oats

Just how free and beautiful are these brownies? On the “free” side they are vegan, so dairy-free and egg-free, they are also gluten-free and nut-free, plus they are no-added sugar! So, what on Earth do they have? They have plenty of chocolate, cocoa powder, and cocoa nibs, which gives them their chocolate richness.

They are also full of ingredients that you will not find in your regular brownies, like a banana I use here for sweetness and a egg replacement, and oats and chickpeas, which I use as the key flour-like components. Chickpeas and the chickpea water – the miraculous aquafaba – are essential here. They add the protein needed to help give the brownies a bit of structure and texture. They combine well with oats so that the result is not chocolate oatmeal but a real double chocolate brownie with a bite and a chew.

For this and other baking projects, like my meatloaf and my marshmallow topping, I suggest you try making your own chickpeas. They do need some work – you soak them overnight in lots of water, then you rinse them and boil them in double the amount of water to get soft chickpeas and very useful aquafaba. I cook them in an electric pressure cooker on the “beans” setting. To help aquafaba along, I recommend letting the liquid that chickpeas were cooked in sit in the refrigerator for a day or so before using.

Other than cooking the chickpeas that’s a bit elaborate, everything else is smooth sailing. You will need a large food processor, pile everything in, and pulse to mix and combine. The baking is a standard deal, using a 350 F (175 C) oven and taking somewhere between 20 and 25 minutes. Let your brownies rest for at least 15 minutes before serving, then cut and plate. They’d be great with some vanilla nicecream, if you’d like to make them fancy. They are also great as is or with some orange zest on top.

Flourless Double Chocolate Brownies with Chickpeas and Oats

What you’ll need:

2 cups oats, gluten-free

2 cups chickpeas, cooked

1 banana

3/4 cup aquafaba

1/2 cup cocoa powder

1/3 cup chocolate chips or chunks, vegan

2 tablespoons cocoa nibs

2 teaspoons vanilla

1 teaspoon baking powder

What you’ll do:

  1. Preheat the oven to 350 F (175 C).
  2. Place cooked chickpeas, oats, roughly chopped banana, and all the rest of the ingredients except chocolate chips and cocoa nibs into a food processor, and process until you form a dough.
  3. Add the cocoa nibs and chocolate chips and mix everything together.
  4. Pour the mix into a square, 8 x 8 in (20 x 20 cm) baking dish and put your brownies to bake for 20 minutes.
  5. Take the brownies out and let them rest for at least 15 minutes before cutting and serving. Enjoy with some vegan ice cream or as is!

Copyright © Eat the Vegan Rainbow, 2018

Towards a Gluten-free Vegan Bread Loaf

img_4482
Kamut and Chickpea Fluor Vegan Loaf, via Eat the Vegan Rainbow

Imagine the smell of freshly baked bread spreading throughout your kitchen, and beyond… Cozy, sweet, homey, friendly and welcoming – the smell of freshly baked bread sends all those signals to our senses and more.

But, bread making and baking has always seemed too complicated and too impractical to me, especially since you can get an almost-freshly-baked loaf at any large supermarket these days. And if you live in Europe, small, local bakeries are likely on every street corner, offering really delightful breads made in small batches and very often available right out the oven.

Now, freshly baked gluten-free breads are far less widely available. And if you are looking for gluten-free and vegan breads, freshly baked or otherwise, you may be completely out of store-bought options because almost all gluten-free breads use either eggs or egg whites to give the bread structure in absence of gluten.

I’ve been tinkering with gluten-free baking a bit, and it’s generally forgiving if you are going for cookies, muffins, brownies, or pizza. But, making anything that needs to rise, and stay up, has been a challenge.

Enter bread machine! I recently purchased a basic bread machine model that offers couple of bread settings and loaf size and crust options, and have now used it to get very close to achieving the impossible, a loaf of 100% gluten-free vegan bread.

I’m not there yet but I think I’m getting closer. My most recent experiment used sprouted kamut (khorasan) flour, which is a wheat variety and therefore not gluten-free. But, khorasan flour seems to be easier to digest, especially when sprouted, and therefore better for people who are trying to avoid and/or minimize gluten for reasons other than allergy, celiac or intolerance. I’ve combined khorasan flour with chickpea flour, which is a gluten-free option, a mix of starches (corn and tapioca), and some flax meal. I also added some xantham gum into my dry ingredients as well as some baking powder. This baking powder is in addition to yeast and it helps the bread rise – gluten-free and low-gluten breads need all the help they can get! I meant mixed all the dry ingredients together before adding them to the bread machine.

Regarding the order of the ingredients, you must follow your bread machine instructions. Mine start with the liquids and end with instant rise yeast that is not supposed to touch the liquids directly, so it always added last into the dry ingredients.

If you have an option to select gluten-free setting, I recommend you use it. If not, you may want to play around with the timing a bit. Gluten-free breads tend to work best when they are allowed to rise only once, so you may want pick an express cycle or do a more manual prep if your machine does not have a gluten-free program. Here, I used French bread setting, 2 lbs (1 kg) loaf size, and medium crust on the basic Oster model.

The result is a very hearty loaf, with a good amount of chew, and a very nice nutty earthiness to it. You can enjoy it as is, with a salad, or with a quick jam, or homemade Nutella. The crunch and the aroma of freshly baked bread can’t be beat!!!

Vegan Kamut and Chickpea Flour Bread Loaf

What you’ll need:

1/4 cup oil, canola

1 3/8 cup (300 ml) water

2 cups khorasan flour, sprouted

3/4 cup chickpea flour

1/2 cup corn starch

1/2 cup tapioca starch

1 tablespoon sugar

1 1/2 teaspoon salt

2 tablespoons flax meal

1 1/2 teaspoon xantham gum

1 teaspoon baking powder

2 teaspoons quick-rise active yeast

What you’ll do:

loaf

  1. Add water and oil into your bread machine pan.
  2. In a separate mixing bowl mix all dry ingredients except the yeast. Add the dry ingredients to the wet.
  3. Using your finger make a small hole in your dry ingredients and add yeast to it.
  4. Close your bread machine, pick the appropriate cycle keeping in mind that this amount of ingredients is supposed to yield a 2 lbs (1 kg) loaf, and that you should preferably go with a gluten-free bread setting. If unavailable, you can use Express setting if the baking step is at least 40-50 minutes long. If none of this is what your bread machine offers in terms of options, go with the most basic program. You may need to re-adjust so approach this with an open and experimental mind. Remember: your perfect loaf is within your reach!

Copyright © Eat the Vegan Rainbow, 2018

Unbelievably Easy Baked Polenta Sticks

img_3352
Baked Polenta Sticks, via Eat the Vegan Rainbow

I was raised eating polenta with milk and sugar for breakfast. As I grew up and started experimenting with my food, I would add sour cream and even ajvar, the roasted red pepper and eggplant spread many associated with Bulgaria and the South East Balkans. But even with these add-ons, polenta remained a breakfast food.

So, I was quite surprised to discover that fancy Italian restaurants include polenta on their dinner menus. Of course I had to try it, and I liked it! I actually never met a polenta I did not like. And as a cook it’s something that you can whip together in minutes!

Polenta is basically boiled coarse corn meal, so it is in the same food family as grits. And, practically speaking it is as easy as it sounds – you bring a pot of water to boil and you add some corn meal to it while stirring constantly and furiously to prevent clumping. You let the pot boil for five minutes with constant stirring and the polenta is done.

The recipe here is two steps removed from the basic polenta. First, after you make the polenta according to the instructions on the box, you will need to pour it into a deep baking dish which is either lined with some parchment paper or well sprayed with the cooking spray. Spread the polenta into one even and smooth layer and let it set for at least an hour.

Once the polenta has set and hardened you will be able to slide it out of the dish and onto the cutting board. Slice polenta into 1 x 2 in (2.5 x 5 cm) sticks and arrange them on a baking sheet. Spray the tops with a cooking spray.

From here you can take your polenta in any direction you like. You can add fresh or dry spices, nutritional yeast, small bits of cheese or vegan butter that melt well, or sprinkle sugar and cinnamon if you want to make the baked polenta sticks into a dessert. Here, I decided to go two ways and top one set of polenta sticks with some cumin powder, dry basil and oregano. The second batch I spiced up a bit with freshly ground black pepper as well as smokey red pepper flakes. The topped polenta stick are then baked until their surface is nicely browned.

I served the Baked Polenta Sticks with vegan bolognese sauce but you can eat them as is, or serve them with a wide range of dishes. The flavor of polenta sticks is mild, slightly nutty, and depends on the spice combination you used. In general, Baked Polenta Sticks are great with any dish you would serve with corn bread, like chili, Jackfruit Barbacoa, or Bean and Leek Soup. They can also be used as an appetizer, served along side simple marinara dipping sauce and some olives.


Baked Polenta Sticks

What you’ll need:

2 cups polenta (or corn meal)

4 cups water

1/4 teaspoon salt (adjust salt to taste)

Cooking spray

Dried basil

Dried oregano

Cumin powder

Crushed red pepper flakes

(Onion powder, garlic powder, nutritional yeast, freshly ground black pepper, lemon zest,… quite a few toppings will work so feel free to experiment)


What you’ll do:

  1. In a large pot, bring water to boil.
  2. Add the salt and polenta to the boiling water while stirring rapidly to prevent clumps from forming. Decrease the heat to medium/medium low, and keep stirring the polenta for about 5 minutes.
  3. Pour the polenta out into a baking dish that you previously sprayed with cooking spray. I recommend using 9 x 13 in (22 x 33 cm) dish for this amount of polenta – this will give you 1/2 in (1 cm or so) thick sticks – but you can use any other flat bottom container you have on hand. Just note that the thickness of the sticks will vary depending on what you use.
  4. Let the polenta cool and set for at least an hour. The thicker your polenta layer, the longer it will take.
  5. Slide the polenta slab out onto a cutting board. Cut into sticks of regular size.
  6. Arrange your polenta sticks on a parchment paper lined baking sheet. Do leave some space between the stick so they can bake evenly, which means you may need to use two baking sheets or bake in two batches.
  7. Spray the top with some cooking spray and sprinkle the toppings/spices of your choice liberally.
  8. Place into the oven that was preheated to 400 F (205 C). Bake for 15 minutes or until the sticks are golden brown.
  9. Serve as a side dish with a soup, or as an appetizer with marinara sauce, or simply munch on these any time. They are best served fresh from the proven, but couple of minutes in a toaster oven will help the next day!

Copyright © Eat the Vegan Rainbow, 2018

Vegan Onion and “Bacon” Tart

img_2394
Vegan Onion and “Bacon” Tart, via Eat the Vegan Rainbow

Savory tarts are a great source of comfort during long, and cold, winter months, so fall seems like a perfect time to stock pile great savory tart recipes. One of the favorite topping combinations for this type of tart is onions and bacon. There can be little mystery about why this is so. Caramelized onions are sweet and juicy, and browned bacon is crispy and salty. Putting those two together makes for a sweet, salty, juicy yet crispy topping. Add to that a thin tart crust – and you get the picture!

In this recipe I wanted to recreate a bit of that onion-bacon dichotomy, by combining thinly sliced onions caramelized to perfection with marinated, thinly sliced, tempeh that has been browned until crispy on the outside. The trick with onions is to slice them into thin strips and then let them caramelize for a long time over medium heat. If you are counting calories and trying to stay as oil-free as possible, you can use just a bit of cooking spray to get your onions going – I did it, and it works just fine! But if you regularly use oil, starting with a tablespoon of olive oil will work well here. I recommend using a well-seasoned cast iron skillet here – not only will it help caramelize the onions and brown the tempeh bacon, it will also go straight from the cooktop to the oven, making this a one pot dish.

To prep the tempeh, first boil it for couple of minutes, pat dry it, cut into thin strips, and let it marinate for couple of hours. I used the same basic marinade that The Buddhist Chef used for his Tofu Bacon. It’s made of oil, maple syrup (I did skip maple syrup in this case since caramelized onions are plenty sweet), soy sauce,  liquid smoke, and nutritional yeast. I prepped the tempeh ahead of the onions, so when the onions were done I could remove them from the skillet and cook the “bacon” immediately afterwards.

My version of the tart is crustless, so there is no fancy pastry making required. What holds the tart together is the mix of almond milk and corn starch that comes in last, as the veggies are finishing cooking. And speaking of veggies, one other ingredient here is jackfruit. I use canned jackfruit and for this tart you will want to rinse it out well, drain it, then shred with your fingers, and remove any tough core bits. I can’t comment on using raw jackfruit since I’ve never done it, but I am guessing that it would be better since canned food does come with a bit of that canned taste/flavor.

The tart will spend some time in the oven, and to finish it off I recommend turning on the broiler at the end for five minutes or so to crisp up and brown the top. Let the tart cool for about ten to fifteen minutes before serving, and enjoy as is, or with some yogurt – I used a drizzle of cashew yogurt and a sprinkle of thyme. The tart is rich, fragrant and fantastic!

Vegan Onion and “Bacon” Tart

What you’ll need:

2 large onions

8 oz (225 g) tempeh

2 tablespoons soy sauce

2 tablespoons oil

1 tablespoon nutritional yeast

1 teaspoon liquid smoke (or more, depending on your taste)

2 20 oz (570 g) can young green jackfruit in brine

3/4 cup almond milk (plain, unsweetened)

2 tablespoons corn starch

1 teaspoon dry thyme

Cooking spray


What you’ll do:

  1. Bring 2 cups of water to gentle boil in a pan that’s large enough to hold the entire piece of tempeh flat without cutting. Lower the tempeh into the boiling water and let it boil for couple of minutes.
  2. While the tempeh is boiling mix together the marinade by combining oil, soy sauce, liquid smoke, and nutritional yeast.
  3. Take the tempeh out and pat dry. Let it cool for a moment, until it feels ok to handle. My heat tolerance is pretty high so I usually wait only a few minutes, but depending on your comfort zone when it comes to handling hot things you may want to wait longer before slicing the tempeh into relatively thin slices. Lower the slices down into the marinade and let it stand for an hour or two.
  4. While tempeh is marinating, prepare the jackfruit. Rinse the canned jackfruit well and let the excess water drain. Using a fork or fingers, pull the jackfruit into shreds. Discard the hard core, if present. Set aside.
  5. Slice the onions thinly into fine strips.
  6. Turn the oven to 400 F (200 C).
  7. Heat a heavy skillet, like a cast iron skillet, over medium high heat. Spray with cooking spray (or add a tablespoon of olive oil if using), and add the onions. After about 5 minutes at medium high heat, reduce the heat to medium to medium low and cook for another 10 minutes, until onions are soft and golden brown. Transfer the onions into a separate dish.
  8. Increase the heat to high and add tempeh “bacon” strips. Let the side brown then turn over and brown on the other side.
  9. Add back the onions, and jackfruit, mix the “bacon”, onions and jackfruit well, and continue to brown.
  10. In a small mixing bowl combine almond milk and corn starch. Whisk them together so that there are no clumps. Pour over the rest of the ingredients and let it start to bubble.
  11. Sprinkle the thyme and nutmeg, mix again and place the skillet into the oven for 20 minutes.
  12. To brown the top, turn the broiler on and broil for 5 minutes, until the top is browned and crispy.
  13. Take the tart out of the oven and let it rest for 10 to 15 minutes. Serve with a side of salad, or drizzle some yogurt over the top for a delicious meal.

Copyright © Eat the Vegan Rainbow, 2018

Vegan Zucchini Fruitcake

img_4057
Vegan Fruitcake with Zucchini, via Eat the Vegan Rainbow

Fruitcake has a bad reputation. Nobody loves it, yet puts up with it because of the tradition and whatnot. And although some of you may find it hard to believe, fruitcake can be really delicious!

In this veganized version of the milenia-old (oh, yes – fruitcake dates back to Ancient Rome) tradition, I skip the butter, extra sugar, and eggs and go really wild with dried fruits. I combined everything I could get my hands on – figs, dates, cranberries, apricots, prunes, and pineapple – with a nice selection of spices featuring orange and lime zest, as well as almond extract, cinnamon, cloves, and nutmeg. I also used some finely grated, almost sauced, zucchini as a binder, and roughly chopped walnuts and red maraschino cherries for some added texture.

The key to this cake is soaking the fruit and although you could soak the fruit in rum, as is the custom, I soaked mine in water to avoid being too over the top with the flavors and the kick to the system this cake delivers. Although most of the alcohol would evaporate as the cake bakes, I wanted to keep this one rated G so that both kids and adults can enjoy as much of it as they like and decided to skip the rum altogether. At the end, the most important thing is to let the fruit soak in liquid (alcoholic or non-alcoholic) because that will help keep the cake moist and soft.

This fruitcake is pretty rich and filling. It makes for a lovely treat, as well as an excellent breakfast choice. It is definitely one more thing to add to your list of vegan Holiday treats and traditions, like the Peppermint Bark and the Gluten-free Sweet Potato Pancakes. If you are wondering whether this cake can be made gluten-free, the answer is yes, absolutely! Just use your favorite all-purpose gluten-free flour and go for it.


Vegan Fruitcake with Zucchini

What you’ll need:

1 zucchini, small (1 1/2 cup grated)

5 medjool dates

15 dried apricots

1/2 cup dried cranberries

2/3 cup dried pineapple

5 dried figs

1/3 cup prunes

1 cup maraschino cherries, drained and roughly chopped

1 cup flour

1 cup walnuts, chopped

1 tablespoon almond extract

2 teaspoon baking powder

1 teaspoon baking soda

1 teaspoon cinnamon

1/2 teaspoon nutmeg

1/4 teaspoon cloves

Zest of 1 orange

Zest of 1 lime


What you’ll do:

  1. Combine all the dried fruits in a large bowl, cover with warm to hot water, and let soak for 30-60 minutes. Drain the fruit, pat dry to remove excess water, and chop to bits and pieces of different size. Place into a large mixing bowl.
  2. Preheat the oven to 350 F (175 C).
  3. Grate the zucchini using a fine grater or a food processor. The finer the grating the better!
  4. Add the zucchini and the rest of the ingredients to the chopped fruit and mix well until everything is combined.
  5. Line the bread pan, or any other baking pan (I used a spring form pan because it makes getting the cake out a breeze), with some parchment paper. Pour in the fruitcake batter and spread around to form a 1.5 in (3-4 cm) thick layer. The cake will not rise much, and it will be quite moist, so don’t make it too thick as your surface will burn while you wait for your center to bake.
  6. Bake for 35 min or until a toothpick comes out clean. Let the cake stand for at least 15 minutes, ideally an hour, before cutting and serving. Serve with some vegan whip cream, ice cream, or with a glass of eggnog, and enjoy the season!

Copyright © Eat the Vegan Rainbow, 2017

Baked Sunflower Seed Cheese – Deluxe Edition

img_3742-1
Baked Sunflower Seed Cheese – Deluxe Edition, via Eat the Vegan Rainbow

Hooray – a plant-based cheese success story!!! Believe me, the three exclamation points are not for nothing as I’ve had my fair share of plant-based cheese disasters. But, let us not dwell on failure and talk about this latest, greatest treasure I discovered. Like my vegan fresh mozzarella experiment that was out of this world delicious, this Baked Sunflower Cheese is fully based on a lovely recipe created by another person. Credit for today’s recipe goes to Sweet Potato Soul, a lovely and so bright and cheerful vegan food blog by Jenné (you can also follow her on Twitter @SweetPotatoSoul).

img_3745
Baked Sunflower Seed Cheese topped with slivered almond, via Eat the Vegan Rainbow

I was looking for something to do with sunflower seeds and this recipe popped up. The recipe is simple and follows the same logic of plant-based cheese making – you soak in this case the seeds but more often the nuts overnight, and then you process them with flavor and umami agents of your choice. Jenné’s recipe uses a nice combination of ingredients that all play well together with the raw sunflower seeds, so other than adjusting the amount of lemon juice and miso paste, I increased both, and dialing down the nutritional yeast, I followed all the rest.

img_3736
Baked Sunflower Seed Cheese on a cutting board, via Eat the Vegan Rainbow

My main point of departure was at the end. Once I’ve chopped and blended everything in the food processor I used my muffin tin to form small individual cheeses. I sprayed the muffin tins with some olive oil cooking spray, and packed the cheese mix into the molds tightly. I let it firm up in the fridge overnight and the next day I inverted the individual cheeses out, topped them with couple of different toppings (capers, slivered almonds, sun dried tomatoes, and hot sauce), placed them on a parchment paper lined baking sheet, and baked them at 350 F (175 C) for 10-15 minutes, just enough for the individual cheeses to warm up and the topping to caramelize.

img_3741
Slivered Almonds topped Baked Sunflower Seed Cheese, via Eat the Vegan Rainbow

I served the cheeses at a party, with some crackers (and couple of other goodies), and it was amazing!!! Pictures here tell only half a story, so make thus cheese and see for yourself how the story ends.

img_3738
Baked Sunflower Seed Cheese topped with capers, via Eat the Vegan Rainbow

Note: I stored the leftover cheese in the fridge and used it the next day to make wonderful sandwiches with roasted red pepper hummus and the cold Baked Sunflower Seed Cheese. Yummy!


Copyright © Eat the Vegan Rainbow, 2017

Simple Harvest Roast

img_3630
Harvest Roast, via Eat the Vegan Rainbow

Roasting is one of my favorite ways of making food. Preparing vegetables and fruits at high temperature brings out the natural sugars and flavors they have and releases all sorts of aromas that make your entire home feel more inviting and cozy.

This Harvest Roast was my centerpiece for the Thanksgiving feast and it could not be simpler to make! Basically all you need to do is get the oven nice and hot, cut up some yummy vegetables, toss everything with a bit of salt, freshly ground black pepper, and olive oil, and roast it away. Actually, I recommend adding a cup of water to the bottom of your roasting pan and keeping the veggies covered with foil for the first twenty minutes, then removing the cover for the last fifteen minutes.

The vegetable selection is entirely up to you. Because this is my Thanksgiving roast, the vegetables I used are earthy and hearty, mostly root vegetables that in many ways symbolize the season. I combined sweet potatoes, carrots, turnips, parsnips, butternut squash, corn on the cob, and some apples to create a real comfort food medley.

Simple Harvest Roast

What you’ll need:

1/2 butternut squash, peeled and cubed

3 purple head turnips, peeled and cubed

3 parsnips, peeled and roughly chopped

10-15 baby carrots (or 3 large carrots, peeled and roughly sliced)

3 sweet potatoes, peeled and cubed

3 tart apples, roughly chopped

3 ears of corn, cut into 4-5 pieces each

3 tablespoons olive oil

1 cup water

Salt and pepper to taste

Sage leaves

Thyme sprigs


What you’ll do:

  1. Pre-heat the oven to 450 F (230 C).
  2. Add all the vegetables and fruit to a large roasting pan and mix with oil, salt and pepper if using. You can roast without oil, salt and pepper as well.
  3. Add water to the very bottom of the pan. Best is to pour in the four corners and then move the pan around to spread.
  4. Arrange sage leaves and thyme sprigs on top.
  5. Cover the pan with foil and roast covered for 20-25 minutes.
  6. Remove the foil and roast for another 20-25 minutes.
  7. Take the roast out, let it rest for 10 minutes and serve!

Copyright © Eat the Vegan Rainbow, 2017

Pecan Apple Baklava with Orange Maple Syrup

D8D949D5-2F6E-4012-93D8-2A17FF20B807
Pecan Apple Baklava with Orange Maple Syrup, via Eat the Vegan Rainbow

A bite of baklava is a shock to the system, but once you have recovered from that first bite you won’t be able to stop eating, usually until your teeth start feeling like they may just fall out from all the sugar. Baklava is a dessert from Middle East that has made its way to Greece and beyond. It is made with thin sheets of dough, the phyllo dough, and it is usually layered, although some recipes do ask that you roll up the sheets into a strudel.

The most commonly used filling for baklava are ground walnuts. And the signature feature of baklava is the super sweet syrup that is poured over the hot baklava immediately after it comes out the oven. The baklava is then allowed to soak up all the syrup, which usually takes a day or so. At the end of that process you end up with a super sweet and very rich piece of dessert on your plate that is very often an acquired taste.

I personally have a bit of love/hate relationship with baklava. It’s been on my mother’s holiday dessert list for as long as I can remember, and I was not a huge fan until she started using apples to break up the heaviness of walnuts and the syrup, and lighten things up.

In this recipe I wanted to combine that insight into what makes a perfect baklava with what makes a great pecan pie, the apple in the eye of every Southern cook, the amazing creaminess combined with the crunch of pecans.

Neither baklava nor pecan pie is actually good for you. They are both full of high amounts of sugar and fat, so my challenge for this Pecan Apple Baklava was to flip the dessert into something much healthier without sacrificing any flavor. I used lots of apples, some pecans, and to sweeten things up a good amount of maple syrup. But, instead of drowning your baklava in pure maple syrup I recommend combining maple syrup with some orange juice, cooking it down a bit, and pouring it over your baked baklava while both the syrup and the baklava are still hot.

There’s not much in putting baklava together. Traditionally, you would use melted butter on each sheet of phyllo dough but you can achieve the same thing with spreading just a bit of water or water mixed with a drop of lemon juice, or a a bit of oil. It’s up to you to decide how much oil you want to use. Here, I use only some cooking spray on my dish, to make sure the baklava slices come out smoothly at the end. For the rest I use plain water. So you will layer a sheet of phyllo dough, brush very lightly with water, layer another one, put your ground pecans on, layer a sheet of phyllo dough, brush lightly with water, lay another sheet, pour pecans, another layer of phyllo dough, then apples, and so on and so forth until you run out of things to layer. One trick for getting the perfect baklava is to slice before you bake. And don’t forget that a bit of oil mist will help brown the top!

Final touch? Make baklava one day ahead. It will be rich, delicious and ready to serve, and you can feel good about serving your friends and family a dessert that is actually full of good for them stuff!!!

Pecan Apple Baklava with Orange Maple Syrup

What you’ll need:

8 oz (225 g) pecans, ground into a rough meal

4 apples, grated and drained of excess liquid

1 lbs (450 g) phyllo dough

1 teaspoon cinnamon

1/2 teaspoon allspice

1/4 teaspoon ground nutmeg

2/3 cup maple syrup

1 1/2 cup orange juice

Cooking spray or oil

Fresh orange slices, for decoration and presentation

What you’ll do:

  1. Preheat the oven to 375 F (190 C).
  2. Using a food processor grind the pecans into a rough meal. You want the pecans to be almost a meal but having few bigger pieces would add some interesting texture, so keep that in mind. Place pecans into a bowl, mix in cinnamon, allspice and ground nutmeg, and set aside.
  3. Using the same food processor with a grater blade, grate the apples. You don’t need to peel them unless you really want to. But you to have to squeeze the excess moisture out using your hands, and set aside. (Keep the squeezed out juice – it’s delicious as a freshly pressed cider which you can enjoy as you are making you baklava!)
  4. Spray the bottom of 9 x 13 in (22 x 33 cm) baking pan with cooking spray and start layering the baklava. Place one sheet of phyllo dough at the bottom, and brush couple of water drops across. Layer the next sheet, sprinkle pecans, layer another two sheets one at a time spreading a drop or two of water in between, sprinkle pecans, then repeat with two more phyllo sheets, spread a batch of apples, 1/2 cup or so, then continue layering following the same pattern until you use up all the ingredients.
  5. Cut the baklava into pieces, spray the top with a bit of oil, and put in the oven for about 20 minutes. You want the baklava to be nicely golden brown.
  6. While the baklava is baking, prepare the syrup by combining maple syrup and orange juice into a saucepan and reducing the volume down to about 1 1/2 cup or so.
  7. Once the syrup and baklava are ready and still hot, pour the syrup over the pastry one 1/2 cup at the time, starting with pouring along the cut sites so that the syrup can penetrate to the bottom of the baklava, and then what ever you have leftover you can pour right over the top. Place the cut orange pieces over the top, cover with foil and let the baklava sit for at least 6 hours, preferably overnight, before serving.
  8. Serve with a cup of strong coffee – and get ready to dance the night away!

Copyright © Eat the Vegan Rainbow, 2017