Quinoa with Roasted Cranberries and Pistachios, via Eat the Vegan Rainbow
Like a fabulous supporting actor in a movie, the perfect side dish for a rich, holiday meal is subtle and complementary to the lead actors laid out on the festive table, yet able to make a lasting impression of its own.
This Holiday Quinoa with Cranberries and Pistachios is just that – visually pleasing, with layers of complexity in terms of texture and flavors, yet not overwhelming. Additionally, for anyone putting together a vegan, fully plant-based feast this side dish will add lots of protein to your plate.
Quinoa, just in case you are not familiar with it, is a grain, not a cereal, like wheat, but more like rice, and you would cook it like rice as well. When cooked it actually looks like couscous, and you will need to fork it up the same way. Although quinoa is fine served by itself, given that we are in the midst of fall/winter holiday season I decided to add just a bit to it, by adding some chopped pistachios and some oven-roasted cranberries.
One note on cranberries: fresh cranberries are very tart, and almost impossible to eat without adding a huge amount of sugar to them. I decided to try roasting and that worked to a point. Roasted cranberries are still tart, but a bit of tartness in this dish is actually a nice thing. If you prefer something with less bite, toss your cranberries with some sugar or a sweetener of choice, or simply chop some dried cranberries up – those are most certainly sweet.
Quinoa with Roasted Cranberries and Pistachios, via Eat the Vegan Rainbow
Quinoa with Roasted Cranberries and Pistachios
What you’ll need:
1 cup quinoa
1 1/2 cup water or vegetable stock
1 shallot, finely diced
1 cup pistachios, chopped
1 1/2 cup fresh cranberries – this will yield about 3/4 cup roasted
Cooking spray
What you’ll do:
Preheat the oven to 425 F (220 C).
Wash and sort the cranberries. Place them on a baking sheet lined with foil and roast them for 20-25 minutes. Once soft and slightly browned, take the cranberries out the oven and set aside to cool for a bit.
While cranberries are roasting, cook your quinoa. Mix 1 cup quinoa with 1 1/2 cups water, bring to boil, decrease the heat to a gentle simmer and let quinoa cook for about 20 minutes. Turn the heat off and let quinoa stand for another 10 minutes. Use the fork to fluff up quinoa before using in the next step.
Spray the bottom of a skillet with some cooking spray and place over medium heat. Add finely chopped shallots and let them sauté for 5-8 minutes.
Once shallots are done, add chopped pistachios and let them toast just slightly, for 2-3 minutes.
Add the fluffed up quinoa, mix well, and sauté for 5 more minutes or so.
Turn the heat off and mix in the roasted cranberries. Go gently as they will be very soft and falling apart.
Creamy Cauliflower Winter Soup, via Eat the Vegan Rainbow
This soup is pure gold, and by gold I mean absolutely a light delight, and by light delight I mean that it uses none of the usual suspects you can find in a creamy soup. So, on the side of ingredients that this soup does not use you will find cream, butter, and flour, and on the side of ingredients that this soup does use you will find cauliflower, green peas, yellow corn, vegetable bouillon cube, fresh thyme and almond yogurt. Yes, you read that right – six ingredients and you will be done!
The soup comes together in less than an hour and serves four to six people, and if you include on your holiday menu where lots of other goodies are being served as well, this recipe can easily be served to eight people! So, one head of cauliflower with couple of extras can really go a very long way.
All you need to do is wash and chop one large head of cauliflower, put the pieces into a large pot, pour in 3 cups of water, add the bouillon cube, cover, bring to boil and cook the cauliflower for fifteen minutes or so, until cooked through. Let the soup cool a bit – it does not need to be completely cold but you do need to be able to handle cauliflower and the broth safely. Purée the broth and the cooked cauliflower until completely smooth, with either an immersion blender or using a standing blender. I highly recommend getting an immersion (stick) blender, if you don’t already have one. This is a kitchen gadget I use all the time for soups, burgers, even cookies, so I am getting a lot of mileage out of mine.
Place the soup back on the stove top, add green peas and corn, and bring to gentle simmer. You can use either fresh or frozen peas and corn, or even canned. If using the canned vegetables do check the salt content and buy “no salt added” variety. The soup should simmer for about twenty minutes. Turn it off, and then stir in fresh thyme and plain, unsweetened almond yogurt. Serve warm, with a squeeze of lemon if you like (I do!!!), and a handful of oyster crackers or freshly toasted bread.
Creamy Cauliflower Winter Soup, via Eat the Vegan Rainbow
Creamy Cauliflower Winter Soup
What you’ll need:
1 large head of cauliflower
3 cups water
1 vegetable bouillon cube
1 1/2 cup green peas, frozen
1 1/2 cup yellow corn, frozen
1/2 cup almond yogurt, plain and unsweetened
10 springs of fresh thyme
What you’ll do:
Cut the cauliflower florets out, wash them and chop roughly into bits. Place in a large pot, add water and the bouillon cube, cover with a lid, and bring to boil.
Boil the cauliflower for 15 minutes or until fully cooked – cauliflower should be soft and falling apart.
Purée the cauliflower together with the broth it cooked in with a stick (immersion) blender until smooth.
Add frozen (fresh, or canned) peas and corn. If you are using canned vegetables make sure you use “no salt added” and make sure you drain the veggies well before adding them in.
Bring the soup to gentle simmer, and leave it for 20 minutes or so. If you are using canned vegetables you can simmer for less, and 10 to 15 minutes should be plenty.
Turn the heat off, then add thyme and yogurt, mix well and serve. This soup can be a meal on its own, with some freshly toasted bread, or a nice start for your next three course, festive winter holiday dinner!!!
From time to time it’s good to do things just for fun, with no hidden agendas or pretense of deeper meaning attached. This recipe is my example of doing something just for fun and just because.
Few months ago I acquired a spiralizer, one of those machines you hook your vegetables or fruit to and get long, lovely and elegant noodles of various width. I’ve been using it to make great zucchini noodles, and I love it! But, there’s a limit to how much zucchini noodles a person can eat and still remain excited about seeing them on the plate, so I’ve been trying to pace myself and find other things to spiralize. I tried apples – that worked! I tried sweet potatoes and beets – ditto! I tried jicama – thumbs down, and the same goes for celeriac.
One vegetable that did work – meaning it produced a pile of lovely noodles – were baking (Russet) potatoes. So, I decided to have a bit of fun with them and bake them into little piles of potato yarn which we can call Spiralized Oven Fries. All you need to make this recipe happen is a muffin pan, some seasoning of your choice, and a hot oven. What you’ll get is a fun take on oven fries – the fries that look like spaghetti. And that is exactly what I said this post is all about – pure fun!
Spiralized Oven Fries
What you’ll need:
4 medium baking potatoes
Freshly ground black pepper
Freshly ground crushed red pepper flakes
Salt (optional)
Cooking spray, or olive oil
What you’ll do:
Preheat oven to 425 F (220 C).
Wash the potatoes well, and pat them dry.
Spiralize the potatoes without peeling using a fine gauge spiralizer, the same you would use for making zucchini spaghetti.
Season the potato “noodles” with any seasoning you like. I suggested freshly ground black pepper and ground crushed red pepper flakes, making this quite spicy, but you can use any seasoning you like. Let stand for couple of minutes.
Oil the muffin pan with cooking spray or oil.
Take a handful of potato noodles and gently place them into the individual muffin holes. Don’t press them too hard – let the noodles fall where they may, more or less, and try to arrange them so they fit neatly into the space.
Place the muffin pan into the oven and roast for 30 minutes or so, until the tops start to brown. You don’t want them to burn but a bit of browning is nice.
Take the fries out and let them cool for a bit. Then using a fork gently lift them out and plate them. The sort of “muffins” are not really held together by anything so they will fall apart if you are not careful. But if you are you will end up with a serving of fried that had never looked funkier. And that’s worth it!
Miso Soup with Scallions and Rice Noodles, via Eat the Vegan Rainbow
The colder weather is definitely here, and everywhere you look around here you can find picture perfect foliage spanning all shades from deep green, to intensely and furiously red, and everything in between. Autumn… or is it fall? Whatever it is, the warm, fuzzy sweaters are in, and the shorts are out – I like fuzzy sweaters and can’t stand shorts so this is the right season for me! With the new season comes a new menu, the one that is full of roasted root vegetables, pumpkins and winter squash, apples and pies, cinnamon and nutmeg. There will be more of those types of recipes later, but today it will be all about the soup, my take on miso soup that is amazingly easy to make, and definitely rich enough to qualify as a warm and comforting cold weather favorite.
The key ingredient in a miso soup is miso. What is miso, I hear you ask? It’s a fermented soybean paste with salt and koji – a filamentous fungus not unlike the yeast we use in baking. Miso comes in few different versions – I’ve seen white and red miso into stores I go to, but there are others out there so keep your eyes open and read the labels carefully because what you need for this miso soup is the white miso. However, miso soups that you may enjoy in your local Japanese restaurants may be made with different kinds of miso and their flavor will definitely vary.
The recipe here is super fast and super easy. All you need is a pot, some scallions, white miso, and a bunch of thin rice noodles. Scallions will brown in a minute or two, and the thin rice noodles, sometimes called rice vermicelli, will cook in five minutes so, taken all together, from an empty pot to the full bowl, this soup will be ready in under half an hour.
When serving, I also added some Sriracha sauce to my bowl, but that is a condiment that you can definitely skip. Some other types of condiments that would work with this soup are a squeeze of lime juice or a dash of lime zest, freshly ground black pepper, a slice or two of pickled ginger, or some toasted panko. Your choice, your delicious bowl of filling and satisfying soup!!!
Not fan of miso? There are more soup recipes for you to try here.
Miso Soup with Rice Noodles and Scallions
What you’ll need:
6 scallions
1/2 cup white miso
7 oz (200 g) thin rice noodles (rice vermicelli)
4 cups water
Cooking spray
What you’ll do:
Wash the scallions, trim the tops, and some of the green bits that need trimming but definitely use both the white and the green parts. Chop finely.
Spray the bottom of a large pot with cooking spray and place over medium heat. Add the scallions and brown for 1-2 minutes. Keep an eye on the scallions since they can burn quickly.
Add the miso and mix well. Let the miso brown for 1-2 minutes. Stir frequently.
Pour in the water and use a whisk to make sure the soup is smooth and there are no miso clumps.
Bring soup to boil, and once it’s boiling add the rice noodles. Depending on the size of your pot and the water level, the noodles may or may not be completely submerged when you put them in. Don’t force them in, as they’ll break. Wait for the bottoms to soften then gently ease the rest of them in. The noodles need about five minutes and they will be ready.
Let the soup cool just a bit before serving and then enjoy as is or with any number of toppings, like Sriracha, vegan bacon bits, fresh cilantro, squeeze of lime, toasted panko… Options and flavor variations are endless!
Hearty Vegetable Soup with Kale, via Eat the Vegan Rainbow
There’s always room for soup, and in some cases the soup is so rich that there’s room only for the soup. I definitely like making hearty soups that are rich and filling. I’ve already shared with you my split pea soup, which is on the left lighter side, and “clam” chowder and bean and leek soup with soy chorizo, which are both really more a meal in a bowl than a light intro to a main course.
Today’s soup is somewhere in between: not quite hearty enough to qualify as a meal yet not light by any means. It is full with vegetables and resembles Minestrone Soup. The soup builds on the classic mirepoix, a classic base of many soups and stews. Practically speaking mirepoix is a mix of diced carrots, onions and celery that is sautéed until caramelization starts to take place. This what I would normally do when making a soup like this but this time around I had to take a shortcut and I used a lot of frozen and canned veggies, including the frozen peas and carrots mix so my mirepoix started with only onions and celery.
At the end the soup came together well, with frozen corn and canned tomatoes and beans, and a whole bunch of kale. The main trick here was to let the soup simmer for a long time which helps soften kale, which has quite a sturdy leaf structure.
Hearty Vegetable Soup with Kale
What you’ll need:
6 stalks celery, diced
1 yellow onion, diced
16 oz (454 g) kale, roughly chopped
15.5 oz (439 g) can red kidney beans
2 cups yellow corn kernels, frozen
16 oz (454 g) peas and diced carrots mix, frozen
28 oz. (794 g) can crushed tomatoes
32 oz (907 g; 4 cups) vegetable stock
3 cups water
Cooking spray
What you’ll do:
Dice celery and onions to a medium dice. It does not have to be very fine or precise because the whole soup is a bit rustic.
Spray the bottom of a large soup pot with cooking spray and place over medium high heat. Add celery and onions and sauté for 5 to 10 minutes, with occasional stirring.
While onions and celery are cooking, wash the kale and remove any parts of stalk that look particularly tough. Chop the kale roughly into smaller bits. If you are wondering how small should you make them, it’s really up to you. My preference is to keep them at about 2 in (5 cm). Set aside.
Add the frozen veggies in all at once and cook with stirring for 5 to 10 minutes. They will not be completely thawed but they will start to soften.
Add the beans – I usually drain and rinse mine but if you are a fan of keeping all the flavors of canned beans intact (including extra salt they use when canning) go ahead ad just dump the whole thing right in. Stir to combine and cook for 5 minutes.
Add the crushed tomatoes, stir again and cook for another 5 minutes.
At this point you are ready to add the kale. As with all other green leafy vegetables, the raw leaves occupy a significantly larger space than cooked, so don’t panic if adding the kale pushes your pot to its size limits. The kale will settle down. Gently fold the kale into the soup and cook for another 5 to 10 minutes. By the end of this process your pot should look like it can fit the stock and water.
Add the stock and as much water as you like really. What I do is dump the stock into the pot and then use water to rinse the carton out. But if you would like to keep this Soup really dense and almost like a stew you can skip adding water.
Bring everything to boil, lower the heat to low and simmer for another 30 to 45 minutes or until the kale is done to your liking.
Enjoy this soup with some fresh bread, top with some fresh parsley, with a squeeze of lemon or top with a bit of Cashew Sour Cream.
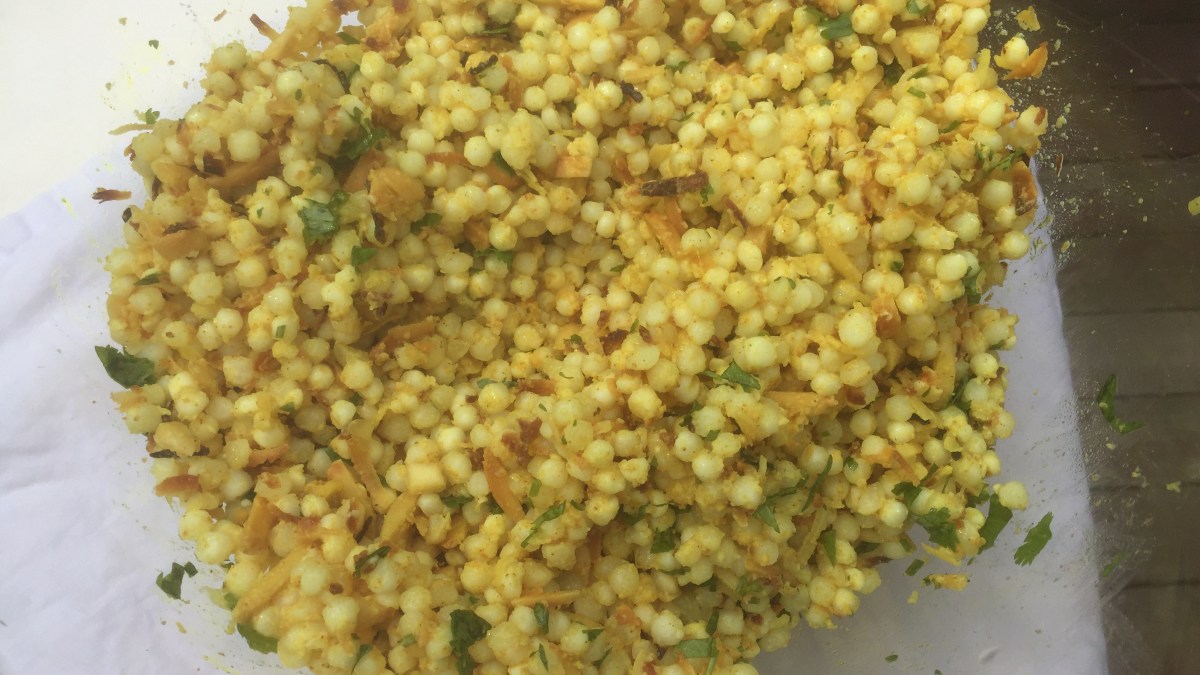
Tapioca Pearls (Sabudana) with Spicy Almonds and Toasted Coconut, via Eat the Vegan Rainbow
Most people probably think “bubble tea” when they hear “tapioca pearls”. But these delicious little pearls are definitely worth getting to know more intimately, especially in the context of gluten free cooking. They are inexpensive and very simple to make. They actually require no cooking – just soaking – so although no cooking skills are required, some level of patience (and a good amount of time) is.
Before we go any further lets try to answer this questions first: “What are tapioca pearls?”. They can come in different sizes and colors. The ones I will focus here are white and small, close to the size of Israeli couscous. But unlike the couscous, which is made with wheat and thus off limits for those watching their gluten intake, tapioca pearls are made from starch extracted from cassava root. So, they are little starch balls when all is said and done. Think micro potatoes that don’t need peeling!
If you are into Indian food, you have likely already had some tapioca pearls because they are often used to make desserts, like kheer pudding. Earlier this summer I had some homemade Sabudana Khichdi and I loved it. Sabudana Khichdi is a traditional dish and usually consumed during Hindu fast days. The dish includes tapioca pearls, finely chopped, cooked potatoes, finely chopped peanuts, finely grated coconut flakes, and a nice combination of spices (curry leaf, cumin seeds and green chilis). There are some variations on the recipe and the ingredients may vary depending on whethe Sabudana Khichdi is served during the fast or outside the fasting days, and my friend who made the dish for us also mentioned that a more protein-rich version of Sabudana Khichdi can be made using quinoa, and she suggested I check a blog by another friend of hers called Indfused, which I did and so should you, especially if you are interested in creative Indian/American fusion cooking (FYI: Infused is not a vegan blog, so keep that in mind).
Back to the the version of Sabudana Khichdi I had – it was a delicious addition to our summer cook out and prompted me to get some tapioca pearls of my own and start experimenting. The recipe below is the second iteration and deviates from the original recipe quite a bit. I took some liberties so my Tapioca Pearl Salad is Sabudana Khichdi inspired, but not meant to be “traditional” in any way. First point of difference is that I left the potatoes out. In my view, leaving potatoes out does not affect the taste nor the nutritional profile of the dish, yet saves some time and effort. I also left the peanuts out and replaces them with slivered almonds. I used slightly different spice mix, to make the dish a bit more fragrant. Finally, I toasted my coconut flakes, because in my mind coconut is just better toasted!
The key to making tapioca pearls is patience. All you need to do is rinse the pearls in cold water, then soak them in enough cold water, usually in 1:2 ratio (for example 1 cup pearls and 2 cups water), for 2-3 hours. How do you know they are ready? They should feel loose, not stuck together, and soft, yet slightly chewy, to bite – think pasta al dente. You can go a bit further if you prefer softer texture, but you do want your pearls to remain pearly, not mushy, so don’t overdo it.
Now a key to make the dish really flavorful and spices vibrant, is toasting the spices. I use a frying pan here, and, although you can dry toast the spices, I do add a bit of oil in this case and let the spices toast for one to two minutes before adding the almonds to finish it off. I pour the toasted spice and almond mix over the drained tapioca pearls, instead the other way round, but that’s more of a personal preference I suppose. The toasted coconut flakes come next, and the chopped fresh cilantro is the final touch. You can serve this dish immediately, you can heat it up more and serve hot, or you can leave it in the refrigerator overnight and serve it cold. It actually works across the range of temperatures so it could work as a surprising pasta salad at your next picnic. It is a great, easy and inexpensive dish to make for your next pot luck or any other get together!
Tapioca Pearls with Spicy Almonds and Toasted Coconut, via Eat the Vegan Rainbow
Tapioca Pearls with Almonds and Toasted Coconut Flakes
What you’ll need:
2 cups tapioca pearl
4 cups water
1 cup slivered almonds
1/2 cup coconut flakes or shreds, unsweetened
2 tablespoon vegetable (or canola) oil
1 teaspoon cumin powder
1 teaspoon curry powder
1/2 teaspoon turmeric
2 tablespoon fresh cilantro, chopped
What you’ll do:
Rinse the tapioca pearls under cold water and place into a large bowl. Cover with water and let stand for 2 to 3 hours. The pearls will absorb water and they should become soft and al dente.
Drain the pearls well, pat dry with a paper towel and put into a large mixing bowl that you will use for serving as well. You can use the same bowl you used for soaking just remember to dry it well in the meantime.
Heat the oil over medium high in a large frying pan. Add the dry spices (cumin, curry and turmeric powder) and toast in oil for 1 minute.
Add slivered almonds and toast for another 2 to 3 minutes, until almonds start to brown.
Pour the hot almond and spice mix over tapioca pearls and mix well.
Toast coconut flakes in a toaster oven or a frying pan for 2-3 minutes. You need to keep an eye on your coconut flakes as they go from beautifully toasted to inedible in a blink of an eye! If you are using the frying pan, you can use the same pan you just used for almonds and spices, just don’t add extra oil as coconut flakes should be fatty enough.
Add hot, toasted coconut flakes to your tapioca pearls and mix well.
Let the mix stand for couple minutes and while those flavors are combining, wash and chop fresh cilantro.
Sprinkle the cilantro over your tapioca pearls, mix again and serve!
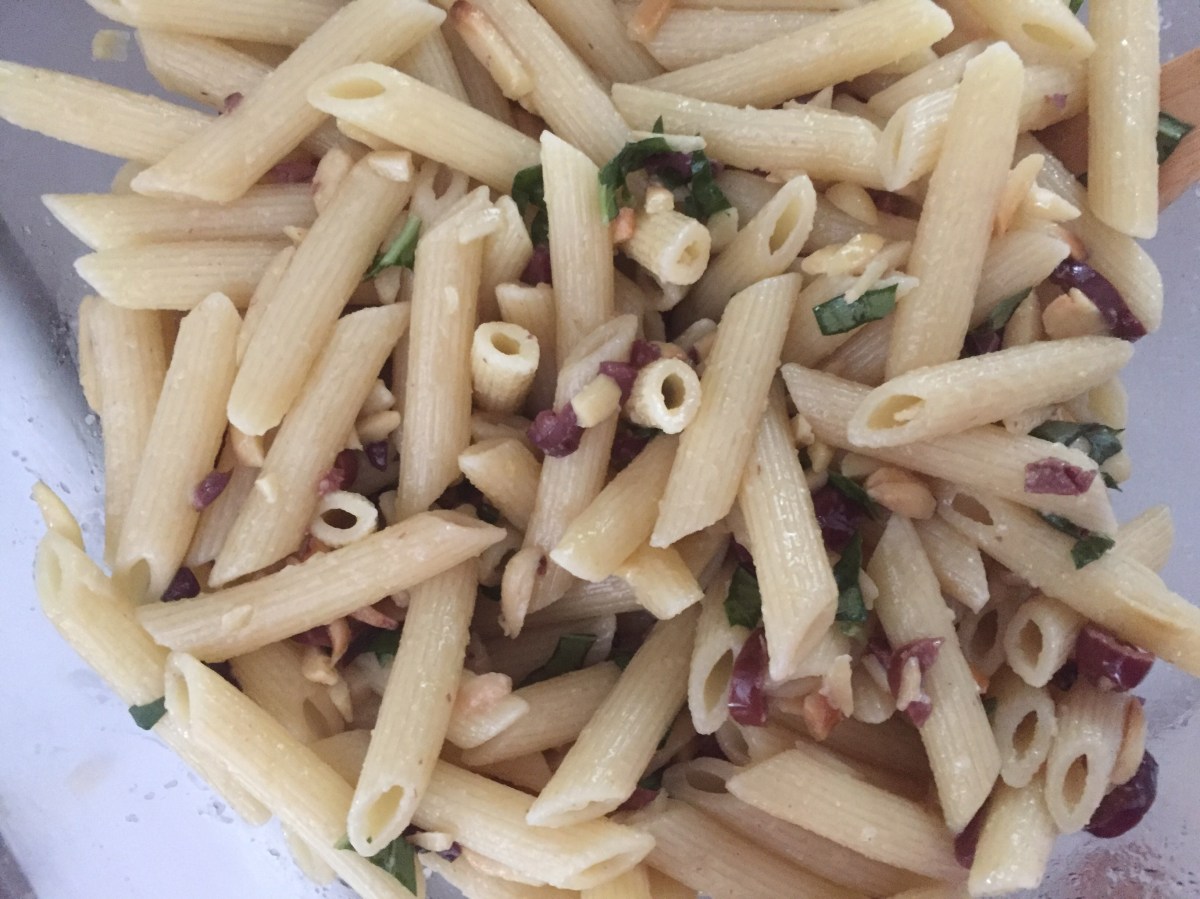
Simple Summer Pasta Salad, via Eat the Vegan Rainbow
For me, pasta salad is a conceptually hard thing to swallow since I equate salads with (mostly) green leafy vegetables. Growing up, there was a clear separation between salads and pastas in my mother’s cooking and our family meals. But, after living in US for almost two decades, I’ve come around and appreciate that pasta salads have a place on my plate, especially if I am holding that plate during a large summer cookout or a potluck.
Having said that, I still think that many pasta salads leave a lot to be desired as they tend to be overloaded with mayonnaise, meat or even cheese. So, I decided to develop a pasta salad recipe that is simple and light, yet full of flavors and surprising textures.
The recipe below really blew me away! It’s super simple, uses only six ingredients, it takes less than twenty minutes to make, and it is a perfect pasta salad for big get togethers because it is super inexpensive.
The recipe is very simple and self-explanatory. Few tips here are: don’t cook your pasta for too long, drain it well but don’t rinse; mix the pasta with the rest of ingredients while it’s still hot, and then let it cool while the flavors are developing and merging; and if using kalamata olives in oil, scale back on the amount of olive oil you actually add – otherwise you’ll end up with something that’s too oily, which will be too bad!
And speaking of olives – kalamata olives that I get come with a nice level of acidity so I don’t feel like I need to use extra vinegar when I’m using them. This means that my recipe below does not include vinegar. Now, if you like a bit more tang, feel free to add some lemon juice or a dash of red wine vinegar to adjust the acidity level in this salad to your personal taste.
Finally, if you don’t have a box of penne rigate on hand, don’t worry. You can use any spoon friendly pasta for this – meaning not long pasta. Why do I recommend NOT using long pasta? Well, if you are thinking of this salad as picnic, pot luck, sharing-with-friends-and-family friendly, then help your friends and family help themselves by not having to wrestle with long pasta. I also think that tubular pastas work better for this recipe than flat ones – think penne, ditalini, macaroni as better, and farfalle as perhaps less suitable for this recipe – as tubular pastas have a bit more surface area to absorb the subtle flavors. And among the tubular pastas, those with ridges will work just slightly better because of the same surface area availability principle I mentioned. Having said all this, and having dragged you through likely totally unnecessary details on how to choose just the right pasta for this recipe, I’d like to stress again – just grab a box of pasta you have on hand and it will be just fine!
STOP: I just remembered – I would not recommend black bean pasta for this. I did not like the flavor of that one when I paired it with my Clams-free “Clam” Sauce and can’t recommend it for this application either. 😦
Simple Summer Pasta Salad
What you’ll need:
12 oz (340 g) penne rigate pasta
1 cup kalamata olives, pitted and chopped
1 cup slivered almonds
1/4 cup olive oil, extra virgin
1 teaspoon garlic powder
3 tablespoons fresh basil
What you’ll do:
Cook the pasta following the instructions on the box. Don’t overcook it – the pasta will be ready when it is slightly chewy to the bite.
While pasta is cooking, chop the olives and the fresh basil leaves. Put to the side.
Drain the pasta well and place in a large mixing bowl. Add oil, chopped kalamata olives, garlic powder, and mix well.
Toast the almonds in a toaster oven or on the stove top in a heavy skillet. Watch the almonds constantly as they do burn quickly.
Add the toasted almonds to the rest of the pasta salad, mix well and leave for an hour or so.
Add fresh basil just before serving, toss everything together and enjoy. The result is fragrant, complex in flavors and textures, yet simple and cheap to make, perfect summer pasta salad.
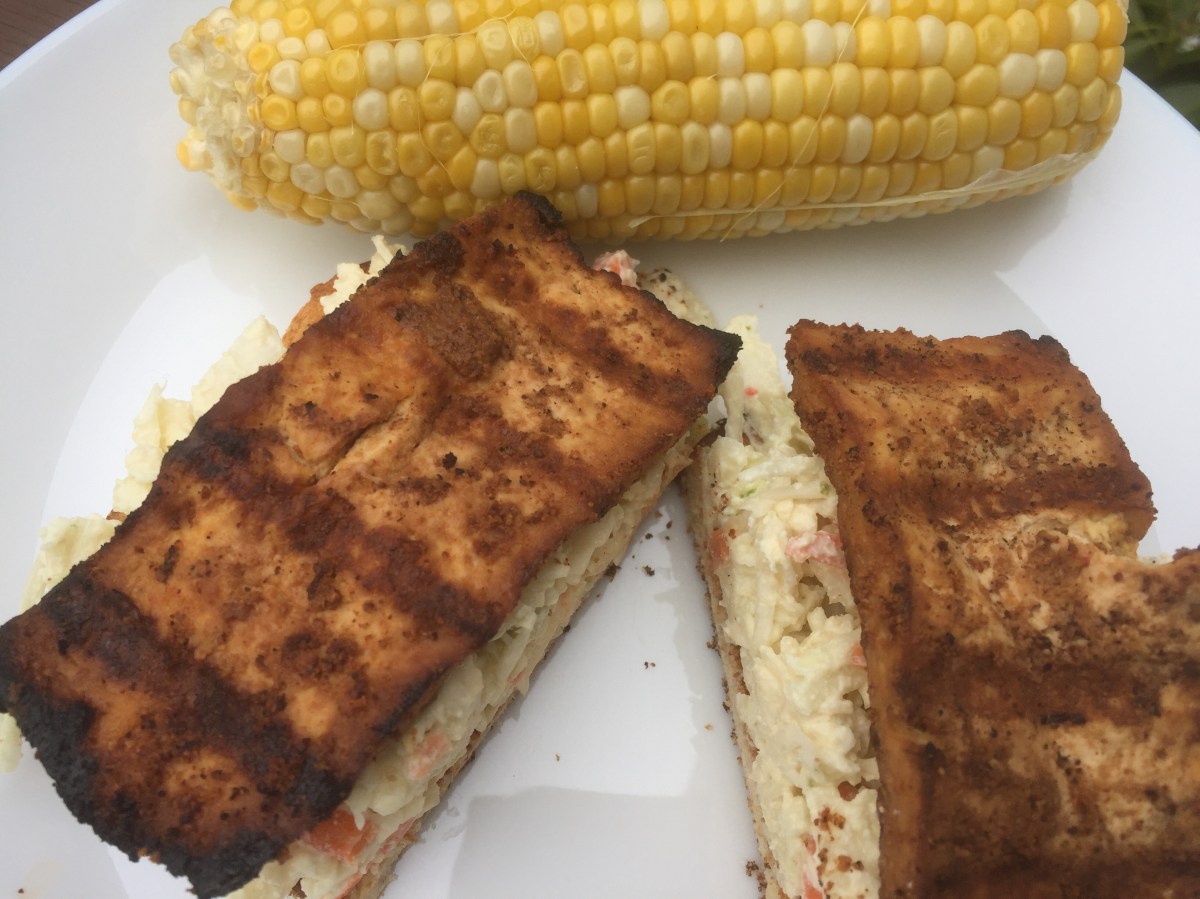
Grilled Tofu and Spicy Coleslaw Sandwich, via Eat the Vegan Rainbow
Let’s face it: if you don’t enjoy some grilled food during the fleeting late spring, you are totally missing out. And even if you are a committed vegan or a plant-based eater you should not stay grill deprived.
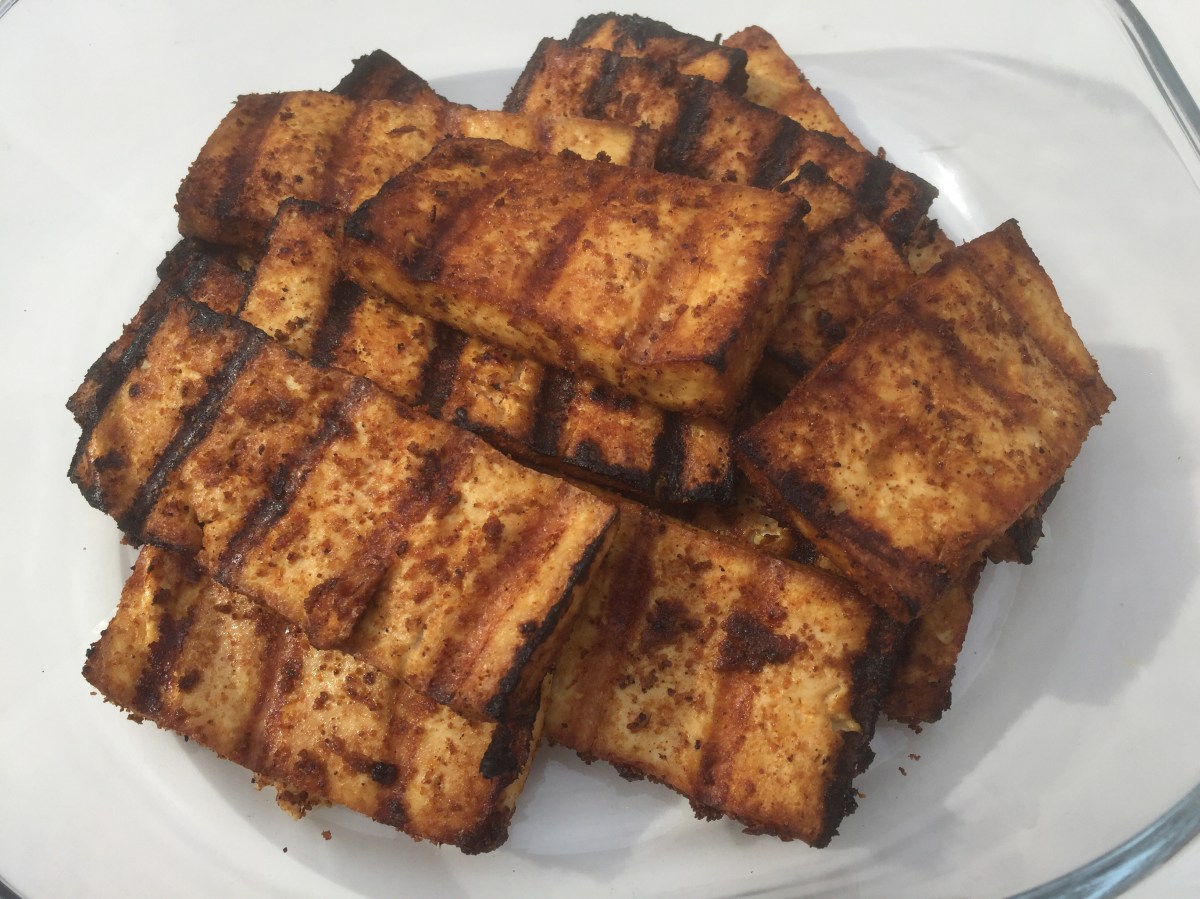
I’ve already showed you how to make phenomenal grilled portobello mushroom steaks, and flavorful grilled eggplant. Today is the day when we cross the Rubicon of vegan grilling with a Grilled Tofu recipe. Trust me: once you try it, you will not be going back!
Before I dive into the details, I have to give credit where credit is due. In this case it all comes down to a fabulous Tofu Bacon recipe developed by The Buddhist Chef. I made that bacon quite a few times and it is absolutely amazing. That recipe inspired me to look for other ways to cook tofu and get it taste and look in a way you would never expect. So here I decided to see whether I can optimize tofu for grilling.
What I discovered is that for successful grilled tofu you do need to cut thicker slices, so I recommend slices that are about 1/2 in (1.5 cm) in thickness. What you’ll need to do is start from extra firm tofu and drain it really well. I left my block of tofu in a strainer and put a heavy can on top to help the draining. Let it sit for one to two hours then pat dry and slice.
The sliced tofu goes into a marinade, and this is a critical step because no matter how good your grilling skills are, tofu is so subtle tasting that grilling it as is will not produce a rich flavor. The marinade I use builds on the Tofu Bacon recipe by using liquid smoke, smoked paprika, chili powder, and cumin, which all work together towards giving tofu the extra smoky aroma. You will need a bit of oil in this marinade, as well as a bit of steak sauce or vegan Worcestershire sauce. Let the tofu marinate for about an hour, then grill it on high and enjoy with your favorite add-ons.
On this occasion I went with a simple steamed corn on the cob, toasted bread, and vegan spicy coleslaw. For this coleslaw you can use any vegan mayo you like, including store bought one. I recommend adding some ground mustard for extra punch. The coleslaw and grilled tofu work incredibly well – they are match made in heaven!
16 oz (454 g) bag of Coleslaw mix (or 2 cups shredded green cabbage plus 1 cup shredded carrots)
1/2 cup vegan mayo
3 tablespoons white vinegar
1 tablespoon Dijon mustard
2 teaspoons ground mustard seeds
1 teaspoon ground black pepper
1/4 teaspoon salt
What you’ll do:
In a large bowl, mix all the Spicy Coleslaw ingredients together, cover with plastic wrap and set aside for couple of hours. Coleslaw needs some time to “mature”, mostly because cabbage needs a bit of time to soften and become smooth and more palatable.
Drain the tofu and leave in the strainer for 2-3 hours. You can do this overnight in which case leave the tofu blocks in the refrigerator, or you can use any other method of pressing tofu you are used to.
Once the tofu is pressed/drained, slice each block into 8 slices. Arrange in a single layer, in a deep baking dish or any other type of a container with a flat bottom that will allow your tofu slices to rest flat and absorb the marinade.
To make a marinade mix all the ingredients (except bread and oil you need for the grill grate). Mix well and pour over the tofu slices.
Marinate tofu slices for 1-2 hours.
When ready to grill, prepare your grill as you usually do. In my case this means turning all the burners on (I have a gas grill) to full blast, closing the lid and letting any bits and pieces of food from last time burn off for 10 minutes. Then, I turn down the flames, scrape the grill grates well, and oil them with fresh batch of vegetable oil.
For grilling tofu I recommend medium high to high flames, so bring the flame up and place the tofu pieces on. Grill for 5-10 minutes on one side, brush on the marinade, flip them over and grill for another 5-8 minutes. If you like the classical grill marks, you will need to rotate your tofu by about 45 degrees and let it grill some more. If doing that, I suggest you keep brushing on the marinade so your tofu does not dry out.
Keep your grilled tofu tightly wrapped in some foil, to keep it hot while you grill or toast the bread. Once the bread is ready, place a good amount of spicy coleslaw on and top with grilled tofu. I like my sandwiches open faced by you can definitely make this into a standard sandwich, or a wrap. Serve with some grilled or boiled corn for a summer meal worth sharing!
Grilled Eggplant, via Eat the Vegan RainbowSummertime and the grilling is easy… Well, that’s me paraphrasing the George Gershwin classic, but the statement is spot on. Grilling is easy, and it is my favorite way of preparing food during the hot summer months. Over the years I figured out how to grill quite a few different things, and at the end of the day grilling is really easy and with a little practice you can get really good at grilling almost anything. My Grilled Portobello Steaks recipe was just the beginning of “From the Grill” section of this blog and in addition to that recipe and the Roasted Red Beets Hummus, there’s much more to come.
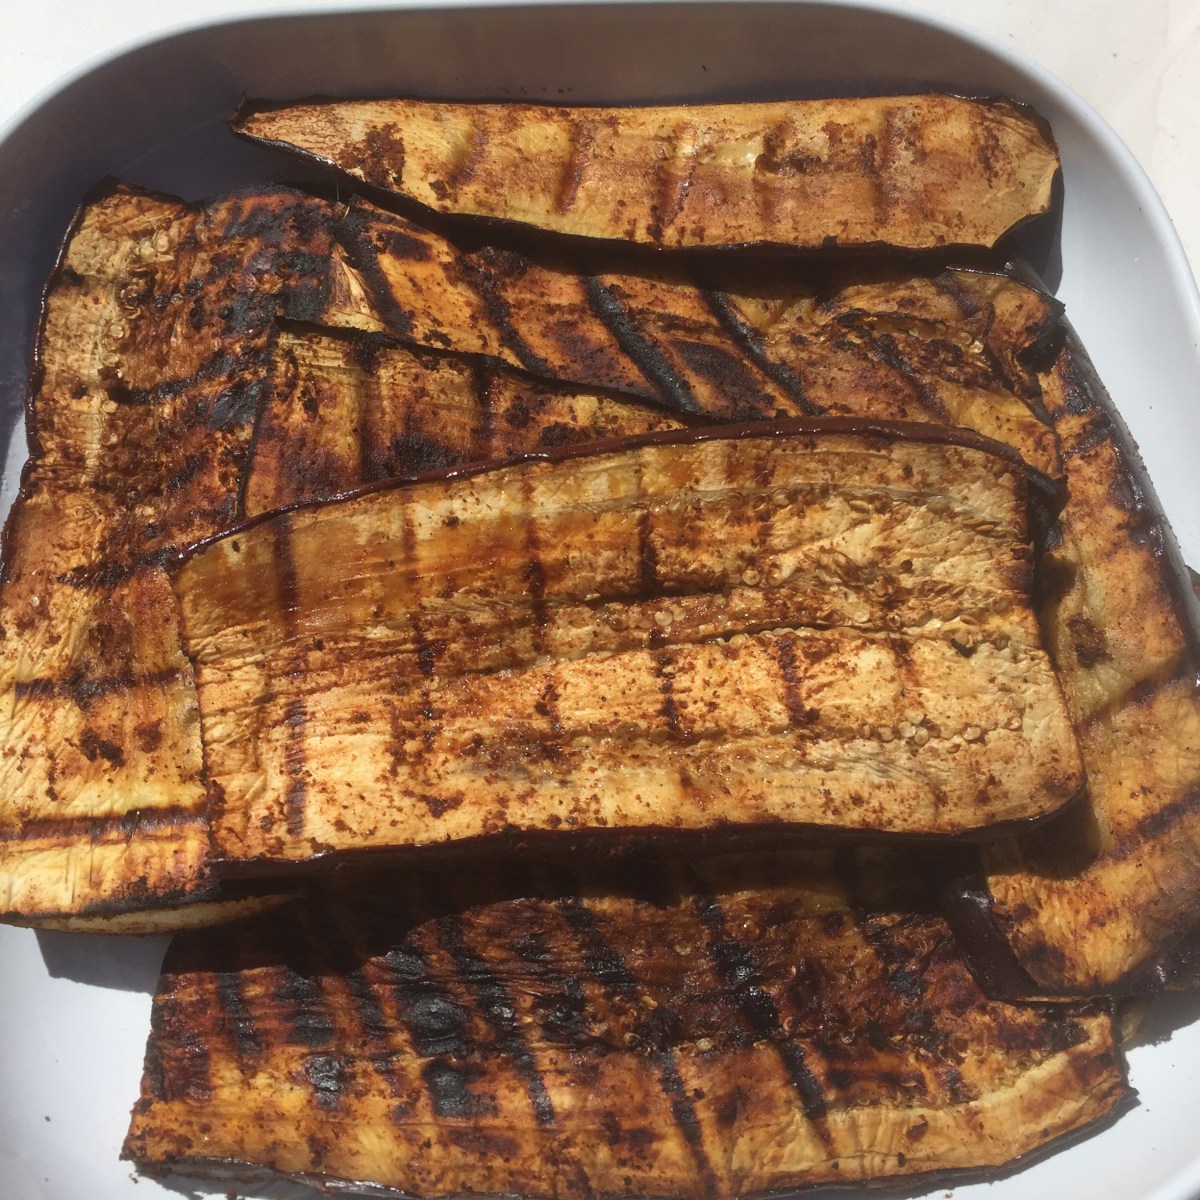
Today I am sharing a quick and easy way to make perfect grilled eggplant. Eggplant is a tricky vegetable to make because of its spongy texture that absorbs oil like crazy making almost every commonly encountered eggplant dish too oily and too rich. In the past I tried the trick where you sprinkle salt on the eggplant slices and let it sit between the paper towels, which does help but it adds salt and it takes time. More recently I started skipping all this and either simply cubing the eggplant, skin and all, or roasting the eggplant before stuffing.
Now this Grilled Eggplant recipe couldn’t be easier and does not require any special eggplant handling. Actually, the simple marinade I make, which includes couple of smokey spices, like smoked paprika, chili powder, liquid smoke and allspice, mixed with lemon juice and zest, can work well for summer squash, zucchini, or even tofu.
Grilled Eggplant, via Eat the Vegan Rainbow
Grilled Eggplant
What you’ll need:
2 large eggplants
1/2 lemon, juice and zest
2 tablespoons soy sauce
2 tablespoons liquid smoke
1 teaspoons smoked paprika
1 teaspoons allspice
1 teaspoons chili powder
1 teaspoons onion powder
1 teaspoons garlic powder
Vegetable oil
Cooking spray
What you’ll do:
In a large plastic container with a tight fitting lid, mix lemon juice and zest, soy sauce, liquid smoke and all the spices to make a pasty marinade.
Wash and dry the eggplant. Cut lengthwise into 1/4 in (2.5 cm) thick slices.
Place the eggplant into the marinade. Cover every piece well (use your fingers to help spread it out) and stack ghee eggplant slices. Cover with the lid and let stand for 30 to 60 minutes on the kitchen counter.
Prepare your outdoor grill as you normally do. For me this means turning all the burners on high (I have a gas grill) with the lid down for 10 minutes, turning the flames down to low then using a steel brush to clean the grill grate. Finally, before placing food on the grill, I oil the grill well. I use a pair of long tongs and a paper towel dipped in vegetable oil.
Bring the heat up to medium. Spray each eggplant slice with a bit of cooking spray before placing on the grill. Leave it to grill on one side for about 4 to 5 minutes. Depending on how hot your grill is this may take a bit longer.
Spread the leftover marinade over the top of the eggplant slices before turning over. Grill for another 3 to 5 minutes.
Take off the grill and serve. The grilled eggplant works well as a topping for couscous, rice or polenta. It also works really well in sandwiches and salads. My serving suggestion would be to wrap it in a grilled pita topped with plain hummus and sprinkled with kalamata olives.
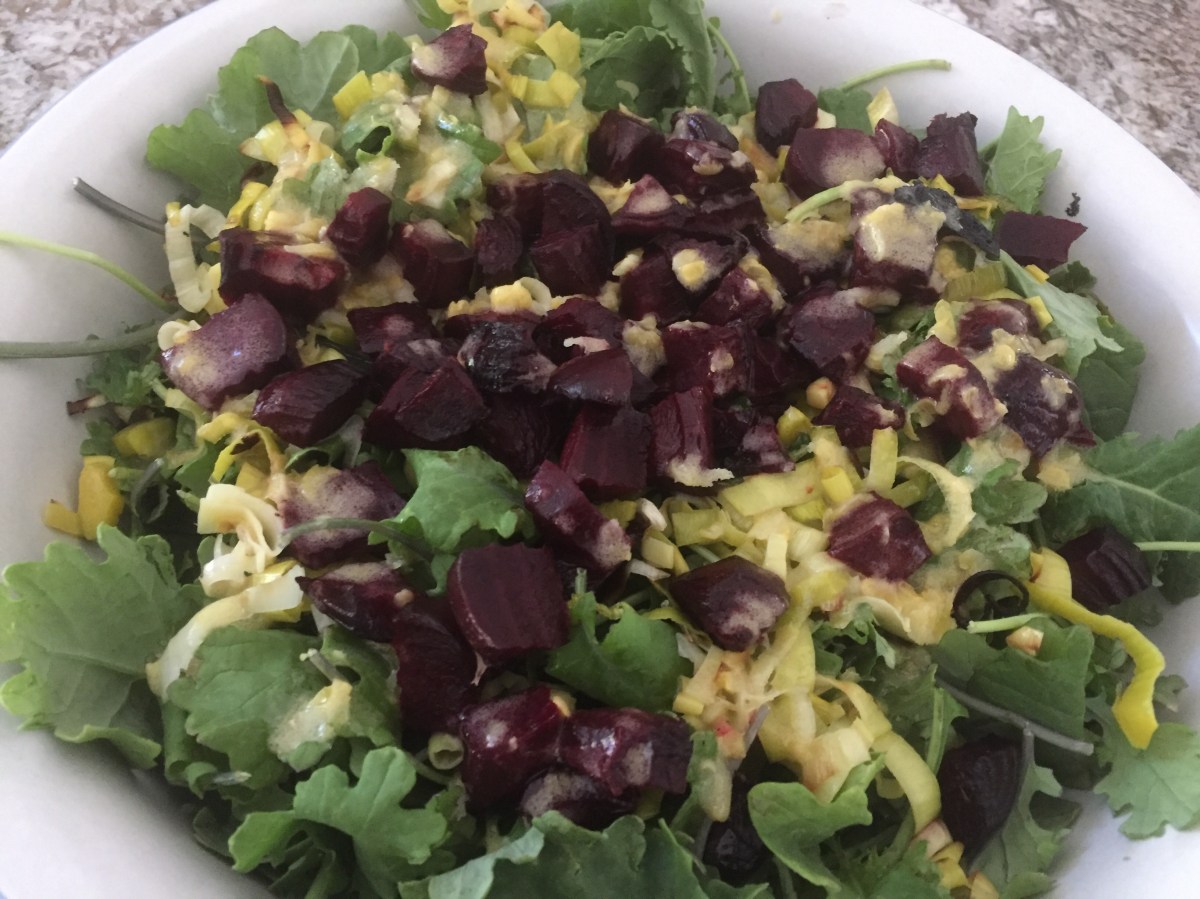
Baby Kale with Roasted Beets and Leeks, Tossed with a Lemon Vinaigrette, via Eat the Vegan RainbowSalads can be simple, but as I was putting together my first ever plant-based – vegan – Easter dinner this year I decided that going for impressive, fabulous and a bit over the top, even when it comes to a salad, wouldn’t hurt. Maybe you’ve already seen, or even tasted, my Meatless Shepherd’s Pie – if you haven’t now would be a good time to do it – and this salad is what I paired it with.
The base of the salad is baby kale which you can probably get these days in any well-stocked supermarket. If you can’t find baby kale go with mixed field greens or baby lettuce, or just chop up some romain or butter lettuce. Stay away from baby spinach and iceberg lettuce as I am not convinced those two will play nice with roasted beets and roasted leeks.
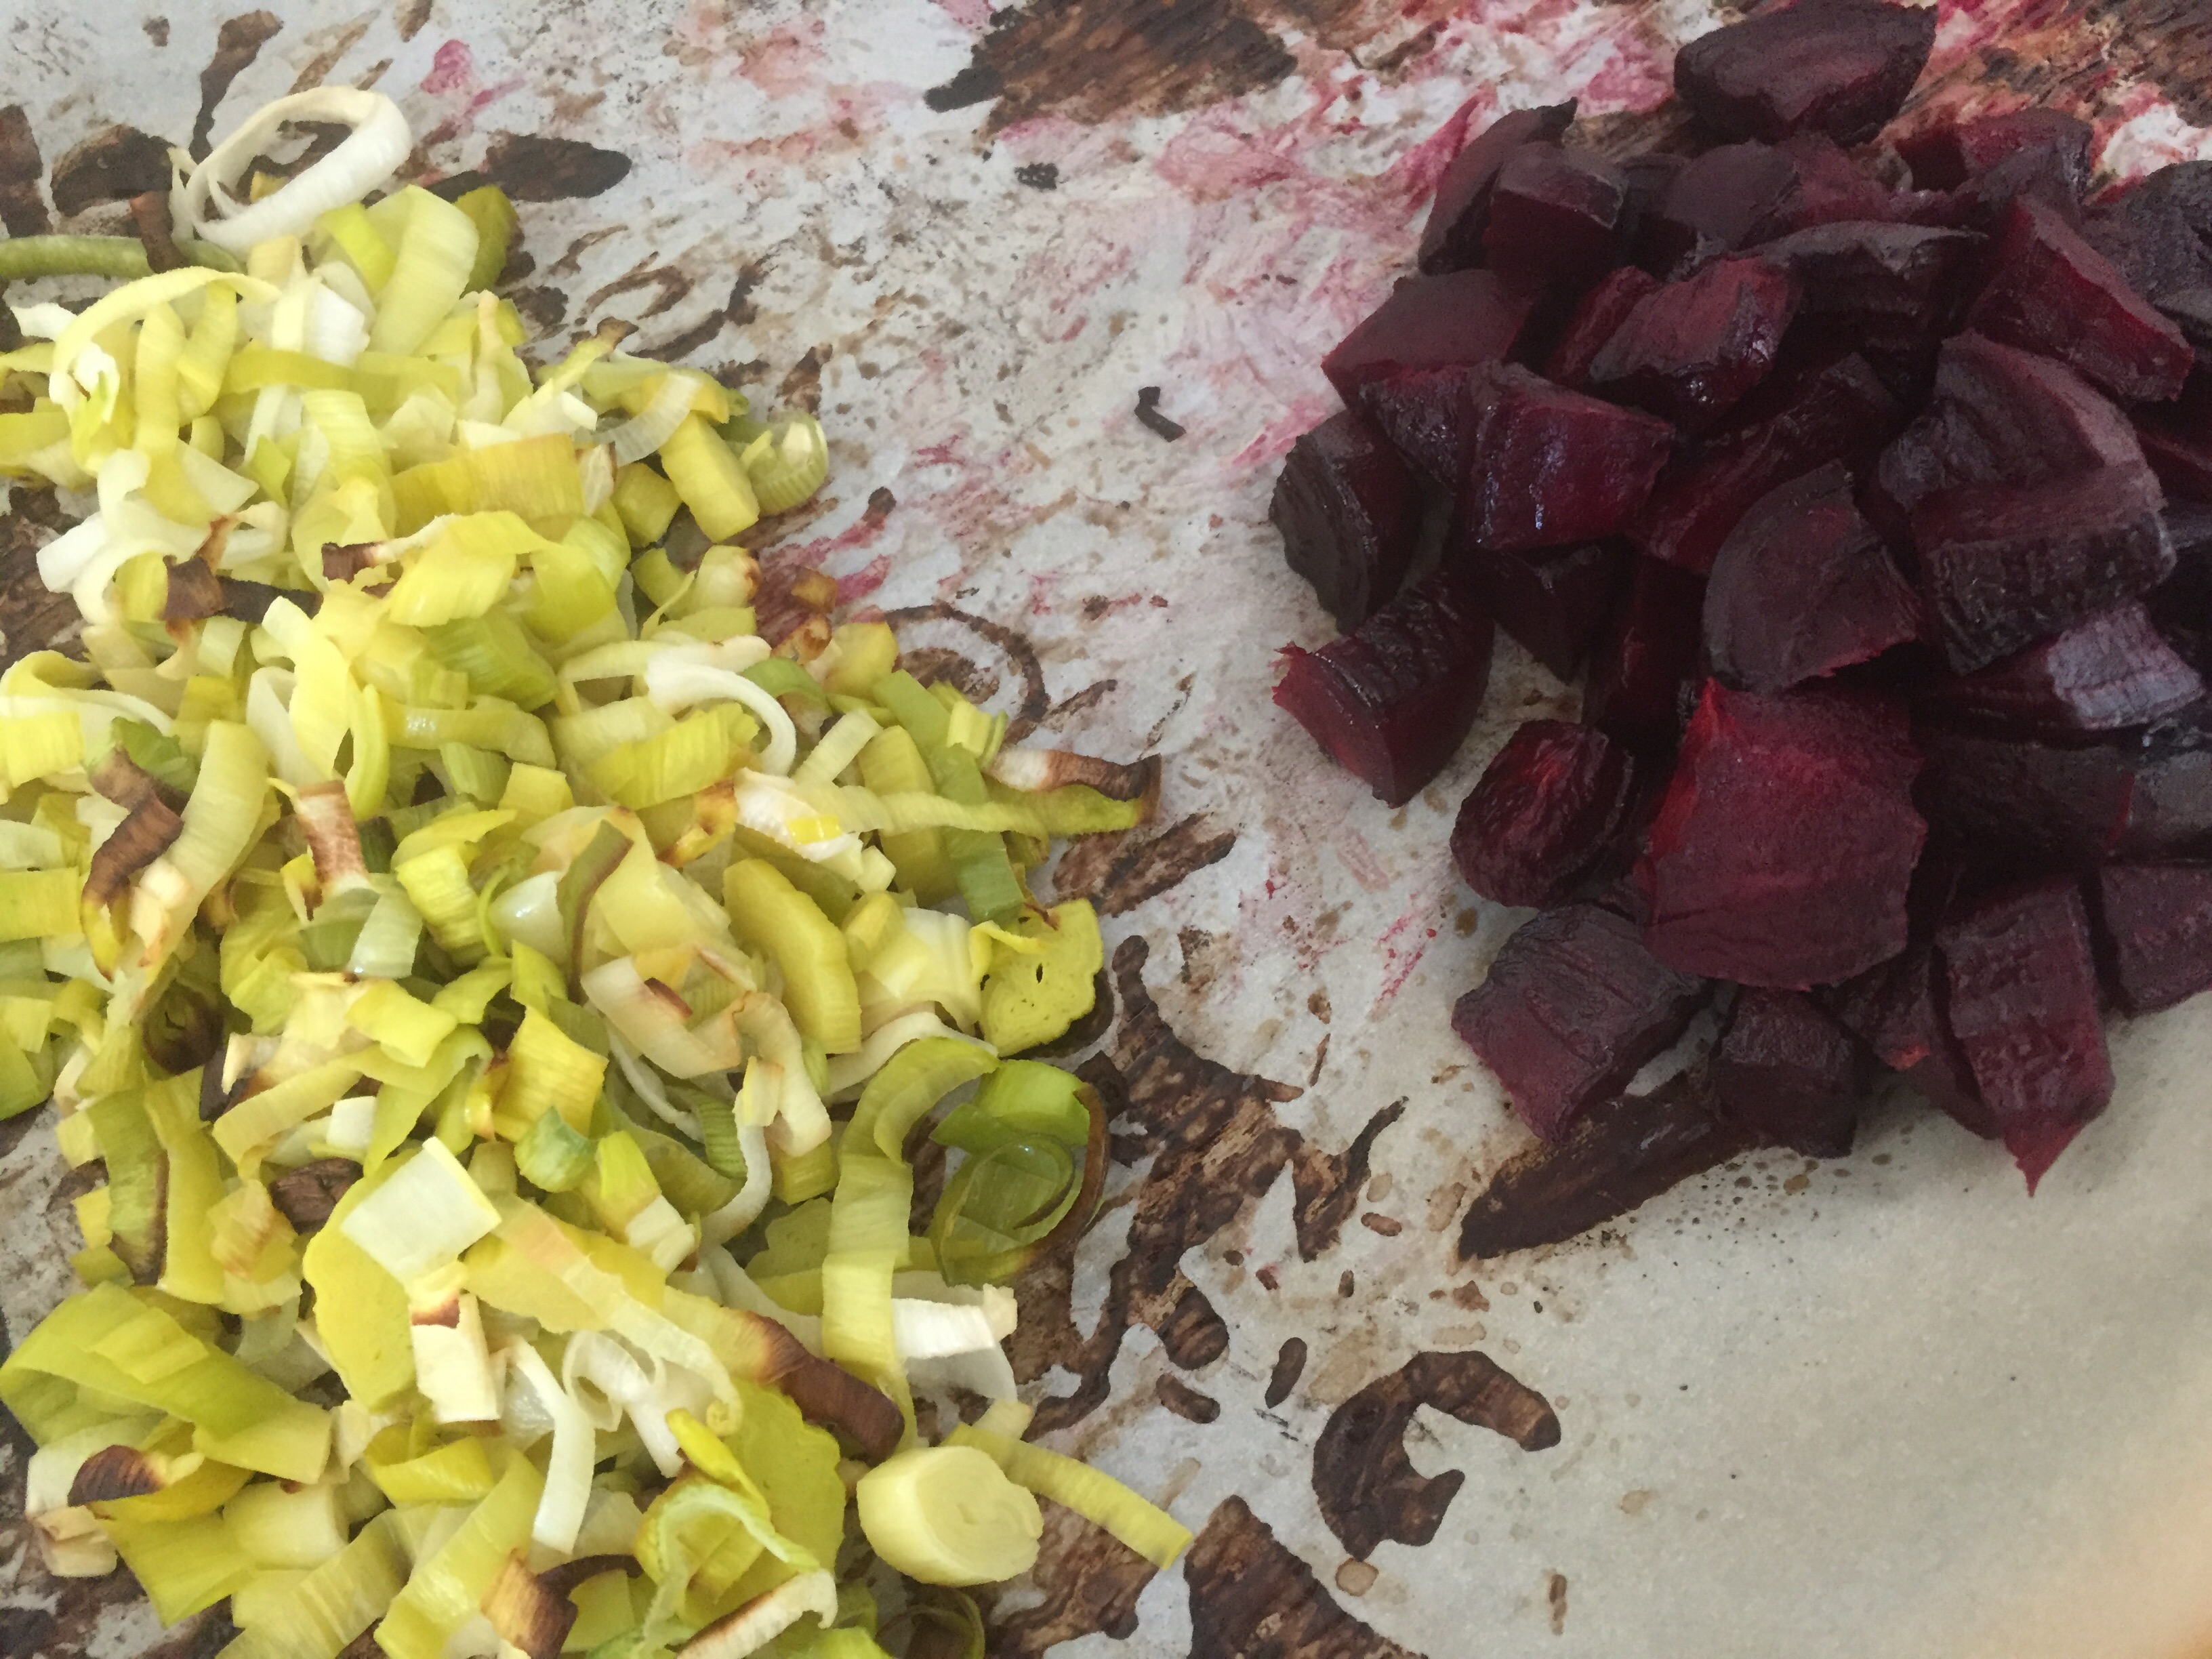
What makes preparing this salad a bit more elaborate than your tossed salad is the fact that both leeks and beets need to be cleaned, chopped, roasted and cooled before hitting the salad bowl. I’ve already shared how to clean leeks, so I used the same cleaning method on this occasion as well. For this recipe I recommend cleaning and chopping the beets before roasting to maximize the amount of beer surface that is nicely caramelized. You may want to wear gloves when you handle beets as they will stain your hands. I personally don’t mind it at all but if you do please plan to protect your hands an wear the gloves.
Baby Kale with Roasted Beets and Leeks tossed with a Lemon Vinaigrette
What you’ll need:
3 beets
3 leeks
11 oz (312 g) baby kale
1 lemon, juice and zest
2 tablespoons olive oil
1 tablespoon Dijon mustard
Cooking spray
What you’ll do:
Preheat the oven to 425 F (220 C).
Clean the leeks to remove all the sand and dirt that leeks usually come with. Dry well and place on the parchment paper lined baking sheet. Spray with a generous amount of cooking spray.
Peel the beets and cut them to 1 in (2.5 cm) cubes. Place on the parchment paper lined baking sheet and spray with cooking spray.
Roast for 20 to 25 minutes.
Take out of the oven and let cool for several hours. You want the roasted vegetables to be at room temperature for this one!
To make the lemon vinaigrette, mix together juice and zest of one lemon, with the olive oil and Dijon mustard.
Place baby kale in a large salad bowl. Top with roasted beets and leeks, and drizzle the vinaigrette all over the salad. Toss everything together and serve!!!
Sweet Potato and Leek Soup with Tofu Bacon, via Eat The Vegan RainbowSoups are part of all cultures and culinary traditions. So it is no wonder that I make pots and pots of soups each week. My absolutely go to soup is Vegan Split Pea Soup or variations of it made with lentils, but over the last few months I have also shared with you a colorful and fabulously satisfying Bean & Leek Soup with Soy Chorizo, and even a vegan version of the New England Clam Chowder.
Why such a soup passion? Well, I grew up eating soup almost every day, and the soups my mom made came in many different shapes, forms and sizes. Soups are a great way to combine different bits and bobs into a one pot to create a satisfying meal for a family. In general, soups are easy to make, very inexpensive, and they store and reheat very well. So, what’s not to love?
This Sweet Potato and Leek Soup is my take on a standard soup that is usually made with potatoes, leeks, butter and heavy cream. I got rid of butter and heavy cream and replaced potatoes with sweet potatoes, making this version a bit sweeter. But, I did not remove all the fun – I made some tofu bacon to top this soup with. The Buddhist Chef makes the most fabulous tofu bacon and I’ve been using his recipe to make crunchy and delicious vegan bacon that works as a snack, in sandwiches and now on soups.
You can top this soup with couple of other toppings if you don’t have time to make the tofu bacon. Chives or green onions (scallions) will work, as will cashew sour cream like the one Angela Liddon shared on her Oh She Glows site, or simple croutons aka piece of toast cut in smaller pieces. Regardless what you put on top of your bowl of Sweet Potato and Leek soup what’s inside it is a tasty, creamy and healthy soup.
Sweet Potato and Leek Soup
What you’ll need:
5 sweet potatoes
2-3 large leeks
2 carrots
4 cups vegetable stock (optional)
3 cups water (or 7 cups if you decide not to use stock)
1 cup almond milk
2 tablespoons potato starch
2 bay leaves
Cooking spray
What you’ll do:
Peel and cube sweet potatoes and carrots into a rough chunks. The size of the chunks does not really matter because you will use a blender at the end to create a smooth and creamy soup. But, the smaller the chunks the quicker the cooking so decide for yourself if you would like to spend more time simmering or more time chopping.
Prepare the leeks using the cleaning method of your choice. The leeks are very often full of send and dirt that gets inside the leek so you will need to open them up and wash everything out. I described my preferred cleaning method in one of my previous posts.
Spray the bottom of a large pot with the cooking spray and place it over the medium high heat. Add leeks and sauté for 5 minutes. The leeks should soften and start to brown.
Add sweet potatoes, carrots, bay leave and potato starch. Mix well and sauté for another 3 to 5 minutes.
Add vegetable stock and/or water. mix well and turn the heat on high. Stirring occasionally, bring the pot to boil then turn the heat down to a gentle simmer. Simmer for 15 to 30 minutes, depending on whether your vegetables were chopped into smaller or larger chunks.
Take the bay leaves out and add the almond milk. Using either a counter top blender or a hand held stick blender to blend the soup together and create smooth soup. Top with any topping you like and enjoy!
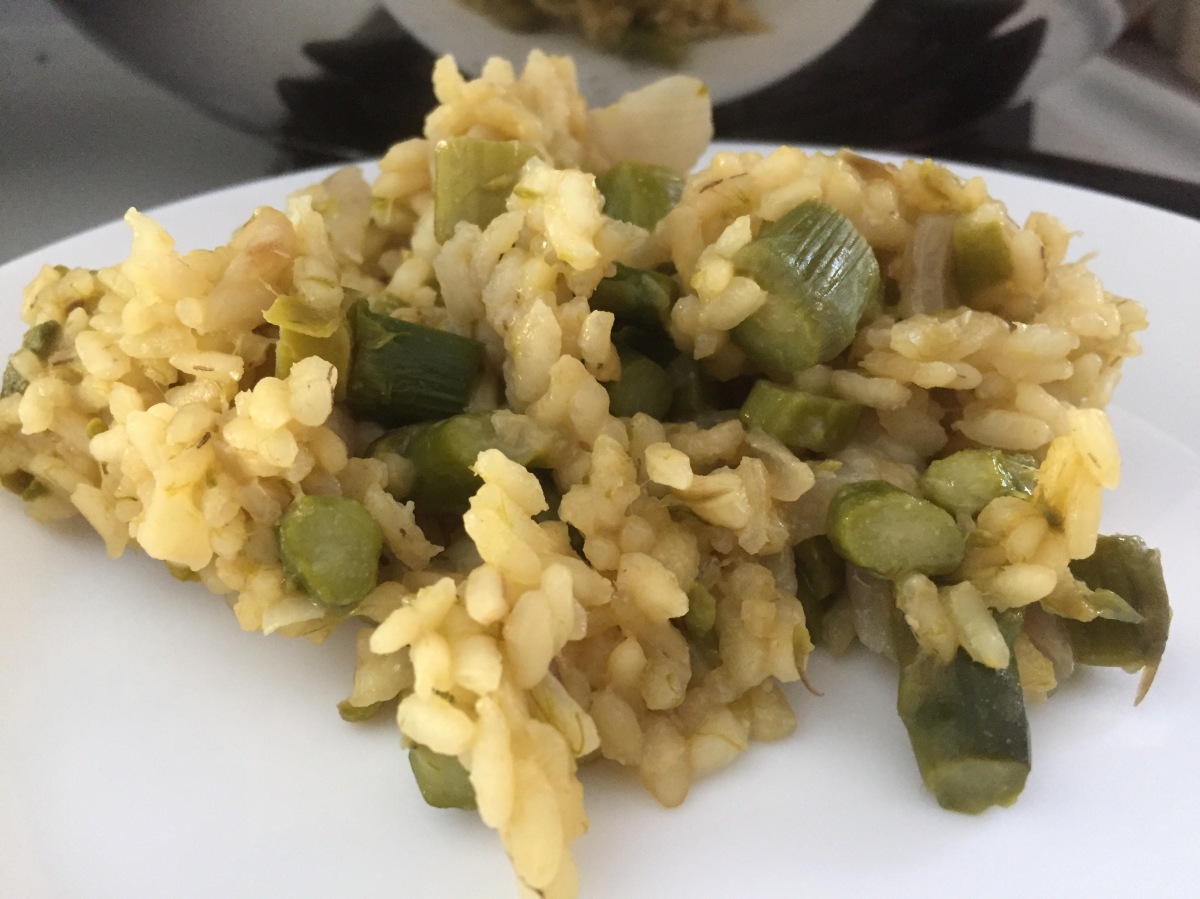
Healthy Asparagus Risotto, via Eat the Vegan RainbowSpring is in the air, although perhaps not yet on the ground, and when it comes to spring vegetables asparagus is it! If you haven’t enjoyed asparagus before, do give it a try. Asparagus is very easy to make as it tastes really good roasted, or in a soup. It is also one of those risotto-friendly ingredients that blends well with creamy rice to add crunch and earthy flavor.
The path to a really lovely risotto goes through picking the right rice and cooking it with patience and with a lot of stirring. My go-to rice for risottos, as well as for sushi and other rice dishes that need a stickier rice variety, is medium grain rice. This is a point of difference with most risotto recipes out there as they recommend using short grain rice variety called arborio rice. Arborio rice will work really well in this recipe too, so if you have it on hand go for it. The kinds of rice that may not work well here are the long grain variety, like Jasmine or Basmati rice.
Cooking risotto does require lots of stirring, and one trick that I use is to add the liquid in batches to let the rice absorb it before adding more. It takes time, but at the end your risotto will be rich and creamy without needing any butter, cream or parmesan, all common risotto ingredients.
My risotto recipe does use on less-common ingredient, nutritional yeast. If you will be preparing vegan recipes often nutritional yeast is definitely worth getting because it is a common add-on that mimics dairy. In the case of this risotto nutritional yeast acts as a substitute for parmesan cheese.
Healthy Asparagus Risotto
What you’ll need:
1 pound (500 g) green asparagus, chopped
1 yellow onion, diced
1 cup medium grain or short grain rice
2 tablespoons nutritional yeast
2-3 cups vegetable stock or water
Cooking spray
Lemon zest, lemon juice (optional)
What you’ll do:
Wash and trim the asparagus. I don’t peel it because I try to get spears that are thin and less woody, but if your asparagus is thick it will need peeling. Cut into approximately 1/2 in (1 to 1.5 cm) bits. You don’t need to be precise here but just think about what your final spoonful will look like and make sure your asparagus bits are small enough to be in harmony with the rice.
Dice the onion into fine dice.
Spray the bottom of a wide and shallow pan with cooking spray. Turn the heat to medium high. Add onions and cook until they soften and start to brown. This will take 4-5 minutes.
Add asparagus and let cook for another 4-5 minutes with occasional stirring.
Add the rice and stir well. Let cook for 1-2 minutes.
Lower the heat down to medium low. Add 1 cup of liquid. Stir well and let the rice soak up the liquid. Give it time and repeat with more liquid. Risotto is definitely one of those dishes that people fear to approach and many articles and posts have been written about how to get to the perfect bowl of risotto and avoid mistakes. Fear not, because all you really need to do is hang around your pot, watch your rice and add the liquid when the rice tells you its thirsty. The amount of rice in this recipe can take anywhere between 2 and 4 cups of liquid. You also might want to start by adding one cup at a time for first 2 cups and then decrease to 1/4 cup of liquid at a time. Keep going until the rice is soft but not mushy, a shade softer than al dente.
Turn the heat off and sprinkle with nutritional yeast. Mix everything together and let stand for 5 minutes.
Sprinkle with lemon zest and a dash of lemon juice just before serving!


