Chickpea Burgers with Sun Dried Tomatoes and Walnut Meat, via Eat the Vegan Rainbow
You should get to know walnuts. They are super nutritious because they have a large amounts of polyunsaturated fats, and surprisingly high amounts of protein, fiber, even vitamins B-6.
Walnuts are also fun and funky. They look like large, green balls when young, and their pretty green skin shrivels into dark brown to black husk as they ripen. This husk eventually falls off, revealing the nut. If you do find yourself with a pile of walnuts still wearing their husks on your hands, do use gloves when peeling them. The walnut husks will release dark brown pigments that will color your skin, and the stuff does not come off easily. It’s actually still used as a natural hair dye in some places, and if you ever get a pile of green walnuts stick them into some brandy and make some dark liquor called nocino.
If you are like me, chances are the walnuts you can easily find come nicely cleaned and sometimes even chopped. These days I prefer to get chopped walnuts as that speeds things up in the kitchen. I use walnuts in my desserts, as a quick snack, and as a meat substitute. This recipe here falls into the “walnuts as a meat replacement” category and to boost their meaty flavor I combine them with sun dried tomatoes, caramelized onions, cumin, smoked paprika, and chili powder. This serves as a fantastic flavor add-on to chickpeas, which are the main ingredients in this burger. Having said that, I think chunks chickpeas here are more of a filler and that walnuts and the sundried tomatoes are the stars.
The main binding agents here are flax meal and bread crumbs. Flax meal has to be soaked in hot water for about fifteen minutes, which should be enough to transform it into sticky goo that you can use instead of eggs as a binding agent.
Chickpea Burgers with Sun Dried Tomatoes and Walnut Meat
What you’ll need:
1 onion, diced
1 cup walnuts, chopped
3 oz. (85 g) sun dried tomatoes, sliced
3 tablespoons flax meal
6 tablespoons water, boiling
2 15.5 oz. (439g) cans chickpeas, rinsed and drained
3 tablespoons olive oil
2/3 cup plain bread crumbs
1 teaspoon smoked paprika
1 teaspoon cumin
1 teaspoon chili
Cooking spray
What you’ll do:
In a large cup or a measuring cup mix flax meal and the boiling water. Let the mixture stand for 15-20 minutes.
Spray the bottom of a large frying or sauté pan with cooking spray and place over medium heat. Add the diced onions and sauté for 8-10 minutes until the onions are nicely caramelized.
Add chopped walnuts and let them toast slightly. This will take 3-5 minutes.
Add the sun dried tomatoes, mix well and sauté for another couple of minutes.
Transfer the sautéed mixture into a large mixing bowl. Add the chickpeas that have been carefully washed, drained and half-mashed with either a hand or a fork. Add the soaked flax meal, spices, oil, and bread crumbs and mix well.
Form the burger patties, and place them on the wax paper lined platter. Put the patties in the fridge for at least 30 minutes to firm up.
Grill the burgers using an outside or an inside grill, or a grill pan. These burgers are sturdy and should not fall apart while grilling. They need 3-5 minutes per side to get nice grill marks.
Serve them on a ham burger bun with your choice of toppings and condiments!!!
White Bean Burgers with Chia Seeds, via Eat the Vegan Rainbow
Another veggie burger, another sensation (if you like to see some past examples, there are here, here, here, and here)! And you don’t need to take my word for it, just go ahead and make a batch of these. First of all, they are ultra-cheap. I use dry beans and one pound, approximately half a kilo, of dry beans will make a huge pile of these burgers. At the end, I think my yield from this recipe was about 15 burgers. The burgers store well in the tightly sealed container in a fridge – you can keep them for a week – and reheat easily in the microwave oven, toaster oven or on the stove top. I am not entirely sure they freeze well, but you can try. If you do decide to freeze a batch, I recommend cooking them through, letting them cool, then separating individual burgers with some wax paper, then freezing. In that way you can grab a burger any time you need it!
Chia seeds are the magic ingredient here. I’ve used chia seeds in the past to make puddings, but here I use them as the main binding agent, the same way you would use egg or a flax “egg”. To make chia “egg” all you need to do is soak chia seeds in some water for about 30 minutes or so. By the time half an hour is up you should have a very thick and gooey mixture that looks quite slimy and that is a good sign. It means your chia seeds are ready to use. Chia seeds add not only the cohesiveness to this recipe, but bump up the nutritional value of your burgers because they are rich in polyunsaturated fatty acids.
I used to be afraid of cooking the beans and would get canned ones only. But, I recently started using a pressure cooker and I love it! I soak the beans overnight to speed things up, although I did make the beans without soaking and that works as well – you just need to cook them for a longer time. Once ready for the pressure cooker, I rinse the beans, place them in the pot and cover with water. I use an electric pressure cooker and use a preset bean program which takes about fifteen minutes of pressuraized cooking. Once the program is done and the pressure cooker is safe to open, I drain the beans and use without rinsing. You can save the liquid too, and make it into a soup if you like.
Note: if you are cooking dry chickpeas this water is the actual aquafaba that everybody is raving about, so do keep it and use it as the egg white substitute. I recently made aquafaba meringue and topped my Butter Squash and Cranberry Pie with Praline and Meringue Topping.
Once you have your chia egg and your cooked beans the rest is easy. All the ingredients so into a large mixing bowl or a food processor and get processed together. Once formed, the burger patties need to sit in the fridge or on the kitchen counter for about half an hour to an hour to firm up, and they are ready to go. I made my batch in a non-stick pan sprayed with some cooking spray, but you can grill them or even put them in the oven. They don’t need much cooking really since all the ingredients have already been cooked, so what you are really looking to do is brown the patties nicely on both side and heat them through.
You can serve these veggie burgers through the year and with any condiments you enjoy. I can recommend a piece or two of avocados and a spoonful of Macadamia Nut Queso Fresco with just a spring of cilantro. That out to do the trick!
White Bean Burgers with Chia Seeds
What you’ll need:
1 lbs (450 g) white beans, dry
1/2 cup red pepper paste (or tomato paste, if you don’t have red pepper paste)
2 tablespoons chia seeds
6 oz (3/4 cup) water
1 cup coarse corn meal
1/2 cup fine corn meal
2 tablespoons stake sauce
1 teaspoon cumin powder
1 teaspoon chili lime powder (or regular chili powder)
Cooking spray
What you’ll need:
Cover the beans with water and soak overnight at room temperature.
Rinse the beans before cooking, then cook them in a fresh batch of water until done. If you are using a pressure cooker the total cooking time will likely be about 30 minutes. If you are cooking them in a regular pot they will probably need an hour or an hour and a half. You can also use the canned beans and you probably need 3-4 15 oz (425 g) cans to get the amount equivalent to what you get from a pound of dry beans.
While beans are cooling, start soaking chia seeds in 3/4 cup of water. This will take 30 minutes or so.
By the time chia seeds are ready to use, your beans will be cool. Place the beans, chia seeds, and the rest of the ingredients into a large mixing bowl and process everything together with a stick blender. You can also use a food processor for this step.
For the burger patties and leave them to firm up for about 30 minutes. You can leave them on the kitchen counter or in the fridge. You can also make them a day ahead and leave them in a fridge and finish cooking them the next day.
Preheat the grill, grill pan or a non-stick frying pan to medium-high. I recommend using some cooking spray to help the burgers brown and get them going, but if you do have a good non-stick pan you can probably get away with not using any oil or cooking spray. The burgers need 3-4 minutes per side.
Serve them fresh from the grill/out of the pan and enjoy with your favorite toppings and condiments!
Spicy and Smokey Pulled “Pork” Jackfruit, via Eat the Vegan Rainbow
For many transitioning to plant-based, vegan or vegetarian diets giving up meat could be very difficult, especially during the summer months of outdoor grilling and the good ol’ BBQ. So, it’s no wonder that many recipe developers have been interested in capturing some of the BBQ flavors and channeling them into plant-based dishes.
Few weeks ago I reviewed one of the newest cookbooks dedicated entirely to vegan grilling, and I am currently going over the vegan butcher’s cookbook. Almost every one of these cookbooks as well as many vegan blogs and recipe aggregators include at least one vegan pulled “pork” recipe that uses green young jackfruit to recreate the look and feel of pulled pork. Jackfruit BBQ pulled pork recipe was even featured on TODAY.com as one of the biggest food trends of 2017!
I’ve been using jackfruit for over a year now, and have tried couple of different pulled pork recipes. They left me a bit underwhelmed, and I put the idea of BBQ pulled jackfruit on a side burner. And that’s where it stayed until very recently when I decided that it’s time to tackle this challenge again.
The recipe I came up with is slow cooker based and it takes about six hours to make. First, I combined lots of finely chopped onions and finely grated carrots to give the BBQ lots of natural sweetness. To help the aromas develop, I mixed the onions and carrots with oil and tomato paste and cooked them in the microwave oven for six minutes or so, until almost fully softened and slightly caramelized.
Next, I pulled the drained and rinsed jackfruit before cooking. I discarded all the very tough bits and pulled the rest apart with my fingers.
For smokiness and flavor, I added molasses, mesquite powder, and some sauce from chipotle peppers in adobo sauce. This sauce is super spicy so go easy with it, or replace it with some smoked paprika, or liquid smoke. I like a bit of a kick so this sauce (in moderation) works for me. The mesquite powder is something that you may need to order online (I got this brand from Amazon), but it is worth having on hand. It’s a powder that adds nice nutty and subtly smokey flavor to baked goods, desserts, and now “pulled” pork.
The slow cooker did all the work once I mixed everything together. The main pro tip when using a slow cooker (crock pot) is to use a liner to help with clean up. Other than that – you mix all the ingredients, put the lid on, turn on high for several hours, and you are done!
The pulled jackfruit really delivered! The sweetness and the heat from the adobo sauce combined to give this all sort of happy balance. Jackfruit turned out soft and very much like pulled pork in texture, while onions and carrots have almost melted into the final sauce, which is exactly what I wanted.
Spicy and Smokey BBQ Pulled “Pork” Jackfruit
What you’ll need:
1-2 yellow onions, finely diced
3 large carrots, finely grated
3 tablespoons tomato paste
2 tablespoons canola (or other neutral taste) oil
3 10 oz (280 g) cans green, young jackfruit in brine (drained, rinsed and pulled apart)
1/4 cup dark molasses
1 tablespoon adobo sauce
2 tablespoons mesquite powder
What you’ll do:
Mix diced onion, finely grated carrots, oil and tomato paste in a microwave safe bowl. Put in the microwave for 6-8 minutes until onions start to caramelize.
While the onion and carrot mix is caramelizing and softening, drain and rinse the jackfruit then use your fingers to pull apart all the soft bits while discarding the tough pieces of core.
Line the slow cooker with a liner, add the pulled jackfruit, onion and carrot mix, and the rest of the ingredients. Please note that adobo sauce from a can of chipotle chilis in adobo sauce is very smokey and very spicy, so you may want to dial down or dial up (if you are really adventures!) according to taste. If you rather not have the heat, you could use some smoked paprika and/or a teaspoon of liquid smoke.
Cover the slow cooker, and turn it on to high heat for 5-6 hours.
Serve the BBQ pulled “pork” in a hamburger bun, with some mashed potatoes, coleslaw, grilled corn, or any of other of your favorite sides. The BBQ pulled “pork” would also go really well with some freshly made cornbread, and you can always pour on some of your favorite BBQ sauce for that “finger lickin’ good” feel!
Vegan, fully plant-based meatballs are one of the easiest thing in the world to make. I like putting meat-free “meatballs” together because they are fun – fun always comes first of course – and they are versatile, you can stick them into a sandwich, over pasta, serve with mashed potatoes, with rice and beans, and the list goes on and on…
Plus: unlike dealing with meat, especially poultry, all the ingredients in these meatballs are safe to eat as is, which means that even young kids can get involved and roll some meatballs. I told you – these can be fun for everyone!
What makes these meatballs Asian is the combination of scallions (green onions), Sriracha (hot red chili sauce), fresh ginger, panko (Japanese breadcrumbs), and peanut butter that get mixed with chopped, not ground, soya chunks. The idea is to retain some of the soya chunks structure rather than grind them to the consistency of ground beef. Think chicken salad, rather than taco meat.
To complete the meal you will need to do some spiralizing, which is one of my favorite things to do with zucchini, summer squash, and even potatoes. Here, I combined carrots and zucchini which gives the salad a nice contrast of crunch versus softness, plus a colorful appearance. The spiralized vegetables are mixed with some slivered almonds, lime juice and zest, and tossed to combine. Top them with a meatball or three, and you got yourself a dinner!
Asian Meatballs with Spiralized Zucchini and Carrot Salad
What you’ll need:
FOR THE SALAD
3 zucchinis, spiralized
3 fat carrots, spiralized
1/2 cup slivered almonds
1 lime, juice and zest
FOR THE MEATBALLS
200 g soya chunks
1 1/2 cup panko, Japanese breadcrumbs, regular or gluten-free
3 scallions, white and green parts, finely chopped
1 tablespoon ginger, freshly grated
1 tablespoon peanut butter, natural and unsalted
3 tablespoons soy sauce, reduced sodium
1/2 teaspoon hot chili sauce (sriracha)
Cooking spray
What you’ll do:
Prepare soya chunks according to the instructions on the box. They usually need about 3-5 minutes in a pot of boiling water.
Drain and rinse your soya chunks under some cold water, then chop or grind them into small chunks, similar to chicken chunks commonly used in Asian Dumplings recipes. Place them in a large bowl, and add all the rest of the ingredients. Mix everything well and let stand for 5-10 minutes before making the meatballs.
Heat a large skillet or a cast iron pan over the medium high heat. Spray with some cooking spray and brown the meatballs on all sides until golden brown. Brown the meatballs in batches and make sure you don’t overcrowd the pan.
While the meatballs are browning, prepare the salad. You can either buy a box of spiralized carrots and spiralized zucchini and toss them with some lime juice, lime zest, and toasted slivered almonds, or you can spiralize your own if you have the spiralizer. Let the salad rest while the meatballs finish browning.
To plate, place a good amount of salad in the middle of the plate, and top with 2-3 meatballs. Enjoy!
Although it may seem like a mission impossible, recreating meat like appearance, consistency and even the taste with plant-based ingredients is not all that hard. The basis for many of my meatless recipes are mushrooms. I usually use baby portobello mushrooms, also known as the crimini mushrooms, but white button mushrooms would work just as well. Very often I grind the mushrooms into a paste and this also helps with the final meat-like vibe of a dish. Finally, I cook the dish with the same spices and in the same way as someone would a meat version of the same recipe.
The meatless Shepherd’s Pie I made some time ago nicely illustrates these tips. For that recipe I used mushrooms and lentils, as the key umami components, and combined them with herbs that you would typically use in this pie – thyme and plenty of rosemary. What you see and smell will evoke the right memories and experiences, so by the time you have the first bite your brain is already convinced it’s having meat.
Here I use all those strategies to make koftas, which are sort of flat-ish lamb meatballs placed on a skewer and grilled. Minced mushrooms give the right level of umami and TVP (textured vegetable protein) gives the koftas structure. One note on the TVP – instructions usually say that you need to soak the TVP flakes before using which is true for many applications but not for this one. Use dry TVP and mix it with minced mushrooms and the rest of the ingredients to get to the right consistency for the koftas. After all they will need to go on the skewers and need to be robust enough for broiling on high. I did add some bread crumbs to the mix as well, as an extra binding agent. If you are not a fan of bread crumbs, you could add oats, or some corn meal.
Koftas need to be shaped by hand, and the skewers gently threaded through. Ideally, the skewers you are using are long enough to rest on the edges of your broiler pan (see picture below) so that you can turn them midway through broiling and get all sides well browned. I can’t recommend the bamboo skewers I used here – by the end of the broiling they were all black band falling apart – so metal ones seem like a much better idea.
Serve Broiled Vegan Koftas with some Saffron Cauliflower Rice, and with a spoonful of mint chutney, and you will have yourself a great, well-rounded meal.
Broiled Vegan Koftas
What you’ll need:
10 oz (280 g) white button mushrooms
10 oz (280 g) TVP
1 cup bread crumbs, plain, gluten-free
4 cloves garlic
3 tablespoons olive oil
2 teaspoons coriander powder
2 teaspoons ground cumin
2 teaspoons smoked paprika
1 teaspoon crushed red pepper flakes
Cooking spray
What you’ll do:
In a large food processor, mix all the ingredients (except the cooking spray) and pulse to mix and combine. Let this mixture stand for at least 30 minutes and up to one hour.
Start your broiler on “HI” or use the outdoor grill if you like.
Line a broiler pan with some foil. You don’t need the top grate part that broiler pans usually have so leave it aside.
Using your hands take about 1/2 cup worth of koftas’ mix and form an elongated oblong shape about 1 1/2 in (3-4 cm) wide then pierce it with a skewer. These koftas are gentle so handle them with care. You may need to adjust the amount of bread crumbs, or add some flex meal as a blunder. Leaving them in a fridge or freezer to firm up will help them hold their shape. Place the skewers on a broiler pan making sure their ends rest on the pan’s rim and the koftas don’t touch the bottom (see picture above).
Broil on high for 5-8 minutes than turn over to broil on the other side.
Let koftas cool just for a moment then serve with some rice, Saffron Cauliflower Rice, or a mild yogurt, like almond or cashew ones.
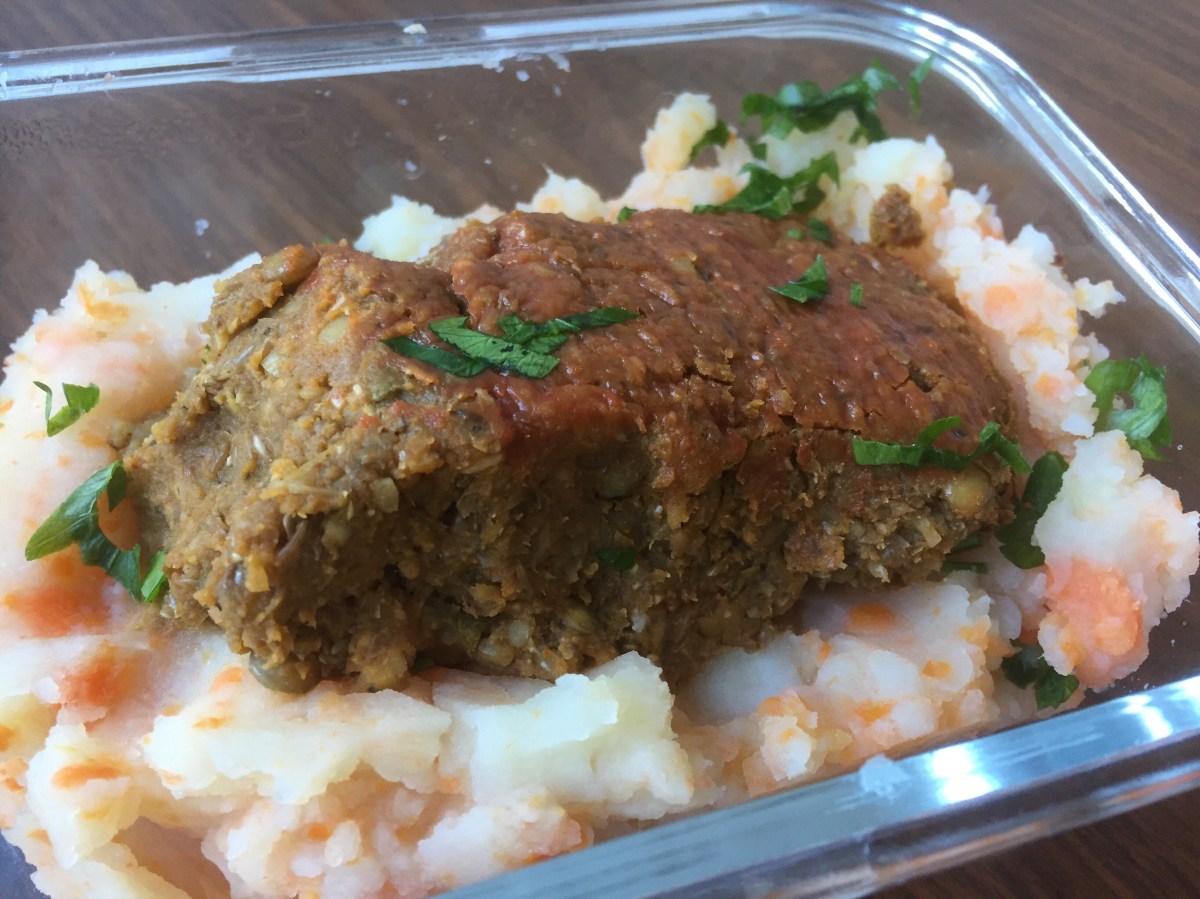
Lentil and Pumpkin Meatloaf with Carrot-Potato Mash, via Eat the Vegan Rainbow
Meatloaf – that one dish that is universally despised yet it persists against all odds. During my meat eating days, I may have made meatloaf once or twice and it did not make a great impression. This Lentil-loaf is different. It’s full of flavor and lightness, while at the same time a little goes a long way.
The key ingredient are the lentils. They are one of those ingredients that can replace minced or ground meat in almost anything. I used them in Shepherd’s Pie, and in Lasagna, as well burgers, meatballs and in that staple of vegan cooking, Lentil Soup. Lentils are cheap, available, nutritious, and lend themselves to many spice and flavor combinations.
In this meatloaf, lentils are the meat, but meat is not all it takes to make a loaf. So, to bind everything together I use a can of pumpkin. The pumpkin holds things together almost as good as an egg would. If your loaf turns out a bit softer than you like, add some oats or some bread crumbs to it. I also recommend letting the loaf sit for 15 minutes or so after coming out of the oven to firm up before serving.
Finally, what really makes a huge difference is what you do to onions and celery before you mix them all into a loaf. I recommend that you place the diced onions and celery, with a dash of cooking spray or oil, into a microwave for five minutes or so. You want the aromatics to soften and brown as they will not have a real chance to do so while the loaf is baking. This will add a nice sweet and savory tone to the loaf and help lentils and the pumpkin, as neither one has a strong flavor. To help them out even further, you will need to add some more umami-type of components, like the Worcestershire and the tamari sauce.
You can serve this meatloaf with any sides you like. Here, I paired it with mashed carrots and potatoes. Adding some carrots to the plain, white potato mash makes it more colorful, playful and in some ways healthier. Plus, it offers a break from the routine! You can make the mash withou adding any salt or butter (oil), it would taste just fine, especially when served with this lentil and pumpkin loaf which has plenty of flavor itself.
Lentil and Pumpkin Meatloaf with Carrot-Potato Mash
What you’ll need:
For the Meatloaf:
1 yellow onion, diced
2 cloves garlic, crushed
4 stalks celery, diced
16 oz (454 g) brown lentils, cooked
1 15 oz (425g) can pumpkin
1/3 cup tamarind sauce
1 tablespoon Worcestershire sauce, vegan
1 tablespoon dried oregano
1 tablespoon dried basil
1 teaspoon chili powder
2 teaspoon smoked paprika
1/4 cup ketchup
Cooking spray
For Carrot-Potato Mash:
6 carrots, peeled and chopped
4 potatoes, white, peeled and chopped
1 tablespoon butter, vegan
1/4 teaspoon salt
What you’ll do:
Bring 4 cups of water to boil and add the lentils that have been washed and sorted. Reduce the heat and simmer for 30 minutes until lentils are fully cooked. Drain the excess liquid and transfer the lentils into a large mixing bowl. Let them cool while you assemble the other ingredients.
Peel, wash and chop the carrots and potatoes into smallish cubes of about similar size. Place in a large pot or a pressure cooker, cover with water, bring to boil and cook for 20 minutes if using a conventional method or 10 minutes in the pressure cooker. Drain from excess liquid, add the salt and butter and mash it with the potato masher. Place into a serving dish and cover with foil to keep warm until the meatloaf is ready. If you like you can even place the mashed carrots and potatoes into an oven safe dish and let the top get crunchy.
Preheat the oven to 375 F (190 C).
While lentils are cooling and carrots and potatoes boiling, dice onions and celery. Place into a microwave safe bowl, spray with cooking spray or with 1/4 teaspoon oil and microwave on high for 5-6 minutes, until soften and slightly browned. Add to the lentils when ready.
Add the rest of the meatloaf ingredients (except ketchup), and using a stick blender form a well blended mixture. You can also use a food processor. In both cases, do leave some lentils whole to add to the texture of the final meatloaf.
Line a large baking sheet, or a loaf pan if you prefer your meatloaf more loaf-y, with a foil, spray with come cooking spray to prevent loaf from sticking, form the loaf with your hands if you are using the baking sheet, and place into the oven (if you are using regular size loaf pans you will have enough of a mixture for two loafs).
Bake for 20 minutes, take the meatloaf out and spread the ketchup across the surface, and bake for another 10 minutes. Take the loaf out and let it rest for 15 minutes before serving.
Serve the meatloaf with the mashed vegetables and enjoy!
Top 5 Eat the Vegan Rainbow Recipes of 2017, via Eat the Vegan Rainbow
Well, the year came and went. 2017 saw two major changes in my life: I decided to become vegan, and I changed my job after a decade. Both of these changes have helped me rebalance, and regain control of my wellness. The change I made to my diet had profound effects on my energy levels, and gave an incredible boost to my culinary creativity. I’ve have not felt so inspired and motivated to try new things for a long, long time.
On top of wanting to eat and make different food, I also decided to share everything. That’s how this blog was born! It’s been a great adventure because blogging, sharing, and being engaged in social media in many plant-based and vegan groups has been eye-opening. There’s so much creativity, encouragement, and positive energy out there!
I appreciate that many of you may be struggling because a life-style change is never an easy thing, and I also gather from comments and posts that many are surrounded by family, friends or work environment that does not support or even approve of the plant-based and vegan eating and living. The best advice I can give you is to take it one step at a time, and keep reminding yourself of why you decided to make this huge change to begin with. And: keep creating delicious dishes and keep serving them to all you love and care in your lives to spread the well-being and comfort that well-prepared and nutritious food brings.
So, as is customary to do as a year is winding down I took a look at Eat the Vegan Rainbow to see what people enjoyed reading the most. Not surprisingly, the most read post of 2017 is “5 Must-try Recipes for Beginner Vegans” which I put together after being a vegan for about 6 months, to highlight some of the recipes that I found incredibly helpful. And I am glad to see that many of you have found it to be useful as well!
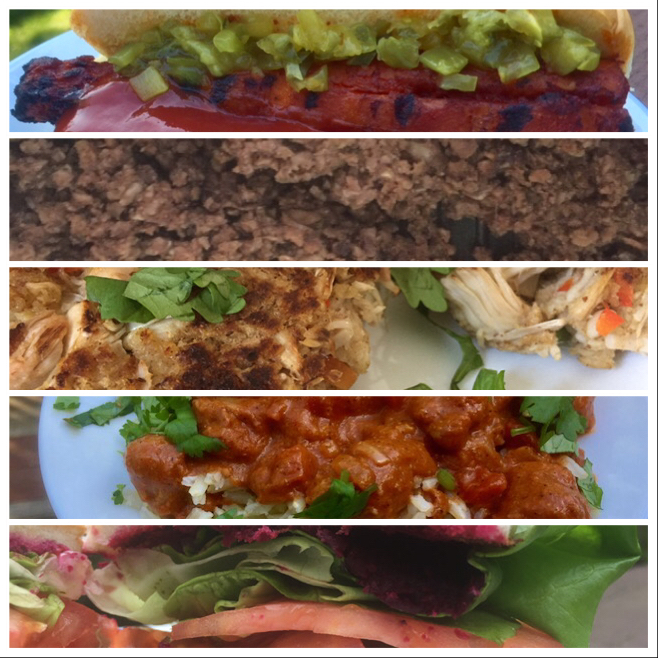
When it comes to my original recipes, there is definitely a clear pattern to the top five. All top five recipes are substitutes to animal-based recipes, and provide a healthier alternative to the types of foods most of us have been exposed to for most of our lives. So, without further ado I give you the Top 5 Eat the Vegan Rainbow Posts of 2017:
Hottest Summer Trend: Carrot Dogs – these “hotdogs” made from marinated carrots that have been grilled are the most amazing thing that I had so far, and it did not surprise me to see that others have loved them too! Since that summer treat, I’ve use similar ingredients to make an incredible Cream of Carrot Soup, which is also a winner in my book and if you have not tried it yet do give it a go!
Homemade Ground Beef Substitute – this was an essential recipe for me to develop since the store-bought ground beef substitutes were just not making me happy. They were either too expensive to really work for me, or had weird ingredients, or spices I did not enjoy, or left a strange aftertaste. So, I developed my own mix that works, and I’ve been using it in tacos, nachos, stuffed peppers, and similar dishes that use ground beef as a filler. It is spot on!!!
Chicken-less Tikka Masala – for those of you who love Indian food, this one is the winner! The blend of spices and nut-based yogurt, with gentle tomato sauce and soya chunks as chicken replacement work incredibly well. You will get all the texture and flavors of the original dish!!! And if you not familiar with Indian cuisine, you should make it one of your New Year’s Resolutions to give it a try. First of all, many of Indian dishes are already vegetarian since India has a huge culture of not eating meat, and many of the traditional dishes are easily veganized. Just take a look at the Vegan Saag Paneer, and Sabudana Khichdi.
Vegan Jackfruit “Crab” Cakes – these “crab” cakes are simply amazing! They deserve quite a few superlatives, because they are super easy to make, super cheap, and super impressive. They will be able to convince even the hard core crab cake lovers that you can have a great crab cake without the crab. You can actually have an excellent New England Clam-free “Clam” Chowder as well, and while we are talking about seafood replacements, you can also have a great Faux-lobster roll, although some have been saying that it just not the same! For me all these recipes are really good, and so close to the original thing that I can not longer tell the difference, and that’s good enough for me.
A Very Beefy Veggie Burger – as it turns out, and perhaps not surprisingly, we all love to grill outdoors during the summer days, and we all enjoy a great burger. The veggie burgers that are out there fall a bit short of delivering that meaty bite and flavor, and the high-tech Beyond Burgers are fantastic but really pricey. So, I’ve been playing around and making all sorts of burgers, like the Avocado Burgers, Black-Eyed Peas Burgers, and Roasted Red Pepper Chickpea Burgers, which were all worth getting excited about. They have different degrees of beefy flavor and texture, and they hold up to grilling to a different extent, and you can’t go wrong with any of them.
I can’t leave without asking you to share some of your favorite recipes. What were your clear winner in 2017? Something similar to what I highlighted above, or something completely different? Let’s share each other’s food and thoughts about eating and well-being, and keep helping each other navigate the world of plant-based foods and flavors. I wish you a Happy and a Healthy New Year!!!
Chicken-less Tikka Masala, via Eat the Vegan Rainbow
Several months ago I shared the recipe for a Vegan Chicken Tikka Masala that used jackfruit instead of the chicken and came together in a slow cooker. I still think that that’s a great, flavorful and aromatic dish and if you are looking for new ways of making and enjoying jackfruit it is definitely something you should try. Having said that, someone did ask about what the source of protein was in a dish like that, and although jackfruit, as well as all the other fruits and vegetables on the planet, has some protein it is not a protein-rich food.
So, I went looking for ways to increase the protein content in the plant-based Tikka Masala and found soya chunks. Soya chunks are not something that’s easy to find in US grocery stores. I was able to find them in Serbia easily enough and I have now also found them on Amazon and in my local Indian grocery store. If you have an Indian grocery store relatively nearby, it’s absolutely worth the trip. I find that the prices in the Indian grocery store I go to are on average three to four times cheaper than online, and things like rice, soy and chickpea flour, and spices are a fraction of the price when compared to my regular grocery store or health food store. Most Indian stores have a freshly made food section as well, so although not many items on the traditional Indian menu are vegan, I’m sure you will find a couple worth trying out.
Back to soya chunks now. Soya chunks are made from fat-free soy meal, a by-product of soybean oil extraction. The meal is molded into different shapes and textures (soya chunks of different shape and size) and dried out to create a shelf-stable, long lasting products. I use several different size of soya chunks, depending on what I am making. For example, the size of soya chunks I chose for a dish like chicken-less tikka masala matches the size of chicken chunks, which are usually about 1 inch (2.5 cm) cubes. An essential step for almost all soya chunk dishes involves boiling soya chunks in water for five minutes or so to rehydrate them. If you are using very fine soya chunks, like TVP (textured vegetable protein), boiling is usually not required but some soaking will be needed. The only TVP application where I advise against soaking is when making burgers, and you can find out why and how come in my recipe.
For this Chicken-less Tikka Masala to work, you will have to marinade soya chunks in a spice-and-yogurt sauce. Basically, you are following all the same steps as you would if you were making the chicken version of this dish, and by the time you are finished all the marinating and simmering nobody will be able to tell that what they are eating is not the real thing. I recommend marinating soya chunks overnight, but if you are in the hurry starting the marinate in the morning and finishing the dish later the same day will work.
The Chicken-less Tikka Masala is best served with some Basamati Rice, and topped with fresh cilantro. For a full restaurant experience you can add some Naan bread and Cucumber Raita, which you can make easily with some finely sliced cucumber, some yogurt, and a squeeze of lemon juice!
Chicken-less Tikka Masala
What you’ll need:
7 oz (200 g) medium soya chunks
2 tablespoon coriander powder
1 tablespoon paprika
1 tablespoon cayenne
1 tablespoon ground cumin
1 tablespoon garam masala
1/2 tablespoon cardamom powder
1 cup cashew yogurt
1 large onion, diced
6 oz (170 g) tomato paste
1 14.5 oz (411 g) can petite diced tomatoes
2 tablespoon vegetable oil (divided)
Fresh cilantro
What you’ll do:
In a large pot cover soya chunks with water, bring to boil, and let cook for 5 minutes. Remove from the heat and let stand for 30 minutes. Transfer soya chunks into a large strainer, rinse with cold water and gently press any access water out. You want your soya chunks to be soft and moist but not dripping with water.
Place one tablespoon of vegetable oil in a pan and heat until the oil is hot. Reduce the heat to medium and add the spices (coriander, paprika, cayenne, cumin, garam masala, and cardamom). Toast the spices for 1-2 minutes, until fragrant. Place the toasted spices into a large mixing bowl and let cool for few minutes.
Once spices have cooled just a bit, add the yogurt and mix well. Next, add the soya chunks, make sure they are well covered with the marinade, and refrigerate for at least 12 hours. If you are in a rush you can cut down the marinating time to couple of hours – in that case leave everything on the kitchen counter.
In a large and heavy pot, like a Dutch oven, heat 1 tablespoon of oil over the medium high heat. When oil is heated, add the diced onion and let it brown for 5 to 7 minutes.
Once the onion is browned, add the tomato paste, mix well and let the tomato paste brown slightly. This will take 3 to 4 minutes.
Next, add the marinated soy chunks together with all the yogurt marinade. Mix well, and let the soy chunks brown just slightly. You will need to give it an occasional stir, but the idea is to let the soy chunks get a chance to caramelize on the edges just slightly. This will take about 10 minutes.
Add diced tomatoes, mix well, decrease the heat to medium low, and let the Chicken-less Tikka Masala simmer for 15 minutes or so. This simmering will allow all the flavors to come together more completely, and the sauce to thicken slightly. If you discover that your sauce is not as thick as you like it, keep simmering until you reach the consistency you like.
Zucchini Lasagna with Walnut and Brown Lentil Ragù, via Eat the Vegan Rainbow
Let’s cut to the chase and be honest here – although we can pretend otherwise, we are all as obsessed with lasagnas as Garfield is! The layers of soft noodles, amazing sauce, fresh herbs, and most commonly lots and lots of ground meat and soft cheese. All this means that lasagnas are not the healthiest thing on the menu. Having said that, there is no reason to ban lasagnas from your plate; you just need to learn how to keep it healthy and plant-based, and I think I can help you to troubleshoot both of those problems.
Keeping lasagnas meat-free seems to be the problem many have tackled, usually by overloading lasagna with cheese, cheese and eggs, or cheese and a selection of vegetables, like mushrooms, and increasing the amount of tomato sauce and making it chunkier. But, really the most prominent ingredient in majority of meatless lasagna recipes is the cheese. When I was developing this lasagna recipe I did not want to give up on idea of “meat”, so what I came up with is a hearty, meaty, and flavorful walnut and brown lentil “meat” ragù base. My thinking was inspired by my previous, wildly successful Meatless Shepherd’s Pie, which I served for Easter this year as a substitute for a more traditional, lamb-based dish. In that recipe, lentils, mixed with ground mushrooms and cooked with rosemary and thyme, made for an amazing feast.
Here, I wanted to recreate the traditional meat ragù and went for a combination of chopped walnuts and dark lentils. The trick is too cook the lentils separately and add them to the rest of the ragù when they are fully cooked. Also, chop your walnuts into pieces that are about the size of what ground meat pieces may look like. I chopped the walnuts by hand, just by going over walnut pieces with a knife few times, back and forth. You can buy whole walnuts, or walnut halves in store and start from there, but for this a bag of walnut pieces will make your life easier and make the dish cheaper. Walnuts work really well in this lasagna, because they add some of their natural crunchy texture, protein, and a bit of fattiness to the otherwise very lean recipe. Worried about this extra fat? Walnuts are known for having a lot of unsaturated fat, which is the good kind, so don’t skip it! The meatiness of the ragù is further enhanced by a good amount of tomato paste and crushed tomatoes and letting the ragù simmer for a while.
Walnut and Brown Lentil Ragù, via Eat the Vegan Rainbow
The preparation of any lasagna happens in several stages and this one is no different. In order to make the process more efficient I recommend that you start roasting the zucchini at the same time you start making the ragù, and then start boiling the lasagna noodles when zucchini is just about done. In that way you don’t even need to turn the oven off, you can just lower the temperature from roasting to baking and be ready for lasagna to go in immediately. Please note that I don’t use zucchini as a complete lasagna noodle replacement. I suppose you could, but then you’ll end up in a more of a Zucchini Mousaka territory than lasagna paradise. If you are concerned about gluten, there are now many gluten-free lasagna noodle options for you to choose from and most of them work perfectly.
The final touch on this lasagna is the Béchamel sauce (besciamella), which is a white sauce traditionally made with milk, butter and flour. In this case, the quick white sauce I put together requires only a blender, some soft, silken tofu, a squeeze of a lemon, and a bit of nutritional yeast. It is very much the blend-and-pour type of sauce, so you can do it a in a blink of an eye. The sauce adds a nice, slightly cheesy flavor to this very rich lasagna, and makes for a nice, almost golden glaze.
Zucchini Lasagna with Walnut and Brown Lentil Ragù
What you’ll need (for 9 x 13 in (23 x 33 cm) baking dish):
8-10 lasagna noodles, gluten-free if preferred
1 lbs (450 g) brown lentils
3 zucchinis, cut lengthwise into long strips
2 large carrots, diced
3 stalks celery, diced
1 cup raw walnut pieces, chopped
1/2 yellow onion, diced
1 can (28 oz, 800 g) crushed tomatoes
2 tablespoon tomato paste
1 tablespoon crushed garlic
1 teaspoon dried oregano
1 teaspoon dried basil
3 tablespoons fresh Italian (flat leaf) parsley
1 lbs (450 g) silken tofu
2 tablespoons lemon juice, freshly squeezed
1 tablespoon nutritional yeast
Cooking oil spray
What you’ll do:
Preheat oven to 425 F (220 C).
Prepare the lentils according to the instructions on the bag. Basically, bring 4 cups of water to boil and add the lentils that have been washed and picked over to remove any impurities that may have made their way to the lentils. Bring the lentils back to boil than lower the heat to a gentle simmer, and cook for 20 minutes or so, until lentils are completely cooked. Drain the lentils from excess water and set aside to cool.
While the oven is preheating, and lentils are cooking, prep your veggies. Peel, wash, and dice the onions and carrots, and wash and dice the celery. Wash the zucchini well, remove the ends, then cut into long, thin strips. You can use a mandolin slicer for this, but cutting by hand also works. The zucchini slices should be as close to the thickness of the lasagna noodles as possible, but you don’t need to go crazy here – just keep in mind that a bit thinner is better.
Line a baking sheet with parchment paper, place the zucchini slices on and spray with cooking spray. You may need to use two baking sheets, since you may discover that you can’t manage to have all your zucchini slices arranged in a single layer. Don’t pile the zucchini on top of each other and do roast in batches if needed. Place the zucchini “lasagna noodles” into the oven to roast. The roasting will take anywhere between 15 and 25 minutes and will depend on the thickness of your zucchini. Keep an eye on the oven and if you are roasting two pans of the zucchini at the same time do rotate the pans mid way through the roasting. You will know that the zucchini is done when the edges are slightly brown and the middle is golden. Once you take the zucchini out, decrease the oven temperature to 350 F (175 C).
While the zucchini is roasting, start your the ragù. Spray the bottom of a Dutch oven, or another type of heavy pan, with cooking spray and heat up over the medium to medium high heat. Add carrots, onions and celery and let them brown for 10 minutes. Add chopped walnuts and let them pan roast for about 2 to 3 minutes. Add garlic, oregano, and basil, and let the flavors develop for a minute. Next comes tomato paste – add it to the pan, mix well and let brown just slightly. This takes about 2 minutes or so. Add the cooked lentils and the crushed tomatoes, and mix well. Let the ragù simmer for 10 to 15 minutes. Turn the heat off, add the fresh parsley and mix well to combine.
Once the ragù is simmering, it’s time to start cooking your lasagna noodles. Most varieties ask for a large pot of boiling water and about 10 minutes of boiling time. The noodles don’t need to be cooked all the way through as they will continue to cook in the oven but they do need to soften quite a bit, so 8 to 10 minutes should be enough to achieve that. Drain the noodles and use immediately.
Combine tofu, lemon juice and nutritional yeast in a blender and blend until smooth. Set the besciamella to the side.
Spray the bottom and sides of your 9 x 13 in (23 x 33 cm) pan with some cooking spray. Cover the bottom liberally with the ragù (use about a half of the amount you made), layer the first set of noodles (for me that came to about 5 noodles per layer), then layer the zucchini in a single layer, pour the rest of the ragù, and top with the remaining noodles. Pour the besciamella over and cover with foil.
Place the covered lasagna into the 350 F (175 C) oven and let bake for 30 minutes covered and then about 10 minutes uncovered. Let the lasagna sit for about 10 minutes before serving. I like to add some freshly ground black pepper or a mix of black pepper and red pepper flakes to my lasagna just before enjoying, but you can also sprinkle some fresh parsley, or fresh basil. Have fun!
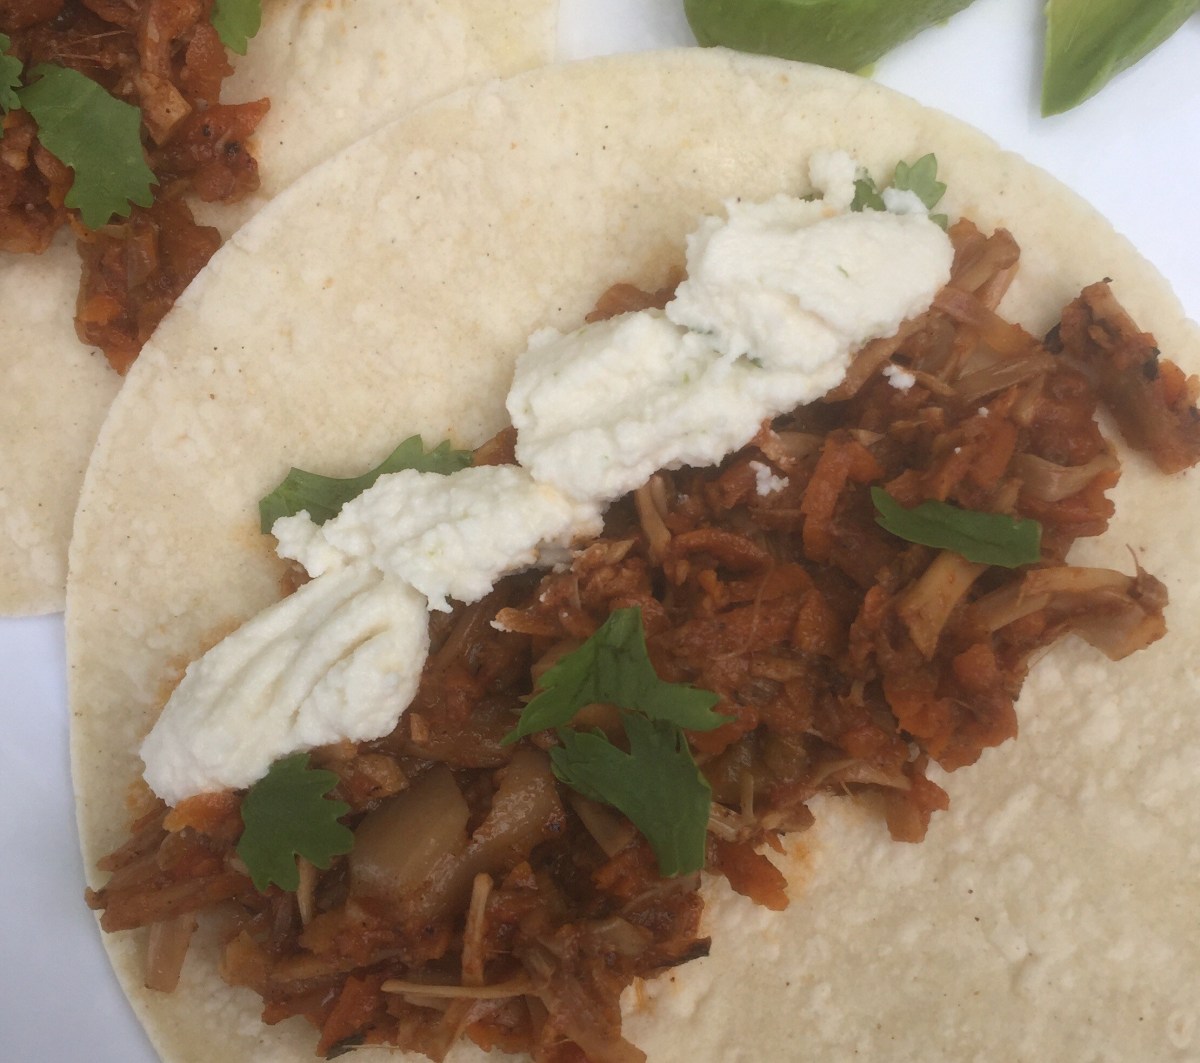
Jackfruit Barbacoa Tacos with Queso Fresco, via Eat the Vegan Rainbow
One of the most amazing discoveries I made when I transitioned into plant-based, vegan, eating and cooking was the jackfruit. I had never heard of jackfruit before but once I read, and then made few recipes I was completely sold on it! The jackfruit recipes I made so far varied from very simple, like tacos, to a couple that replaced seafood and shellfish with jackfruit, like the New England Clam-free “Clam” Chowder and Crab-less “Crab” Cakes, to some that take a bit of time to come together, like the Jackfruit Tikka Masala.
If you are not familiar with jackfruit, it is a beast of a fruit. It is actually the largest fruit produced by a tree, since one jackfruit can weigh as much as 80 pounds (35 kg). Not to worry, most home cooks will not have to carve this beast themselves, because the jackfruit comes chopped up in a can. I recently saw a real fresh jackfruit and was tempted to buy it, but it is just too expensive plus I am not even sure I would be able to handle all the prep work. When it comes to jackfruit in a can, for savory dishes you need to pick young, green jackfruit in water or brine. I drain and rinse the jackfruit well to remove excess salt, and use my fingers to pull it apart and remove any seeds that may be in there and the bits of the hard core. At the end of all that I have a pile of jackfruit shreds that are ready to go.
For this barbacoa I start with a pile of onions and grated carrots to give the dish a lot of sweetness, and by caramelizing the onions and carrots I add smoked flavors as well. There are no tricks here, other than taking it slowly and adding layers off flavor one by one. I start by letting the onions caramelize over the medium heat. Then I add carrots and let them cook through, before adding garlic and a nice mix of spices (dried oregano, cumin, allspice, and paprika) leading the way.
My secret ingredient for this barbacoa is roasted red pepper purée, which is super simple to make. All you need is couple of roasted red peppers, homemade or store bought, a can of fire roasted green chili peppers, and a food processor or a blender. You need to give your peppers a buzz for ten to fifteen seconds, and they will be ready to pour over the barbacoa. Finally, I add the shredded jackfruit and let everything simmer for a while, with couple of additions of water to deglaze the bottom of the pan and get all those flavorful brown bits incorporated into the barbacoa.
You can serve this barbacoa any way you like, but it works really well in tacos. If you are into making your tacos exciting, you can try pairing the jackfruit barbacoa with Macademia Nut Queso Fresco and some fresh cilantro. Yummy!
Jackfruit Barbacoa
What you’ll need:
3 large white onions
6 large carrots
3 20 oz. (570 g) cans of young (green) jackfruit in brine
4 cloves garlic
1 7 oz (200 g) can fire roasted green chili peppers
Peel and slice the onions lengthwise into thin strips.
Spray the bottom of a large Dutch oven with cooking spray and place over the medium to medium high heat. Add the onions and let them caramelize for 10 to 15 minutes, stirring occasionally.
Peel and grate the carrots using a grater or a food processor. You want the carrots to be about the same width as the onions. Add them to the caramelized onions and continue to cook for another 10 minutes.
Peel the garlic and mince by hand or use a garlic press. Make a bit of room in your Dutch oven by pushing the onion and carrot mix to one side. Add the garlic and let it brown for a minute or two.
Push the garlic to the side and add the rest of the spices. Let the spices brown for a minute, until the aromas start to develop. Mix everything together and simmer for couple of minutes.
Put roasted green chili peppers and roasted red peppers in a blender or a food processor. Blend until a smooth purée forms.
Add to the rest of your barbacoa and mix together. Let simmer for couple of minutes.
Add jackfruit to the post, mix everything together and increase the heat to medium high to high. Stir occasionally, but do let your bottom brown a bit before stirring. This will help your jackfruit and the rest of your barbacoa get browned, and look almost as if they came from a grill or a roasting pan. You are going for a bit of burned ends look and feel here, but keep an eye on things and from time to time add a bit of water to deglazed the bottom. This step takes about 15 minutes.
Lower the heat to medium low, put the lid on and let barbacoa cook for another 15 to 20 minutes. Serve hot in a taco, burrito, with rice or beans. Top with sour cream or queso fresco.
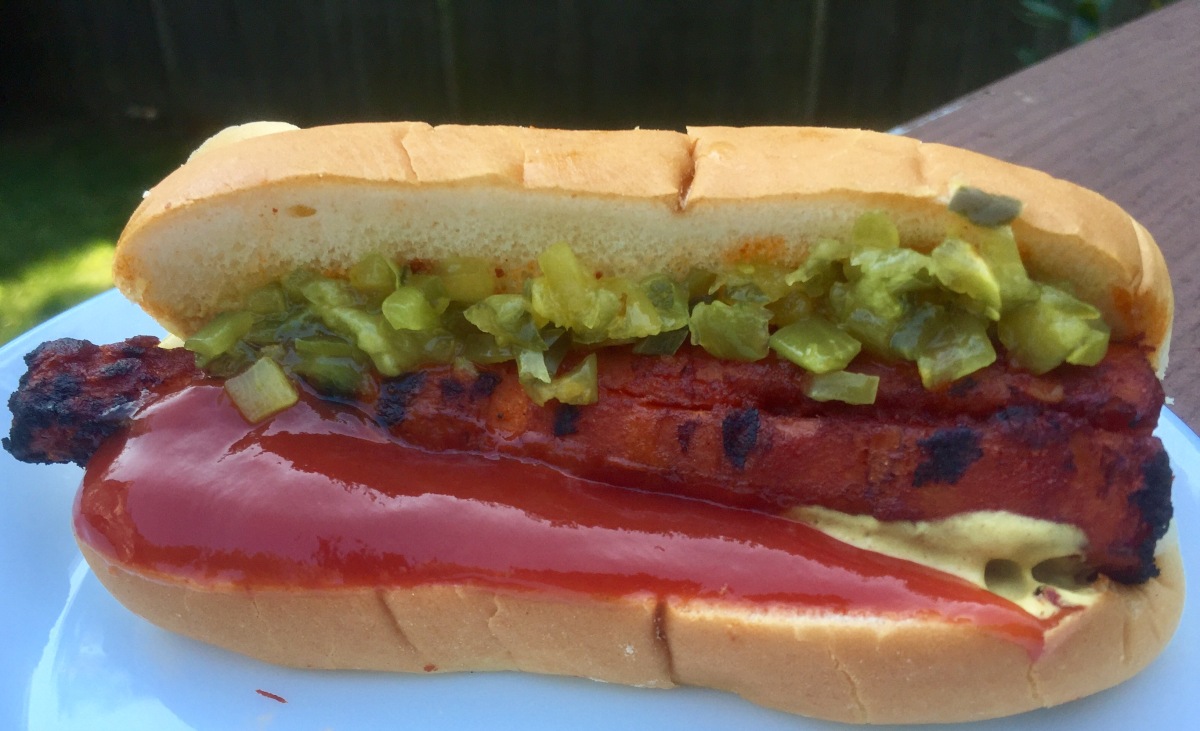
Hottest Summer Trend: Carrot Dogs, via Eat the Vegan Rainbow
There are many ways for plant-based and vegan eaters to enjoy one of the summer food staples, the hot dog. Most grocery store (supermarket) chains in US now carry plant-based hot dogs, and I tried a few. They are OK, and some are really, really good! This makes dinner really quick and easy – from fridge to plate in less than 15 minutes, but the store bought vegan hot dogs are not cheap, and depending on the brand they may not taste all that great.
Enter a super cheap, super easy, super cute and super hero hot dog alternative: carrot dog! If you have not seen or tried these you are missing out. Carrot Dogs are what they are – carrots made into a hot dog. Now, some of you may think that carrot is a carrot and it’s perfect the way it is. I agree: carrots are perfect as they are, and joy to munch any time. But, we all now carrots have always led a secret agent life as a sweet vegetable that can be made into a cake, a muffin, a cookie or in many other things. So why not a hot dog?
I started seeing posts on Carrot Dogs few months ago and had to admit it to myself: Carrot Dogs are an IT items this summer. So, I went for it and boy or boy do I like the results. I made carrots dogs couple of times now and they made the rounds: to the beach, to the back yard BBQ party, to the laid back late summer dinner outdoors. Trust me: they are absolutely worth it!
One thing to keep in mind is the thickness of your carrots. They should be relatively evenly cylindrical and about the diameter of a regular hotdog. Take some time to eyeball your carrots and pick those that look they fit the part. Also, keep in mind that they should fit nicely into your hot dog bun, so cut them accordingly. If you want to get really realistic, you can shape their ends into a hot dog looking end lobes, but I didn’t. All this is purely cosmetic and at the end of the day will not change the taste. But, if you are entertaining and want to go for a real WOW factor, take some time to fine tune the look of your carrot dogs. You may want to do this final fine sculpting step after your carrot dogs are cooked, as they will be softer and easier to carve.
Speaking of cooking carrot dogs, there is one major trick to a perfect carrot dog: boiling the carrots just enough to make them as soft as a regular hot dog would be. This is a bit tricky because that level softness in a carrot is only a step or two removed from when the carrots start to fall apart when handled with a fork or a pair of grill tongs. The exact time will depend on how thick your carrrots are, and what variety they are. I started with boiling the carrots for 11 minutes and that turned out not to be enough, so I went up to about 15 to 16 minutes which was much better. I also tried the pressure cooker – that was way too much!
Once you have your perfectly shaped and perfectly cooked carrot dogs, they will need to spend some time marinating in a mix of oil, vinegar, and spices which all work together to add a layer of hot dogginess to the carrots. The marinating step can take anywhere between half an hour to couple of hours. Longer is fine, and you can make your carrots a day ahead and leave them to marinate overnight in the refrigerator. Less than half an hour is probably not going to be long enough.
The second to last thing that remains to be done is grilling, and that takes only a few minutes per side. The dogs are fully cooked so all you really want to do here is add some grill marks and get some caramelization going. If you like your hot dog buns warm, you can put them on the grill once your carrot dog is a minute away from being done. So, the very last thing is to put the dog into the bun and top it with your favorite hot dog topping. I go a bit wild with my condiments and pile on ketchup, yellow mustard, and dill relish but really anything goes. Bite in, and be amazed at how great carrot dogs taste. Believe me, you will immediately understand why people are raving about these!!!
Carrot Dogs
What you’ll need:
8-12 carrots (or as many as you like)
1/2 cup vegetable broth
1/3 cup apple cider vinegar
3 tablespoons vegetable oil
3 tablespoons soy sauce (reduced sodium)
1 tablespoon smoked paprika
2 teaspoons garlic powder
2 teaspoons onion powder
1 teaspoon ground yellow mustard
Cooking oil (for oiling the grill)
Hot dog buns, mustard, ketchup, relish, sauerkraut, chili – anything else you like – for serving!!!
What you’ll do:
Peel and cut your carrots to be about the length of your hot dog buns. You don’t need to be super precise but do try to pick carrots that are more or less cylindrical, and about the same diameter as this will help them cook more evenly.
Place carrots into a pot – I use the pot with large bottom so the carrots can lay flat – and cover with water. Bring water to boil, and boil carrots for 10 to 16 minutes. You will need to keep an eye on your carrots and check from time to time as the exact time will vary from a carrot variety to a carrot variety, and depend on how thick your carrot dogs are.
While carrots are cooking, whisk together the marinade by mixing together vegetable broth, vinegar, oil, soy sauce, smoked paprika, garlic powder, onion powder and ground mustard.
Run the hot carrots under the cold water to stop the cooking, drain, pat dry, and add to the marinade. Marinate for about 30 to 60 minutes at room temperature or overnight in the refrigerator.
Prepare the outdoor grill for grilling as you would normally do. I have a gas grill and turn all my burners on full blast for 5 minutes, with the lid down to burn off any leftovers from last time. Then I dial them back and use my brush to clean off any remaining bits and pieces from the grill grates. Once that’s done I dip a paper towel in some oil and using a pair of long tongs pass the oiled paper towel over the grill grates. Now we are ready!
Place your carrot dogs on the grill over medium high heat and grill for couple of minutes on each side, or until nice grill marks form. You could brush the carrot dogs with the marinade as they cook to prevent them from drying out, but the process is quite quick and this may not be necessary. One tip: if you marinated your carrot dogs in the refrigerator, take them out a hour before you plan to grill them to let them come to room temperature. That will help with flavors and the grilling.
Enjoy the carrot dogs the way you would any ole’ hot dog!
Shiitake Mushroom Stroganoff, via Eat the Vegan Rainbow
Mushrooms come in many different shapes and sizes. They also range a lot in terms of their availability and price. The kind I find readily available in my local supermarket are white button mushrooms. They tend to be affordable and versatile, and use them in many of my recipes. Those with bigger caps are easy to stuff, and I’ve experimented with couple of different types of stuffing, like the mashed potatoes and corn tortilla, Mexican-flavor inspired stuffing. Small and imperfect mushrooms are great for chopping up, and using for recipes like a quiche or a stews. White button mushrooms are also a common ingredient in my burgers and my homemade ground beef substitute, where I grind them and add to the burgers for color, texture and flavor.
In many aspects, white button mushrooms and baby portobello (crimini) mushrooms are interchangeable, and I may use one or the other or both depending on which variety looked best at the store that day. Crimini mushrooms had a more woody, deep and rich flavor than white button mushrooms, but the differences are not major, so they tend to cook and taste about the same. They also cost about the same as well, and tend to be on sale at the same time!
Once in a while I lay my hands on really large portobello mushrooms, and those I like to grill and transform into portobello steaks. They look and taste amazing, and make for an easy and healthy dinner. The price tag on these is a bit larger, and you do have make more of them to feed the crowd, because one portobello steak is usually not enough. But, they are absolutely irreplaceable if you need to make a great grilled steak vegan style.
What makes mushrooms an essential staple of any vegetarian, vegan and plant-based kitchen is their flavor, and a large amount of umami, the flavor associated with perception of meatiness. The naturally occurring chemicals behind this umami flavor are glutamate and guanylate (plus couple of others), and mushrooms have large amounts of them, none more than shiitakes. Shiitakes are native to Southeast Asia and have been used in local cuisines for centuries, either fresh or dried. They are also now becoming more commonly available in US supermarkets, although they tend to be more expensive.
Luckily for me, I recently ran into a pile of loose shiitake mushrooms in my store that were plump, fresh, large and reasonably priced. I bought about a pound (half a kilo) of shiitake mushrooms and decided to try making a Shiitake Mushroom Stroganoff. I am sure this recipe would work with other types of sturdier mushrooms but shiitakes, becasue of their sweeper umami flavor, work exceptionally well.
I paired Shiitake Mushroom Stroganoff with some spaghetti for a satisfying dinner. You can make the dish gluten free if you need to by the right kind of pasta. Alternatively, you can serve with quinoa for a higher protein meal.
Shiitake Mushroom Stroganoff
What you’ll need:
1 lbs (454 g) shiitake mushrooms
5-6 cloves garlic
1 cup raw cashews, unsalted
3/4 cup almond milk, plain & unsweetened
2 tablespoons tapioca starch
1 tablespoon olive oil
freshly ground black pepper, to taste (optional)
fresh basil (for garnish, optional)
crushed red pepper (for garnish, optional)
1/2 pound spaghetti, cooked according to instruction on the box
What you’ll do:
Cover the cashews with water and let them soak for at least 30 minutes, best overnight.
The next day, rinse the cashews and place them into a blender. Add almond milk and tapioca starch, and blend until creamy. Set aside.
Clean the shiitake mushrooms to remove the stems and any signs of visible dirt. Rinse them with water, pat dry with some paper towel and slice the caps intro strips.
Peel the garlic cloves and slice them very thinly.
Place a large pan over the medium heat and add olive oil to it.
When the oil is hot, add mushrooms and garlic to the pan. Stirring frequently sauté the two for 5 to 10 minutes, until mushrooms have softened.
Mix in the freshly ground black pepper to taste, then add cashew cream sauce and fold everything together.
Simmer for another 10 to 15 minutes, until the sauce is rich and thick.
Pour over your favorite pasta, quinoa or polenta, and enjoy with a sprinkle of crushed red peppers and fresh basil!