A “Thank You” Cake, for All of You!

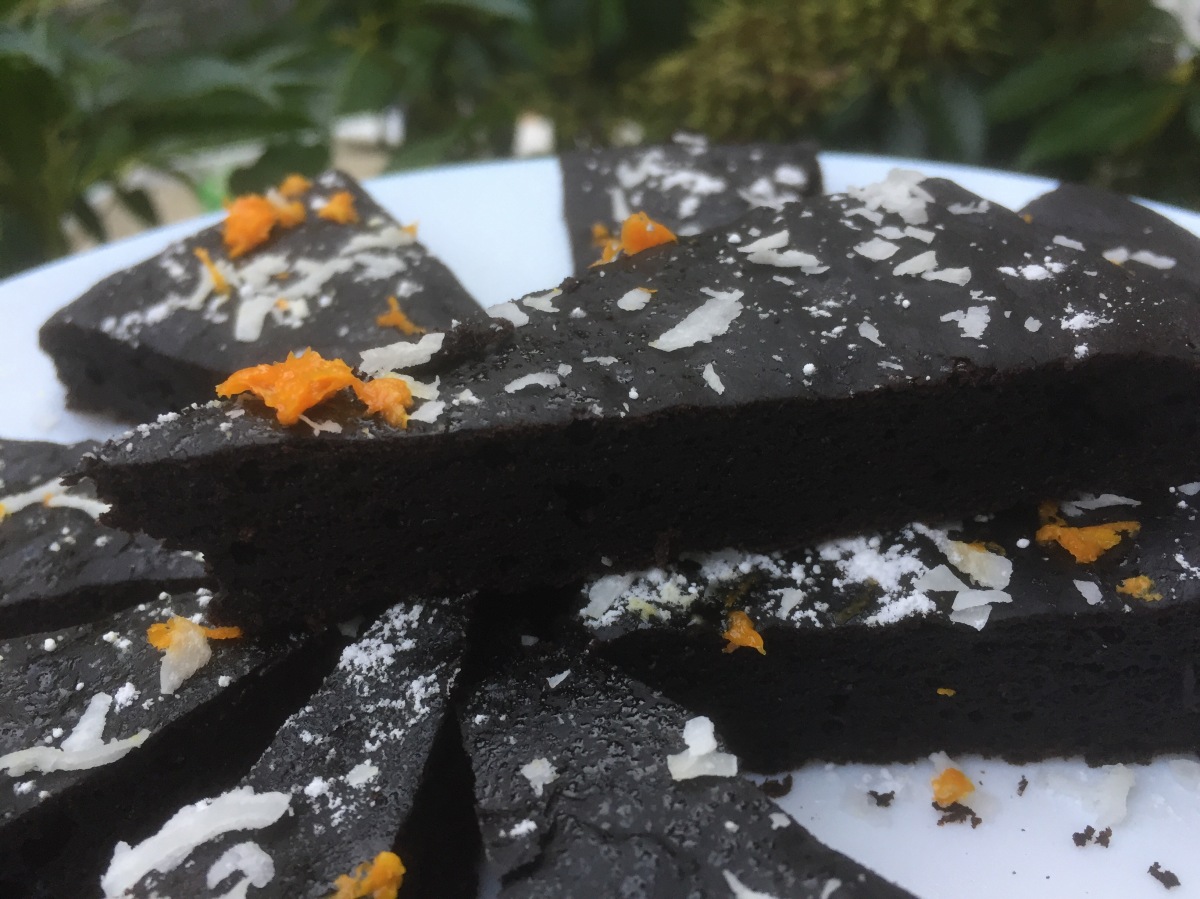
Dark Chocolate Brownie “Thank You” Cake, via Eat the Vegan Rainbow

10000 views… I can’t believe that my tiny,  homemade, low key, experimental, and very much just for fun blog recently hit a phenomenal milestone: 10000 views!

I am still in a bit of disbelief about it all, to be quite honest and totally humbled, yet thrilled.

Although I can’t explain how I went from my very first posted to 10000 views in less than 6 months, I’m guessing that this is a sign that there are many of you out there who are looking for guidance, inspiration and help in transitioning to 100% plant-based eating and cooking, while at the same time staying within a reasonable budget.

I can only hope that at least some of you have found my recipes to be yummy, homey, inviting, creative, entertaining and pure fun, which is what this entire transition to vegan cooking has been for me. Thank you for joining me on this journey and for helping me along the way with your kind comments, suggestions and many, many engagements.

And… this being a vegan, plant-based, healthy cooking type of a blog I thought that it would be cool to say a huge “Thank You, All” with some cake. So, thanks everyone – I hope you enjoy this Dark Chocolate Brownie “Thank you!” Cake, and come back again for seconds!!!

The recipe is super simple and uses ripe bananas as an egg replacement, and lots of dark, Dutch process cocoa. It also uses a simple trick to transform almond milk into almond butter milk by adding a tiny amount of cider vinegar to almond milk and letting it stand for fifteen minutes at room temperature before using. Finally, to help the dark cocoa release its color you will need to use some hot water.

Putting all this together, you will start by mixing dry ingredients in a large mixer bowl separately from wet ingredients (all except water), combine them together and then add the hot water gradually as you mix, keeping a close eye on consistency. You want your batter to be smooth and fluid, but not completely liquid. The recipe below makes two 8 in (20 cm) round brownie cakes, or one 9 x 13 in (23 x 33 cm) rectangular cake. I recommend lining the bottom of your baking pan with some parchment paper, as this helps get the cake out. In principle you could bake this cake in a springform pan, and it should pop right out.

The cake tastes rich and decadent, yet it’s relatively light in terms of the ingredients and especially in terms of added sugar. The bananas help not only hold the cake together, but add natural sweetness to it, so you can use 1/3 amount of sugar that a cake of this size would normally use. Of course, you are not limited to sugar and can use a sweetener of your choice, including artificial sweeteners if that’s what you like or need to use.

Dark Chocolate Brownie “Thank You” Cake

What you’ll need:

1 1/2 cup all purpose flour

3/4 cup cocoa, Dutch-processed

2 teaspoons baking soda

1 1/2 teaspoon baking powder

3/4 cup almond milk, unsweetened

3/4 teaspoon apple cider vinegar

1/4 cup canola oil

2 bananas, pretty ripe, brown ok

1/2 cup powdered sugar, vegan (+ 1 tablespoon for dusting)

1 tablespoon vanilla extract

1/2 cup hot water

2 tablespoons coconut flakes, unsweetened (optional)

Zest of one orange (optional)

What you you’ll do:

  1. Preheat oven to 350 F (180 C).
  2. Mix the almond milk with apple cider vinegar (or lemon juice) and let stand for 10 to 15 minutes. This will be your almond buttermilk.
  3. In a large mixing bowl, or the bowl of your standing mixer, combine all your dry ingredients (flour, cocoa powder, baking soda, and baking powder).
  4. In a separate bowl, combine all wet ingredients except the hot water. Note that powdered sugar and the bananas count as a wet ingredients. I recommend that you use a blender to cream your bananas, although you could simply mush them with a fork. Either way, make sure that your wet ingredients are fully mixed together and as smooth as possible.
  5. Next, slowly add your wet ingredients into the dry ones. For this, I keep my standing mixer runing on low, and pour the wet ingredients in, bit by bit.
  6. Let everything combine before adding the hot water. I recommend adding 1/4 cup water at a time, slowly so that you are in full control over the consistency of your batter. It should be smooth and pour out with ease.
  7. Line two 8 in (20 cm) round cake pans with parchment paper and pour the batter in.
  8. Put in the oven for 25 to 30 minutes.
  9. Take the cake out, flip it out of the pan, and leave it to cool for 1-2 hours.
  10. Cut into wedges and sprinkle with powdered sugar, coconut flakes and orange zest. Serve and enjoy!!!
img_2724
Saying “Thank You!” with a Cake, via Eat the Vegan Rainbow

Copyright ©Eat the Vegan Rainbow, 2017

Good Morning, Sunshine! Smoothie

Good Morning, Sunshine! Smoothie, via Eat the Vegan Rainbow

It’s a bit ridiculous to share a smoothie recipe like it is a thing. After all, smoothie is nothing more than throwing couple of things in a blender and pressing a button. But, I’ve now made this version a few times, never straying from the original recipe and it is a keeper. Even people who usually refuse to drink almond milk were able to get behind this one, so I decided to share it with the world.

The recipe is super fast, super easy, super cheap, super convenient – all in a real superlative fest! All you need is a banana, five frozen strawberries, some almond milk, preferably unsweetened and vanilla flavored, a dash of unsweetened coconut flakes and a sprinkle of vegan mini chocolate chips. These last two ingredients are completely optional but they do elevate this smoothie to the seventh heaven.

I do recommend using frozen whole strawberries. First of all, they have great flavor all year round as most brands use the best looking whole strawberries for freezing. Note that you should stay away from chopped frozen strawberries because I am not so sure that you can tell what those looked likes before they were chopped, and you should definitely check that strawberries are the only ingredient in the bag, just to be on the safe side. Frozen whole strawberries are usually cheaper than fresh, and they are really handy to have on hand in your freezer to use for smoothies, or other recipes. For the purpose of this recipe you can definitely use fresh strawberries if you have some. In that case you may want to add an ice cube or two, if you like your smoothie cold. The benefit of using frozen strawberries is that no extra ice is needed – they give this smoothie a nice, subtle chill that is just fabulous for summer breakfast at home or on the go.

Final note for those who like a sturdier breakfast. This smoothie is light, has no added sugar and a minimal amount of fat that comes from the almond milk, coconut flakes and the mini chocolate chips. If you want to make this smoothie thicker and more filling, you can simply add two to three spoonfuls of rolled oats. If you are adding oats, I recommend you letting the smoothie rest for five minutes or so before enjoying to let the oats soften just a smidge.

Good Morning, Sunshine! Smoothie

What you’ll need:

1 banana

5 frozen whole strawberries (fresh will work too!)

1/2 cup almond milk, unsweetened, vanilla flavor

1 tablespoon unsweetened coconut flakes (optional)

1 tablespoon mini chocolate chips, vegan (like Enjoy Life) (optional)

2-3 tablespoons rolled oats (optional)

What you’ll do:

  1. Place chopped banana, strawberries and almond milk into a blender. If you are using oats add them now. Blend until smooth and to consistency you like.
  2. Pour into a glass or a travel jug if you are taking it on the road.
  3. Sprinkle coconut flakes and chocolate chips and walk into the sunlight, figuratively and/or literally!

Copyright ©Eat the Vegan Rainbow, 2017

Miso Glazed Tempeh, From the Grill!

Miso Glazed Grilled Tempeh, via Eat the Vegan Rainbow

If you have not done so already, you should definitely try tempeh. I’ve been hearing about it for some time now, and seeing several different brands and varieties right next to the tofu that I usually get but I only got the first batch of tempeh just the other day. I bought several different varieties to try them out and spent few days reading about what’s tempeh good for and how to best cook with it. Tempeh is related to tofu because both are soy based. But, in terms of flavor and texture (and as far as I can tell in terms of how you actually make the two, based on what Wikipedia says), tofu and tempeh are quite different. Tempeh is firm, much firmer than the firmest tofu, and does not come in liquid. It is actually fermented soy beans mixed with rice [edited after reading comment from Mary S below – thanks Mary S, it’s good to get the facts all squared away. I am still a bit confused since the ingredients’ list of the tempeh I used did include rice; at the end of the day my confusion does not matter change the fact that the food was delicious], so although it is dry, it does feel sticky to touch and just a bit slimy. FYI: I am not saying this to freak you out, rather to forewarn you so that you are not as surprised when you start handling it as I was – I thought my tempeh has gone bad and wanted to throw it out! But, I double-checked the date on the bag, regained my cool and went for it.

I decided to start simple and build from there, so this Miso Glazed Grilled Tempeh is more or less my starting point. The brand of tempeh I got is Lightlife and the two varieties I started with are their Organic Garden Veggie and Organic Soy Tempeh. Each package is half a pound (about 250 g), and the block of tempeh comes in a vacuumed-sealed package, that’s within a sealed plastic bag, so there are two bags to remove! I used both blocks at the same time, since one just did not seem enough to make for the end of the week Friday dinner.

The first thing I did was to fire up the grill. I have a gas grill and it takes it about ten to fifteen minutes to get to be sizzling hot, with burners going at full blast and the lid down. That was just enough time for me to prep the tempeh and the glaze. For tempeh, I placed the pieces into a pan large enough to keep the pieces flat, covered with water, brought to boil and boiled for four to five minutes per side – I did flip the pieces over once since the pan I was using was shallow and the water did not fully cover the tempeh, so if your tempeh is fully covered you will not need to do the flip! After about ten minutes I took the tempeh out, pat dried the pieces, and left them uncovered on some paper towels.

While the tempeh was boiling and the grill was heating up, I mixed together a simple glaze with some soy sauce, Worcestershire sauce, white miso glaze and vegetable oil. I spread the glaze over the tempeh pieces just before placing them on the grill the glazed side down. Then I glazed the top and let it grill for about five to six minutes. By that time the grill marks will be perfect, and the pieces ready to be flipped. I did reglaze both sides again and flipped again, so that at the end each side got two layers of glaze and about eight to ten minutes of grilling, so in total the grilling bit took less than twenty minutes. If you are in a rush, you can definitely skip the reglazing, but if you are outside hanging around the grill with friends and family and enjoying the lovely summer evening, then why not give tempeh extra love, glaze and grill time?

Let grilled tempeh rest for just a second, then slice and serve. You can serve it in a hamburger or a hot dog bun with the usual trimmings, but note that condiments, like mustard and ketchup, are going to overpower the flavor of the grilled tempeh. So, I recommend serving tempeh with a side of coleslaw and baked, or barbecue beans, which is how I had mine. Add to that a glass of cold beverage of choice, and what can be better?

Miso Glazed Grilled Tempeh Sliced, via Eat the Vegan Rainbow

Miso Glazed Grilled Tempeh

What you’ll need:

2 8 oz (227 g) blocks of tempeh (any variety and brand you like)

2 tablespoons soy sauce, reduced sodium

2 tablespoons white miso paste

2 tablespoons vegetable oil

1/2 tablespoon Worcestershire sauce (vegan)

Oil for oiling the grill grates


What you’ll do:

  1. Prepare your grill like you normally do. I recommend getting the grill really hot and letting any bits and pieces from the previous grill session burn off, then scrapping the grates with an appropriate type of a brush (please be careful here because you can really damage your grill grates if you don’t follow the manufactures instructions and recommendations), and then oil them generously with a paper towel dipped in vegetable oil – please use long tongs here to prevent getting burned!
  2. Take tempeh out of the wrapping and palace in a pan large enough to hold it flat and straight. Cover with water, bring to boil and let it boil for 5 to 10 minutes. Make sure you flip the tempeh half way through if your tempeh is not fully submerged in water. If it is, no mid-way flipping is needed!
  3. While tempeh is boiling and the grill is getting hot, mix together the glaze by whisking together soy sauce, vegetable oil, miso paste and Worcestershire sauce. The glaze should be smooth, but even if you have few lumps in there don’t worry about it – it won’t matter at the end.
  4. Place the boiled tempeh onto some paper towels and gently dry.
  5. Using a (silicone) food brush spread the glaze liberally ove the tempeh and place the piece of tempeh glaze side down on the hot grill. Keep the gas grill on medium high heat, or if you are using a charcoal grill keep it as hot as you would when grilling vegetables, veggie burgers, or mushroom or tofu steaks. Grill the glazed tempeh 5 to 6 minutes on one side, and while it is grilling apply the glaze on the other side, flip over, grill for 4 to 5 minutes, glaze, flip, grill, repeat for as long as you like.
  6. Let stand for just a moment or two, slice and serve!!! This Miso Glazed Grilled Tempeh will work as an appetizer, finger food, as well as dinner, especially with some grilled corn, veggies, coleslaw, baked or barbecue beans, or as a salad topping…

Copyright ©Eat the Vegan Rainbow, 2017

Vegan Jackfruit “Crab” Cakes

Vegan Jackfruit “Crab” Cake, via Eat the Vegan Rainbow
I discovered jackfruit about two months ago and can’t live without it ever since. I used it as my secret “chicken” in the Vegan Chicken Tikka Masala, as well as a quick and easy taco filling. If you are new to jackfruit, here is a brief intro. The type of jackfruit that works for savory main dishes is called young green jackfruit and for most of us it will come in a can, usually packed in brine or water. There is also jackfruit in syrup, which is ripe and sweet – I did not taste that one yet, but it seems like it tastes like pineapple or grapes.

One thing I noticed over the last few weeks is that people are very much interested in trying jackfruit but they don’t really know where to find it. My source is a local Asian food market – the trip is fun and the price is right. But, I know that not everyone has a handy Asian food market nearby so in that case places like Amazon.com will help, or places like Whole Foods Market that carries products of The Jackfruit Company, which is a Boston-based company I just stumbled upon dedicated to promoting use of jackfruit and supporting farmers who grow it.  The Jackfruit Company site also includes a long list of interesting looking recipes, but no “Crab” Cakes – they don’t know what they are missing!

My jackfruit comes in a brine so I always begin by rinsing the jackfruit off really well and letting it drain for a while. Basically I leave it in the same strainer I wash it in over a bowl on the kitchen counter for at least 30 minutes, and then I also pat it dry. For this crab cake recipe, I recommend pulling the jackfruit pieces apart to make them roughly the same size crab chunks usually are. The two other ingredients that I enjoy in crab cakes are scallions (green onions) and red peppers, both of which I chop relatively finely.

Vegan Jackfruit “Crab” Cakes Step 1, via Eat the Vegan Rainbow
Finally, one ingredient that you simply can’t have a crab cake flavor without it is Old Bay Seasoning. One note of caution when using Old Bay Seasoning: if you are keeping your meals low salt you may want to skip this one and make your own seasoning mix, or use a smaller amount.

If you are wondering if there are any other tricks to this recipe, I would say that the really neat trick is to leave the cakes in the refrigerator for at least 30 minutes before cooking. This will help them keep their shape while cooking and as a result you will have a plate of Jackfruit “Crab” Cakes that are delicious, and good lookers to boot!

Vegan Jackfruit “Crab” Cakes Last Step, via Eat the Vegan Rainbow

Vegan Jackfruit “Crab” Cakes

What you’ll need:

2 cans (10 oz, 280 g each) young green jackfruit in brine

6 scallions, finely sliced

1/2 large red bell pepper, finely diced

2 cups panko (Japanese breadcrumbs)

3 tablespoons flax meal

6 tablespoons warm water

2 tablespoon dijon mustard

2 tablespoon Old Bay Seasoning

Cooking spray

Fresh cilantro and lemon wedges for garnish

What you’ll do:

  1. Use flax meal and warm water to make vegan flax egg. What you need to do is in a small bowl or a measuring cup mix flax meal and water in 1:2 ratio (1 tablespoon flax meal plus 2 tablespoons warm water and scale up from there if you know you need more binding agent), mix well and let sit for 15-30 min.
  2. Drain and wash the jackfruit. Pull apart with your fingers into smaller pieces that are approximately size of crab meat used in crab cakes. Place into a large mixing bowl.
  3. Dice the red pepper into small dice and add to jackfruit.
  4. Chop scallions (white and green part) finely, add to the bowl.
  5. Add all the other ingredients including the flax egg and mix well.
  6. Line a tray with wax paper, form crab cakes with your hands, and set on the tray. This amount of jackfruit should yield 6-8 cakes. Leave the cakes in refrigerator for 30-60 minutes.
  7. Spray the bottom of the frying pan with cooking spray and heat it over the medium high to high heat. Place 3 to 4 crab cakes into the pan at a time. Make sure you leave enough room between the crab cakes as it will help you move them around and flip them over. Cook for about 4-5 minutes on the first side and 3-4 minutes on the second side.
  8. Sprinkle the Vegan Jackfruit “Crab” Cakes with some freshly chopped cilantro and a squeeze of lemon.

Copyright © Eat the Vegan Rainbow, 2017

Balkan Style Cornbread, Gluten-free and Vegan

Balkan Corn Bread
Balkan Style Cornbread, via Eat the Vegan Rainbow
Yesterday I shared the recipe for Balkan Cabbage and Bean Stew that I developed as a way of keeping my grandmother’s culinary traditions going in the 21st century. The very best, and also very traditional, side food for a sturdy Balkan dish featuring a pile of cabbage and beans is proja (pronounced pro-ya), a savory cornbread that is, in its pure form simple and subtle.  Think polenta but in sold form!

Over the years, recipes for proja have diversified away from using just corn flour, water, oil and baking soda, into more elaborate recipes that include eggs, cheese, yogurt, ham, and even pickles. I tried and enjoyed many of them, and they are delicious. But when it comes to pairing with a rich main dish, simpler is better. The recipe below is a relatively pared down but not-your-grandma’s Balkan style cornbread that is gluten-free and vegan.

I decided to add actual corn kernels to this recipe for a slightly more interesting texture. The corn I use is frozen corn that I defrosted on my kitchen counter top (you can always do it overnight in the fridge or quickly in the microwave). To jazz things up a bit I did add a can of fire roasted diced green chiles. You can totally skip this or add any other pepper you like if you are into a spicier version of the corn bread with a bit of kick!

Balkan Style Corn Bread
Balkan Style Cornbread, Gluten-free and Vegan, via Eat the Vegan Rainbow

Balkan Style Cornbread, Gluten-free and Vegan

What you’ll need:

1 1/2 cup corn meal, fine

1 1/2 cup rice flour

1/2 cup corn starch

2 cups kernel corn

1 can chili peppers

2 teaspoon baking powder

1 teaspoon baking soda

3 tablespoons  vegetable oil

2 cups water

Cooking spray

What you’ll do:

  1. Preheat the oven to 425 F (220 C).
  2. In a large mixing bowl combine all the ingredients except water. Add 1 cup of water and mix well. The cornbread batter should be wet but not too fluid, so I recommend adding the second cup of water in stages to make sure you don’t end up with a corn bread soup.
  3. Spray the bottom and the sides of a 13 x 9 in (33 x 23 cm) baking dish with the cooking spray.
  4. Pour the cornbread batter in, even it out and put it in the oven.
  5. Bake at 425 F (220 C) for 20 min then lower the temperature to 350 F (175 C) for another 20 minutes.
  6. Leave on the counter top for 10-15 minutes to cool, then cut and enjoy!

Note: This corn bread tastes great warm but if you don’t finish the entire cornbread immediately I recommend taking it out of the baking dish and storing in an air tight container in the refrigerator for up to 5 days. You can reheat it in the toaster oven or zap it for 30 sec in the microwave oven.

Copyright © Eat the Vegan Rainbow, 2017

Balkan Cabbage and Bean Stew

Balkan Cabbage and Beans
Balkan Cabbage and Beans, via Eat the Vegan Rainbow
Growing up in the Balkans cabbage and beans were unavoidable, especially during the winter months when each household used to have bins of dry beans and barrels of homemade sauerkraut. Although for the most part dishes that I grew up with kept cabbage and beans apart, one of my grandmother’s signature dishes was a cabbage and dark bean stew that was packed with both, as well as with piles of smoked meat. I do remember the taste with fondness, so I wondered if I can come up with a vegan way of making a Balkan style cabbage and bean stew.

This is a straightforward recipe with only a handful ingredients. I recommend using a Dutch oven, or a similar type of pot, and not being afraid of keeping it on relatively high heat to get the onions, which form the aromatic base of the stew, and Trader Joe’s Soy Chorizo, brown and caramelize. In looking for an ingredient that can replace smoked meat, I decided to go with this chorizo as I found it to work really well in the past, both in Mexican-style lasagnas, and in hearty soups.

Balkan Cabbage and Beans Stew Step 1
Balkan Cabbage and Beans Stew Step 1, via Eat the Vegan Rainbow
The star of this stew is definitely cabbage and for a big pot you will need lots of it. In principle, you could grab few bags of shredded cabbage and that will work fine, but for best texture I recommend shredding the cabbage a bit more thickly. This time around I used both red and green cabbage, but traditionally this type of stew would use fresh green cabbage or even sauerkraut (don’t laugh until you try it – it is delicious!). And don’t freak out about the volume of cabbage, it will cook down.

Balkan Cabbage and Beans Stew Step 2
Balkan Cabbage and Beans Stew Step 2, via Eat the Vegan Rainbow
One final trick to this stew is creating a bit of a roux to bind the stew together. Traditionally, the roux in the Balkans starts with lard and flour, and it often includes paprika. To keep this stew vegan and gluten-free, I used corn starch and instead of making the roux in a separate pan and pouring it over I simply sprinkled the corn starch and mixed in with the onion, chorizo and wilted cabbage before adding the beans and water.

Balkan Cabbage and Beans Stew Step 4
Balkan Cabbage and Beans Stew Step 3, via Eat the Vegan Rainbow
Once you add corn starch, beans and water, as well as whole peppercorns and bay leaves, the rest is easy. You bring your pot to gentle simmer, put the lid on and leave it on low heat. In less than 30 minutes you have your perfect post of a not-so-traditional Balkan Cabbage and Bean Stew which is best enjoyed hot with a piece of freshly baked Balkan cornbread (proja).

Balkan Cabbage and Beans Stew

What you’ll need:

1 medium head of green cabbage, anywhere between 1.5 to 2 lbs (700 to 900 g)

1/2 small head of red cabbage, anywhere between 0.5 to 0.75 lbs (250 to 350 g)

1 yellow onion, diced

1 Trader Joe’s Soy Chorizo

2 15.5 oz (439g) cans pinto beans

3 tablespoons corn starch

2 cups water

3 bay leaves

20 whole peppercorns

Cooking Spray

What you’ll do:

  1. Spray the bottom and the sides of your Dutch oven or a large pot with the cooking spray. Turn the heat on to medium high to high and add diced onions. Let the onions brown for 3-5 minutes.
  2. Add soy chorizo (note: if using Trader Joe’s Soy chorizo please make sure to remove the casing before cooking because it is plastic and inedible!), and brown for additional 3-5 minutes.
  3. While onions and chorizo are cooking, shred the cabbage into thick shreds. Add the cabbage into the pot, stir well and let it cook down for 5-10 minutes with occasionally stirring.
  4. When the cabbage has gone down a bit, stir in corn starch. Mix well and cook for 1-2 minutes.
  5. Add beans that have been drained and rinsed. Mix well.
  6. Add bay leaves, peppercorns and water. Let the pot come to a simmer than lower the heat to low, put the lid on and let it cook for 20-30 minutes.
  7. Enjoy with the piece of Balkan Style Cornbread!

Copyright © Eat the Vegan Rainbow, 2017

Gluten-free Vegan Spaghetti & Meatballs

VeganMeatballs_withZucchiniSpaghetti_DONE
Gluten-free Vegan Spaghetti & Meatballs, via Eat the Vegan Rainbow
Can gluten-free, vegan cooking be budget friendly, healthy, feed the whole family, and yet leave everyone feeling they are getting away with something? The answer is yes, and this recipe is my evidence. I use no fancy ingredients, and no fancy techniques.

How did I end up here? Well, as they say “Necessity is the mother of invention”. What happened is that I found myself facing a large bag of frozen vegetable mix, which I have cooked with many times before never to any great success. This is a classic item you can find in any grocery store – a bag that includes unspecified amounts of frozen peas, corn, green beans, carrots, and lima beans. The price on these is usually too hard to resist, and they keep really well if kept frozen so I usually have a couple in my freezer in case of an emergency where all other options dry up.

So one of those emergency situations came up and this time around, perhaps because of all this blogging I’ve been doing recently, I had a real brain wave. I decided to transform the relatively amorphous tasting vegetable mix into really incredible vegan meatballs, or should I say veggie balls?

VeganMeatballs_01
Frozen Vegetable Mix, thawed, via Eat the Vegan Rainbow
There are couple of simple tips that when put together make this recipe work. First of all, thaw your vegetables don’t cook them! Depending on the amount of veggies you use this may take 5-10 minutes in the microwave on high. Once the veggies are thawed and soft all through, use a stick (immersion) blender, or a food processor to make a thick paste out of it all. This will be a base for your “meatballs”.

Another thing that you will need to do is add flavor to the mix. Although each one of these veggies is lovely on their own and when fresh, put all together and after freezing and thawing they do lose some of their flavor. My secret ingredient in this recipe is definitely a dash of Trader Joe’s Chile Lime Seasoning Bland. If you don’t live in the area with a handy Trader Joe’s store near by, you can use regular chili powder and add some lime or lemon zest – that will do the trick!

You will have to be a bit patient with this recipe as it does take a bit of time. First of all, I use oats to help the meatballs stick together. I did not leave the oats whole, rather I blended them all into the veggie mix using a stick blender, added the spices, and left the mix to sit for about 15 minutes. That gives oats some time to absorb the liquid and make the mix stick together better, which helps for the next step – forming the “meatballs” and browning them. I recommend using a Dutch oven to brown the “meatballs”, as well as simmering the rich tomato sauce.

VeganMeatballs_03
Vegan “Meatballs” Browned in a Dutch Oven, via Eat the Vegan Rainbow
One word of advice is not to overcrowd your Dutch oven, and keep some room in between the “meatballs”. This helps them cook, and helps you maneuver them around. Once the “meatballs” are nicely browned set them aside and use the same Dutch oven for putting your tomato sauce together. I kept my recipe simple and my cost down by using canned crushed tomatoes and using some crushed garlic, dried oregano and dried basil to flavor the sauce. The sauce does not need to cook for long, and once it starts to simmer nicely and gently you can add the “meatballs” back.

VeganMeatballs_05
Vegan Meatballs in Tomato Sauce, via Eat the Vegan Rainbow
Don’t forget to lower the heat , bring the post to a very gentle simmer, and put the lid on! Without the lid you will soon end up with tomato sauce all over the stove top and the floor as this sauce does erupt in tiny little tomato sauce geysers.

To keep the recipe ultra healthy and gluten-free, I paired the meatballs with simple Zucchini Spaghetti.

Gluten-free Vegan Spaghetti & Meatballs

What you’ll need:

2 lbs (1 kg) bag of classic frozen vegetable mix

2 cups oats

1 tablespoon tomato paste

1 tablespoon soy sauce, reduced sodium

1 teaspoon garlic powder

1 teaspoon onion powder

1 teaspoon chili powder

1 teaspoon Trader Joe’s Chile Lime Seasoning Bland

1 1/2-2 28 oz (800 g) can crushed tomatoes

2 tablespoons crushed garlic

1 teaspoon dried oregano

1 teaspoon dried basil

Cooking spray

Fresh basil for serving

What you’ll do:

  1. Place the frozen vegetable into a microwave safe dish and microwave on high for 5-10 minutes to thaw the vegetables and slightly heat them through.
  2. Place the vegetables into a large mixing bowl. Use the stick blender to grind the vegetables into a relatively fine paste.
  3. Add oats and blend again.
  4. Add tomato paste, soy sauce, as well as onion, garlic, chili and lime chili powder. Mix well and let stand for 15 minutes or so.
  5. Spray the bottom of a large Dutch oven with cooking spray and bring to medium high heat. Use 1/4 cup or the ice cream scoop to scoop out the “meatball” mix and form the balls. Place them into the hot Dutch oven and let brown for 2-3 minutes. Turn the “meatballs” over and brown on the other side. Take them out of the Dutch oven and set aside. Spray with more cooking spray if needed and add another batch of “meatballs”. Continue until all your “meatballs” have been browned.
  6. Bring the heat up to high, add more cooking spray, and add crushed garlic and dried oregano and basil. Let it bloom, develop & release the aroma for 1-2 minutes. Add crushed tomatoes. Depending how much tomato sauce you’d like to have you may need to adjust the amount of crushed tomatoes you add. Bring the tomato sauce to a simmer and let it simmer for 5-10 minutes.
  7. Turn the heat way down and add back the “meatballs”. You will likely have two layers of meatballs which is fine, but it’s a good idea to keep in mind that they are relatively soft so treat them gently! Make sure they are nicely snuggled and covered by the sauce. Put the lid on and let the “meatballs” and sauce simmer for 15 – 20 minutes.
  8. When you are ready to serve, start with a generous amount of Zucchini Spaghetti, add couple of vegan meatballs, spread some sauce, and top with fresh basil. Enjoy!

Update: Few days ago I used the same “meatball” mix and made a “meatloaf” out of it. It worked really well!!! Here are couple of pictures to show you what it all looks like. One tip: bake the “meatloaf” on 375 F (190 C) for 25-30 minutes first, before putting on the tomato paste, then bake for 15 minutes more. Let the “meatloaf” stand for 15 minutes before cutting – the loaf will be soft when it comes out of the oven but it will firm up!

Copyright © Eat the Vegan Rainbow, 2017