Hello! My name is Milka.
I like to think of myself as the Goddess of Fruit and Veg, and an Occasional Nut!
For me, one of the most important things is to have fun preparing the food, and sharing the joy with those who you are feeding. My blog's name was inspired by my daughter's love of rainbows, and serves as a daily reminder of the important things in life, like vegan rainbows and well-fed unicorns.
Stuffed Savoy Cabbage Rolls, via Eat the Vegan Rainbow
Stuffed cabbage rolls, stuffed peppers, stuffed grape leaves – with so many things to stuff how do you decide on what to put in each one and does it really matter? I grew up with stuffed cabbage leaves, the fermented cabbage leaves to be precise, and the result called “sarma” is a bit of a staple, tradition and highlight of the Serbian and other Balkan cuisines.
The most common stuffing ingredient is a mix of rice and meat, with some onions and carrots, all sautéed together. There’s also a tradition to make vegan versions during the weeks of lent that precede both Christmas and Easter. Most vegan versions either skip the meat or replace it with chopped walnuts.
The key to perfect stuffed cabbage rolls is to have nice, large cabbage leaves that are soft and pliable. Traditional recipe uses fermented cabbage leaves that fit these requirements well, but if you don’t have a barrel-full of fermented cabbage heads don’t worry. There’s a way to go around this problem.
The best way to do this is to pick a cabbage with softer leaves to begin with. I recommend savoy but Napa would work.
No. 2: discard 2-3 leaves that are right on the surface as they can be tougher, and then gently peel off 8-10 large leaves without ripping them.
No. 3: bring a large pot of water to boil and blanch the leaves unto softened then rinse under cold water to prevent them from getting too soggy.
Once you have your leaves ready, it’s time to fill them up, and roll them into tight little packages. My stuffing here is simple – I mixed some store-bought ground beef substitute (Trader Joe’s in this case but you can use any kind you like or make your own), and mixed it with some tomato paste to make a stuffing that sticks together.
Place your leaf on a flat surface, spread it out, place about one to two tablespoons of stuffing at the base of the leaf, fold one side over, roll it up, tuck the other side in, and you are done (see pictures below).
Finish rolling the rest, then place your rolled cabbage into a simple tomato sauce – you can find the recipe for my go to tomato sauce below, but you can also use a jar or two of pre-made marinara sauce as well. Let everything simmer for some time, then enjoy!
Stuffed Savoy Cabbage Rolls
What you’ll need:
10-12 leaves (1 large head) Savoy cabbage
24 oz. (680 g) ground beef substitute (homemade or store-bought)
3 tablespoons tomato paste
2 28 oz cans crushed tomatoes, chunky style
4 cloves garlic, finely sliced
2 tablespoons olive oil
1/4 cup parsley, flat leaf, chopped
What you’ll do:
Starting from a large head of Savoy cabbage, remove 2-3 outermost leaves and discard, then carefully remove the next 10-12 leaves. Wash the leaves a pat dry.
Bring 8-12 cups of water to boil in a large pot. Once the water is boiling, submerge the cabbage leaves and boil for 3 minutes or so.
Place the softened yet still not fully cooked leaves into a strainer and quickly rinse with cold water. Leave in a strainer to continue to drain.
In a large mixing bowl, mix the ground beef substitute with the tomato paste.
Taking one leaf at a time, place them on a flat surface, add 1-2 tablespoons of the stuffing, fold one side over, roll into a tight roll, then tuck the other side in to form the tightly packaged roll. Set aside and continue to roll until all the cabbage and stuffing are used up.
Place a large Dutch oven or a heavier pot over the medium high heat. Add olive oil and sliced garlic. Sauté for 1 minute, which should be enough for garlic to start releasing its aroma without burning.
Add tomato sauce, stir well and simmer for 2-3 minutes.
Gently place your cabbage rolls into the tomato sauce. Spread them into a single layer and Bring the sauce to a gentle simmer, cover and let everything cook for 15-20 minutes.
Sprinkle in fresh parsley and serve. Some complementary sides are freshly baked bread, basmati or cauliflower rice, or classic mashed potatoes. Enjoy!
Creamy Vegetable Soup with Roasted Garlic, via Eat the Vegan Rainbow
Vegetable soups are supposed to be healthy and good for you. But on a recent plane trip I realized that some of the cooking shows out there go out of their way to make absolutely everything in their reach as unhealthy as possible, or even worse – talk up these recipes as good for you, usually referring to them as “soul food”.
Of course, all of us have a soft spot for rich food, the one our mom or grandma used to make… Most people have warm memories associated with big family meals and joy that comes from being surrounded by the loved ones. And, yes, it is true that most of the food consumed in those occasions is not something that any nutritionist would approve off!
To be honest, I don’t disprove an occasional overindulgence, but what rubbed me the wrong way was that during the three hours of different cooking shows there was not a single recipe that would qualify as healthful, and even couple of soup and salad recipes included exuberant amounts of butter, cream, bacon…
As I was watching the continuous array of that heart-attack-in-the-making “soul food” recipes I could not stop thinking that there must be a better way. Actually, I started jotting down recipe ideas and ingredient lists while still on the plane, and this creamy vegetable soup is the first one that I have now fully developed.
I’ve made quite a few creamy soups in the past, like the Cream of Carrot Soup, Creamy Cauliflower Winter Soup, and the New England Clam-less Chowder, which are all rich in flavor and light in calories, or at least far lighter than the more conventional soups of their kind. The recipe below is super simple and cheap, so there’s no excuse not to try it.
The only slightly more time-consuming bit is the roasted garlic. I am not even sure if you can get roasted garlic in the store, if you can you may try using the store bought stuff as a short cut. But roasting your own batch and then using it as needed is simple so you might just as well do it yourself, and here is a good recipe for you to follow (it’s basically putting a head of garlic in an hot oven for 30 minutes or so and you- there, I told you it was easy!)
To re-cap: angered by cooking shows that succeeded in making even soups and salads into a health hazard, I decided to roll my sleeves up and show the world that couple of simple ingredients, like a bag of frozen mixed vegetables, some starch and a carton of vegetable stock, when combined with flavor enhancing agents, like the roasted garlic, lemon juice and lemon zest, will make a wonderful, flavorful and rich-tasting soup without any butter, cream, bacon or cheese. Now that’s some real soul food!
Creamy Vegetable Soup with Roasted Garlic
What you’ll need:
1 bag (1 lbs, 454 g) bag mixed vegetables, frozen
2 tablespoons corn (or potato) starch
4 cups (960 mL) vegetable stock
2 cups water
4 cloves roasted garlic
1 lemon, juice and zest
1 tablespoon oil (optional)
What you’ll do:
Place a large post over the medium to medium-high heat, add the oil (if using), and all the vegetables. Let defrost and sauté with frequent stirring for 3-5 minutes.
When the veggies have softened, add the starch. Make sure that vegetables are fully coated with a thin layer of starch. Sauté for another minute, just to let everything fully combine.
Add the vegetable stock in a slow and steady stream, while mixing continuously. This vigorous mixing is essential to prevent lumps, so keep at it! You can use a large whisk for this if you like – the whisk works well for me.
Next, add the water still mixing/whisking as you go, then let the soup come to a steady boil. Once you reach that point, lower the heat all the way down, add the chopped up roasted garlic, and allow the soup to simmer for 15-20 minutes.
Turn the heat off, and mix in the juice of one lemon, and all the lemon zest. Serve warm and enjoy! (As you can see from a photo above I had mine for lunch with some buttered homemade bread. If you are into making your own bread via a bread machine, my recipe is here.)
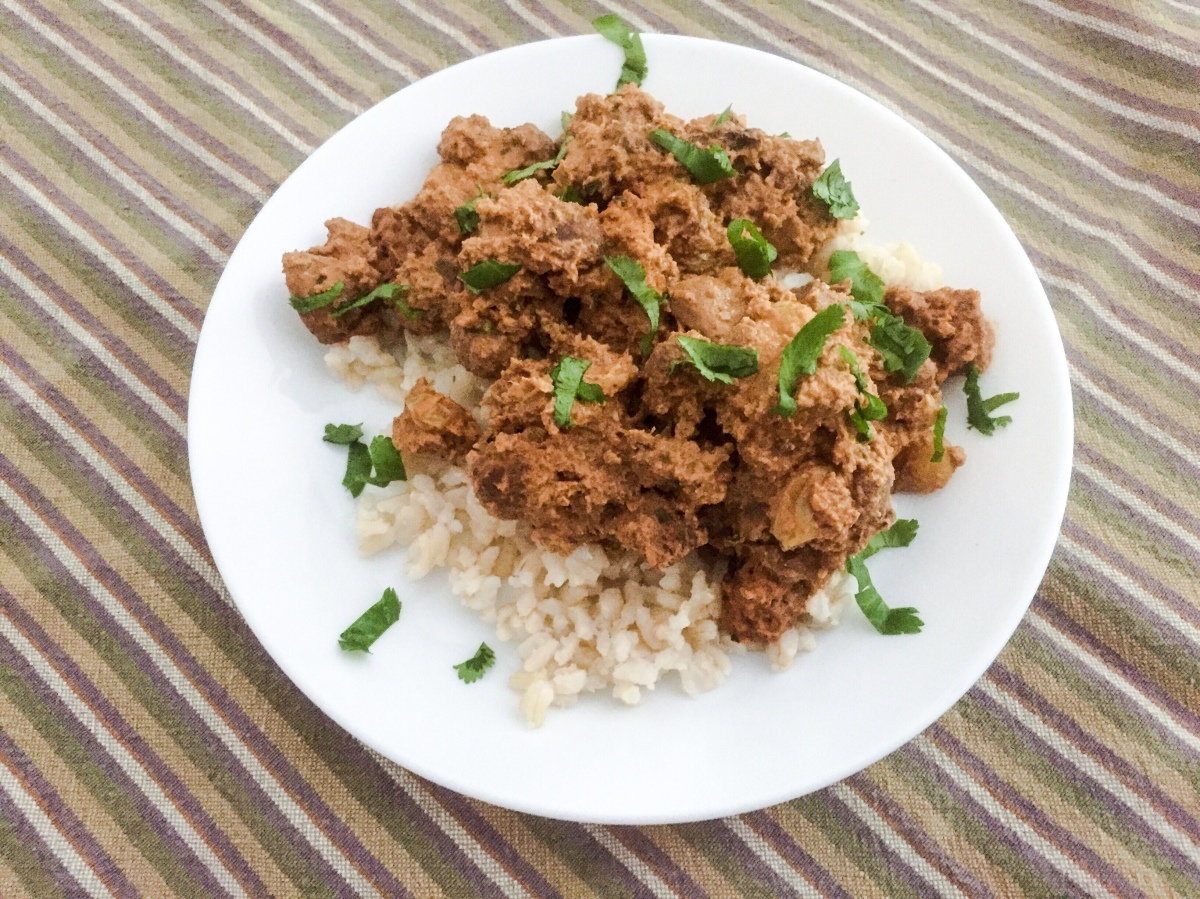
Vegan “Chicken” in a Nut Sauce, via Eat the Vegan Rainbow
Creamy, aromatic, and surprisingly sweet – those are just some of the ways to describe this rich dish. Originally made with chicken and cashews, I transformed the recipe into one that uses soya chunks instead of chicken, and walnuts instead of cashews. The result is a nuttier and creamier vegan delight!
What are soya chunks?
Soya chunks are a common meat substitute. According to this Wikipedia page, the ingredient used to make soya chunks is the byproduct of soy oil production, so basically all the protein rich solids left after the fat has been extracted. These solids can be made into many different shapes and sizes and some common products are texturized vegetable protein (TVP), soya curls and soya chunks. All these products usually require some soaking in water or a brief dip in a pot of boiling water to rehydrate them as they are packaged an sold dry.
Where do you find soya chunks?
Most large grocery store chains in the USA don’t carry soya chunks. This is a surprise since we could easily find them in my small home town in Serbia when we visited last summer! But in the US, you either need to order them through Amazon, or visit an South Asian grocery store. The price at my local Indian grocery store is about $2-3 for a 200 g box, which is enough to make a big pot of dinner to feed 6-8 people. Amazing, isn’t it?
Let the food processor do all the work
The recipe calls for a range and of ingredients, and quite a few spices. But the preparation itself is super easy. The sauce comes together in a food processor and then it slowly cooks and simmers with the rest of the ingredients. If you prefer a chunky sauce, dial down the length of processing, and if you prefer a smooth sauce keep processing and add a bit of water as you go for smoother consistency.
This dish is rich and complex, and it’s best served with simple basmati rice. Enjoy!
Vegan “Chicken” in a Nut Sauce, via Eat the Vegan Rainbow
Vegan “Chicken” in a Nut Sauce
What you’ll need:
200 g soya chunks
2 yellow onions, finely diced
4 cloves garlic, thinly sliced
2 tablespoons sliced ginger
1 cup walnuts
1/4 cup tomato paste
1/4 cup yogurt (almond, cashew or any other one you like)
1/2 lemon, juice only
2 tablespoon vegetable oil
2 teaspoons garam masala
1 teaspoon chili powder
1 teaspoon coriander powder
1/4 teaspoon turmeric
1/4 teaspoon salt
1/4 cup golden raisins (sultanas)
10 oz white mushrooms, quartered
1/2-1 cup water, to taste
2 tablespoons fresh cilantro, and more for garnish
What you’ll do:
Rehydrate soya chunks according to instructions on the box. This will usually require either leaving them in some boiling water for 3-5 minutes or soaking them for a while.
Drain and rinse the soaked chunks. Squeeze them gently to shake a bit of excess liquid off, but don’t squeeze them dry. That will make them rubbery and too chewy. You want the chunks to be soft and moist. Set aside.
Place onions, garlic, ginger, walnuts, tomato paste, spices, oil, lemon juice, and yogurt into a food processor, and process until a smooth sauce forms.
Place a large, heavy pot, like a Dutch oven, over the medium high heat and bring to temperature. Add the sauce and cook for 5 minutes with frequent stirring.
Add the mushrooms and mix well. Cook for another 5 minutes then add the soya chunks. Mix well again, and check if any water is needed. You want the sauce to be dense, but still flowing so adjust the liquid accordingly.
Add the golden raisins and simmer, covered, for another 10-15 minutes.
Serve over some rice and sprinkled with fresh cilantro.
Quick Protein Power Balls with Apples, Hazelnut Meal and Oats, via Eat the Vegan Rainbow
This recipe is as quick as lightning and perfect for those crazy and hectic mornings. I made it as we were heading out for a day at a beach, as a healthy snack that packs lots of protein, fiber and general goodness.
All you need really is a food processor, and you’ll be done in no time. All ingredients get added one by one, in the order they appear on the recipe list. I recommend switching your cutting blade with the kneading blade once you are done processing oats and apples. Or you can dump your oat/apple mix into a large bowl and continue to combine everything by hand.
To form the balls, scoop out a tablespoon of the mix at a time, then roll the dough around until tightly together. These snacks held up well to the car ride and beach time when kept in a plastic box. They also store well in the fridge and you can enjoy them for several days.
With oats, apple, pea protein powder and hazelnut meal, these balls can also be a quick breakfast as well as the afternoon pick-me-up.
Quick Protein Power Balls with Apples, Hazelnut Meal and Oats
What you’ll need:
1 cup oats
1/2 cup hazelnut meal
1 Granny Smith (or another tart) apple, peeled, cored and processed
1/2 cup pea protein powder
1/4 cup agave syrup
1 tablespoon vanilla bean paste
1 tablespoon cocoa nibs
What you’ll do:
Place the oats into a food processor and process into a fine meal.
Add the apple and process until fully chopped and incorporated.
Replace the chopping blade with a kneading one, then add the rest of the ingredients, and pulse until everything is smooth and incorporated ( you can do this without a kneading blade, by using a mixing bowl and your hands to mush and mesh).
Scooping 1 tablespoon at a time, form balls and arrange on a baking sheet, covered with wax paper, or another type of platter.
Enjoy immediately, pack for a trip, have for lunch or snack – yummy!
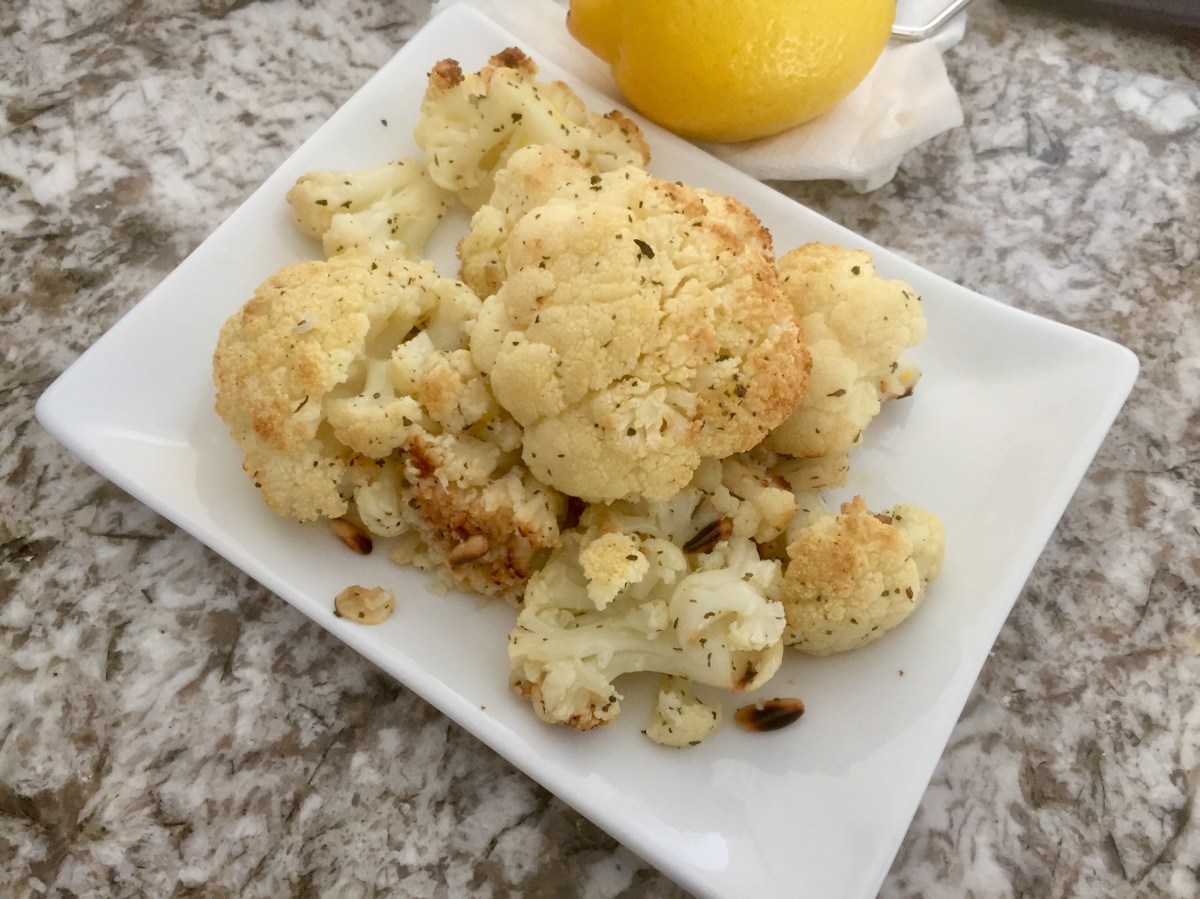
Lemony Roasted Cauliflower, via Eat the Vegan Rainbow
Cauliflower is the king of the vegetable world, and beloved by millions who follow the plant-based or vegan diet. It’s also loved by paleo diet eaters, and of course many, many others. What makes cauliflower versatile is the fact that it is mild enough on its own, which allows it to carry many different flavors. For example, you can make a lovely Cauliflower Buffalo Wings and Cauliflower Pizza Crust, as well as a great Cauliflower Basmati Rice or pasta shells stuffed with cauliflower ricotta. You must agree that this is quite a range for a single ingredient!
This dish is a simple yet delicious side dish or a quick lunch. It tastes great warm as well as cold, so you will be able to make the most out of your leftovers. The dish does take some time to make – roasting cauliflower can take up to 45 minutes. But, trust me: roasting is the way to go. Although you could boil the cauliflower the flavor will not be the same, so just don’t go there.
The rest of the ingredient list is simple and straightforward. Pine nuts add nice toastiness and crunch to the dish, garlic give it the aroma, and lemon juice and zest make this dish light and full of sunshine. Of course, a dash of basil never hurts!!!
Wash the cauliflower, and cut out the florets only (you can use the leftover cauliflower to make rice, or a creamy soup, so don’t throw it away!). Pat dry the cauliflower florets and set aside.
Line a large baking sheet with some parchment paper, arrange the cauliflower florets so that there is some space around each one, and place in the oven. Roast for 30-40 minutes. The florets should be soft and nicely browned.
Place the roasted florets into a large mixing bowl and let them cool slightly.
Bring a large frying pan up to temperature over medium-high heat. Add the pine nuts and toast on high for 2-3 minutes. Stay with your pine nuts as they toast and stir frequently as they can quickly go from nicely toasted and fragrant to burnt! Add the toasted pine nuts to the roasted cauliflower.
Add the oil to the pan and decrease the heat to medium low. Add the sliced garlic and cook it for 1-2 minutes. Pour the garlic and oil over the cauliflower and pine nuts mix.
Next, add lemon juice, lemon rind, and basil and mix everything well. Let the cauliflower rest for 10 minutes or so, then serve and enjoy!
Vegan & Gluten-free Baked Eggplant Parmesan, via Eat the Vegan Rainbow
Eggplant Parmesan – the staple of Italian restaurants in our area, and a frequent favorite of many. Unfortunately, it is so easy to overdo this dish and make it almost inedible. For example, frying the breaded eggplant very often results in a mushy piece of oily eggplant that is far from appetizing. So, to compensate for absence of flavor of a soggy eggplant people usually dump in a whole lot of cheese, usually a mix of ricotta and mozzarella. This makes for a goopy mess of a meal that can be easily avoided by following couple of simple rules. Rule 1: bake your eggplant; Rule 2: make your own tomato sauce; and Rule 3: make the dish 100% plant based.
Prepping the eggplant
Eggplant has a bad reputation for being bitter unless prepared a certain way. However, I don’t remember the last time I had one that was bitter when grilled, or made into a stew. Having said that, for the eggplant parmesan I do recommend that you use the trick that’s supposed to draw the bitterness out. You slice the eggplant, sprinkle with salt and then let drain for 15-30 minutes. The way I did it is to place the eggplant on several layers of paper towels, sprinkle salt, cover with more paper towels, put a baking sheet over the top and weigh with some cans. The amount of liquid that eggplant releases is not enormous but the paper towel should be quite damp.
Breading the eggplant, gluten-free and vegan way
The next step towards your Eggplant Parmesan is breading and baking the eggplant. I don’t recommend frying the eggplant – baking at 425 F (220 C) will give you much better results, and nice crispy eggplant.
To get to a gluten-free version of this classic all you need to do is use gluten-free bread crumbs which are now available in most grocery stores. If you don’t have access to gluten-free breadcrumbs you can use stale and/or roasted gluten-free bread to make your own bread crumbs. Or, if that is not available either, you could use corn flakes and make them into the crumbs! And don’t forget to add some dried oregano and basil to your breading – that just makes everything better!!!
For the breading, you will also need an “egg” mix, in this case some vegan mayo mixed with some plant milk. This mixture gives a nice thick consistency, but if you’d rather skip mayo, you could use just plant milk. The main point of the “egg” mix is to make the surface sticky so that the breading adhere to it well.
Eggplant parmesan breading assembly line
So, your breading assembly line will look something like this – pile of eggplant slices, deep fish (soup plate) with the “egg”, a pie dish with the bread crumbs, and the baking sheet lined with parchment paper sprayed with some cooking spray. An eggplant slice would go from the “egg” mix, to the crumbs, to the pan.
After about 15-25 minutes in the oven the eggplant should be nicely golden and crunchy.
Making the perfect marinara tomato sauce
While the eggplant is baking, you can make your very own amazing tomato (marinara) sauce. The sauce starts with some olive oil and garlic, and includes only five ingredients. You will need olive oil, garlic, crushed and whole peeled tomatoes, and dried oregano and basil.
Vegan eggplant parmesan needs some good cheese
The cheese starts with cashews soaked overnight. It includes nutritional yeast, plant milk, lemon juice and that’s it! As with the tomato (marinara) sauce, this cheese is universally applicable to a range of recipes and dishes. The final consistency is that of a ricotta not mozzarella, but in this case that works great.
Putting the eggplant parmesan together
This magnificent eggplant parmesan starts with a layer of marinara sauce on the bottom, then a layer of breaded eggplant, followed by some tomato sauce then cheese, another layer of eggplant, sauce and cheese, and so on. You can keep layering until you run out of ingredients. Once all the layers are in, put your eggplant parmesan in the oven and let the top and the edges brown. Let the baked dish cool for 15 minutes or so, sprinkle some fresh basil and some freshly ground pepper, then serve with a simple salad. Yummy!
Vegan and Gluten-free Baked Eggplant Parmesan
What you’ll need:
FOR BAKED BREADED EGGPLANT
3 large eggplants, cut across into 1/2 in (1-1.5 cm) rounds
1 teaspoon salt
1/2 cup mayo
1/4 cup milk
1 cup bread crumbs (gluten-free or regular depending on your preference)
1 teaspoon dried oregano
2 teaspoons dried basil
Cooking spray
FOR SIMPLE TOMATO (MARINARA) SAUCE
1 can crushed tomatoes
1 can whole peeled tomatoes, crushed by hand
3 cloves garlic, thinly sliced
2 tablespoon olive oil
FOR SIMPLE RICOTTA CHEESE
1 cup cashews, soaked in water for at least 3 hours (overnight in the fridge is fine)
7 oz. silken tofu
1/2 cup almond milk
1/2 lemon, juice
1 tablespoon nutritional yeast
1/4 teaspoon salt
Fresh basil, finely chopped (optional)
Freshly ground black pepper (optional)
What you’ll do:
Cut the eggplant into rounds, arrange on several layers of paper towel, sprinkle with salt, overlay with several more layers of paper towel, then weight down and leave for 15 minutes. This will draw excess moisture out – your towels should be quite damp, so pat the eggplant dry and set it aside.
Preheat the oven to 425 F (220 C).
Line a large baking sheet with parchment paper and spray with the cooking spray.
In a large soup plate combine mayo and plant milk together. Whisk well. Next, in a separate plate combine bread crumbs and dried oregano and basil. Take a piece of eggplant, dip in the mayo/milk, then move to the breadcrumbs, and lay flat on the parchment paper. Repeat until all the eggplant is used up. You may need two baking sheets for this, so have another one on stand by just in case.
Spray the top with a bit more cooking spray, then bake the eggplant for 15 minutes. Flip it once and bake for 10 more minutes. Take the baked breaded eggplant out and let it cool before handling further.
While the eggplant is baking, prepare the sauce and the cheese. To make the marinara sauce, place a large, heavy pot (I use a Dutch oven) over the medium high heat, add the oil and sliced garlic. After 1-2 minutes, add the can of crushed tomatoes and the can of whole peeled tomatoes that you have smushed with your hands. Let the sauce come to a simmer, lower the heat down, and leave the sauce to simmer with a lid one until needed for the next step.
While the sauce is simmering, combine all the ingredients for the ricotta and blend until smooth using a blender. Set aside.
For the final step you will need a deep baking dish, like the 13 x 9 in (33 x 23 cm) dish. Pour in some tomato sauce, and spread around until the bottom is fully covered. Layer in the eggplant. Top with sauce, then cheese, then add another layer of eggplant, then sauce, and finally cheese. Keep layering until you run out of ingredients. Depending on the size of your baking dish, you may have 2 or 3 layers. If you end up with leftover sauce or cheese, you can store them in the fridge and use for 5 days or so.
Bake the eggplant parmesan for 20-25 minutes, until the dish is bubbling and the top is browned. Let the baked eggplant parmesan rest for 15 minutes before serving and enjoy!
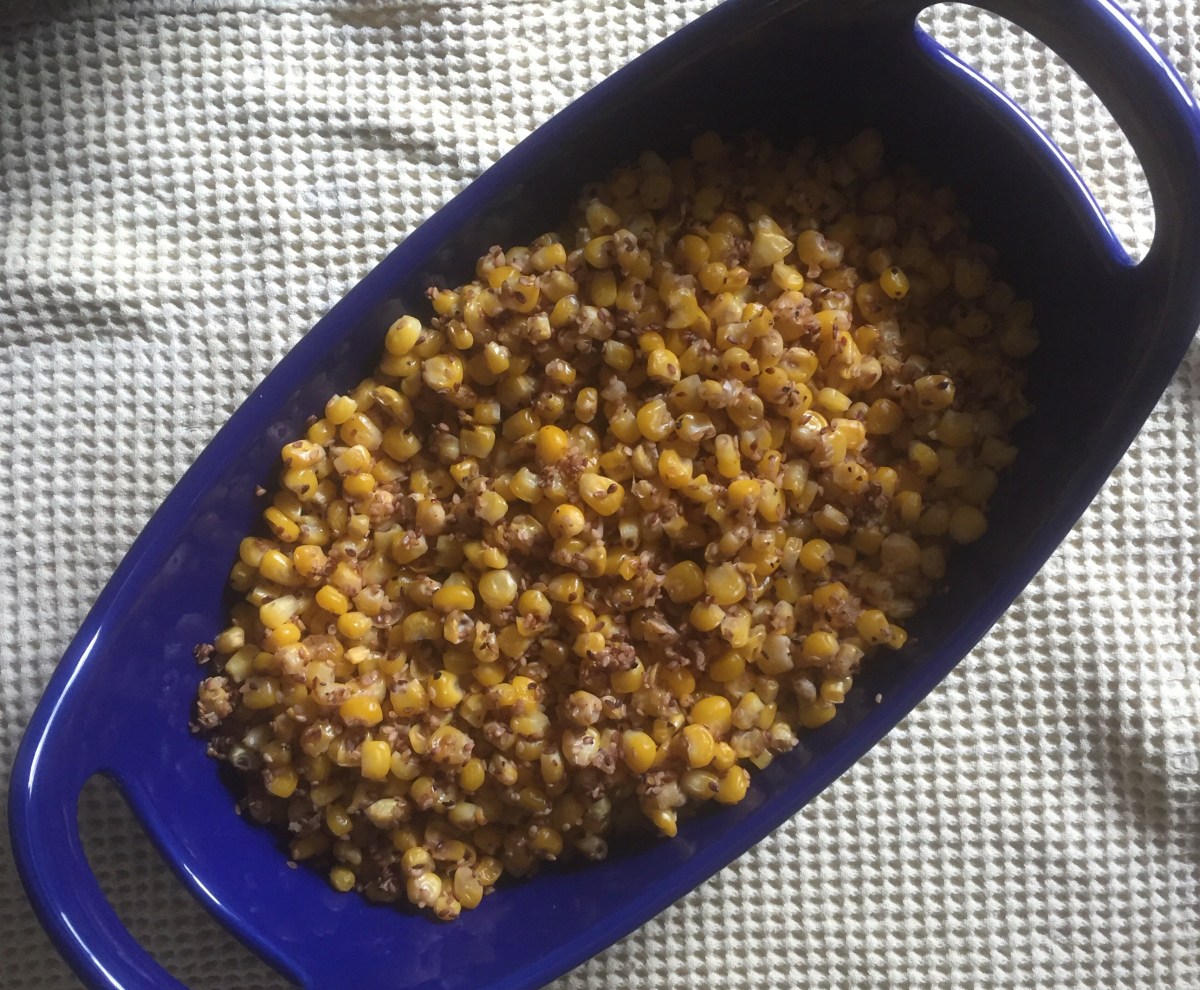
Sweet Corn and Sesame Seed Salad, via Eat the Vegan Rainbow
Sometimes salads are complex, feel elaborate and deep, mature and intense. I’ve made couple of those in my life, like this incredible roasted beets and leeks salad with baby kale and the most amazing lemon vinaigrette. I also made salads that are just for fun, with a bit of this and a bit of that, by combining fruits, vegetables and nuts.
But during summer, I like my salads to be simple, yet out of the ordinary. Last summer I went nuts for a pasta salad that used only a handful of ingredients but which I could not stop making over and over again. I think we are at that point in summer when it’s time for another easy, yet amazing salad, with no greens allowed (I love the greens but there is sometimes scope to be just a bit different!).
This corn salad is it – and it’s absolutely a fabulous accompaniment to any grilled food feast. All you need are four simple ingredients and 10-15 minutes. If you have that – boom, boom, boom and you are done.
The corn I use most often is frozen sweet corn, but you could grill your corn and cut the kernels out and use that instead. I bet the grilled/charred corn flavor would be fantastic.
Place a large frying pan over medium high to high heat. Add olive oil and frozen corn. Let the corn brown as it defrosts. Mix frequently but do let the corn get some surface caramelization.
While the corn is cooking, toast your sesame seeds. You can do this in a toaster oven or using a stove top. Keep a close eye on your sesame seeds as they toast because they do from nicely toasted to completely burned in a matter of seconds!
Add the toasted sesame seeds to your corn, as well as the steak spice and mix well. The salad is best served room temperature, but you can serve it warm as well. Enjoy!
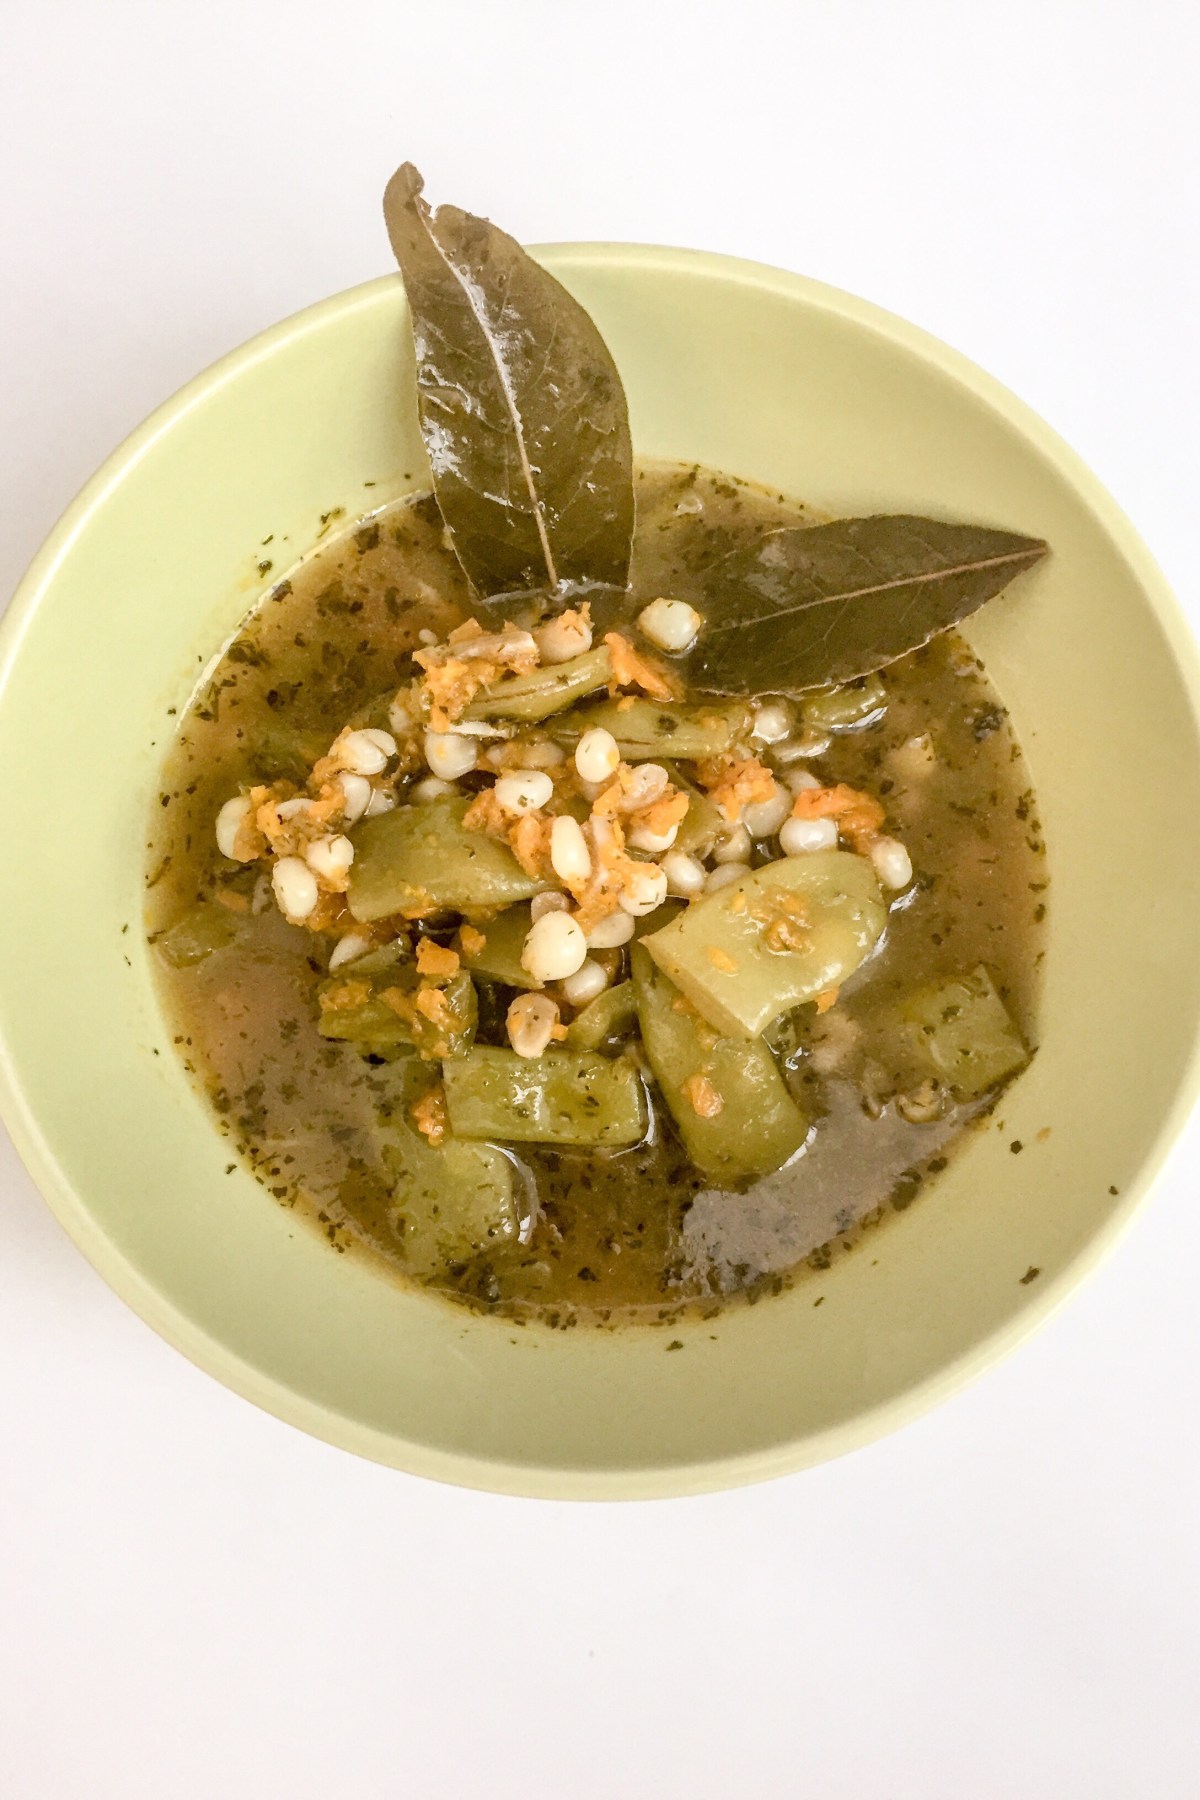
Super Summer Soup with Italian Flat Beans, via Eat the Vegan Rainbow
The adventures of the CSA share continue! This is our week 8 share and the eggplant, zucchini, and cucumbers are in full swing. If you need some zucchini inspiration, check out my stuffed zucchini boat recipe from last week. There are also some new items this week, and that’s my focus here: corn, green peppers, and flat (romano beans)! And this is what makes taking part in a CSA (Community Supported Agriculture) program so great – finding surprise ingredients that your local supermarket may not carry, and figuring our what to do with them.
The credit for this soup goes entirely to my 7 year old who suggested we use flat beans for a soup, add corn to it, plus one tablespoon each of dried dill, dried basil and onion powder. Oh, and garlic and vegetable broth! Then I stepped in with some carrots, bay leaves, and green pepper (also courtesy of the CSA share this week). The rest is history and the recipe below!
What are flat beans?
Flat Beans, Raw – By Andrewa, from Wikimedia Commons
Before we dive into cooking, let me just share what flat beans are. I don’t think I ran into them before, and I am guessing many of you are in the same boat! These beans are also known as romano beans, and also Italian flat green beans. They are similar to green beans, but much broader – about one inch (2.5 cm) or so, and they are quite long too. They have a good bite to them, although my seven year old helper did not like their taste when raw. These beans are meaty and that’s another reason why putting them into a stew or a hearty soup makes a lot of sense as they need a bit of time to cook, and I don’t think steaming them would work. So, if you like to try a green bean variety with a bit more meat and bite to it, these are a great option.
2 cups grilled corn, just kernels (frozen or canned whole kernel corn would work too!)
2 large carrots, chopped very finely using a food processor
1 green pepper, diced to small pieces
4 cups (about 1 L) vegetable broth
4 cloves garlic, thinly sliced or crushed
1 tablespoon onion powder
1 tablespoon dried dill
1 tablespoon dried basil
4 dried bay leaves
2 tablespoons olive oil
Squeeze of lemon for serving (optional)
What you’ll do:
Place a large pot over the medium-high heat. Add oil then garlic and let the garlic brown just slightly for 1-2 minutes.
Next, add diced green peppers and sauté for 2-3 minutes, with occasional stirring.
Add finely chopped carrots, mix well and cook for another 2-3 minutes.
When the peppers have softened and the carrot pulp starts to brown, add the beans, corn and all the spices and sauté for another 5 minutes, then pour in the vegetable stock, bring to boil, lower the heat to simmer, put the lid on and leave it for 15 minutes.
Serve this soup as a light supper, lunch, or pair with a salad and some bread for a meal!
Tex-Mex Stuffed Zucchini with Homemade Salsa and Diced Avocado, via Eat the Vegan Rainbow
When life gives you zucchini, there are actually many things you can do with it, grilling and sautéing being my go-tos most of the time. But, doing same thing over over again, no matter how tasty and satisfying they are, does get old. When it comes to zucchini, I have been trying new things, like zucchini lasagna, and zucchini fruitcake – I did also give zucchini cheese a try but that one did not work for me, so I am putting my zucchini cheese making days behind me.
To me, perfect stuffing zucchini is about 8-9 in (20-25 cm) and what makes this the perfect size is the fact that it matches is the size of my 9 x 13 in (23 x 33 cm) baking dish! Plus, the zucchini in this size range is in the Goldilocks zone – not too big and not too small, yet just right for carrying a good amount of stuffing.
The best way to get the zucchini ready for stuffing is to wash them, cut the ends off (this step is actually optional, you could skip it and leave the ends on – this would give your dish a nice, rustic presentation at the end), then slice the zucchini lengthwise and scoop out the seeds. If the zucchini is old and seeds look well-formed and unappetizing, please feel free to discard them. But, if the inside looks fresh and soft, scoop it out into a bowl and put aside to use as a part of the stuffing.
Par-roasting zucchini
You may have heard about par-boiling, when you boil something only half way through before doing something else with it. Par-roasting is essentially the same thing, just using roasting as a strategy to get the nice, roasted and caramelized flavors going without too much oven time. This can come in handy during hot summer months, for example.
I use par-roasting when prepping most of my stuffed vegetables, be it mushrooms, peppers, eggplant, or zucchini. The method is simple: you turn your oven on high (425 F (220 C) or higher), line a baking sheet with some parchment paper, toss the veggies with some oil, or spray with some cooking spray, or skip the oil altogether if avoiding fat (you can also sprinkle salt on if using, I don’t because the stuffing is usually plenty salty for me), and let the veggies brown for 15 minutes or so, flipping them over once if needed to get them equally browned on both sides.
Why par-roasting?
Well, most stuffing I make is already cooked by the time all is said and done. So, the stuffing itself usually does not need any more cooking time – all it needs to do is go into the oven for 10 minutes or so to get nicely browned on top. Par-roasting is my way of brining whichever vegetable is supposed to hold the stuffing up to speed so that the vehicle is ready for the final oven ride, when the stuffing gets browned and the vehicle finishes baking while absorbing some of the flavors that seep from the stuffing. In this way everything gets harmonized and delicious.
My secret to a perfect (and easy) Tex-Mex flavor
The best way to get the tex-mix flavors going is to start with a good chili powder, then add cumin powder and smoked paprika. These three things combined make for nice smokiness with just a hint of heat, so even with the amount of chili powder I use here the heat will not be overpowering. Having said that, do adjust the chili powder to fit your preferences. Of course, having corn and black beans in this dish is also essential. Here, I used canned corn and canned beans, but you can definitely use frozen corn and cook your beans from scratch. If you are using frozen corn, 1-1/2 cups of frozen corn should be enough, and if you are cooking the beans, 1 cup dry beans will probably be plenty.
Easy homemade salsa
What also helps tex-mix flavors is topping the stuffed zucchini with some freshly made salsa. If you don’t have the time, store-bought is perfectly fine to use here, either freshly made or from a jar – you can pick your own favorite flavor and enjoy! But, if you do want a quick homemade salsa, then follow the instructions below. The main tip here is to cut the tomatoes lengthwise and scoop out the seeds. Don’t throw them out – you can mix them into the tex-mex stuffing! Here, almost everything goes into a food processor for easy chopping. I recommend leaving one cleaned out tomato aside, and dicing it finely by hand to give the final salsa a bit more texture. This salsa takes only a few minutes to make, and you will love the flavor of freshly chopped cilantro and freshly squeezed lime, so it is worth doing it from scratch.
Diced avocado for a final touch
Last but not least is the diced avocado. You actually don’t need the avocado if you can’t stomach it (I know there are some people out there that have trouble with avocado), but it does add a nice, smooth, rich and creamy flavor to the final dish. It’s like a five layer dip right there in your zucchini “boat”!
To pick the best avocado, get those that are still quite hard and then leave them next to some bananas on your kitchen counter for a day or so. The avocado will soften and then you can store it in the fridge until ready to use. In this way you will avoid getting avocados that are too bruised by all the squeezing and poking, and can buy extra avocados on sale and use them 5-7 days later.
After that PSA, back to the Tex-Mex Stuffed Zucchini – to finish the stuffed zucchini, squeeze some fresh lime juice over your avocado and sprinkle some fresh cilantro. If you are using homemade salsa you can skip the cilantro, but if you are using the store-bought then no cilantro-skipping is allowed!
Tex-Mex Stuffed Zucchini with Homemade Salsa and Diced Avocado
What you’ll need:
3 zucchini, washed but not peeled
1 15.25 oz (430 g) can yellow corn (whole kernel)
1 29 oz (820 g) can black beans
1 medium yellow onion, finely diced
4 cloves garlic, thinly sliced or crushed if you prefer
2 tablespoons vegetable oil
2 teaspoons chili powder
1 teaspoon cumin powder
1 teaspoon smoked paprika
Freshly ground black pepper and additional salt to taste!* (see Note)
1 avocado, finely diced, for garnish, optional
Fresh cilantro and freshly squeezed lime juice for topping (optional)
SIMPLE HOMEMADE SALSA
4 plum tomatoes, seeded, divided
1/4 – 1/2 jalapeño pepper, deseeded (or more, to taste)
1/4 onion or red onion
3 tablespoons tomato paste
1/2 cup fresh cilantro
1/2 lime, juice
1/4 teaspoon sat (more or less, to taste)
Cooking spray, salt, pepper
What you’ll do:
Preheat the oven to 425 F (220 C).
To make the salsa, cut the tomatoes lengthwise, the use a paring knife to take out the seeds and the middle of the tomato. Reserve the middles for the stuffing. Place all the ingredients, except one tomato into a food processor and buy until finely chopped. Dice the leftover tomato finely and mix in with the rest of pasta. Once mixed, set the pasta to the side.
Wash the zucchini, remove the ends, and cut lengthwise into two pieces (I prefer to remove the ends but you don’t need to do that). Use a teaspoon to scrape out the inside of the zucchini – if full of seeds you can discard, otherwise add to the tomato scrap pieces and put aside.
Line a large baking sheet with parchment paper. Spray with some cooking spray, then place zucchini on, spray the tops and place the zucchinis into the oven. Zucchini will be nicely browned in about 10 minutes. Take the zucchini out and set aside.
Lower the oven temperature to 375 F (190 C).
While the zucchini is par-roasting, get going on the stuffing. Add the oil to a large pan (frying or sauté) and place over the medium-high heat. Add the chopped onions and sliced garlic and let them caramelize for 2 minutes or so. Next add the spices (chili powder, cumin powder, smoked paprika) and let them “bloom” for 1-2 minutes.
Next add the scooped out zucchini and tomato scraps, and mix well. Sauté for couple of minutes, then add corn and black beans. For corn and black beans, I recommend straining them using a large colander, and rinsing them for half a minute under some cold water before using. If you are using frozen corn, or fresh corn, and the beans you cooked yourself this washing and straining step is, of course, not necessary! Mix everything well and sauté for another 8-10 minutes.
Spray a 9 x 13 in (23 x 33 cm) baking dish (or a large casserole pan) with cooking spray, then cover the bottom with a layer of stuffing. Place the par-roasted zucchini boats in and fill them with stuffing. Pile the stuffing high, and press gently in as you fill to make sure you get to all the little nooks and crannies. (You may end up with extra stuffing – if that’s the case you can serve the stuffing itself as a side for another dinner, for example this would be a grate thing to put into a taco shell and enjoy, or serve cold on your next tex-mix salad!).
Put the stuffed zucchini into the oven and bake for about 15 minutes. All you are looking for is some nice caramelization on the top and the sides. Pull the stuffed zucchini out, and let it cool for couple of minutes before serving.
When serving, top each zucchini boat with salsa and diced avocado, freshly chopped cilantro, and a squeeze of lime and you are done!
Kale Pesto with Cashews, via Eat the Vegan Rainbow
Pesto, a fragrant bright green pasty sauce made by crushing or blending basil, garlic, pine nuts and olive oil together has been around in one form or another since Ancient Rome. There are quite a few variations on the original theme, but they all boil down to combining a ground nut base with a flavor enhancer, like garlic and basil, and fortifying these with some oil and usually cheese.
My first attempt at making pesto, many, many years ago did not go that well. I am a bit foggy on detail but as far as I can remember the follow up conversation with friends had revealed that I used arugula instead of basil, and that I should have used pine nuts, which I completely skipped. Still, it was not all a waste and a horde of graduate students, who this was made for, gobbled it all down nevertheless.
These days I know the difference between basil and arugula, and appreciate that a good pesto does need something more than just greens to give it real body and bite. Yet, as you will see, it seems that I remain determined not to use basil or pine nuts to make the pesto happen.
What happened this time around is that I had two large bags of kale without much interest to use them in a soup or roast them. So, I was looking for something more exciting to do – and the rest may go down in the pesto history!
And once I had my pile of pesto, I went very traditional and used it to dress my pasta. However, pesto, be it basil based or kale based, is quite versatile and you can use it in many different ways. There are even blog posts dedicated to showing what pesto can do beyond pasta (see here for a good example).
Whatever you decided to do with this pesto, I think you’ll like it. It offers a nice kale bite, mixed wit gentle cashew nuttiness and freshness that the lemon brings. And, of course there’s garlic!!!
Kale Pesto with Cashews
What you’ll need:
4 cups kale leaves, stemmed and chopped
1 cup raw cashews, soaked in water overnight
4 cloves garlic, sliced
1 lemon, juice and zest
1/4 teaspoon salt
2 tablespoon olive oil
What you’ll do:
Clean the kale carefully and make sure that all the woody pieces of stems are fully removed. Although you will be using a food processor, which should take care of all the tough kale pieces, I recommend that you do spend some time making sure you have mostly nice, green kale leaves.
Place a large pan over medium heat. Add oil and garlic, and sauté for just a minute, until the garlic starts to release it’s aroma.
Add chopped kale leaves and let them wilt by tossing them with oil and garlic continuously. This will take anywhere between 5 and 10 minutes depending on the size of your pan. The more surface area your bottom has, the quicker it will be. Once the kale is fully wilted, turn the heat of and let the kale cool.
Rinse the soaked cashews under some cold water, drain well and place in a large food processor. Add the wilted kale, lemon juice and lemon zest, and a pinch of salt and process until fully ground and smooth.
Enjoy on pasta, in a sandwich, as a dip, on a pizza… The possibilities are endless and just remember that you are keeping it healthy and eating a whole bunch of kale!
Onwards and upwards – this summer has been energizing. We have vegetables growing in our garden, and farm fresh ingredients coming from the Upswing FarmCSA. I’ve been sharing the recipes featuring vegetables from our farm share, and have now created a new CSA – Community Supported Agriculture category to help you navigate my pages, so check it out!
What to do with cabbage?
Week 6 share featured two heads of cabbage, one of those vegetables that people have very mixed feelings about. On one hand you know it’s super healthy for you, with huge amounts of vitamins C and K, but on the other hand you also know that it’s just not something you necessarily like to see on your plate. Unless, of course, you are from Central or Eastern Europe in which case you are raised to adore cabbage!
I hail from the Balkans, so I think of cabbage as a part of my cultural heritage. I grew up eating cabbage stews traditionally made with meat, cabbage salads, sauerkraut, stuffed cabbage leaves (also often done with meat but here is a great vegan version), and overall loving it, especially the cabbage pie my grandmother used to make using shredded cabbage, phyllo dough, salt, pepper and oil. Quite honestly, one of the best things to do with cabbage is to shredded it finely, add some oil, vinegar, salt and black pepper, chill well and enjoy as a crisp salad.
What’s the deal with coleslaw?
Having grown up with abundance of cabbage, coleslaw came as a bit of a surprise to me. If you never had coleslaw, let me take a moment to describe it to you. It’s a very popular side dish for a BBQ, or surprisingly enough, a clam/lobster bake. It’s made of shredded cabbage and carrots, mixed with mayonnaise, some sugar, a bit of milk, a splash of vinegar, a sprinkle of celery seeds, and salt to taste. As with plain shredded cabbage salad I grew up with, coleslaw is at its best after 6-8 hours and served chilled.
By now you can probably guess that I am not a huge fan of many coleslaws that I tried. First of all they are too wet, second of all they are too sweet, and third of all they have too much mayo!
The taming of the coleslaw
After giving traditional coleslaw recipes a try, I decided to make coleslaws my own way. And my own way means more vinegar, usually a bit of Dijon mustard, no sugar, less or no mayonnaise, and absolutely no milk. If you are looking for a version of coleslaw with a bit of a kick to it, try this spicy version, which I shared last summer. The version below was inspired by this week’s CSA share that included cabbage, carrots and celery.
Food processor is your coleslaw making secret weapon
For this recipe I recommend using a food processor. Although cabbage is best when thinly sliced by hand, the food processor does the chopping in a blink of an eye, so it is an acceptable shortcut. So, after buzzing the celery, cabbage and carrots all you need to do us mix in some vinegar, caraway seeds, ground mustard, a pinch of salt, and some mayo (vegan of course, I like Just Mayo and Trader Joe’s Vegan Spread & Dressing). You can eat the coleslaw as soon as it’s mixed, but it will be tastier if you leave it in the fridge for couple of hours.
My favorite way to eat coleslaw? As a coleslaw sandwich! Of course, you can serve it with Beyond Burgers, or vegan BBQ ribs, or with your next vegan sausage. No matter how you serve it, I hope you give it a try – it will help you fall in love with cabbage, guaranteed!!!
Basic Vegan Coleslaw
What you’ll need:
1 medium head cabbage (1 1/2 lbs (600-700 g))
4 large carrots
5-6 stalks celery (I used young celery here, which is dark green but you can use any you have on hand)
Using an S blade in your food processor, chop the celery roughly.
Take the S blade out and put in your grater attachment (I recommend coarser grating side, if you have a food processor that gives you an option to choose between finer and coarser grating). Process your cabbage and your carrots.
Invert the contents of your food processor into a large mixing bowl and add the rest of the ingredients. Mix well to combine.
Cover with some plastic wrap or a lid if your bowl has a tight fitting one, and leave in the refrigerator for at least 2 hours. I think you’ll get best results if you make the salad in the morning and serve that afternoon but making the night before and serving the next day is fine too.
Enjoy as a salad with your next vegan BBQ or burgers, as a topping for your carrot dogs, or in a sandwich – you can’t go wrong with this one!
Barley and Mushroom Burgers, via Eat the Vegan Rainbow
When life gives you barley, you should probably make some burgers! This is especially true when life simultaneously gives you some mushrooms so that your burley burgers can take full inspiration from that old-time favorite, the Mushroom and Barley Soup. The soup is a traditional menu item in delis and other lunch places, and it work because it combines robustness and heartiness of barley with plenty of umami savoriness that comes from mushrooms.
These burgers are built on the same principles. Cooked barley is mixed with plenty of ground mushrooms, and a handful of flavoring agents to make these gently spicy and smokey baked burgers. The patties are sturdy enough to hold up to the outdoor grilling, so you don’t need to limit yourself to an oven.
The key flavor agents in this case are sliced black olives and chipotle peppers in adobo sauce. You need to be careful with the chipotle peppers because they are hot! I usually use either only the sauce or just one pepper as more than that can make a dish, including these burgers, quite uncomfortable. The adobo sauce itself is an excellent source of smokey flavor, so if your taste buds are sensitive you can skip the pepper, or replace the adobo sauce with some smoked paprika.
Mushroom and Barley Burgers
What you’ll need:
2 cups barley
4 cups water
1 cup black olives, sliced
10 oz mushrooms
3 tablespoons tomato paste
1/3 7 oz. (200 g) can chipotle peppers in adobo sauce
1 tablespoon minced garlic
2 tablespoons soy sauce
1 cup flat leaf parsley, fresh
Cooking spray
What you’ll do:
Cook 2 cups of barley in 4 cups of water. I recommend using a pressure cooker (30 min bean cycle on the electric pressure cooker I have gave great results), or cook on the stove top using the instructions on the bag. Let cooked barley cool before using further.
Preheat the oven to 425 F (220 C), or prepare your outdoor grill as you normally do. For the outdoor grilling I recommend getting the grill grates hot, burning off any bits that may have been stuck on them, then scrubbing them, and oiling them before use.
Place the olives and the rest of the ingredients all the way to the cooking spray, into a food processor and process until finely chopped, then add into the cooked barley. Mix well, and using your hands form the patties.
If you are using an oven, place the patties onto a baking sheet lined with some parchment paper. Spray them with cooking spray, then flip over and spray again. Bake on one side for 10-15 minutes then flip them over and bake for 10 min more. For outdoor grilling, 8-10 minutes per side should be enough to get the perfect grill marks and develop that lovely grilled flavor.
Serve the burgers with all your favorite trimmings. They are hearty and just slightly spicy, and pair well with neutral flavors like avocado, lettuce and tomato.