Gluten-Free (and Vegan) Chocolate Chip Cookie Dough Balls

Gluten-free and Vegan Chocolate Chip Cookie Dough Balls, via Eat the Vegan Rainbow

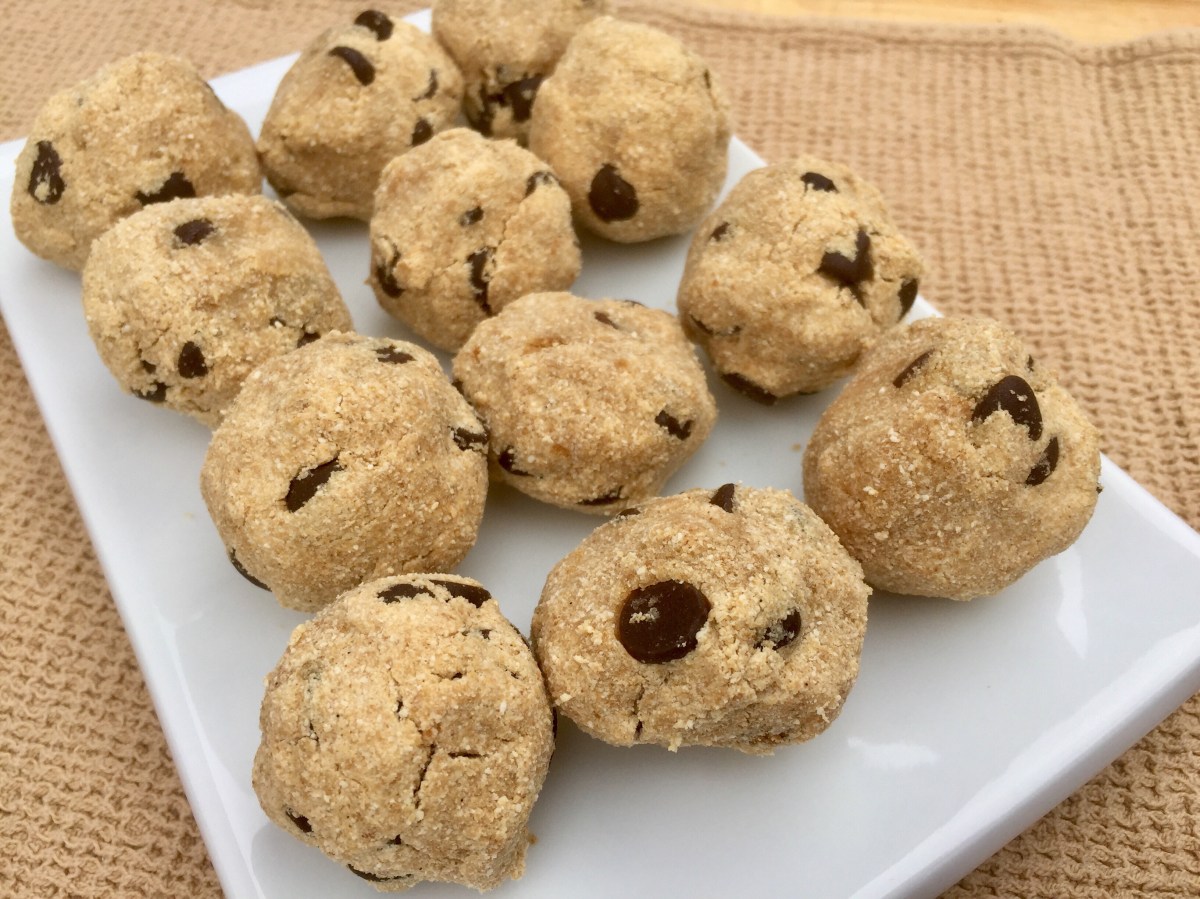
If you are looking for a quick, fun, satisfying and irresistible dessert, well look no further. These Chocolate Chip Cookie Dough Balls are it!

They are no-bake dessert that you can whip up on a whim by using a handful of ingredients, most of which you can find in your local grocery store or easily make in a food processor. Some ingredients that you likely already have are almond flour, coconut flour, vegan chocolate chips (I recommend Enjoy Life brand, especially the mini chocolate chips!), almond milk, almond extract, agave nectar, and vanilla bean. Mixing all these together will give you lovely and yummy treats.

What kicks the flavor over the top for me is mesquite powder. Yup, you heard that right – mesquite! This is a new ingredient for me and I’ve been experimenting with its use. The powder comes from and can be used raw, so I’ve been adding it to smoothies. The powder has an earthy and nutty flavor, and that’s why it works really well in these treats.

One tip: add the almond milk gradually in small increments, 1/4 cup at a time. After each addition mix your ingredients well and let them rest for few second before adding more milk. This will help your cookie dough absorb the liquid and result in a moist dough that will come together well as you roll it.

And speaking of rolling, be gentle but not too gentle. The dough should not be crumbly – if it is you likely need a drop or two more almond milk or if you like to kick it up a notch in terms of calories you could add some almond butter which will help hold things together. Use the same technique you would when putting together meatballs: scoop a tablespoon or so of the dough into the palm of your hand and start rolling and squeezing at the same time until you have a nice little treat in your hand.

Since these cookie doughs are free of eggs, butter and flour, they are totally fine to snack on as you make them. Just remember to save a few for later!

Gluten-Free (and Vegan) Chocolate Chip Cookie Dough Balls

What you’ll need:

1 cup almond flour

1 cup coconut flour

1/4 cup mesquite powder

1/4 cup agave nectar (maple syrup, or other sweetener of choice)

1 teaspoon almond extract

1 vanilla bean, scraped

1 cup mini chocolate chips, vegan

3/4 – 1 cup vanilla almond milk, unsweetened (or another dairy-free alternative; if you are using a sweetened version just add less agave nectar; if you are using plain version add a bit more vanilla bean)

What you’ll do:

  1. In a large mixing combine all the ingredients except almond milk. Mix well and start adding the milk, 1/4 cup at a time. The final dough should be moist but not wet.
  2. Using your hands, take one tablespoon of the chocolate cookie dough mix and shape it into a tight ball. As you are shaping the ball, keep rolling and pressing. The ball should stick together, if not consider adding a tablespoon or two of almond milk.
  3. You can enjoy these chocolate cookie dough balls immediately. They are best freshly made, but they also keep ok, covered at room temperature for 2 days or so.

Copyright © Eat the Vegan Rainbow, 2018

Vegan Onion and “Bacon” Tart

img_2394
Vegan Onion and “Bacon” Tart, via Eat the Vegan Rainbow

Savory tarts are a great source of comfort during long, and cold, winter months, so fall seems like a perfect time to stock pile great savory tart recipes. One of the favorite topping combinations for this type of tart is onions and bacon. There can be little mystery about why this is so. Caramelized onions are sweet and juicy, and browned bacon is crispy and salty. Putting those two together makes for a sweet, salty, juicy yet crispy topping. Add to that a thin tart crust – and you get the picture!

In this recipe I wanted to recreate a bit of that onion-bacon dichotomy, by combining thinly sliced onions caramelized to perfection with marinated, thinly sliced, tempeh that has been browned until crispy on the outside. The trick with onions is to slice them into thin strips and then let them caramelize for a long time over medium heat. If you are counting calories and trying to stay as oil-free as possible, you can use just a bit of cooking spray to get your onions going – I did it, and it works just fine! But if you regularly use oil, starting with a tablespoon of olive oil will work well here. I recommend using a well-seasoned cast iron skillet here – not only will it help caramelize the onions and brown the tempeh bacon, it will also go straight from the cooktop to the oven, making this a one pot dish.

To prep the tempeh, first boil it for couple of minutes, pat dry it, cut into thin strips, and let it marinate for couple of hours. I used the same basic marinade that The Buddhist Chef used for his Tofu Bacon. It’s made of oil, maple syrup (I did skip maple syrup in this case since caramelized onions are plenty sweet), soy sauce,  liquid smoke, and nutritional yeast. I prepped the tempeh ahead of the onions, so when the onions were done I could remove them from the skillet and cook the “bacon” immediately afterwards.

My version of the tart is crustless, so there is no fancy pastry making required. What holds the tart together is the mix of almond milk and corn starch that comes in last, as the veggies are finishing cooking. And speaking of veggies, one other ingredient here is jackfruit. I use canned jackfruit and for this tart you will want to rinse it out well, drain it, then shred with your fingers, and remove any tough core bits. I can’t comment on using raw jackfruit since I’ve never done it, but I am guessing that it would be better since canned food does come with a bit of that canned taste/flavor.

The tart will spend some time in the oven, and to finish it off I recommend turning on the broiler at the end for five minutes or so to crisp up and brown the top. Let the tart cool for about ten to fifteen minutes before serving, and enjoy as is, or with some yogurt – I used a drizzle of cashew yogurt and a sprinkle of thyme. The tart is rich, fragrant and fantastic!

Vegan Onion and “Bacon” Tart

What you’ll need:

2 large onions

8 oz (225 g) tempeh

2 tablespoons soy sauce

2 tablespoons oil

1 tablespoon nutritional yeast

1 teaspoon liquid smoke (or more, depending on your taste)

2 20 oz (570 g) can young green jackfruit in brine

3/4 cup almond milk (plain, unsweetened)

2 tablespoons corn starch

1 teaspoon dry thyme

Cooking spray


What you’ll do:

  1. Bring 2 cups of water to gentle boil in a pan that’s large enough to hold the entire piece of tempeh flat without cutting. Lower the tempeh into the boiling water and let it boil for couple of minutes.
  2. While the tempeh is boiling mix together the marinade by combining oil, soy sauce, liquid smoke, and nutritional yeast.
  3. Take the tempeh out and pat dry. Let it cool for a moment, until it feels ok to handle. My heat tolerance is pretty high so I usually wait only a few minutes, but depending on your comfort zone when it comes to handling hot things you may want to wait longer before slicing the tempeh into relatively thin slices. Lower the slices down into the marinade and let it stand for an hour or two.
  4. While tempeh is marinating, prepare the jackfruit. Rinse the canned jackfruit well and let the excess water drain. Using a fork or fingers, pull the jackfruit into shreds. Discard the hard core, if present. Set aside.
  5. Slice the onions thinly into fine strips.
  6. Turn the oven to 400 F (200 C).
  7. Heat a heavy skillet, like a cast iron skillet, over medium high heat. Spray with cooking spray (or add a tablespoon of olive oil if using), and add the onions. After about 5 minutes at medium high heat, reduce the heat to medium to medium low and cook for another 10 minutes, until onions are soft and golden brown. Transfer the onions into a separate dish.
  8. Increase the heat to high and add tempeh “bacon” strips. Let the side brown then turn over and brown on the other side.
  9. Add back the onions, and jackfruit, mix the “bacon”, onions and jackfruit well, and continue to brown.
  10. In a small mixing bowl combine almond milk and corn starch. Whisk them together so that there are no clumps. Pour over the rest of the ingredients and let it start to bubble.
  11. Sprinkle the thyme and nutmeg, mix again and place the skillet into the oven for 20 minutes.
  12. To brown the top, turn the broiler on and broil for 5 minutes, until the top is browned and crispy.
  13. Take the tart out of the oven and let it rest for 10 to 15 minutes. Serve with a side of salad, or drizzle some yogurt over the top for a delicious meal.

Copyright © Eat the Vegan Rainbow, 2018

Quinoa with Roasted Cranberries and Pistachios

img_3592
Quinoa with Roasted Cranberries and Pistachios, via Eat the Vegan Rainbow

Like a fabulous supporting actor in a movie, the perfect side dish for a rich, holiday meal is subtle and complementary to the lead actors laid out on the festive table, yet able to make a lasting impression of its own.

This Holiday Quinoa with Cranberries and Pistachios is just that – visually pleasing, with layers of complexity in terms of texture and flavors, yet not overwhelming. Additionally, for anyone putting together a vegan, fully plant-based feast this side dish will add lots of protein to your plate.

Quinoa, just in case you are not familiar with it, is a grain, not a cereal, like wheat, but more like rice, and you would cook it like rice as well. When cooked it actually looks like couscous, and you will need to fork it up the same way. Although quinoa is fine served by itself, given that we are in the midst of fall/winter holiday season I decided to add just a bit to it, by adding some chopped pistachios and some oven-roasted cranberries.

One note on cranberries: fresh cranberries are very tart, and almost impossible to eat without adding a huge amount of sugar to them. I decided to try roasting and that worked to a point. Roasted cranberries are still tart, but a bit of tartness in this dish is actually a nice thing. If you prefer something with less bite, toss your cranberries with some sugar or a sweetener of choice, or simply chop some dried cranberries up – those are most certainly sweet.

Quinoa with Roasted Cranberries and Pistachios

What you’ll need:

1 cup quinoa

1 1/2 cup water or vegetable stock

1 shallot, finely diced

1 cup pistachios, chopped

1 1/2 cup fresh cranberries – this will yield about 3/4 cup roasted

Cooking spray

What you’ll do:

  1. Preheat the oven to 425 F (220 C).
  2. Wash and sort the cranberries. Place them on a baking sheet lined with foil and roast them for 20-25 minutes. Once soft and slightly browned, take the cranberries out the oven and set aside to cool for a bit.
  3. While cranberries are roasting, cook your quinoa. Mix 1 cup quinoa with 1 1/2 cups water, bring to boil, decrease the heat to a gentle simmer and let quinoa cook for about 20 minutes. Turn the heat off and let quinoa stand for another 10 minutes. Use the fork to fluff up quinoa before using in the next step.
  4. Spray the bottom of a skillet with some cooking spray and place over medium heat. Add finely chopped shallots and let them sauté for 5-8 minutes.
  5. Once shallots are done, add chopped pistachios and let them toast just slightly, for 2-3 minutes.
  6. Add the fluffed up quinoa, mix well, and sauté for 5 more minutes or so.
  7. Turn the heat off and mix in the roasted cranberries. Go gently as they will be very soft and falling apart.
  8. Serve warm, and enjoy with some White Wine Gravy!

Copyright © Eat the Vegan Rainbow, 2017

Pumpkin Truffles – Two Ways

img_3517-e1510705062190.jpg
Pumpkin Truffles, Traditional and Dark Chocolate, via Eat the Vegan Rainbow

Thanksgiving desserts are all about pies, most often pumpkin, apple, sweet potato, or pecan. Those are the big four, with pumpkin pie being the gold standard. I am not a baker – I mean I do bake, and I have made pies, including the pumpkin variety, in the past, but these pies are a bit too much for me to handle if I am making a big holiday feast.

So, this year I am trying out a no-bake route to a dessert offering that captures the spirit of winter holidays but does not require any oven real estate or lengthy prep work. With this in mind I developed these Spicy Pumpkin Truffles and I did them two ways – Dark Chocolate Covered and the Traditional, which means rolled in cocoa powder.

No baking, a handful of simple ingredients, and your holidays feast will be complete! The only trick, which by the way I am yet to master, is getting an even coat of chocolate. This batch turned out just a bit too irregular but that did not make them any less irresistible – the treats disappeared in a blink of an eye.

The truffles themselves are very easy to mix together and they are inspired by the pumpkin pie recipes. I used some canned pumpkin and mixed it with almond meal, almost flour, and coconut flour. I added some maple syrup to sweeten things up because the pumpkin I was using was not sweet at all. But before you add the sweetener of your choice do try your mix and adjust to taste. Keep in mind that your chocolate is sweet as well, unless you are using bitter kind, so you may need to play around a bit to achieve the right level of sweetness for your taste.

What pulls these truffles over the top are actually the spices. I used ground cinnamon, ground nutmeg and ground cloves. Those three spices blended well with the pumpkin, maple syrup and the almond/coconut flour mix and gave these yummy treats a real winter holidays flair. Bite in, and you’ll forget all about baking and enjoy the no-bake holiday desserts!!!

Pumpkin Truffles

What you’ll need:

1 15 oz. (425 g) can pumpkin

1 1/2 cup almond meal

1 1/2 cup almond flour

1/2 cup coconut flour

2 tablespoons maple syrup

1 teaspoon ground cinnamon

1/2 teaspoon ground nutmeg

1/4 teaspoon ground cloves

12 oz (g) vegan dark chocolate (chunks, chips, or blocks)

3 tablespoons cocoa powder

What you’ll do:

  1. In a large mixing ball combine all your ingredients except cocoa powder and the chocolate – those will come later.
  2. Mix everything well and using your hands for the dough into balls that are approximately 2 in (5 cm) in diameter. Place the preformed truffle balls on a platter and set aside.
  3. Melt the chocolate using either a microwave oven or a double boiler.
  4. Dip half of your truffles into the melted chocolate and place on the platter or a plate that’s lined up with wax paper.
  5. Put your chocolate covered pumpkin truffles in a refrigerator so that the chocolate coating hardens.
  6. Pour the cocoa powder in a flat dish and roll the rest of the pumpkin truffles in cocoa powder.
  7. Arrange the two kinds of Pumpkin Truffles any way you like. You may want to place couple of pieces of cloves in the bottom of your serving dish, or line your serving dish with some finely pulled orange peel. None of this will change the fantastic flavor of the truffles but it will make your dessert tray more festive! Enjoy!!!

Copyright © Eat the Vegan Rainbow, 2017

Creamy Cauliflower Winter Soup

img_3504
Creamy Cauliflower Winter Soup, via Eat the Vegan Rainbow

This soup is pure gold, and by gold I mean absolutely a light delight, and by light delight I mean that it uses none of the usual suspects you can find in a creamy soup. So, on the side of ingredients that this soup does not use you will find cream, butter, and flour, and on the side of ingredients that this soup does use you will find cauliflower, green peas, yellow corn, vegetable bouillon cube, fresh thyme and almond yogurt. Yes, you read that right – six ingredients and you will be done!

The soup comes together in less than an hour and serves four to six people, and if you include on your holiday menu where lots of other goodies are being served as well, this recipe can easily be served to eight people! So, one head of cauliflower with couple of extras can really go a very long way.

All you need to do is wash and chop one large head of cauliflower, put the pieces into a large pot, pour in 3 cups of water, add the bouillon cube, cover, bring to boil and cook the cauliflower for fifteen minutes or so, until cooked through. Let the soup cool a bit – it does not need to be completely cold but you do need to be able to handle cauliflower and the broth safely. Purée the broth and the cooked cauliflower until completely smooth, with either an immersion blender or using a standing blender. I highly recommend getting an immersion (stick) blender, if you don’t already have one. This is a kitchen gadget I use all the time for soups, burgers, even cookies, so I am getting a lot of mileage out of mine.

Place the soup back on the stove top, add green peas and corn, and bring to gentle simmer. You can use either fresh or frozen peas and corn, or even canned. If using the canned vegetables do check the salt content and buy “no salt added” variety. The soup should simmer for about twenty minutes. Turn it off, and then stir in fresh thyme and plain, unsweetened almond yogurt. Serve warm, with a squeeze of lemon if you like (I do!!!), and a handful of oyster crackers or freshly toasted bread.

Creamy Cauliflower Winter Soup

What you’ll need:

1 large head of cauliflower

3 cups water

1 vegetable bouillon cube

1 1/2 cup green peas, frozen

1 1/2 cup yellow corn, frozen

1/2 cup almond yogurt, plain and unsweetened

10 springs of fresh thyme

What you’ll do:

  1. Cut the cauliflower florets out, wash them and chop roughly into bits. Place in a large pot, add water and the bouillon cube, cover with a lid, and bring to boil.
  2. Boil the cauliflower for 15 minutes or until fully cooked – cauliflower should be soft and falling apart.
  3. Purée the cauliflower together with the broth it cooked in with a stick (immersion) blender until smooth.
  4. Add frozen (fresh, or canned) peas and corn. If you are using canned vegetables make sure you use “no salt added” and make sure you drain the veggies well before adding them in.
  5. Bring the soup to gentle simmer, and leave it for 20 minutes or so. If you are using canned vegetables you can simmer for less, and 10 to 15 minutes should be plenty.
  6. Turn the heat off, then add thyme and yogurt, mix well and serve. This soup can be a meal on its own, with some freshly toasted bread, or a nice start for your next three course, festive winter holiday dinner!!!

Copyright © Eat the Vegan Rainbow, 2017

Miso Soup with Rice Noodles and Scallions

img_2631-1
Miso Soup with Scallions and Rice Noodles, via Eat the Vegan Rainbow

The colder weather is definitely here, and everywhere you look around here you can find picture perfect foliage spanning all shades from deep green, to intensely and furiously red, and everything in between. Autumn… or is it fall? Whatever it is, the warm, fuzzy sweaters are in, and the shorts are out – I like fuzzy sweaters and can’t stand shorts so this is the right season for me! With the new season comes a new menu, the one that is full of roasted root vegetables, pumpkins and winter squash, apples and pies, cinnamon and nutmeg. There will be more of those types of recipes later, but today it will be all about the soup, my take on miso soup that is amazingly easy to make, and definitely rich enough to qualify as a warm and comforting cold weather favorite.

The key ingredient in a miso soup is miso. What is miso, I hear you ask? It’s a fermented soybean paste with salt and koji – a filamentous fungus not unlike the yeast we use in baking. Miso comes in few different versions – I’ve seen white and red miso into stores I go to, but there are others out there so keep your eyes open and read the labels carefully because what you need for this miso soup is the white miso. However, miso soups that you may enjoy in your local Japanese restaurants may be made with different kinds of miso and their flavor will definitely vary.

The recipe here is super fast and super easy. All you need is a pot, some scallions, white miso, and a bunch of thin rice noodles. Scallions will brown in a minute or two, and the thin rice noodles, sometimes called rice vermicelli, will cook in five minutes so, taken all together, from an empty pot to  the full bowl, this soup will be ready in under half an hour.

When serving, I also added some Sriracha sauce to my bowl, but that is a condiment that you can definitely skip. Some other types of condiments that would work with this soup are a squeeze of lime juice or a dash of lime zest, freshly ground black pepper, a slice or two of pickled ginger, or some toasted panko. Your choice, your delicious bowl of filling and satisfying soup!!!

Not fan of miso? There are more soup recipes for you to try here.

Miso Soup with Rice Noodles and Scallions

What you’ll need:

6 scallions

1/2 cup white miso

7 oz (200 g) thin rice noodles (rice vermicelli)

4 cups water

Cooking spray

What you’ll do:

  1. Wash the scallions, trim the tops, and some of the green bits that need trimming but definitely use both the white and the green parts. Chop finely.
  2. Spray the bottom of a large pot with cooking spray and place over medium heat. Add the scallions and brown for 1-2 minutes. Keep an eye on the scallions since they can burn quickly.
  3. Add the miso and mix well. Let the miso brown for 1-2 minutes. Stir frequently.
  4. Pour in the water and use a whisk to make sure the soup is smooth and there are no miso clumps.
  5. Bring soup to boil, and once it’s boiling add the rice noodles. Depending on the size of your pot and the water level, the noodles may or may not be completely submerged when you put them in. Don’t force them in, as they’ll break. Wait for the bottoms to soften then gently ease the rest of them in. The noodles need about five minutes and they will be ready.
  6. Let the soup cool just a bit before serving and then enjoy as is or with any number of toppings, like Sriracha, vegan bacon bits, fresh cilantro, squeeze of lime, toasted panko… Options and flavor variations are endless!

Copyright © Eat the Vegan Rainbow, 2017

Dark Chocolate Almond Butter Cups

img_2692
Dark Chocolate Almond Butter Cups, via Eat the Vegan Rainbow
Halloween is almost upon us, which means that piles and piles of candy are everywhere!!! Most of the store bought stuff is, of course, not very good for you. Don’t get me wrong – sweets and candy have their time and place, and a little bit of chocolate at the right moment can go a long way towards restoring harmony in the universe. But finding a vegan-friendly treat that’s rich in flavor yet light in calories, that’s healthy yet decadent, is not easy.

Since transitioning into plant-based, low fat, salt and sugar eating and cooking, I’ve been satisfying my sweet tooth with lots of fruit and lots of smoothiescookies, apple crumbles, muffins, and even chocolate cake that use tons of fruits and sweet veggies (like carrots, bananas, apples, raisins…) to build sweetness without extra sugar. But, there comes a point in everyone’s life when chocolate becomes a necessity, and here’s my answer for those cravings – Dark Chocolate Almond Butter Cups.

These treats are no-bake and super easy to make. You will need some specialized equipment, like a mini muffin pan, the one with 24 muffin holes, and some mini muffin liners, the same kind you would use to line the pan if you were baking muffins. The liners help hold the cups as well as give them the traditional shapes edges.

When it comes to chocolate, you can use any kind you like. My recipe does not use any additional sweeteners, so all the sweetness comes from the chocolate and from the natural sweetness of the almond butter. That’s why I recommend using semi-sweet dark chocolate that does have some sugar added to it. Alternatively, you can add some maple syrup to the almond butter filling and that will elevate the sweetness level. Having said that, I hope you give my original recipe a try before making adjustments because I thought these Dark Chocolate Almond Butter cups turned out just right!

The recipe could not be simpler. You will need to line the mini muffin pan with liners, melt the chocolate using either a double boiler, which you can make yourself, or a microwave, soften the almond butter and mix it with almond meal and maple syrup extract and then work fast to place a tablespoon of melted chocolate in each mini muffin cup, then place a half tablespoon of almond butter filling, which you will need to shape with your fingers into a tiny patty, on top of each chocolate layer, and finally top the almond butter filling with more melted chocolate.

Assembling these Dark Chocolate Almond Butter Cups is a bit of a mad dash but it’s also a lot of fun, with melted chocolate dripping and the aroma of almond butter filling. If you are wondering why I decided to add artificial maple syrup flavor instead of the real thing the answer is simple: calories! The flavoring agent adds just enough warmth to the filling and contributes no calories to the final treat. If you bothered by the idea of an artificial ingredient, skip it or replace it with a dash of cinnamon and/or splash of vanilla extract.

Once filled, Dark Chocolate Almond Butter Cups go into a refrigerator for 30 minutes or so, which will help them firm up. You should leave them out at room temperature for about the same amount of time before serving and you’ll have melt-in-your-mouth, rich and decadent, yet good for you, treat to share (or not!).

Dark Chocolate Almond Butter Cups

What you’ll need:

2 cups dark chocolate chips or baking dark chocolate chip chunks

1 cup almond butter (unsalted, smooth)

3/4 cup almond meal

1 teaspoon imitation maple syrup (or cinnamon, and/or vanilla extract)


What you’ll do:

  1. Line the 24-hole mini muffin pan with baking liners.
  2. Put your chocolate chunks, pieces or chips, into either a double boiler or a microwave safe dish. If you are using a double boiler make sure you start mixing the chocolate continusouly until melted and smooth. If you are using a microwave I recommend going at 50% power and letting the chocolate go for 1-2 minutes at first and then check it at 30 second intervals. It is usually a good idea to pull the chocolate out when it is about 80% melted and then mix for a minute or two and use the heat of the chocolate to melt the rest.
  3. Place the almond butter in a different bowl and microwave for about 30 seconds. The almond butter should be soft but not runny. Add the almond meal and the flavoring agent of choice. Mix well.
  4. Pour a tablespoon of melted chocolate in each muffin hole.
  5. Use half a tablespoon of the almond butter filling and make a small patty with your fingers. Place the patty on top of the chocolate.
  6. Pour another half a tablespoon to a tablespoon of melted chocolate on top of the almond butter filling.
  7. Place the Dark Chocolate Almond Butter Cups into a refrigerator for 30 minutes or until firm and solid.
  8. Take the cups out of the mini muffin pan, and let them come to room temperature before enjoying. You can leave the paper liner on, or remove it – it’s up to you. Those  liners come in many different designs so you can have lots of fun with those as well.
  9. Enjoy!

Copyright © Eat the Vegan Rainbow, 2017


Chicken-less Tikka Masala


fullsizerender-8
Chicken-less Tikka Masala, via Eat the Vegan Rainbow

Several months ago I shared the recipe for a Vegan Chicken Tikka Masala that used jackfruit instead of the chicken and came together in a slow cooker. I still think that that’s a great, flavorful and aromatic dish and if you are looking for new ways of making and enjoying jackfruit it is definitely something you should try. Having said that, someone did ask about what the source of protein was in a dish like that, and although jackfruit, as well as all the other fruits and vegetables on the planet, has some protein it is not a protein-rich food.

So, I went looking for ways to increase the protein content in the plant-based Tikka Masala and found soya chunks. Soya chunks are not something that’s easy to find in US grocery stores. I was able to find them in Serbia easily enough and I have now also found them on Amazon and in my local Indian grocery store. If you have an Indian grocery store relatively nearby, it’s absolutely worth the trip. I find that the prices in the Indian grocery store I go to are on average three to four times cheaper than online, and things like rice, soy and chickpea flour, and spices are a fraction of the price when compared to my regular grocery store or health food store. Most Indian stores have a freshly made food section as well, so although not many items on the traditional Indian menu are vegan, I’m sure you will find a couple worth trying out.

Back to soya chunks now. Soya chunks are made from fat-free soy meal, a by-product of soybean oil extraction. The meal is molded into different shapes and textures (soya chunks of different shape and size) and dried out to create a shelf-stable, long lasting products. I use several different size of soya chunks, depending on what I am making. For example, the size of soya chunks I chose for a dish like chicken-less tikka masala matches the size of chicken chunks, which are usually about 1 inch (2.5 cm) cubes. An essential step for almost all soya chunk dishes involves boiling soya chunks in water for five minutes or so to rehydrate them. If you are using very fine soya chunks, like TVP (textured vegetable protein), boiling is usually not required but some soaking will be needed. The only TVP application where I advise against soaking is when making burgers, and you can find out why and how come in my recipe.

For this Chicken-less Tikka Masala to work, you will have to marinade soya chunks in a spice-and-yogurt sauce. Basically, you are following all the same steps as you would if you were making the chicken version of this dish, and by the time you are finished all the marinating and simmering nobody will be able to tell that what they are eating is not the real thing. I recommend marinating soya chunks overnight, but if you are in the hurry starting the marinate in the morning and finishing the dish later the same day will work.

The Chicken-less Tikka Masala is best served with some Basamati Rice, and topped with fresh cilantro. For a full restaurant experience you can add some Naan bread and Cucumber Raita, which you can make easily with some finely sliced cucumber, some yogurt, and a squeeze of lemon juice!

Chicken-less Tikka Masala

What you’ll need:

7 oz (200 g) medium soya chunks

2 tablespoon coriander powder

1 tablespoon paprika

1 tablespoon cayenne

1 tablespoon ground cumin

1 tablespoon garam masala

1/2 tablespoon cardamom powder

1 cup cashew yogurt

1 large onion, diced

6 oz (170 g) tomato paste

1 14.5 oz (411 g) can petite diced tomatoes

2 tablespoon vegetable oil (divided)

Fresh cilantro

What you’ll do:

  1. In a large pot cover soya chunks with water, bring to boil, and let cook for 5 minutes. Remove from the heat and let stand for 30 minutes. Transfer soya chunks into a large strainer, rinse with cold water and gently press any access water out. You want your soya chunks to be soft and moist but not dripping with water.
  2. Place one tablespoon of vegetable oil in a pan and heat until the oil is hot. Reduce the heat to medium and add the spices (coriander, paprika, cayenne, cumin, garam masala, and cardamom). Toast the spices for 1-2 minutes, until fragrant. Place the toasted spices into a large mixing bowl and let cool for few minutes.
  3. Once spices have cooled just a bit, add the yogurt and mix well. Next, add the soya chunks, make sure they are well covered with the marinade, and refrigerate for at least 12 hours. If you are in a rush you can cut down the marinating time to couple of hours – in that case leave everything on the kitchen counter.
  4. In a large and heavy pot, like a Dutch oven, heat 1 tablespoon of oil over the medium high heat. When oil is heated, add the diced onion and let it brown for 5 to 7 minutes.
  5. Once the onion is browned, add the tomato paste, mix well and let the tomato paste brown slightly. This will take 3 to 4 minutes.
  6. Next, add the marinated soy chunks together with all the yogurt marinade. Mix well, and let the soy chunks brown just slightly. You will need to give it an occasional stir, but the idea is to let the soy chunks get a chance to caramelize on the edges just slightly. This will take about 10 minutes.
  7. Add diced tomatoes, mix well, decrease the heat to medium low, and let the Chicken-less Tikka Masala simmer for 15 minutes or so. This simmering will allow all the flavors to come together more completely, and the sauce to thicken slightly. If you discover that your sauce is not as thick as you like it, keep simmering until you reach the consistency you like.
  8. Serve over Saffron Brown Basmati Rice and sprinkle with some fresh cilantro!

Copyright © Eat the Vegan Rainbow, 2017

Avocado Burgers

You probably know that veggie burgers are going through somewhat of a revolution, with companies like Beyond Meat and Impossible Foods, leading the way within US in creating plant-based products that taste and look like the real meat.  I have not had an Impossible Burger yet, but I can attest to Beyond Burger being everything its creators wanted it to be – a plant-based burger that looks, cooks and tastes like fresh ground beef burger. It is absolutely spot on, thanks to some interesting protein biochemistry and biophysics that transfrorms pea protein into ground beef, as well as the use of plenty of fat for that greasy burger feeling, and a good amount of salt. And fat and salt are likely two components of this burger that, in addition to getting the texture of the protein component just right, make this type of burger so realistic and so delicious and so addictive.

Indulging in one of these burgers as an occasional treat is all fine and good, but making it on a daily basis is almost us unhealthy as eating the beef patty. That’s why I’ve been focusing on creating plant burgers (call them veggie burgers if you like) that can work on a grill or in a grill pan, look very burgery, and taste great without huge amounts of salt and fat. My blog now has the entire section dedicated to Burgers, Hot Dogs & More. Some of the burgers I made taste very much like a beef patty, some less so… At the end, what I discovered is that plant burger needs to pass two tests in order to qualify for being on my plate: it has to hold its shape well and sustain grilling on the grill or in a grill pan, and it has to taste amazing. Any burger that checks those two boxes off deserves to be shared!

The patty I am sharing today has three twists. Twist number one is that I decided to try using avocados as a fat source to add some juiciness to the burgers. Avocados, also known as Alligator Pear – isn’t that awesome? – are not something I ever considered cooking with but we recently had a huge avocado sales in my local grocery store and I got more than I should and there is a limit to how much avocado toasts one can eat in a week, so I was looking for something else to do with them. The idea to try making a burger with avocados was inspired by their high fat content and their creamy consistency (when they are ripe and perfect). I did quite a few internet searchers to see what other have done, but I could not find a single recipe that used avocados inside the actual burger patty. So, off I went to see if Avocado Burgers can be made into reality.

My twist number two is one of my favorite tricks to add umami flavor to just about anything – finely ground mushrooms. They work wonders in a dish like Meatless Shepherd’s Pie, or more generally any time you want to recreate that special “je ne sais quoi” of ground beef.

Final twist to this story is using extra firm tofu that has been frozen for few days than thawed all the way over the course of one to two days in the refrigerator. Freezing and defrosting tofu changes its texture daramatically. The tofu becomes tougher and stronger, and it absorbs the marinades and flavors better. There are no tricks to freezing tofu in my kitchen as I just put the container tofu comes in from the store into the freezer, but if you need a more refined method The Spruce has detailed step by step instructions. Before you use tofu, drain it well and then dig in – use your hands to press and squeeze and get the excess water out. I suppose you could use the tofu press for this or a method where you place tofu slices between paper towels and place a large weight on top for twenty minutes, but because tofu that’s been frozen then defrosted has this tougher and stronger texture, using your hands actually works quite well. Plus, you can easily go from squeezing to crumbling, which is the next step. At the end you will end up with a pile of small tofu crumbles.

To this pile of crumbles you will add mashed avocado, ground mushrooms, tomato paste, and couple of staples when it comes to boosting umami and grilled food flavors: soy sauce or liquid aminos, Worcestershire sauce and liquid smoke. The patties will be soft so it is a good idea to stick them into the fridge or a freezer to firm up before cooking. I felt like pairing only some crispy lattice with this burger but pickles, mustard, ketchup, tomatoes, and all the other common burger fixings will go well with it too!

Avocado Burger

What you’ll need:

1 16 oz. (450 g) block of extra firm tofu, frozen then thawed

8 oz. (225 g) crimini (baby bella) mushrooms

1 large avocado, ripe

2 tablespoon tomato paste

1 tablespoon Worcestershire sauce, vegan

1 tablespoon soy sauce or liquid aminos

1 teaspoon garlic powder

1 teaspoon liquid smoke

Cooking spray (for the pan)

What you’ll do:

  1. Freeze the tofu few days in advance and when completely frozen take it out of the freezer and leave it in refrigerator for a day or two, until completely defrosted. Drain the tofu and using your hands squeeze the water out of tofu. The tofu should feel like a relatively tough sponge soaked with water at the beginning, and at the end it should feel moist but not dripping wet. Crumble the tofu into a large mixing bowl.
  2. Chop the mushrooms using a food processor until they are finely ground. Few chunkier bits here and there will not hurt but try to get the mushrooms to be about the same consistency as your tofu crumbles. Add to the tofu.
  3. Cut and peel the avocado, and scoop out the green flesh into a small bowl and mash with the fork until finely mashed. Ideally the avocado should be as smooth as you can get it, and if you are using a perfectly ripe avocado this should not be a problem. Side note: If you discover that your avocado is tough that means that it is not ripe enough. If your avocado is turning black it means that it is past its prime. Unfortunately, when it comes to avocados only the perfectly ripe, perfectly green and perfectly soft will work, for this or any other recipe. If your avocados are tough to touch it means they need to ripen and you can help them out by putting them in a paper bag, closing it tightly and leaving them on the kitchen counter overnight. That usually helps – and if they are really, really green you can a ripe banana to the bag to help avocados along. 
  4. Add the avocado purée to the tofu mix, as well as the rest of ingredients.
  5. Mix well to combine using your hands. You want to work the mix a bit, which means squeezing and mixing at the same time. Once everything is combined together, use your hands to form patties. Place the patties onto a tray lined with wax paper, and put them into the refrigerator for 30-60 minutes or into a freezer for 15 minutes or so.
  6. Heat your grill pan or a cast iron skillet over the medium high heat. Spray with cooking spray and add 2-3 patties at a time. You need to leave enough room around tha patties to be able to flip them so keep that in mind. Cook on one side for 5 minutes then flip over and cook for another 4-5 minutes, until both sides are nice and brown.
  7. Serve on your favorite hamburger bun with your favorite toppings. And in case you have couple of avocados still left over, go wild – slice them up, toss them on top, and have yourself a Double Avocado Burger!

Copyright © Eat the Vegan Rainbow, 2017

Tapioca Pearls with Spicy Almonds and Toasted Coconut

img_2521.jpg
Tapioca Pearls (Sabudana) with Spicy Almonds and Toasted Coconut, via Eat the Vegan Rainbow

Most people probably think “bubble tea” when they hear “tapioca pearls”. But these delicious little pearls are definitely worth getting to know more intimately, especially in the context of gluten free cooking. They are inexpensive and very simple to make. They actually require no cooking – just soaking – so although no cooking skills are required, some level of patience (and a good amount of time) is.

Before we go any further lets try to answer this questions first: “What are tapioca pearls?”. They can come in different sizes and colors. The ones I will focus here are white and small, close to the size of Israeli couscous. But unlike the couscous, which is made with wheat and thus off limits for those watching their gluten intake, tapioca pearls are made from starch extracted from cassava root. So, they are little starch balls when all is said and done. Think micro potatoes that don’t need peeling!

If you are into Indian food, you have likely already had some tapioca pearls because they are often used to make desserts, like kheer pudding. Earlier this summer I had some homemade Sabudana Khichdi and I loved it. Sabudana Khichdi is a traditional dish and usually consumed during Hindu fast days. The dish includes tapioca pearls, finely chopped, cooked potatoes, finely chopped peanuts, finely grated coconut flakes, and a nice combination of spices (curry leaf, cumin seeds and green chilis). There are some variations on the recipe and the ingredients may vary depending on whethe Sabudana Khichdi is served during the fast or outside the fasting days, and my friend who made the dish for us also mentioned that a more protein-rich version of Sabudana Khichdi can be made using quinoa, and she suggested I check a blog by another friend of hers called Indfused, which I did and so should you, especially if you are interested in creative Indian/American fusion cooking (FYI: Infused is not a vegan blog, so keep that in mind).

Back to the the version of Sabudana Khichdi I had – it was a delicious addition to our summer cook out and prompted me to get some tapioca pearls of my own and start experimenting. The recipe below is the second iteration and deviates from the original recipe quite a bit. I took some liberties so my Tapioca Pearl Salad is Sabudana Khichdi inspired, but not meant to be “traditional” in any way. First point of difference is that I left the potatoes out. In my view, leaving potatoes out does not affect the taste nor the nutritional profile of the dish, yet saves some time and effort. I also left the peanuts out and replaces them with slivered almonds. I used slightly different spice mix, to make the dish a bit more fragrant. Finally, I toasted my coconut flakes, because in my mind coconut is just better toasted!

The key to making tapioca pearls is patience. All you need to do is rinse the pearls in cold water, then soak them in enough cold water, usually in 1:2 ratio (for example 1 cup pearls and 2 cups water), for 2-3 hours. How do you know they are ready? They should feel loose, not stuck together, and soft, yet slightly chewy, to bite – think pasta al dente. You can go a bit further if you prefer softer texture, but you do want your pearls to remain pearly, not mushy, so don’t overdo it.

Now a key to make the dish really flavorful and spices vibrant, is toasting the spices. I use a frying pan here, and, although you can dry toast the spices, I do add a bit of oil in this case and let the spices toast for one to two minutes before adding the almonds to finish it off. I pour the toasted spice and almond mix over the drained tapioca pearls, instead the other way round, but that’s more of a personal preference I suppose. The toasted coconut flakes come next, and the chopped fresh cilantro is the final touch. You can serve this dish immediately, you can heat it up more and serve hot, or you can leave it in the refrigerator overnight and serve it cold. It actually works across the range of temperatures so it could work as a surprising pasta salad at your next picnic. It is a great, easy and inexpensive dish to make for your next pot luck or any other get together!

img_2525
Tapioca Pearls with Spicy Almonds and Toasted Coconut, via Eat the Vegan Rainbow

 Tapioca Pearls with Almonds and Toasted Coconut Flakes

What you’ll need:

2 cups tapioca pearl

4 cups water

1 cup slivered almonds

1/2 cup coconut flakes or shreds, unsweetened

2 tablespoon vegetable (or canola) oil

1 teaspoon cumin powder

1 teaspoon curry powder

1/2 teaspoon turmeric

2 tablespoon fresh cilantro, chopped


What you’ll do:

  1. Rinse the tapioca pearls under cold water and place into a large bowl. Cover with water and let stand for 2 to 3 hours. The pearls will absorb water and they should become soft and al dente.
  2. Drain the pearls well, pat dry with a paper towel and put into a large mixing bowl that you will use for serving as well. You can use the same bowl you used for soaking just remember to dry it well in the meantime.
  3. Heat the oil over medium high in a large frying pan. Add the dry spices (cumin, curry and turmeric powder) and toast in oil for 1 minute.
  4. Add slivered almonds and toast for another 2 to 3 minutes, until almonds start to brown.
  5. Pour the hot almond and spice mix over tapioca pearls and mix well.
  6. Toast coconut flakes in a toaster oven or a frying pan for 2-3 minutes. You need to keep an eye on your coconut flakes as they go from beautifully toasted to inedible in a blink of an eye! If you are using the frying pan, you can use the same pan you just used for almonds and spices, just don’t add extra oil as coconut flakes should be fatty enough.
  7. Add hot, toasted coconut flakes to your tapioca pearls and mix well.
  8. Let the mix stand for couple minutes and while those flavors are combining, wash and chop fresh cilantro.
  9. Sprinkle the cilantro over your tapioca pearls, mix again and serve!

Copyright ©Eat the Vegan Rainbow, 2017

Miso Glazed Tempeh, From the Grill!

Miso Glazed Grilled Tempeh, via Eat the Vegan Rainbow

If you have not done so already, you should definitely try tempeh. I’ve been hearing about it for some time now, and seeing several different brands and varieties right next to the tofu that I usually get but I only got the first batch of tempeh just the other day. I bought several different varieties to try them out and spent few days reading about what’s tempeh good for and how to best cook with it. Tempeh is related to tofu because both are soy based. But, in terms of flavor and texture (and as far as I can tell in terms of how you actually make the two, based on what Wikipedia says), tofu and tempeh are quite different. Tempeh is firm, much firmer than the firmest tofu, and does not come in liquid. It is actually fermented soy beans mixed with rice [edited after reading comment from Mary S below – thanks Mary S, it’s good to get the facts all squared away. I am still a bit confused since the ingredients’ list of the tempeh I used did include rice; at the end of the day my confusion does not matter change the fact that the food was delicious], so although it is dry, it does feel sticky to touch and just a bit slimy. FYI: I am not saying this to freak you out, rather to forewarn you so that you are not as surprised when you start handling it as I was – I thought my tempeh has gone bad and wanted to throw it out! But, I double-checked the date on the bag, regained my cool and went for it.

I decided to start simple and build from there, so this Miso Glazed Grilled Tempeh is more or less my starting point. The brand of tempeh I got is Lightlife and the two varieties I started with are their Organic Garden Veggie and Organic Soy Tempeh. Each package is half a pound (about 250 g), and the block of tempeh comes in a vacuumed-sealed package, that’s within a sealed plastic bag, so there are two bags to remove! I used both blocks at the same time, since one just did not seem enough to make for the end of the week Friday dinner.

The first thing I did was to fire up the grill. I have a gas grill and it takes it about ten to fifteen minutes to get to be sizzling hot, with burners going at full blast and the lid down. That was just enough time for me to prep the tempeh and the glaze. For tempeh, I placed the pieces into a pan large enough to keep the pieces flat, covered with water, brought to boil and boiled for four to five minutes per side – I did flip the pieces over once since the pan I was using was shallow and the water did not fully cover the tempeh, so if your tempeh is fully covered you will not need to do the flip! After about ten minutes I took the tempeh out, pat dried the pieces, and left them uncovered on some paper towels.

While the tempeh was boiling and the grill was heating up, I mixed together a simple glaze with some soy sauce, Worcestershire sauce, white miso glaze and vegetable oil. I spread the glaze over the tempeh pieces just before placing them on the grill the glazed side down. Then I glazed the top and let it grill for about five to six minutes. By that time the grill marks will be perfect, and the pieces ready to be flipped. I did reglaze both sides again and flipped again, so that at the end each side got two layers of glaze and about eight to ten minutes of grilling, so in total the grilling bit took less than twenty minutes. If you are in a rush, you can definitely skip the reglazing, but if you are outside hanging around the grill with friends and family and enjoying the lovely summer evening, then why not give tempeh extra love, glaze and grill time?

Let grilled tempeh rest for just a second, then slice and serve. You can serve it in a hamburger or a hot dog bun with the usual trimmings, but note that condiments, like mustard and ketchup, are going to overpower the flavor of the grilled tempeh. So, I recommend serving tempeh with a side of coleslaw and baked, or barbecue beans, which is how I had mine. Add to that a glass of cold beverage of choice, and what can be better?

Miso Glazed Grilled Tempeh Sliced, via Eat the Vegan Rainbow

Miso Glazed Grilled Tempeh

What you’ll need:

2 8 oz (227 g) blocks of tempeh (any variety and brand you like)

2 tablespoons soy sauce, reduced sodium

2 tablespoons white miso paste

2 tablespoons vegetable oil

1/2 tablespoon Worcestershire sauce (vegan)

Oil for oiling the grill grates


What you’ll do:

  1. Prepare your grill like you normally do. I recommend getting the grill really hot and letting any bits and pieces from the previous grill session burn off, then scrapping the grates with an appropriate type of a brush (please be careful here because you can really damage your grill grates if you don’t follow the manufactures instructions and recommendations), and then oil them generously with a paper towel dipped in vegetable oil – please use long tongs here to prevent getting burned!
  2. Take tempeh out of the wrapping and palace in a pan large enough to hold it flat and straight. Cover with water, bring to boil and let it boil for 5 to 10 minutes. Make sure you flip the tempeh half way through if your tempeh is not fully submerged in water. If it is, no mid-way flipping is needed!
  3. While tempeh is boiling and the grill is getting hot, mix together the glaze by whisking together soy sauce, vegetable oil, miso paste and Worcestershire sauce. The glaze should be smooth, but even if you have few lumps in there don’t worry about it – it won’t matter at the end.
  4. Place the boiled tempeh onto some paper towels and gently dry.
  5. Using a (silicone) food brush spread the glaze liberally ove the tempeh and place the piece of tempeh glaze side down on the hot grill. Keep the gas grill on medium high heat, or if you are using a charcoal grill keep it as hot as you would when grilling vegetables, veggie burgers, or mushroom or tofu steaks. Grill the glazed tempeh 5 to 6 minutes on one side, and while it is grilling apply the glaze on the other side, flip over, grill for 4 to 5 minutes, glaze, flip, grill, repeat for as long as you like.
  6. Let stand for just a moment or two, slice and serve!!! This Miso Glazed Grilled Tempeh will work as an appetizer, finger food, as well as dinner, especially with some grilled corn, veggies, coleslaw, baked or barbecue beans, or as a salad topping…

Copyright ©Eat the Vegan Rainbow, 2017

Spicy and Cheesy Corn Muffins


img_2024
Spicy and Cheesy Corn Muffins, via Eat the Vegan Rainbow
Corn bread and corn muffins are a great way to enjoy freshly baked bread but without the agony of waiting for dough to rise and wondering whether the yeast is still alive. Corn bread and corn muffins are also very customizable – you can make them into a sweet tasting treat or you can add savory ingredients and make them into a complex tasting appetizers or breakfast items.These corn muffins are spicy, thanks to a good amount of fire roasted green chili peppers and vegan pepper Jack cheese. They also include a secret ingredient- pickles! Pickles add a bit of acidity and crunch to the muffins, pushing them over the edge of plain and into the area of edgy and fabulous.

What can you serve these with? Well, they go really well with a chili or a soup like the Bean & Leek Soup with Soy Chorizo, or Balkan Cabbage and Bean Stew. The muffins are somewhat similar to Balkan Style Cornbread but they do use green chilis and pickles whit gives them a very specific and spicy flavor. This means that they work well as appetizers, especially when paired with some guacamole. They are great for breakfast or a quick snack, and would complete any salad. They are best fresh from the oven, but should keep well for couple of days.

img_2027
Spicy, and oh, so cheesy, Corn Muffins, via Eat the Vegan Rainbow

Spicy and Cheesy Corn Muffins

What you’ll need:

1 1/2 cups yellow corn meal

1/2 cup corn starch

1 cup rice flour

1/2 teaspoon baking soda

1 teaspoon baking powder

1/4 teaspoon salt

2 pickles, finely chopped

4 oz (113 g) fire roasted diced green chiles

1 cup shredded pepper jack cheese, vegan

1 1/4 cup seltzer water

Cooking spray

What you’ll do:

  1. Preheat the oven to 400 F (205 C).
  2. In a large mixing bowl combine all the ingredients except seltzer water and mix well.
  3. Add 1 cup of water and mix. Keep adding the last 1/4 cup gradually to make sure your batter is smooth but not runny. Let stand for 10 min.
  4. Spray the muffin tin with cooking spray and divide the batter into 12 even amounts.
  5. Place the muffins in the oven for 10 min, then lower the heat to 350 F (180 C) and bake for another 25 to 30 minutes.
  6. These corn muffins come out bright yellow and are ready to eat after you let stand and cool for 10 to 15 minutes.


Copyright © Eat the Vegan Rainbow, 2017