Hello! My name is Milka.
I like to think of myself as the Goddess of Fruit and Veg, and an Occasional Nut!
For me, one of the most important things is to have fun preparing the food, and sharing the joy with those who you are feeding. My blog's name was inspired by my daughter's love of rainbows, and serves as a daily reminder of the important things in life, like vegan rainbows and well-fed unicorns.
Chickpea Burgers with Sun Dried Tomatoes and Walnut Meat, via Eat the Vegan Rainbow
You should get to know walnuts. They are super nutritious because they have a large amounts of polyunsaturated fats, and surprisingly high amounts of protein, fiber, even vitamins B-6.
Walnuts are also fun and funky. They look like large, green balls when young, and their pretty green skin shrivels into dark brown to black husk as they ripen. This husk eventually falls off, revealing the nut. If you do find yourself with a pile of walnuts still wearing their husks on your hands, do use gloves when peeling them. The walnut husks will release dark brown pigments that will color your skin, and the stuff does not come off easily. It’s actually still used as a natural hair dye in some places, and if you ever get a pile of green walnuts stick them into some brandy and make some dark liquor called nocino.
If you are like me, chances are the walnuts you can easily find come nicely cleaned and sometimes even chopped. These days I prefer to get chopped walnuts as that speeds things up in the kitchen. I use walnuts in my desserts, as a quick snack, and as a meat substitute. This recipe here falls into the “walnuts as a meat replacement” category and to boost their meaty flavor I combine them with sun dried tomatoes, caramelized onions, cumin, smoked paprika, and chili powder. This serves as a fantastic flavor add-on to chickpeas, which are the main ingredients in this burger. Having said that, I think chunks chickpeas here are more of a filler and that walnuts and the sundried tomatoes are the stars.
The main binding agents here are flax meal and bread crumbs. Flax meal has to be soaked in hot water for about fifteen minutes, which should be enough to transform it into sticky goo that you can use instead of eggs as a binding agent.
Chickpea Burgers with Sun Dried Tomatoes and Walnut Meat
What you’ll need:
1 onion, diced
1 cup walnuts, chopped
3 oz. (85 g) sun dried tomatoes, sliced
3 tablespoons flax meal
6 tablespoons water, boiling
2 15.5 oz. (439g) cans chickpeas, rinsed and drained
3 tablespoons olive oil
2/3 cup plain bread crumbs
1 teaspoon smoked paprika
1 teaspoon cumin
1 teaspoon chili
Cooking spray
What you’ll do:
In a large cup or a measuring cup mix flax meal and the boiling water. Let the mixture stand for 15-20 minutes.
Spray the bottom of a large frying or sauté pan with cooking spray and place over medium heat. Add the diced onions and sauté for 8-10 minutes until the onions are nicely caramelized.
Add chopped walnuts and let them toast slightly. This will take 3-5 minutes.
Add the sun dried tomatoes, mix well and sauté for another couple of minutes.
Transfer the sautéed mixture into a large mixing bowl. Add the chickpeas that have been carefully washed, drained and half-mashed with either a hand or a fork. Add the soaked flax meal, spices, oil, and bread crumbs and mix well.
Form the burger patties, and place them on the wax paper lined platter. Put the patties in the fridge for at least 30 minutes to firm up.
Grill the burgers using an outside or an inside grill, or a grill pan. These burgers are sturdy and should not fall apart while grilling. They need 3-5 minutes per side to get nice grill marks.
Serve them on a ham burger bun with your choice of toppings and condiments!!!
White Bean Burgers with Chia Seeds, via Eat the Vegan Rainbow
Another veggie burger, another sensation (if you like to see some past examples, there are here, here, here, and here)! And you don’t need to take my word for it, just go ahead and make a batch of these. First of all, they are ultra-cheap. I use dry beans and one pound, approximately half a kilo, of dry beans will make a huge pile of these burgers. At the end, I think my yield from this recipe was about 15 burgers. The burgers store well in the tightly sealed container in a fridge – you can keep them for a week – and reheat easily in the microwave oven, toaster oven or on the stove top. I am not entirely sure they freeze well, but you can try. If you do decide to freeze a batch, I recommend cooking them through, letting them cool, then separating individual burgers with some wax paper, then freezing. In that way you can grab a burger any time you need it!
Chia seeds are the magic ingredient here. I’ve used chia seeds in the past to make puddings, but here I use them as the main binding agent, the same way you would use egg or a flax “egg”. To make chia “egg” all you need to do is soak chia seeds in some water for about 30 minutes or so. By the time half an hour is up you should have a very thick and gooey mixture that looks quite slimy and that is a good sign. It means your chia seeds are ready to use. Chia seeds add not only the cohesiveness to this recipe, but bump up the nutritional value of your burgers because they are rich in polyunsaturated fatty acids.
I used to be afraid of cooking the beans and would get canned ones only. But, I recently started using a pressure cooker and I love it! I soak the beans overnight to speed things up, although I did make the beans without soaking and that works as well – you just need to cook them for a longer time. Once ready for the pressure cooker, I rinse the beans, place them in the pot and cover with water. I use an electric pressure cooker and use a preset bean program which takes about fifteen minutes of pressuraized cooking. Once the program is done and the pressure cooker is safe to open, I drain the beans and use without rinsing. You can save the liquid too, and make it into a soup if you like.
Note: if you are cooking dry chickpeas this water is the actual aquafaba that everybody is raving about, so do keep it and use it as the egg white substitute. I recently made aquafaba meringue and topped my Butter Squash and Cranberry Pie with Praline and Meringue Topping.
Once you have your chia egg and your cooked beans the rest is easy. All the ingredients so into a large mixing bowl or a food processor and get processed together. Once formed, the burger patties need to sit in the fridge or on the kitchen counter for about half an hour to an hour to firm up, and they are ready to go. I made my batch in a non-stick pan sprayed with some cooking spray, but you can grill them or even put them in the oven. They don’t need much cooking really since all the ingredients have already been cooked, so what you are really looking to do is brown the patties nicely on both side and heat them through.
You can serve these veggie burgers through the year and with any condiments you enjoy. I can recommend a piece or two of avocados and a spoonful of Macadamia Nut Queso Fresco with just a spring of cilantro. That out to do the trick!
White Bean Burgers with Chia Seeds
What you’ll need:
1 lbs (450 g) white beans, dry
1/2 cup red pepper paste (or tomato paste, if you don’t have red pepper paste)
2 tablespoons chia seeds
6 oz (3/4 cup) water
1 cup coarse corn meal
1/2 cup fine corn meal
2 tablespoons stake sauce
1 teaspoon cumin powder
1 teaspoon chili lime powder (or regular chili powder)
Cooking spray
What you’ll need:
Cover the beans with water and soak overnight at room temperature.
Rinse the beans before cooking, then cook them in a fresh batch of water until done. If you are using a pressure cooker the total cooking time will likely be about 30 minutes. If you are cooking them in a regular pot they will probably need an hour or an hour and a half. You can also use the canned beans and you probably need 3-4 15 oz (425 g) cans to get the amount equivalent to what you get from a pound of dry beans.
While beans are cooling, start soaking chia seeds in 3/4 cup of water. This will take 30 minutes or so.
By the time chia seeds are ready to use, your beans will be cool. Place the beans, chia seeds, and the rest of the ingredients into a large mixing bowl and process everything together with a stick blender. You can also use a food processor for this step.
For the burger patties and leave them to firm up for about 30 minutes. You can leave them on the kitchen counter or in the fridge. You can also make them a day ahead and leave them in a fridge and finish cooking them the next day.
Preheat the grill, grill pan or a non-stick frying pan to medium-high. I recommend using some cooking spray to help the burgers brown and get them going, but if you do have a good non-stick pan you can probably get away with not using any oil or cooking spray. The burgers need 3-4 minutes per side.
Serve them fresh from the grill/out of the pan and enjoy with your favorite toppings and condiments!
Gumbolaya- Part Gumbo, Part Jambalaya via Eat the Vegan Rainbow
To be quite honest, I think I may have had gumbo once in my life, and jambalaya only a handful of times. But, I’ve been making something in between the two for some time now. Again, my concoction is not quite paella nor risotto, not a gumbo nor a jambalaya and yet under a slightly different light it could be any of these four. In a nutshell, what I’ve been making is a rice dish with some sautéed onions, celery, and carrots as a base, and with some sausage or seafood added in for good measure.
This version still includes some vegan andouille sausage, and it does start with onions, celery and some orange and yellow pepper (color does not matter really, any sweet pepper would do!), as well as a good amount of okra, but it uses quinoa instead of rice. Quinoa is a protein rich grain, that has delicious nutty flavor. You can use it in any recipe that uses rice, like in these stuffed eggplants, or this gumbolaya!
If you are looking to incorporate more quinoa in your cooking, here’s a flavorful side dish for your late fall and winter holidays – Quinoa with Roasted Cranberries.
Gumbolaya
What you’ll need:
1 yellow onion, diced
6 stalks celery, diced
1/2 yellow pepper, diced
1/2 orange pepper, diced
14 oz. (400 g) andouille sausage, vegan (for example Tofurky), sliced
2 cups quinoa
3-4 cups vegetable broth (or water)
2 teaspoons Creole seasoning
16 oz. (454 g) cut okra, frozen
Cooking spray
What you’ll do:
Spray the bottom of a large sauté pan with cooking spray. You can also use a wok, or a paella pan. Place it over medium high heat and add onions, celery and peppers. Sauté for 5-8 minutes, until softened and caramelized.
Add the sliced sausage and let it brown for 3-5 minutes.
Add quinoa, and 2 cups of stock or water, depending on what you are using. Mix well and bring to a gentle simmer.
Simmer for 10 minutes or so, stirring occasionally until all liquid is absorbed. Add 1 more cup, mix well and continue to simmer. Keep adding the liquid until quinoa is done. This should take no more than 4 cups and no longer than 20 minutes. It’s best to add the last cup in 1/4 cup increments to avoid overuse.
Add the Creole seasoning and mix well.
Add frozen okra, mix everything together and let the okra cook for another 8-10 minutes. Enjoy as is or with a drop or two of hot sauce, like the Louisiana hot.
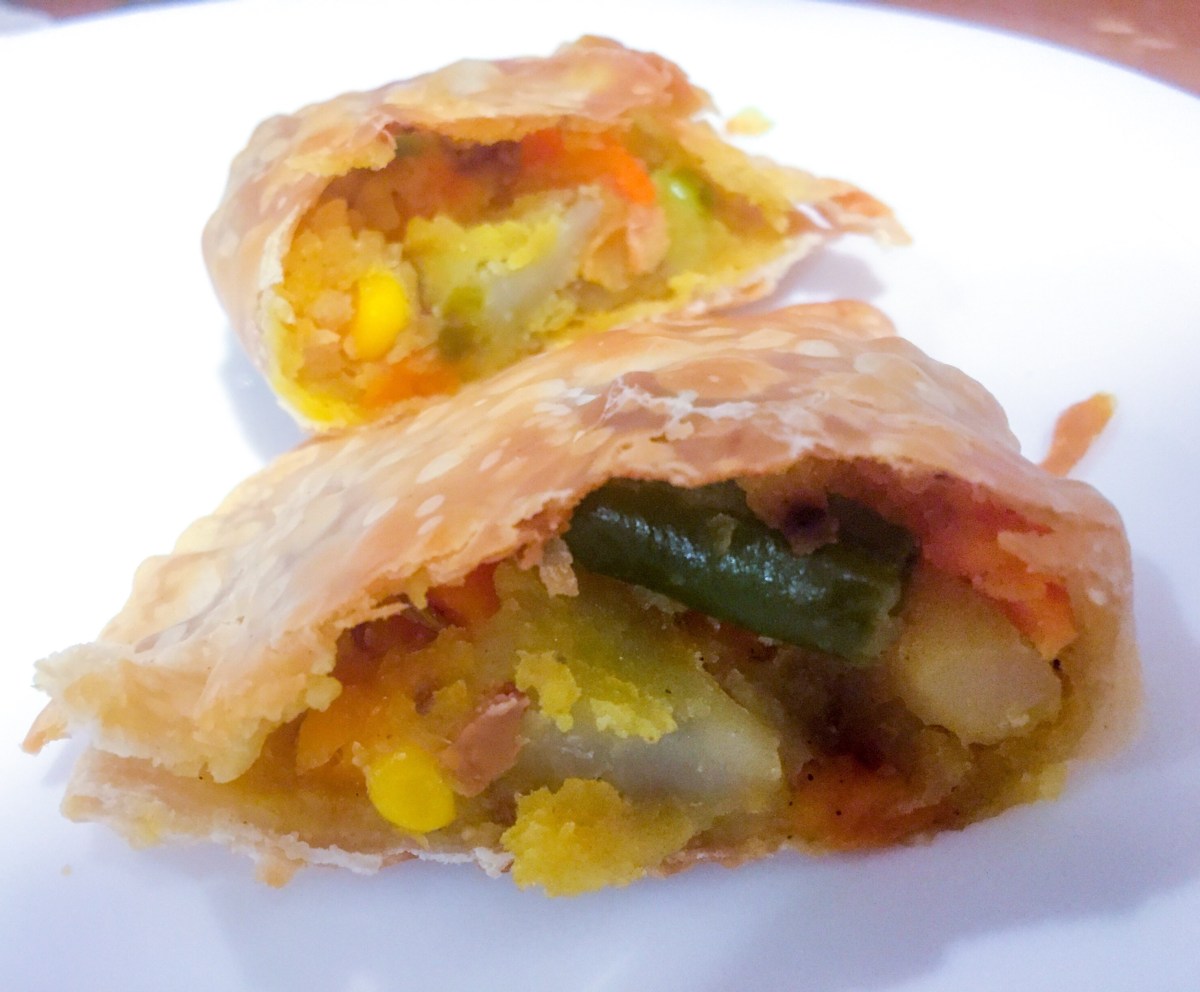
You can call them empanadas, or calzones, or samosas, or pierogi, or turnovers, or whatever you like – these are thin sheets of dough stuffed with your favorite stuffing and baked to their golden-brown perfection. The dough details can vary slightly from culture to culture, cuisine to cuisine, and recipe to recipe. But in general, the dough is made with flour and lots of butter or shortening cut into the flour to generate the flaky texture. It’s not what I’d call healthy, but as something to serve as a holiday appetizer or for a special occasion these yummy treats work well. On this occasion I bought the dough already pre-made and ready to go. If you would like to make your own this recipe should work.
The filling can be anything you like. On this occasion I went for samosa-like vegetable filling made from sautéed potatoes and mixed vegetables. Few months ago I shared how those store bought bags of mixed vegetables have been baffling me forever, so I’ve been looking for ways to use them, like the meatless meatballs I made then. Here, I used that same frozen vegetable mix for these empanadas and in combination with sautéed onions and potatoes these veggies worked really well.
If you are starting from a store-bought empanada wrappers you will need to roll them out just slightly, fill them up, cover them over and make a pretty edge using a fork. Baking does not take that long, and you don’t need to worry about cooking the filling since that’s already cooked through. So, the point of the oven is to let the pastry bake until it’s nice and crunchy. I suppose you could fry these as well, but with all that fat in your dough frying these seems like a major overkill.
This slideshow requires JavaScript.
Vegetable Empanadas
What you’ll need:
1 yellow onion, diced
2 potatoes, peeled, washed and diced
1 cup frozen mixed vegetables
1 teaspoon cumin seeds
1/2 teaspoon chili powder
1/2 teaspoon turmeric
10 empanada wrappers
1 cup water, divided into 1/4 cup increments
Cooking spray
What you’ll do:
Preheat the oven to
Place a large pan over medium high heat. Spray the bottom with cooking spray, and sauté the finely diced onion for 5 minutes, or until soft and slightly browned.
Push the onions to the side to make room for the spices. Add the spices and let them bloom for 1-2 minutes, then mix with the onions.
Add the diced potatoes, mix well, and sauté for 10-15 minutes, stirring occasionally. Add water as you go, in 1/4 cup increments to help the potatoes cook.
Next, when the potatoes are almost done, add the frozen vegetables and mix well. Cook for another 10-15 minutes until the vegetables are cooked through.
Spicy and Smokey Pulled “Pork” Jackfruit, via Eat the Vegan Rainbow
For many transitioning to plant-based, vegan or vegetarian diets giving up meat could be very difficult, especially during the summer months of outdoor grilling and the good ol’ BBQ. So, it’s no wonder that many recipe developers have been interested in capturing some of the BBQ flavors and channeling them into plant-based dishes.
Few weeks ago I reviewed one of the newest cookbooks dedicated entirely to vegan grilling, and I am currently going over the vegan butcher’s cookbook. Almost every one of these cookbooks as well as many vegan blogs and recipe aggregators include at least one vegan pulled “pork” recipe that uses green young jackfruit to recreate the look and feel of pulled pork. Jackfruit BBQ pulled pork recipe was even featured on TODAY.com as one of the biggest food trends of 2017!
I’ve been using jackfruit for over a year now, and have tried couple of different pulled pork recipes. They left me a bit underwhelmed, and I put the idea of BBQ pulled jackfruit on a side burner. And that’s where it stayed until very recently when I decided that it’s time to tackle this challenge again.
The recipe I came up with is slow cooker based and it takes about six hours to make. First, I combined lots of finely chopped onions and finely grated carrots to give the BBQ lots of natural sweetness. To help the aromas develop, I mixed the onions and carrots with oil and tomato paste and cooked them in the microwave oven for six minutes or so, until almost fully softened and slightly caramelized.
Next, I pulled the drained and rinsed jackfruit before cooking. I discarded all the very tough bits and pulled the rest apart with my fingers.
For smokiness and flavor, I added molasses, mesquite powder, and some sauce from chipotle peppers in adobo sauce. This sauce is super spicy so go easy with it, or replace it with some smoked paprika, or liquid smoke. I like a bit of a kick so this sauce (in moderation) works for me. The mesquite powder is something that you may need to order online (I got this brand from Amazon), but it is worth having on hand. It’s a powder that adds nice nutty and subtly smokey flavor to baked goods, desserts, and now “pulled” pork.
The slow cooker did all the work once I mixed everything together. The main pro tip when using a slow cooker (crock pot) is to use a liner to help with clean up. Other than that – you mix all the ingredients, put the lid on, turn on high for several hours, and you are done!
The pulled jackfruit really delivered! The sweetness and the heat from the adobo sauce combined to give this all sort of happy balance. Jackfruit turned out soft and very much like pulled pork in texture, while onions and carrots have almost melted into the final sauce, which is exactly what I wanted.
Spicy and Smokey BBQ Pulled “Pork” Jackfruit
What you’ll need:
1-2 yellow onions, finely diced
3 large carrots, finely grated
3 tablespoons tomato paste
2 tablespoons canola (or other neutral taste) oil
3 10 oz (280 g) cans green, young jackfruit in brine (drained, rinsed and pulled apart)
1/4 cup dark molasses
1 tablespoon adobo sauce
2 tablespoons mesquite powder
What you’ll do:
Mix diced onion, finely grated carrots, oil and tomato paste in a microwave safe bowl. Put in the microwave for 6-8 minutes until onions start to caramelize.
While the onion and carrot mix is caramelizing and softening, drain and rinse the jackfruit then use your fingers to pull apart all the soft bits while discarding the tough pieces of core.
Line the slow cooker with a liner, add the pulled jackfruit, onion and carrot mix, and the rest of the ingredients. Please note that adobo sauce from a can of chipotle chilis in adobo sauce is very smokey and very spicy, so you may want to dial down or dial up (if you are really adventures!) according to taste. If you rather not have the heat, you could use some smoked paprika and/or a teaspoon of liquid smoke.
Cover the slow cooker, and turn it on to high heat for 5-6 hours.
Serve the BBQ pulled “pork” in a hamburger bun, with some mashed potatoes, coleslaw, grilled corn, or any of other of your favorite sides. The BBQ pulled “pork” would also go really well with some freshly made cornbread, and you can always pour on some of your favorite BBQ sauce for that “finger lickin’ good” feel!
Gluten-free chocolate crêpe cake, via Eat the Vegan Rainbow
Crêpes are great – and if you ever hear anyone say otherwise you can safely assume that they don’t know what they are talking about or perhaps did not have an opportunity to try some. Perhaps they don’t know that plant-based, 100% vegan crêpes are easy to make, or perhaps they don’t or can’t consume gluten and are unaware that gluten-free crêpes are within their reach. Or, and this is the final myth that I will dispel, they think that only highly skilled and trained chefs can embark on crêpe making, which is far from reality.
If you own a flat frying pan, and have a whisk that you are willing to use (or a blender!), you can make crêpes. These light, thin, flat pancakes are versatile and can be made into a savory dish, like these Scallion Crêpes, or topped with a range of sweet toppings for a quick and easy breakfast or dessert.
But, there is more to crêpes than that and I recently discovered that you can use them to make multilayered cakes! It usually takes 10-12 crêpes, nice, relatively firm filing, and topping of choice and you’ll have an impressive looking no-bake cake on your hands.
I wanted to make my crêpe cake gluten-free as well, so I followed a crêpe recipe that uses chickpea flour since that was the the type of flour I had on hand (I found the recipe in The Chickpea Flour Cookbook by Camilla Saulsbury and I recommend you check this cookbook out because it does offer lots of gluten-free recipes with helpful comments on how to make each recipe vegan!). The recipe below is a slight modification from the original as I added more almond milk and some vanilla extract, and you should feel free to customize the flavors further or replace some of the flour with cocoa powder if you want your cake to be all chocolate all the way. Additionally, if you prefer to omit oil you can do that as well – here is another excellent and very simple recipe.
The cake is easy to assemble and looks fantastic! If you are not sure you like chickpea flour you can use any gluten-free pancake mix and make a batter that is less dense than your standard pancakes. One way to test whether your batter is the way it’s supposed to be is to pour 1/2 cup in the middle of the pan and then swirl it around until the entire bottom is well covered. If your batter can do this you are all set, if not perhaps you need to add just a bit more water. Go slowly and test frequently, because you don’t want to end up with unusable slurry either.
If you would like to add some sweetness to the crêpes, feel free to add a bit of maple syrup, agave nectar, or other sweetener you like. The chocolate filling and the ganache are quite sweet so you may not need this extra sugar.
Making the chocolate filling is also simple – if you ever made pudding you will know what to do. The filling requires some simmering almond milk, starch and agar, as well we some dark cocoa and maple syrup, and needs to cook over low heat until dense. What kicks the filling up a notch is orange zest which adds citrus tones to the entire cake.
You will need to let your crêpes cool then put the cake together by layering a crêpe then covering it with a tablespoon or two of the chocolate filling, then placing another crêpe on top, the the filling and so on and so forth until all the filling is used up.
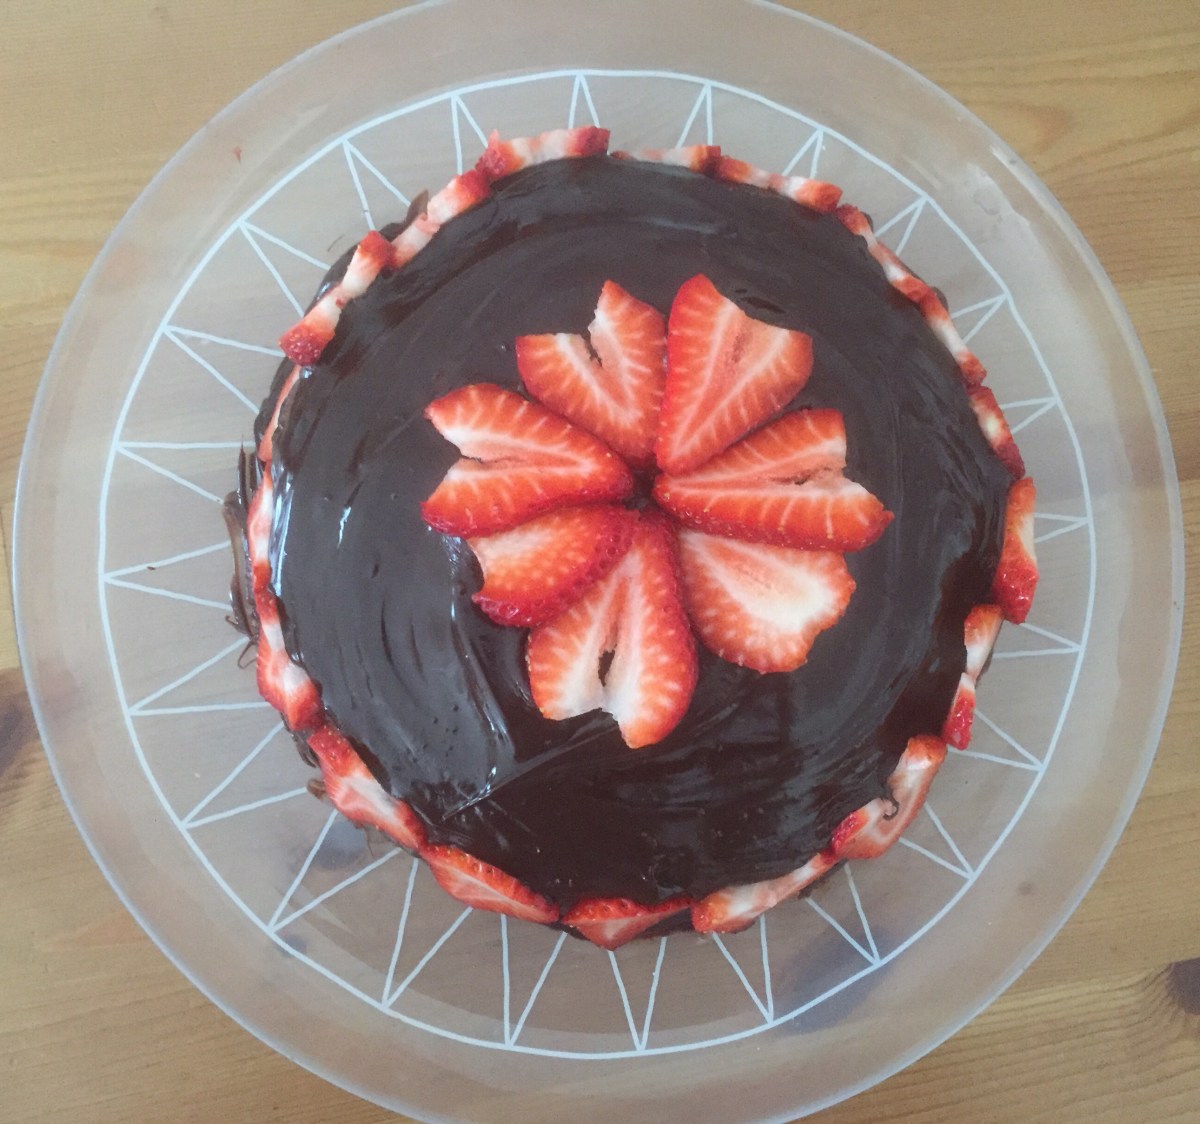
The last touch is chocolate ganache which you can make in the microwave, and pour all over the cake to completely cover the layers. You can decorate the cake with freshly cut strawberries, blueberries, toasted almonds, or some whip cream. Use your imagination to make it unique and incredible!
Gluten-free chocolate crêpe cake, via Eat the Vegan Rainbow
1 cup almond milk, unsweetened, preferably vanilla flavor
2 tablespoons tapioca starch
1/2 teaspoon agar agar powder
4 tablespoons maple syrup
2 tablespoons dark cocoa
1 teaspoon vanilla extract (add more if using plain almond milk)
Zest of one orange
FOR DARK CHOCOLATE GANACHE:
2 cups dark semi-sweet chocolate chips (vegan, like Enjoy Life)
4 tablespoons vegan cream or half’n’half (I used ripple; you can also use any plant-based milk as well, but decrease the amount to 2-3 tablespoons)
4-5 large strawberries, sliced – for decoration (optional)
What you’ll do:
Prepare egg replacer according to instructions. If using flax meal based egg replacer or similar the preparations may require soaking the flax meal in hot water for 5-10 minutes usually by mixing the dry ingredients with water in 1:2 ration (in this case 6 tablespoons egg replacer and 12 tablespoons water).
Mix all the crêpe ingredients (except oil for the pan) using a blender, a mixer or a whisk. The batter should be smooth and clump free.
Place a large frying pan over high heat. Use a brush to brush the oil across the hot surface of the frying pan, then pour in 1/3-1/2 cup of batter and twirl the pan around until all the bottom if covered with a uniform layer of the batter.
Leave the pan over medium-high heat until the surface is completely dry, then flip the crêpe over and continue cooking for 2-3 minutes on the other side. Continue until all the batter is used up, and leave the crêpes to cool.
For the filling start from cold ingredients and bring the almond milk to a gentle boil. Mix tapioca starch and agar powder into the hot milk and continue cooking over low hear until the mix firms up. Leave the mix to cool, which make take some time. You could make both the crêpes and the filling a day ahead and assemble the cake couple of hours before serving.
To assemble this cake, please use a large plate or a cake stand and start by placing a crêpe on the bottom, then the filling (1-2 tablespoons), then another crêpe and more cake filling until no filling is left!
To prepare a ganache, place the chocolate chips and milk, cream or half’n’ half into a microwave safe bowl and microwave on high for 30 seconds. Mix and microwave again, check and repeat until chocolate is about 60% melted. Take the bowl out and start mixing to help finish the melting process.
Pour the melted chocolate ganache over the top and spread as evenly as possible over the top and around the sides. Decorate with fresh strawberries, set aside for 2-3 hours then dive in!
Just how free and beautiful are these brownies? On the “free” side they are vegan, so dairy-free and egg-free, they are also gluten-free and nut-free, plus they are no-added sugar! So, what on Earth do they have? They have plenty of chocolate, cocoa powder, and cocoa nibs, which gives them their chocolate richness.
They are also full of ingredients that you will not find in your regular brownies, like a banana I use here for sweetness and a egg replacement, and oats and chickpeas, which I use as the key flour-like components. Chickpeas and the chickpea water – the miraculous aquafaba – are essential here. They add the protein needed to help give the brownies a bit of structure and texture. They combine well with oats so that the result is not chocolate oatmeal but a real double chocolate brownie with a bite and a chew.
For this and other baking projects, like my meatloaf and my marshmallow topping, I suggest you try making your own chickpeas. They do need some work – you soak them overnight in lots of water, then you rinse them and boil them in double the amount of water to get soft chickpeas and very useful aquafaba. I cook them in an electric pressure cooker on the “beans” setting. To help aquafaba along, I recommend letting the liquid that chickpeas were cooked in sit in the refrigerator for a day or so before using.
Other than cooking the chickpeas that’s a bit elaborate, everything else is smooth sailing. You will need a large food processor, pile everything in, and pulse to mix and combine. The baking is a standard deal, using a 350 F (175 C) oven and taking somewhere between 20 and 25 minutes. Let your brownies rest for at least 15 minutes before serving, then cut and plate. They’d be great with some vanilla nicecream, if you’d like to make them fancy. They are also great as is or with some orange zest on top.
Flourless Double Chocolate Brownies with Chickpeas and Oats
What you’ll need:
2 cups oats, gluten-free
2 cups chickpeas, cooked
1 banana
3/4 cup aquafaba
1/2 cup cocoa powder
1/3 cup chocolate chips or chunks, vegan
2 tablespoons cocoa nibs
2 teaspoons vanilla
1 teaspoon baking powder
What you’ll do:
Preheat the oven to 350 F (175 C).
Place cooked chickpeas, oats, roughly chopped banana, and all the rest of the ingredients except chocolate chips and cocoa nibs into a food processor, and process until you form a dough.
Add the cocoa nibs and chocolate chips and mix everything together.
Pour the mix into a square, 8 x 8 in (20 x 20 cm) baking dish and put your brownies to bake for 20 minutes.
Take the brownies out and let them rest for at least 15 minutes before cutting and serving. Enjoy with some vegan ice cream or as is!
Vegan, fully plant-based meatballs are one of the easiest thing in the world to make. I like putting meat-free “meatballs” together because they are fun – fun always comes first of course – and they are versatile, you can stick them into a sandwich, over pasta, serve with mashed potatoes, with rice and beans, and the list goes on and on…
Plus: unlike dealing with meat, especially poultry, all the ingredients in these meatballs are safe to eat as is, which means that even young kids can get involved and roll some meatballs. I told you – these can be fun for everyone!
What makes these meatballs Asian is the combination of scallions (green onions), Sriracha (hot red chili sauce), fresh ginger, panko (Japanese breadcrumbs), and peanut butter that get mixed with chopped, not ground, soya chunks. The idea is to retain some of the soya chunks structure rather than grind them to the consistency of ground beef. Think chicken salad, rather than taco meat.
To complete the meal you will need to do some spiralizing, which is one of my favorite things to do with zucchini, summer squash, and even potatoes. Here, I combined carrots and zucchini which gives the salad a nice contrast of crunch versus softness, plus a colorful appearance. The spiralized vegetables are mixed with some slivered almonds, lime juice and zest, and tossed to combine. Top them with a meatball or three, and you got yourself a dinner!
Asian Meatballs with Spiralized Zucchini and Carrot Salad
What you’ll need:
FOR THE SALAD
3 zucchinis, spiralized
3 fat carrots, spiralized
1/2 cup slivered almonds
1 lime, juice and zest
FOR THE MEATBALLS
200 g soya chunks
1 1/2 cup panko, Japanese breadcrumbs, regular or gluten-free
3 scallions, white and green parts, finely chopped
1 tablespoon ginger, freshly grated
1 tablespoon peanut butter, natural and unsalted
3 tablespoons soy sauce, reduced sodium
1/2 teaspoon hot chili sauce (sriracha)
Cooking spray
What you’ll do:
Prepare soya chunks according to the instructions on the box. They usually need about 3-5 minutes in a pot of boiling water.
Drain and rinse your soya chunks under some cold water, then chop or grind them into small chunks, similar to chicken chunks commonly used in Asian Dumplings recipes. Place them in a large bowl, and add all the rest of the ingredients. Mix everything well and let stand for 5-10 minutes before making the meatballs.
Heat a large skillet or a cast iron pan over the medium high heat. Spray with some cooking spray and brown the meatballs on all sides until golden brown. Brown the meatballs in batches and make sure you don’t overcrowd the pan.
While the meatballs are browning, prepare the salad. You can either buy a box of spiralized carrots and spiralized zucchini and toss them with some lime juice, lime zest, and toasted slivered almonds, or you can spiralize your own if you have the spiralizer. Let the salad rest while the meatballs finish browning.
To plate, place a good amount of salad in the middle of the plate, and top with 2-3 meatballs. Enjoy!
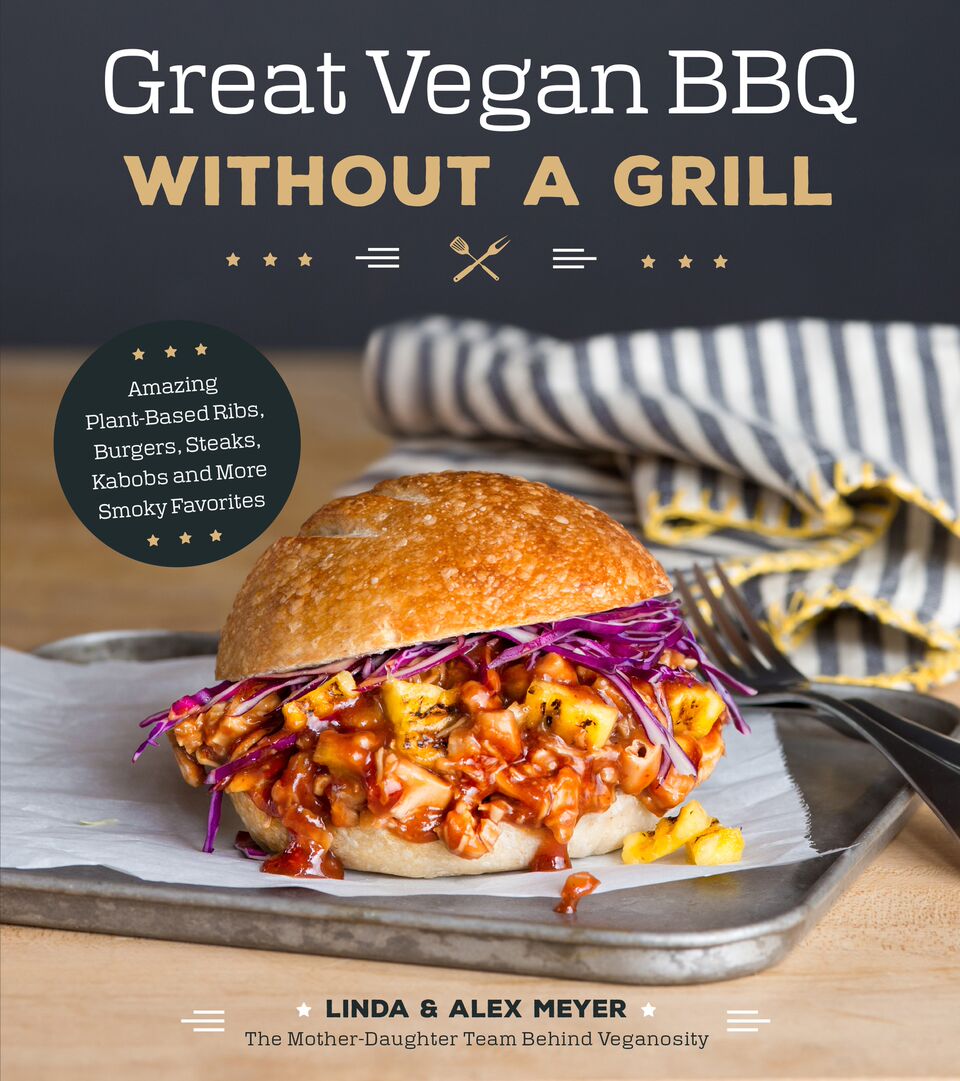
Book review of “Great Vegan BBQ Without a Grill” (photo courtesy of Linda & Alex Meyer)
What better time to write a cookbook review than on a Sunday morning while enjoying a nice cup of coffee and wondering if it will ever stop snowing in New England. It’s the end of March, past the official first day of spring and more snow just started to come down!?
And it is only fitting that in midsts of another snow storm the cookbook I am highlighting is all about barbecue (BBQ) that you can do without much fuss and without ever stepping a foot outside your kitchen. The cookbook in question just came out last week – it’s “Great Vegan BBQ Without a Grill” by a mother-daughter team Linda and Alex Meyer.
Linda and Alex are the creative team behind Veganosity, a web-site that offers lots of recipes and advice on making plant-based food and living a plant-based, vegan, healthy and happy lifestyle. The philosophy behind their new cookbook is that when it comes to the plant-based recipes the best strategy is not to abandon and forget all the flavors and cooking traditions you grew up with, but embrace what you like and learn how to make the same wonderfully tasting dishes using plants only.
The recipes in this cookbook will appeal to all of you who enjoy the flavors and traditional fares of the Southern United States. And if you have not had the chance to explore the American South let me try to explain why you should give it a try – the food is rich in flavor, smokey, savory and sweet at the same time, and best enjoyed in a large circle of family and friends. It’s the food of summer, heat, and hanging out, and this cookbook captures that essence while allowing you to create all the recipes indoors.
In addition to the Jacked Up Crab Dip recipe below – which I could not resist giving a try given my past success with using jackfruit as a seafood substitute for crab cakes, New England Clam Chowder, and White Clam Sauce.
The Jacked Up Crab Dip is creamy and satisfying. It is a perfect party food and it’s sure to please both vegan and non-vegan eaters especially when served with some tortilla or pita chips. It is also very easy to make and nutritious. No mayo in there, which I really appreciate since many commonly used dips are full of either mayo or cheese, so this was really refreshing to see. Plus, the seasoning and the lemon juice fully re-create the flavors of the original. I actually had some leftovers and the dip keeps well for 2-3 days if stored in the fridge
I also made Honey BBQ Ribz that were phenomenal, Southern-Style Skillet Cornbread with Maple Butter, where I skipped the maple butter part and still had a great corn bread that worked really well with the ribz, and Caroline Coleslaw which was refreshing because it used mustard only (no mayo involved). One not on the coleslaw – I found the onion hard to digest so will skip it next time. You can see what my plate looked like at the bottom of this post (below the recipe) – this dinner was a feast!
I’m looking forward giving other dishes in this cookbook a try, and implementing some of the strategies of taking some of the common Southern ingredients and flavoring agents, like molasses or smoked chipotle peppers, and letting them enhance the plant-based food and bring a little bit of sunshine into my kitchen, especially during these stubborn last days of the winter. Congratulations to Linda and Alex on an excellent cook book!!!
Jacked Up Crab Dip (Photo courtesy of Linda & Alex Meyer)
Jacked Up Crab Dip
(RECIPE PROVIDED COURTESY OF LINDA & ALEX MEYER)
Serves 4 to 6
2 cups (300 g) raw cashews, soaked in 2 cups (480 ml) water overnight
1 large clove garlic
¼ cup (60 ml) unsweetened cashew milk or other vegan milk
2 tbsp (30 ml) lemon juice
2 tbsp (30 ml) Dijon mustard
½ tsp Old Bay seasoning
½ tsp ground sea salt
¼ tsp ground paprika
⅛ tsp onion powder
1 (14-oz [400-g]) can young jackfruit packed in water or 1½ cups (400 g) fresh jackfruit
Drain and rinse the cashews and put into a high-powered blender or food processor. Add the garlic, cashew milk, lemon juice, mustard, Old Bay seasoning, salt, paprika and onion powder and blend for approximately 2 minutes (scrape the sides frequently), or until it’s smooth and velvety. You shouldn’t see or taste pieces of solid nuts.
Scrape the cashew mixture into a medium bowl.
Drain and rinse the jackfruit well. Shred the jackfruit with a fork or in a food processor and put in the bowl with the cashew mixture. Gently fold until fully combined. Serve with crackers, toast or sliced vegetables.
(This recipe is courtesy of Linda & Alex Meyer, and just one of many in their new cookbook!)
Indoor BBQ, from “Great Vegan BBQ Without a Grill”
Disclosure: I received a free copy of this cookbook through a community of vegan bloggers. This did not influence my views about the recipes I tried thus far and mentioned above. The photo and the recipe above are reproduced with permission from Linda and Alex – thank you!
Soy-free Vegan Scrambled Eggs, via Eat the Vegan Rainbow
Most of us grew up eating eggs for breakfast, and some of us (me included) have also used eggs as a quick lunch or dinner. Going vegan did not come with simple instructions on how to replace eggs. Although there are some great online resources on how to replace eggs in baked goods, it is less clear how to make a simple egg-based breakfast without eggs. There are couple of products on the market and Follow Your Heart‘s VeganEgg is pretty decent, but could do with some optimization.
I have also been seeing people commenting that tofu scramble just does not do it for them, or that they really miss their breakfast eggs or burritos, and that they are getting bored with all the oatmeal or smoothies, which all of us with plant-based diets seem to be converging on as go-to breakfast items. So, I embarked on a bit of experimentation and I think I struck gold!
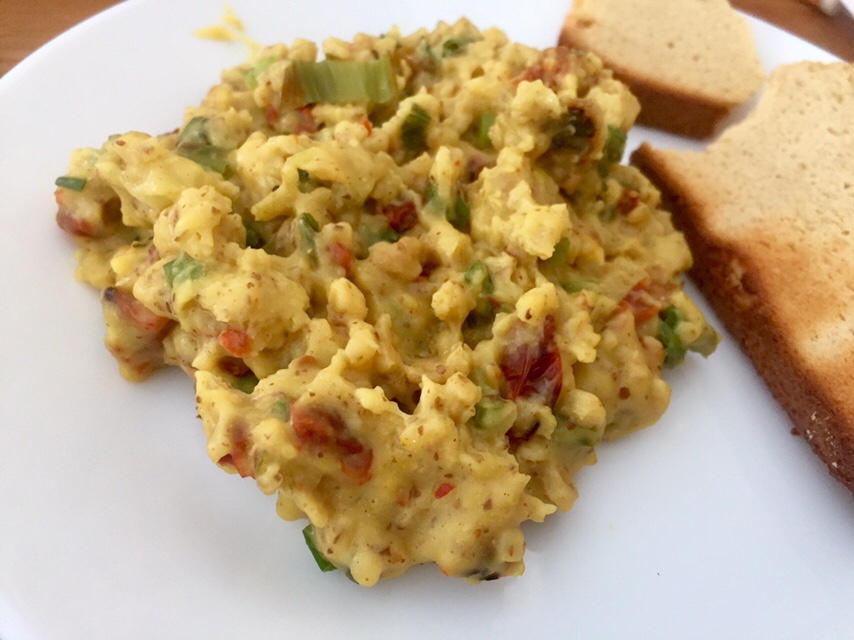
Or to be more specific struck a chickpea flour-based scrambled egg substitute that works relatively well. My special “egg” mix also includes flax meal, as well as tapioca starch as two ingredients that add a bit of stretchiness to the final scramble. I also added just a pinch of turmeric because it gives these eggs a nice, bright yellow color that is very close to the original – however you can skip it if you dislike the taste.
Many egg replacers include some Himalayan black salt, which owes its color to the presence of iron sulfide, and sulfides have that well-known rotten egg smell. So, adding them to egg replacers sends a strong “egg” signal to our receptors. However, it is the smell of rotten eggs, and I prefer my eggs not in state of any decay so I recommend against it. But if you liked your nostrils being tickled by the sulfide aroma, feel free to replace the plain salt below with the black one.
Although the “egg” mix will look a bit weird and have a thick, sort of custard-like consistency that’s OK. You will need to keep stirring the scramble as it cooks to get that nice scrambled egg look and feel. One down side of this recipe is that the “egg” mix needs some help since it is pretty bland tasting on its own. Here, I add some scallions and sun dried tomatoes, which really add a lot of flavor to the scramble. The add-ons are fully customizable and you can use onions, mushrooms, pesto, asparagus, peppers, hot sauce, vegan cheese, nutritional yeast, or any combination of these.
Hopefully, this recipe will bring the scrambled eggs back to your breakfast menu!
Soy-free Vegan Scrambled “Eggs”
What you’ll need:
1/2 cup chickpea flour
1 tablespoon flax meal
1 tablespoon tapioca starch
1/4 teaspoon salt
1/8 teaspoon turmeric (optional, for color only)
1 1/2 cup hot water
6 scallions (green onions), trimmed
1/2 cup (50 g) sun dried tomatoes, finely sliced
2 teaspoons olive oil
What you’ll do:
Combine the first five ingredients (chickpea flour, tapioca starch, flax meal, salt and optionally turmeric) in a mixing bowl and whisk together. Add hot water in 1/2 cup increments and gradually, whisking as you add to avoid clumping. You may need to adjust the amount of liquid so do add the last 1/2 cup slowly. The mixture should have pudding-like consistency.
Let the “scrambled egg” mix sit for 5 minutes or so.
While the mix is resting, chop the scallions, both green and white bits, and the sun dried tomatoes.
Place a large frying pan over the medium high heat, add the oil, and the chopped scallions and tomatoes. Brown the vegetables for few minutes.
Pour the egg mix in, and stir occasionally allowing the mix to slightly brown.
Serve with a slice of freshly toasted bread, an English muffin, a bagel, or wrap in a tortilla for a breakfast burrito. If you are serving with toast, use your fork to fluff the scramble up and give it a more of a scrambled egg look!
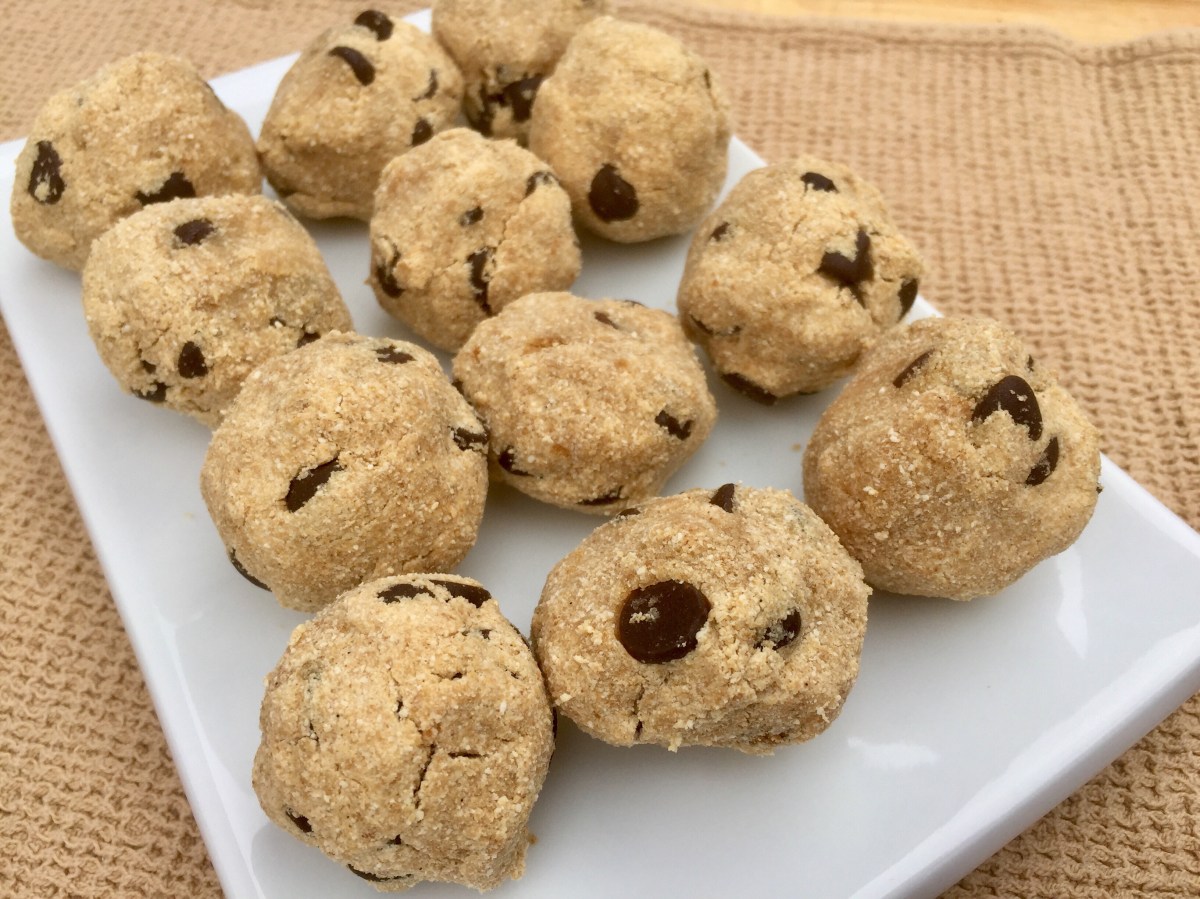
Gluten-free and Vegan Chocolate Chip Cookie Dough Balls, via Eat the Vegan Rainbow
If you are looking for a quick, fun, satisfying and irresistible dessert, well look no further. These Chocolate Chip Cookie Dough Balls are it!
They are no-bake dessert that you can whip up on a whim by using a handful of ingredients, most of which you can find in your local grocery store or easily make in a food processor. Some ingredients that you likely already have are almond flour, coconut flour, vegan chocolate chips (I recommend Enjoy Life brand, especially the mini chocolate chips!), almond milk, almond extract, agave nectar, and vanilla bean. Mixing all these together will give you lovely and yummy treats.
What kicks the flavor over the top for me is mesquite powder. Yup, you heard that right – mesquite! This is a new ingredient for me and I’ve been experimenting with its use. The powder comes from and can be used raw, so I’ve been adding it to smoothies. The powder has an earthy and nutty flavor, and that’s why it works really well in these treats.
One tip: add the almond milk gradually in small increments, 1/4 cup at a time. After each addition mix your ingredients well and let them rest for few second before adding more milk. This will help your cookie dough absorb the liquid and result in a moist dough that will come together well as you roll it.
And speaking of rolling, be gentle but not too gentle. The dough should not be crumbly – if it is you likely need a drop or two more almond milk or if you like to kick it up a notch in terms of calories you could add some almond butter which will help hold things together. Use the same technique you would when putting together meatballs: scoop a tablespoon or so of the dough into the palm of your hand and start rolling and squeezing at the same time until you have a nice little treat in your hand.
Since these cookie doughs are free of eggs, butter and flour, they are totally fine to snack on as you make them. Just remember to save a few for later!
1/4 cup agave nectar (maple syrup, or other sweetener of choice)
1 teaspoon almond extract
1 vanilla bean, scraped
1 cup mini chocolate chips, vegan
3/4 – 1 cup vanilla almond milk, unsweetened (or another dairy-free alternative; if you are using a sweetened version just add less agave nectar; if you are using plain version add a bit more vanilla bean)
What you’ll do:
In a large mixing combine all the ingredients except almond milk. Mix well and start adding the milk, 1/4 cup at a time. The final dough should be moist but not wet.
Using your hands, take one tablespoon of the chocolate cookie dough mix and shape it into a tight ball. As you are shaping the ball, keep rolling and pressing. The ball should stick together, if not consider adding a tablespoon or two of almond milk.
You can enjoy these chocolate cookie dough balls immediately. They are best freshly made, but they also keep ok, covered at room temperature for 2 days or so.
Although it may seem like a mission impossible, recreating meat like appearance, consistency and even the taste with plant-based ingredients is not all that hard. The basis for many of my meatless recipes are mushrooms. I usually use baby portobello mushrooms, also known as the crimini mushrooms, but white button mushrooms would work just as well. Very often I grind the mushrooms into a paste and this also helps with the final meat-like vibe of a dish. Finally, I cook the dish with the same spices and in the same way as someone would a meat version of the same recipe.
The meatless Shepherd’s Pie I made some time ago nicely illustrates these tips. For that recipe I used mushrooms and lentils, as the key umami components, and combined them with herbs that you would typically use in this pie – thyme and plenty of rosemary. What you see and smell will evoke the right memories and experiences, so by the time you have the first bite your brain is already convinced it’s having meat.
Here I use all those strategies to make koftas, which are sort of flat-ish lamb meatballs placed on a skewer and grilled. Minced mushrooms give the right level of umami and TVP (textured vegetable protein) gives the koftas structure. One note on the TVP – instructions usually say that you need to soak the TVP flakes before using which is true for many applications but not for this one. Use dry TVP and mix it with minced mushrooms and the rest of the ingredients to get to the right consistency for the koftas. After all they will need to go on the skewers and need to be robust enough for broiling on high. I did add some bread crumbs to the mix as well, as an extra binding agent. If you are not a fan of bread crumbs, you could add oats, or some corn meal.
Koftas need to be shaped by hand, and the skewers gently threaded through. Ideally, the skewers you are using are long enough to rest on the edges of your broiler pan (see picture below) so that you can turn them midway through broiling and get all sides well browned. I can’t recommend the bamboo skewers I used here – by the end of the broiling they were all black band falling apart – so metal ones seem like a much better idea.
Serve Broiled Vegan Koftas with some Saffron Cauliflower Rice, and with a spoonful of mint chutney, and you will have yourself a great, well-rounded meal.
Broiled Vegan Koftas
What you’ll need:
10 oz (280 g) white button mushrooms
10 oz (280 g) TVP
1 cup bread crumbs, plain, gluten-free
4 cloves garlic
3 tablespoons olive oil
2 teaspoons coriander powder
2 teaspoons ground cumin
2 teaspoons smoked paprika
1 teaspoon crushed red pepper flakes
Cooking spray
What you’ll do:
In a large food processor, mix all the ingredients (except the cooking spray) and pulse to mix and combine. Let this mixture stand for at least 30 minutes and up to one hour.
Start your broiler on “HI” or use the outdoor grill if you like.
Line a broiler pan with some foil. You don’t need the top grate part that broiler pans usually have so leave it aside.
Using your hands take about 1/2 cup worth of koftas’ mix and form an elongated oblong shape about 1 1/2 in (3-4 cm) wide then pierce it with a skewer. These koftas are gentle so handle them with care. You may need to adjust the amount of bread crumbs, or add some flex meal as a blunder. Leaving them in a fridge or freezer to firm up will help them hold their shape. Place the skewers on a broiler pan making sure their ends rest on the pan’s rim and the koftas don’t touch the bottom (see picture above).
Broil on high for 5-8 minutes than turn over to broil on the other side.
Let koftas cool just for a moment then serve with some rice, Saffron Cauliflower Rice, or a mild yogurt, like almond or cashew ones.