Best DIY Sushi Ever!

Best DIY Sushi
Best DIY Sushi Rolls with Minty Peas & Red Cabbage, via Eat the Vegan Rainbow

If you think that making sushi requires hours of practice, one-on-one instruction from a sushi master chef and special equipment… well, you may be right if your goal is to make sushi that contains fish or seafood, especially given health risks involved. But, if you want to explore the wonderful and delightful world of plant-based sushi, all you need is about an hour or two, and some imagination.

I made my first vegan maki sushi, the kind where filling and rice are wrapped in sea weed, few months ago, and I really enjoyed the process and the flavors. I got inspired to start thinking about what ingredients would work together well, and whether there are any dipping sauces I could use to complement the sushi.

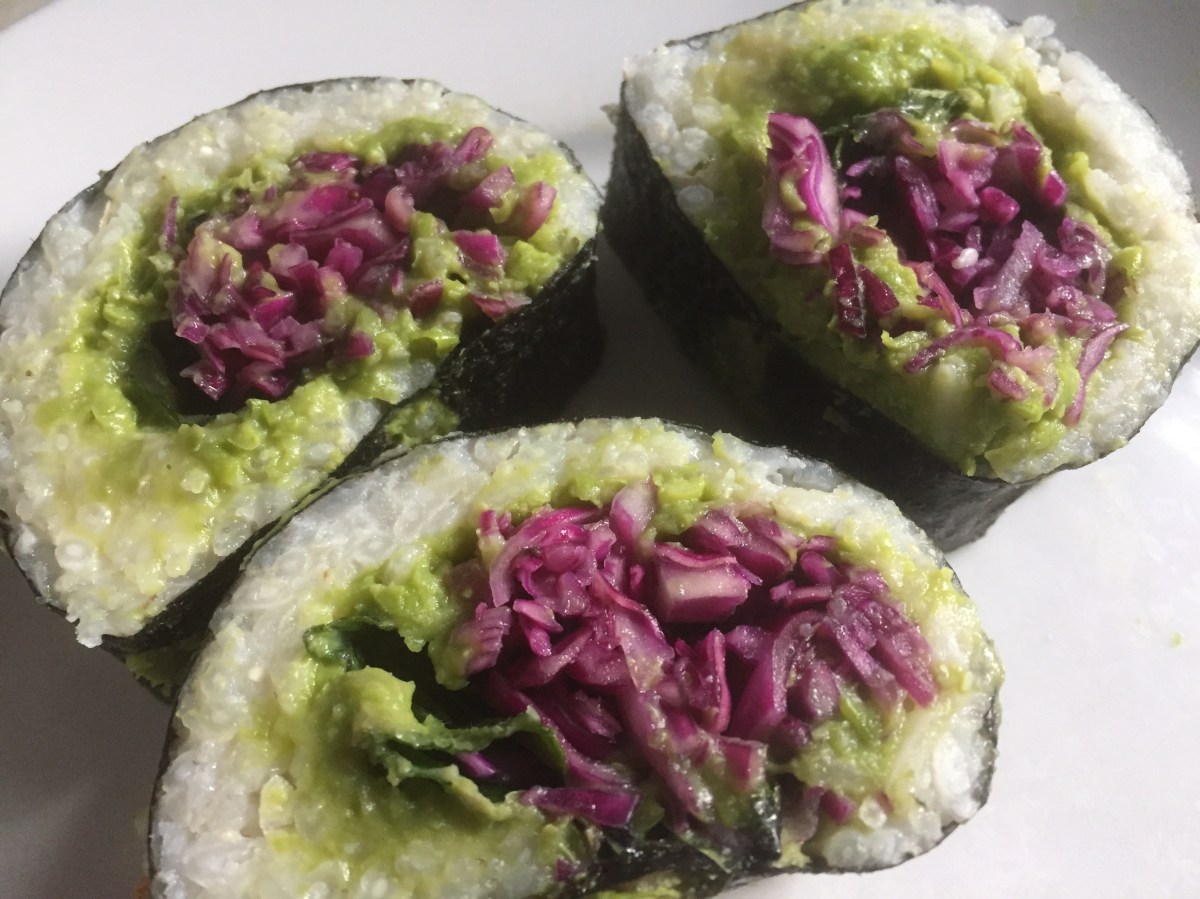
The results of this brainstorming are before you: Green & Orange Sushi Rolls and Peas & Cabbage Sushi Rolls, with Peanut Dipping Sauce and Sour Lemongrass Dipping Sauce.

The basic requirement for a great sushi is plenty of sticky rice. You can get special sushi rice but you can also use any short and medium grain variety of rice. For sushi, I use the same rice I use for risottos. The trick is to add the rice to boiling water, reduce the heat and let the rice gently simmer with occasional mixing.

Finally, leaving the rice to cool will help you handle it as well as help the rice get nice and very sticky. I recommend dipping your hands in water before handling the rice and then keep wetting them as you spread and press the rice.

One other thing you need to pay attention to is what side of seaweed sheet you pile your rice on. It should be the one that feels slightly rough, so that your outside is nice a smooth. What I discovered is that you don’t really need the bamboo sushi rolling mat or any special equipment. The main thing to remember is to go easy on the stuffing so your rolls don’t end up to full. This will make them hard to roll and more likely to rip. I hope you go for these vegan versions of sushi, or create your own. There really is no limit and no rules!

DIY Sushi with Two Dipping Sauces

What you’ll need:

FOR THE STICKY RICE

1 cup short or medium grain rice

2 cups water

FOR GREEN & ORANGE SUSHI ROLLS

1 1/2 cup cooked rice

3 seaweed (nori) sheets

1 carrot

1 English cucumber

1 avocado

1/4 cup sesame seeds

1/4 cup black sesame seeds

FOR CABBAGE AND PEAS SUSHI ROLLS

1 1/2 cup cooked rice

3 seaweed (nori) sheets

2 cups peas, frozen

2 cups water

2 cups shredded red cabbage

1 teaspoon sesame seeds, toasted

1 teaspoon black pepper

1 teaspoon salt

1/2 teaspoon garlic powder

2 teaspoons rice vinegar

1 cup fresh mint leaves

FOR PEANUT DIPPING SAUCE

2 tablespoons peanut butter, unsalted

1 tablespoon rice vinegar

2 teaspoons sriracha(or other hot sauce)

1/4 cup water

2 teaspoons panko, toasted

FOR LEMONGRASS DIPPING SAUCE

1/4 cup rice vinegar

2 tablespoons soy sauce, reduced sodium

1/4 cup fresh cilantro, finely chopped

1 tablespoon lemongrass, finely chopped

1 teaspoon ginger, grated

What you’ll do:

  1. Bring 2 cups of water to boil and add the rice. Lower the heat to gentle simmer and cook the rice, stirring occasionally, until all the water is absorbed, and the grains are soft. Set to the side and let it cool.
  2. In another pot bring 2 cups of water to boil and add frozen peas. Cook until well done for about 15 minutes.
  3. While rice and peas are cooking, put together the dipping sauces. In a medium size bowl, combine all the peanut sauce ingredients, except panko, and mix well to combine. Toast panko in the toaster oven, or in a pan over high heat, for 1-2 minutes. Top the peanut dipping sauce with toasted panko.
  4. In another bowl, combine all the ingredients for the lemongrass dipping sauce and set aside.
  5. Prepare your roll stuffers, like cucumbers, carrots, avocados or anything else you like. The trick is to make your veggie sticks long and thin.
  6. To make the red cabbage, place finely shredded red cabbage in a bowl and add all the rest of the ingredients except mint leaves. Mix everything well using your hands. Squeezing the cabbage as you mix will help soften it and make it absorb flavors better. Let the cabbage “marinate” for 30 to 60 minute.
  7. When peas are fully cooked drain and purée them.
  8. Once the rice is cool it is safe to handle. Place a piece of the seaweed sheet on the flat kitchen surface rough surface up. Place 1/2 cup of sticky rice on the sheet. Spread the rice to cover most of the seaweed sheet using your wet hands. Next, place the topping on 3/4 of the way towards one end of the sheet, and start rolling from that edg, slowly and gently. The roll should come together nicely.Cut the roll into sushi piece. One note on peas and cabbage rolls: spread the pea purée across entire rice and the pickled cabbage and mint leaves in a single line, 2/3 of the way from the edge.
  9. Serve the sushi with the two dipping sauces, some pickled ginger and wasabi paste. Enjoy!

Copyright ©Eat the Vegan Rainbow, 2017

Blueberry Cheesecake 2.0, a Real Space-Age Treat

Vegan Blueberry Cheesecake
Vegan Blueberry Cheesecake, via Eat the Vegan Rainbow

First time I had cheesecake I was twenty five! Yes, it’s true – I spent the first twenty five years of my life in a blissful ignorance, completely unaware that cheesecakes existed. But, soon after moving to US I did partake on a slice and fell in love immediately and over the years things just better and better.

First of all, cheesecakes are easy to make. They are also very versatile because you can customize them in many different ways. I used to make pumpkin cheesecake topped with baked apples and pecan caramel for Thanksgiving because pumpkin pie is sort of boring.

My other favorite cheesecake I used to make was plain vanilla topped with homemade blueberry syrup. So one night, as I was making myself a light dessert of blueberry smoothie, I got inspired to try and make Cheesecake 2.0 – the 21st century version that is dairy-free, gluten-free, and egg-free.

Being the space age type of dessert, this recipe uses an ingredient that you can’t find in a grocery store: agar powder. Chemically speaking, agar is a sugar polymer and I’ve used it a great deal to make many, probably thousands, of agar plates in Petri dishes, which I then used to grow bacterial cultures. (For those interested in the source, agar is isolated from algae (seaweed), so although not of plant origin, I think it is safe to say that definitely plant-like in many ways and not animal-derived.)

So, when I discovered that agar has a culinary application I was skeptical. But when I thought about what I need agar to do – act as a jelling agent in the same way gelatin would – I concluded that my skepticism was not founded in reality and chemical facts but some silly prejudice. Thus, I bought a small jar of agar powder and I’ve been using it to make hard (and shreddable) cheese quite successfully. In this recipe I took agar powder a step further and used it as the firming agent for the cheesecake. It did the trick and the result was a yummy cake with excellent smooth yet firm texture.

Blueberry Cheesecake 2.0
Blueberry Cheesecake for the 21st Century, via Eat the Vegan Rainbow

Blueberry Cheesecake 2.0

What you’ll need:

FOR THE CRUST

1 cup walnuts

1 cup cashews

1 tablespoon brown sugar

1 tablespoon vegan Butter

FOR THE CHEESECAKE FILLING

2 cups blueberries, frozen

1/2 cup oatmeal

1 1/2 cup vanilla almond milk, unsweetened

4 teaspoon agar

2 cups water

What you’ll do:

  1. Use a grinder or a food processor to grind walnuts and cashews to a relatively fine meal.
  2. Pour the ground nuts into an 8 to 9 in (20 to 23 cm) round springform pan.
  3. Add brown sugar and mix well.
  4. Add melted vegan butter (30 sec in a microwave should be enough to melt this amount) and using your fingers mix the melted butter in so that all of your nut and sugar mix is moist. Press the mix into the bottom of the pan to form a crust. Set aside.
  5. In a large blender mix almond milk, blueberries and oatmeal until smooth.
  6. To prepare agar powder, bring 2 cups of water to boil and add the agar. Use a whisk to mix everything together lower the heat to simmer and keep mixing and simmering for 4 to 5 minutes.
  7. Add hot agar to the blender in small batches, 1/2 cup at a time. Pause to incorporate then add more until the entire amount of agar is incorporated.
  8. Pour the filling into the springform pan and use a spatula or a flat spoon to spread around and flatten the top.
  9. Refrigerate for at least 4 hours, best overnight.
  10. Pop it out of the springform pan, cut and serve as is, or with fruit and/or vegan whip cream. I made one from chickpea water (aquafaba), but you can make any one you like or skip it!


Copyright © Eat the Vegan Rainbow, 2017

Oh My… It’s Another Meatless Shepherd’s Pie

Meatless Shepherd’s Pie, via Eat the Vegan Rainbow

The first full meal post on this blog was my version of that classic, Shepherd’s Pie. The reason I kicked things off by veganizing a classic was that I wanted to push the limits and see if I can do it and be happy with the results. At that point I was one month into plant-based diet, and felt that I need to step it up in terms of how I create my meals. That’s a quick story behind the first Vegan Shepherd’s Pie.

Once that recipe was published I did get some backlash from people who firmly believed that a Shepherd’s Pie without meat is an abomination. I obviously don’t agree and have now created another version of Shepherd’s Pie that is so close to the original that very few people will know the difference. I served this for Easter Sunday dinner few weeks ago, and it was a hit!

The three main tricks I used are to fully cook the lentils on their own in water, to use full sprigs of rosemary without chopping, and to grind the mushrooms in the food processor before using. All these three things put together make this Shepherd’s Pie taste very, very similar to the ground lamb containing version. Except that this recipe leaves the lambs alone – which can’t be bad, right?


And if you are not concerned about the well-being of lambs much, perhaps you’ll find the health benefits of this recipe or its budget-friendliness more appealing. Regardless of your reasons, I hope you find at least one to compel you to try this meatless Shepherd’s Pie. Enjoy!!!

Meatless Shepherd’s Pie

What you’ll need (for 8 HUNGRY people):

14 oz (400 g) dark (brown) lentils

4 large carrots, chopped

5 celery stalks, diced

1 onion, diced

20 oz (570 g) mushrooms

3-4 sprigs of rosemary

2 tablespoons thyme, chopped

4 cups green peas, frozen

6 potatoes, medium size

3 cloves garlic

1/4 cup almond milk

2 tablespoons olive oil

Cooking spray

What you’ll do:

    1. Cook lentils according to bag instructions. In brief, for this amount of lentils you’ll need 4-6 cups of water that you need to bring to boil. Once the water is boiling add rinsed lentils in and simmer until lentils are done, which will take 20 to 25 minutes. Set cooked lentils aside.
    2. Peel and cube the potatoes. Put them in a large pot, and add the garlic cloves too. You don’t need to chop the garlic as it will soften during boiling and you will be able to mash it with potatoes. Cover the potatoes with water and bring to boil. Decrease the heat and boil until potatoes are cooked through. Take the pot of the heat, and let it cool off before mashing.
    3. Clean the mushrooms with a paper towel to remove any visible bits of dirt. Use a food processor to chop the mushrooms until they are about the same size as little bits of ground meat.
    4. Spray the bottom of a large frying pan with cooking spray and turn the heat on to medium high. Add onion,  carrots and celery. Sauté for 3 to 5 minutes.
    5. Add whole sprigs of rosemary and chopped thyme and stir everything together. Sauté for another 8 to 10 minutes.
    6. Add chopped mushrooms, stir well and sauté until mushrooms are softened, which should not take longer than 5 minutes.
    7. Add frozen green peas, and mix everything together.  You can lower the heat or turn it completely off as all you need to do now is mix the pie filling until the peas thaw.
    8. Take rosemary sprigs out and discard. Some of the leaves will fall off and that’s OK. Remove as many as you can but leaving some in will help the flavor develop further.
    9. Add cooked lentils and mix everything together. Set aside.
    10. Preaheat the oven to 375 F (190 C).
    11. While the oven is preheating, mash the potatoes. To the pot of boiled potatoes that have been drained and cooked, add almond milk, olive oil and mash using a potato masher until the mashed potatoes are soft and smooth. You can always add more almond milk to get the consistency just right.
    12. Spay the bottom and the sides of a large baking dish with cooking spray. Pour the Shepherd’s Pie filling in and smooth out.
    13. Spoon the mashed potatoes over the top. Smooth out the mash and then using a fork create nooks and ridges. Spray the top with a bit more cooking spray and place in the oven for 15 to 20 minutes or until the potato topping is nice and browned.
    14. Serve with your favorite salad or even some vegan gravy. Trust me, this Shepherd’s Pie will leave you speechless!

Copyright © Eat the Vegan Rainbow, 2017

Mexican Stuffed Mushrooms

Mexican Stuffed Mushrooms, via Eat the Vegan Rainbow

It is May 5th, which in this part of the world means it’s time for Cinco de Mayo, a celebration of Mexican culture and heritage. Big part of any culture is the food, and Mexican food has been one of my favorites for years.  So I could not sit this one out!!!

My Cinco de Mayo tribute recipe is this Mexican Stuffed Mushrooms, that starts with large stuffing mushrooms and uses a stuffing with layers of flavors, all very evocative of what you might expect to find in pub nachos or a tortilla.

These large, plump mushrooms are a perfect vehicle for the rich stuffing and what I like to do is roast the mushroom caps by themselves first, to get rid of extra moisture. And while the mushrooms are roasting, I focus on putting the stuffing together.

As I mentioned previously, I don’t like vasting lovely bits of mushrooms – stems: I’m talking about you! – as there is lots of great flavor in them. So, this stuffing uses all the mushroom stems finely chopped, and mixes them with just a bit of vegan ground beef substitute to maximize the umami flavor.


Now in terms of getting a bit of Mexican flavors going, I applied a shortcut and went for a jar of store bought chunky salsa. You can definitely make your own, or go with any salsa flavor and heat level you enjoy. In case you are wondering, I used mild.

My final touch was to cut up some soft corn tortillas and add them to the stuffing. This adds a bit of texture and brings the flavors much closer to what you’d expect from a Mexican cuisine inspired dish. For the last stage of baking I topped each mushroom with some grated vegan cheese and let it melt for few minutes. Finally, I sprinkled some fresh cilantro on top. If you can’t stand cilantro, you can use flat leaf parsley or fresh basil. Although it would make it less of a Mexican flavor and aroma experience, it will still make these mushrooms yummy!

Mexican Stuffed Mushrooms

What you’ll need:

28 oz (680 g) large stuffing mushrooms

1/2 package Trader Joe’s “Beefless Ground Beef” (or 1 cup homemade version)

3 tablespoon chives, finely chopped

1/2 large yellow onion, chopped

1 teaspoon Trader Joe’s Everyday Seasoning (or adjust the amount of sea salt, black pepper, mustard seeds, chili pepper, coriander, onion garlic paprika to taste)

3 corn tortillas, cut into small chunks

1/2 cup salsa, divided

1/2 cup shredded cheese, divided

Fresh cilantro, finely chopped

Cooking spray

What you’ll do:

    1. Preheat oven to 425 F (220 C).
    2. Wipe the mushrooms of any visible bits of dirt using a damp paper towel. Remove the stems carefully so that you don’t break the caps. Save the stems for later.
    3. Line a baking sheet with parchment paper and place the mushroom caps on, their hole side up. Put them into the preheated oven for 10 to 15 minutes.
    4. Spray a large frying pan with cooking spray and place over medium heat. Add chopped onions and chopped chives. Let them brown for about 5 minutes.
    5. While the mushroom caps are roasting, and onions and chives are sautéing, chop the stems to small pieces and add them to the pan.
    6. Sauté for another 5 minutes then add the beefless ground beef and the seasoning. If you don’t have this specific seasoning mix, you can use store bought taco seasoning, or similar, or just add your own mix of chili powder, paprika, black paper and coriander to taste. Mix everything well together and sauté for another 5 minutes.
    7. Turn the heat off and mix in the chopped corn tortillas. Let stand for about 5 to 10 minutes. This will help the tortillas soak up some of the excess liquid mushrooms may have released as well as soak up then flavors.
    8. Take the mushroom caps out of the oven, and bring the heat down to 350 F (180 C). Using a pair of kitchen tongs, or similar, gently invert the mushroom caps so that the liquid that collected in them drains out. Place the dry mushroom caps into a deep baking dish. Spoon the stuffing into the mushrooms. I like to spoon the stuffing high and if your baking dish is deep enough you don’t have to worry about the stuffing spilling over as there will be a dish to catch it all.
    9. Place one teaspoon of salsa on each stuffed mushroom, and then heap the shredded cheese on top. Spray the tops with some cooking spray and place the dish into the oven. Bake for 10 to 15 minutes, until the cheese starts to melt and the mushrooms are completely cooked.
    10. Take it out of the oven and cool only slightly. Sprinkle with fresh cilantro, or another herb of your choice, just before serving and enjoy as an appetizer or a part of your main course.

Copyright © Eat the Vegan Rainbow, 2017

Sweet Potato and Leek Soup

Sweet Potato and Leek Soup with Tofu Bacon, via Eat The Vegan Rainbow
Soups are part of all cultures and culinary traditions. So it is no wonder that I make pots and pots of soups each week. My absolutely go to soup is Vegan Split Pea Soup or variations of it made with lentils, but over the last few months I have also shared with you a colorful and fabulously satisfying Bean & Leek Soup with Soy Chorizo, and even a vegan version of the New England Clam Chowder.

Why such a soup passion? Well, I grew up eating soup almost every day, and the soups my mom made came in many different shapes, forms and sizes. Soups are a great way to combine different bits and bobs into a one pot to create a satisfying meal for a family. In general, soups are easy to make, very inexpensive, and they store and reheat very well. So, what’s not to love?

This Sweet Potato and Leek Soup is my take on a standard soup that is usually made with potatoes, leeks, butter and heavy cream. I got rid of butter and heavy cream and replaced potatoes with sweet potatoes, making this version a bit sweeter. But, I did not remove all the fun – I made some tofu bacon to top this soup with. The Buddhist Chef makes the most fabulous tofu bacon and I’ve been using his recipe to make crunchy and delicious vegan bacon that works as a snack, in sandwiches and now on soups.

You can top this soup with couple of other toppings if you don’t have time to make the tofu bacon. Chives or green onions (scallions) will work, as will cashew sour cream like the one Angela Liddon shared on her Oh She Glows site, or simple croutons aka piece of toast cut in smaller pieces. Regardless what you put on top of your bowl of Sweet Potato and Leek soup what’s inside it is a tasty, creamy and healthy soup.

Sweet Potato and Leek Soup

What you’ll need:

5 sweet potatoes

2-3 large leeks

2 carrots

4 cups vegetable stock (optional)

3 cups water (or 7 cups if you decide not to use stock)

1 cup almond milk

2 tablespoons potato starch

2 bay leaves

Cooking spray

What you’ll do:

  1. Peel and cube sweet potatoes and carrots into a rough chunks. The size of the chunks does not really matter because you will use a blender at the end to create a smooth and creamy soup. But, the smaller the chunks the quicker the cooking so decide for yourself if you would like to spend more time simmering or more time chopping.
  2. Prepare the leeks using the cleaning method of your choice. The leeks are very often full of send and dirt that gets inside the leek so you will need to open them up and wash everything out. I described my preferred cleaning method in one of my previous posts.
  3. Spray the bottom of a large pot with the cooking spray and place it over the medium high heat. Add leeks and sauté for 5 minutes. The leeks should soften and start to brown.
  4. Add sweet potatoes, carrots, bay leave and potato starch. Mix well and sauté for another 3 to 5 minutes.
  5. Add vegetable stock and/or water. mix well and turn the heat on high. Stirring occasionally, bring the pot to boil then turn the heat down to a gentle simmer. Simmer for 15 to 30 minutes, depending on whether your vegetables were chopped into smaller or larger chunks.
  6. Take the bay leaves out and add the almond milk. Using either a counter top blender or a hand held stick blender to blend the soup together and create smooth soup. Top with any topping you like and enjoy!
  7. Copyright © Eat the Vegan Rainbow, 2017

Oatmeal Raisin Cookies

Oatmeal Raisin Cookies, via Eat the Vegan Rainbow

Today is a double whammy of a day. It’s the National Oatmeal Cookie Day and at the same time the National Raisin Day. So I just had to join in the celebrations by putting those two together into these lovely, healthy and chewy Oatmeal Raisin Cookies that use couple of very simple ingredients and take no time to make.

I decided to start with some naturally sweet ingredients in order to completely omit using added sugar. So I went for a combination of carrots and raisins, both with an amazing amount of sweetness that baking brings out to an amazing extent.

For my oatmeal, I decided to toast some of it to add extra dimensions of nuttiness to the flavor of these cookies without the need to use any nuts. Additional trick I used is to grind most of the oats which made it easy to skip using flour. Still, I did add a bit of corn starch to help the cookies along, and “flax egg” to bind everything together.

Of course, you can’t have a good batch of moist cookies without adding a bit of fat and in this case I decide to use solids out of the can of coconut cream. I used all the liquid and couple of tablespoons of solids for my Bread Fruit Curry, so I had some solids leftover. You can also use coconut oil in this application as well. The oil does not need to be fully melted but it does need to be softened so that can mix well with the rest of the ingredients.

So without any further ado I give to you on this special day gluten-free and dairy-free, no sugar added Oatmeal Raisin Cookies.

Gluten-free, Dairy-free, No Sugar Added Oatmeal Raisin Cookies, via Eat the Vegan Rainbow

Oatmeal Raisin Cookies

What you’ll need (for 24, 2 in (5 cm) diameter cookies):

3 large carrots

1 cup raisins

2 cups oatmeal

1/4 cup flax meal

3/4 cup water

1/4 cup corn starch

1/4 cup coconut oil, melted

1 tablespoon cinnamon

1 tablespoon vanilla

1 teaspoon baking powder

1/2 teaspoon baking soda

What you’ll do:

  1. Preheat oven to 350 F (175 C).
  2. Place raisins into a large cup and cover with hot water. Let them soak for 30 minutes.
  3. Add flax meal to a large cup and mix well with 3/4 cups of hot water. Let stand for 15-30 minutes.
  4. Toast 1/2 cup of oat meal in a toaster oven until they begin to slightly brown and start smelling lovely and deliciously toasty, which should take about 2-3 minutes. Keep an eye on the toaster oven though as the oats will burn quickly. You can toast the oatmeal on the stove top, using a frying pan. I recommend dry toasting them, although you can use a drop of oil or cooking spray to help the toasting along.
  5. Add the toasted oats to a food processor and grind to a fine meal. Pour the toasted oatmeal into a large mixing bowl.
  6. Add another 1 cup of oatmeal to the food processor and grind as finely as the previous batch. Combine with the ground toasted oatmeal.
  7. Add reminder of the oatmeal (1/2 cup) into the mixing bowl without grinding for added texture.
  8. Grind carrots finely using the food processor and add to the oatmeal mix.
  9. Drain the raisins well and add to the oatmeal and carrots.
  10. Add “flax egg” and mix well. The mixture should be moist but not runny.
  11. Add the rest of the ingredients and mix well. If your coconut oil needs a but of melting, put it in the microwave for 30 to 60 seconds. Keep an eye on it because you don’t want it to be completely melted, just soft enough to be able to mix well.
  12. Line two baking sheets with parchment paper and spoon out the cookies with a tablespoon. This should yield 24 cookies, 12 per baking sheet. Use your fingers to shape the cookies into nice, flat rounds or any shape you like. Their final thickness is about 1/2 in (1 cm) and they will not spread or rise much so make sure that you do actually flat them out before baking.
  13. Bake for 16 to 18 minutes. The cookies will be soft to touch but will firm up a bit as they cool.
  14. You can frost them with simple sugar frosting if you like, but I did want to keep this recipe “added sugar” free and they are delicious as is. Enjoy!!!
  15. Copyright © Eat the Vegan Rainbow, 2017

Chocolate Bon Bons with Dates, Walnuts and Apples

Chocolate Bon Bons with Dates, Walnuts and Apples
Chocolate Bon Bons with Dates, Walnuts and Apples, via Eat the Vegan Rainbow
It is Easter Sunday, so you might as well kick back, relax and have some bon bons. So I wanted to share with everyone who observe Easter today and everyone who are just looking for a simple, nutritious and adorable dessert recipe this super-easy and kids-friendly recipe for Bon Bons. This recipe was my entry into Food52 contest Your Best Recipe with Dates.

Dates, especially Medjool dates, are fabulously sweet fruit of date palm trees and have been used in Middle Eastern and North African regions for centuries. Growing up in Serbia (ex-Yugoslavia), dates were a special, almost candy, treat we’d get especially for Christmas Eve.

You may have seen dates in your dried fruit aisle, and that is exactly where you’ll find Medjool dates as well. Some stores have also been featuring them around the produce stands, but don’t expect to find raw dates – at least I’ve never seen them raw. Not to worry though, dried dates work really well in a recipe like these bon bons with a little help of warm water and thirty minutes of rehydration.

The bon bons come together really quickly and there isn’t much to making them really. But, in order to make them easier to handle in the last stage where they meet the melted chocolate you should let them sit in a freezer for half an hour. That will help them hold their shape during their chocolate bath.

Not fan of chocolate? You can skip it and roll the bon bons in coconut flakes, chopped walnuts, slivered almonds or anything else that will make your taste buds jump for joy!!!

One last thing: this recipe is super kid-friendly and if you are looking for something you can make together with any little chefs in your life this is it. There is a bit of mixing and a bit of hands on digging into a mix and making bon bons with your hands, which is sure to please. Plus: as the recipe is no-bake everything is safe to try and lick for those without tree nut allergies. If you are looking to make this recipe tree nut free, you could try doubling the amount of oats and skipping the walnuts. I am not 100% sure this will work, but I am about 95% sure it will – I hope this is good enough for you to give these bon bons a try.

Chocolate Bon Bons with Dates, Walnuts and Apples

What you’ll need:

medjool dates

cup oats

cup walnuts

Granny Smith apple

teaspoon cinnamon

ounces chocolate, vegan

cup coconut flakes, unsweetened

What you’ll do:

  1. Remove the pits and soak medjool dates in warm water for 30 – 60 minutes.
  2. Place oats and walnuts into a food processor and grind them into a fine meal. Pour out into a large mixing bowl.
  3. Core the Granny Smith apple, but don’t peel it. Add it to the food processor and processes it until very fine. Add the apple to the walnut and oats mix. Add the cinnamon.
  4. Drain the dates. Using a small food processor or a hand held (stick) blender, blend the dates into a fine paste. Add the paste to the mixing bowl. Mix everything together using a wooden spoon or a spatula.
  5. Using a measuring spoon, measure out 1 tablespoon of the mix out into your hand. Form a ball (a bon bon) and place it on a freezer safe tray covered with wax paper. The recipe should make 18-24 bon bons.
  6. Put the bon bons in the freezer for 30 minutes.
  7. Just before 30 minutes is up, melt the chocolate either in the microwave or using a double boiler.
  8. Place 1/4 cup of unsweetened coconut flakes at a time in a flat dish. Take the bon bons out of the freezer, dip them into the melted chocolate and roll them in the coconut flakes. Alternatively, you can skip the chocolate and roll the bon bons in coconut flakes only!
  9. Leave the finished bon bons on the kitchen counter for about 30 minutes to allow the chocolate to harden.
  10. Enjoy!
  11. Copyright © Eat the Vegan Rainbow, 2017

Spaghetti Squash Pad Thai

Spaghetti Squash Pad Thai, via Eat the Vegan Rainbow

Basic Pad Thai is a simple noodle dish, where wide rice noodles are mixed with eggs and chopped peanuts, then sprinkled with crushed red pepper flakes, lime juice and chopped scallions (green onions) and sometimes fresh cilantro. The whole dish comes together in five to ten minutes and can be eaten as is, or customized with a range of toppings so it is definitely a very popular dish found in every Thai restaurant.

Although it is relatively straightforward to find the right type of rice noodles that are typically used in Pad Thai, I decided to explore whether spaghetti squash would work. Spaghetti squash is a squash that, as the name suggests, has a stringy flesh structure that can be forked into a noodle-like structures. The texture of these noodles is softer than the regular pasta, and they are usually shorter but the flavor is rich and delicious, and the nutritional facts are definitely on the side of the squash when compared to either rice noodles that one would use in Pad Thai or any other pasta.

One down side to using spaghetti squash in a recipe like Pad Thai is that squash needs to be roasted first, which means that a five to ten minute recipe all of a sudden becomes a sixty to ninety minute recipe. Still, I recommend you give it a try especially as the hands on time is not as intense.

Are there any tricks to spaghetti squash? No, not really. The only two tips that are worth mentioning is to roast the squash cut side down on a parchment paper lined baking sheet, and to let the roasted squash cool as it will help with handling the squash as well help the squash noodles come out better defined.

To make this into vegan Pad Thai, I recommend using extra firm tofu instead of eggs. You don’t need to press it, but do let it drain for just a bit. Otherwise it may make your Pad Thai too mushy.

One final modification to the traditional Pad Thai recipe I made is using peanut butter in the sauce and some chopped cashews for the topping. Reason for this? I ran out of peanuts!

Spaghetti Squash Pad Thai

What you’ll need:

1 medium spaghetti squash, 1 to 1.5 lbs (about 500 to 700 g)

2 tablespoons garlic, crushed

2 tablespoons peanut butter

2-3 tablespoons lime juice

14 oz. (400 g) extra firm tofu

7 scallions (green onions), finely sliced

1/3 cup cashews, chopped

Cooking spray

What you’ll do:

    1. Preheat your oven to 425 F (220 C).
    2. Wash the spaghetti squash, wipe dry and cut in half lengthwise. Use a spoon to clean out the seeds.
    3. Line a large baking sheet with parchment paper. Place spaghetti squash on the parchment paper, cut side down. Place in the oven and let roast for 25 to 30 minutes. Check with a knife and it goes in without resistance your squash is done. Take it our of the oven and let cool for at least 30 minutes. Be patient because the squash needs to be cool to handle.
    4. Once cool, take half of the squash, flip over and using a large fork go in and pull the flesh to make the “spaghetti”.
    5. Spray the bottom of a large pan or wok with cooking spray and place it over medium-high heat. Add garlic and let the garlic aroma develop, which will take about 1-2 minutes.
    6. Add soy sauce and peanut butter. Stir well and cook for 1-2 minutes.
    7. Add spaghetti squash and mix with the sauce. Here, I recommend using a pair of tongs to gently fold the squash into the sauce. Once the two are well incorporated add tofu that you have crumbled to small bits that look like scrambled eggs.
    8. Mix everything well together and cook for another 4-5 minutes.
    9. Turn the heat off, add the lime juice, scallions and cashews.
    10. If you like to add some heat you can use crushed red pepper flakes, or a dash of sriracha sauce. You can also top with fresh cilantro for some added freshness.

Copyright © Eat the Vegan Rainbow, 2017

Clams-free “Clam” Sauce

Jackfruit Clam Sauce with Black Bean Pasta
Jackfruit Clam Sauce with Black Bean Pasta, via Eat the Vegan Rainbow

Cooking is in many ways similar to doing experiments in a research lab. In a lab we start from a protocol, or a recipe (oh, yes… we use recipes in science big time!), and more often than not we change things up to see what happens to our experimental results under a new set of parameters or conditions. We make observations and jot them down. The main and the biggest, actually a life and death, difference between cooking and science is that you don’t taste results of your science experiments, while tasting cooking experiments is recommended.

Why do I mention experiments? Well, although seldom talked about most experiments actually give negative results or even fail. Now this happens in cooking too, but I have to say at this point in my life not very often. So, it is with a bag of mixed emotions that I am jotting down this recipe – the Clam-free Clam Sauce with Black Bean Pasta – as this did not turn out the way I was hoping it would.

The sauce itself is actually spot on, creamy and delicious. It uses jackfruit as a stand in for clams, similar to what I’ve done in my New England “Clam” Chowder, and a batch of homemade vegan mozzarella, recipe for which I found on a fun vegan cooking blog site it doesn’t taste like chicken. This vegan mozzarella, combined with the jackfruit, some almond milk, lemon juice, and a dash of Old Bay Seasoning gave a beautiful, rich, and creamy sauce.

The main problem was that I decided to pair this delicious sauce with black bean pasta, instead of more traditional linguine pasta, and this DID NOT work at all. The black bean pasta had a strong flavor that interfered with the subtle flavors of the Clam-free Clam Sauce so the final dish was definitely very far from authentic pasta with the clam sauce.

Conclusion of this experiment? When in possession of the clam sauce, even if it is a vegan version of it, just go with linguini, which is exactly what I’ll do next time!

Clam-free Clam Sauce

What you’ll need:

1 can (10 oz, 280 g) young green jackfruit in brine

1 tablespoon Old Bay Seasoning

2 tablespoons garlic, crushed

1/2 cup vegan mozzarella

1 cup almond milk

1 tablespoon corn starch

2 tablespoon lemon juice

1 teaspoon dry basil

1 teaspoon dry oregano

Cooking spray

Fresh flat leave (Italian) parsley

What you’ll do:

    1. Prepare the vegan mozzarella according to instructions on it doesn’t taste like chicken site.
    2. Prepare the jackfruit by draining the brine out and washing the jackfruit off from access brain to make sure that most of the salt is washed off. Pull jackfruit apart into smaller pieces, about the size of clam “meat”.
    3. Spray the bottom of your pot with cooking spray and turn the heat on medium-high. Add jackfruit and sauté for 3-4 minutes.
    4. Add Old Bay seasoning, mix well and sauté for 1-2 minutes.
    5. Add garlic and sauté for another minute, until the garlic releases its aroma.
    6. Next add the vegan mozzarella and mix everything together. Let it simmer for 2-3 minutes.
    7. Add almond milk and decrease the heat to medium to medium-low. Let the sauce come to simmer.
    8. In a small bowl, mix corn starch and couple of tablespoons of sauce to temper the corn starch. Then add it to the sauce and mix well. Let the sauce simmer for 10-15 minutes.
    9. Add lemon juice, oregano and basil. That ought to do it. But remember: no matter what don’t pair this sauce with the black bean pasta, it’s not worth it!

Copyright © Eat the Vegan Rainbow, 2017

Healthy Asparagus Risotto

Asparagus Risotto, via Eat the Vegan Rainbow
Healthy Asparagus Risotto, via Eat the Vegan Rainbow
Spring is in the air, although perhaps not yet on the ground, and when it comes to spring vegetables asparagus is it! If you haven’t enjoyed asparagus before, do give it a try. Asparagus is very easy to make as it tastes really good roasted, or in a soup. It is also one of those risotto-friendly ingredients that blends well with creamy rice to add crunch and earthy flavor.

The path to a really lovely risotto goes through picking the right rice and cooking it with patience and with a lot of stirring. My go-to rice for risottos, as well as for sushi and other rice dishes that need a stickier rice variety, is medium grain rice. This is a point of difference with most risotto recipes out there as they recommend using short grain rice variety called arborio rice. Arborio rice will work really well in this recipe too, so if you have it on hand go for it. The kinds of rice that may not work well here are the long grain variety, like Jasmine or Basmati rice.

Cooking risotto does require lots of stirring, and one trick that I use is to add the liquid in batches to let the rice absorb it before adding more. It takes time, but at the end your risotto will be rich and creamy without needing any butter, cream or parmesan, all common risotto ingredients.

My risotto recipe does use on less-common ingredient, nutritional yeast. If you will be preparing vegan recipes often nutritional yeast is definitely worth getting because it is a common add-on that mimics dairy. In the case of this risotto nutritional yeast acts as a substitute for parmesan cheese.

Healthy Asparagus Risotto

What you’ll need:

1 pound (500 g) green asparagus, chopped

1 yellow onion, diced

1 cup medium grain or short grain rice

2 tablespoons nutritional yeast

2-3 cups vegetable stock or water

Cooking spray

Lemon zest, lemon juice (optional)

What you’ll do:

  1. Wash and trim the asparagus. I don’t peel it because I try to get spears that are thin and less woody, but if your asparagus is thick it will need peeling. Cut into approximately 1/2 in (1 to 1.5 cm) bits. You don’t need to be precise here but just think about what your final spoonful will look like and make sure your asparagus bits are small enough to be in harmony with the rice.
  2. Dice the onion into fine dice.
  3. Spray the bottom of a wide and shallow pan with cooking spray. Turn the heat to medium high. Add onions and cook until they soften and start to brown. This will take 4-5 minutes.
  4. Add asparagus and let cook for another 4-5 minutes with occasional stirring.
  5. Add the rice and stir well. Let cook for 1-2 minutes.
  6. Lower the heat down to medium low. Add 1 cup of liquid. Stir well and let the rice soak up the liquid. Give it time and repeat with more liquid. Risotto is definitely one of those dishes that people fear to approach and many articles and posts have been written about how to get to the perfect bowl of risotto and avoid mistakes. Fear not, because all you really need to do is hang around your pot, watch your rice and add the liquid when the rice tells you its thirsty. The amount of rice in this recipe can take anywhere between 2 and 4 cups of liquid. You also might want to start by adding one cup at a time for first 2 cups and then decrease to 1/4 cup of liquid at a time. Keep going until the rice is soft but not mushy, a shade softer than al dente.
  7. Turn the heat off and sprinkle with nutritional yeast. Mix everything together and let stand for 5 minutes.
  8. Sprinkle with lemon zest and a dash of lemon juice just before serving!
  9. Copyright © Eat the Vegan Rainbow, 2017

Roasted Red Peppers Chickpea Burgers

Roasted Red Pepper Chickpea Burger
Roasted Red Pepper Chickpea Burgers, via Eat the Vegan Rainbow

There are many things that every time I make then turn out perfect and exactly as I want them. Well, veggie burgers ain’t that! I’ve tried many veggie burger recipes and had failure after failure to reckon with.

The main issue with most of the veggie burger recipes I tried (and failed at) is that the burger consistency is just so delicate that they fall apart as they are cooked. One way to make the veggie burgers sturdier is to use a grain or a flour based binder, like bread crumbs, which I use in my Vegan Jackfruit “Crab” Cakes, or oats, which I used in my Meatless Meatballs. But, I really wanted to see if I can skip using those in a burger.

The recipe I came up with uses chickpeas – in all honestly because I bought one too many cans of chickpeas at a recent sale – and some roasted red peppers, for color and flavor. It also uses sunflower seeds that add a different texture, a bit of crunch, good amount of healthy fats and a good amount of iron, which is something that I keep in mind when cooking given that meat, a great source of dietary iron, is off my table. Additionally, a key ingredient that glues the burgers together is “flax egg”, which is flax meal soaked in water which turns it gooey and slimy, just like egg!  The mix comes together really quickly and all you need will be a stick (hand-held) blender or a food processor.

Roasted Red Pepper Chickpea Burger Mix
Roasted Red Pepper Chickpea Burgers Mix, via Eat the Vegan Rainbow

The rest of the preparation does take a bit of time but really not much effort because you will let the fridge or a freezer do some work for you. Placing formed patties into a fridge or a freezer to firm up is officially the greatest tip ever. It helped my Jackfruit “Crab” Cakes, and I can now say it most certainly helped these Roasted Red Pepper Chickpea Burgers. I recommend keeping the patties in the freezer for quite a bit, until they are almost frozen on the edges, because these burgers are still gentle and soft while they cook. They do come together as they cool off and they will be great when you serve them, but you will need to be gentle and careful when you flip them so give the patties plenty of room.

Roasted Red Peppers Chickpea Burgers in the Pan
Roasted Red Peppers Chickpea Burgers in the Pan, via Eat the Vegan Rainbow

Leave the burgers to cool just for couple of minutes. As I mentioned, they will come out of the pan pretty soft and they will get firmer as they cool. You can serve these burgers any way you like your burgers served, in a bun or without. They have a delicious, just slightly sweet flavor from the roasted red peppers and the lovely browning they get as they cook.

Could you bake or broil these? I think that would work. Could you form patties, freeze them and then cook them a week later? I don’t see why not. But in that case I recommend thawing for a bit before letting them hit the griddle. Could these be grilled? Well, sorry to disappoint you but I don’t think so. But, this is not to say that I am not going to try. After all, experimenting is half the fun…

Roasted Red Pepper Chickpea Burger
Roasted Red Pepper Chickpea Burgers, via Eat the Vegan Rainbow

Roasted Red Pepper Chickpea Burgers

What you’ll need:

3 15.5 oz (439 g) cans chickpeas (garbanzo beans), low sodium

1/2 cup roasted red peppers, homemade or store bought (jarred in water)

1/4 cup sunflower seeds, roasted and unsalted

1 tablespoon tomato paste

1 teaspoon onion powder

1 teaspoon garlic powder

1 teaspoon chili powder

1 teaspoon smoked paprika

1 teaspoon soy sauce

2 tablespoon flax meal

4 tablespoons hot water

Cooking spray

What you’ll do:

    1. In a mixing/measuring cup mix flax meal and hot water. Stir well and let stand for 15-30 minutes.
    2. Place the chickpeas in a large colander or a strainer. Rinse well and drain.
    3. Put chickpeas, roasted red peppers, sunflower seeds, “flax eggs”, and all the spices in a large and deep mixing bowl (or the food processor if that’s what you are using instead of the stick blender) and blend until mostly blended. I like some texture to the burgers so I do leave some bigger chunks around, but follow your taste buds and preferences here.
    4. Line a flat serving platter or a tray with wax paper. Using your hands shape the burgers and place them on the tray. This amount of the burger mix makes about 8 good size burgers. Put the burgers in the freezer for 30-45 minutes of refrigerator for 2-3 hours. If using the freezer method make sure the patties are not frozen through but still soft in the middle and mostly solid at the edges. If you are using the refrigerator, the patties need to give some resistance when you poke them.
    5. Spray the bottom of your frying pan with cooking spray and heat over high heat. Put 3-4 burgers in at a time, how many depends on the size of your pan and it’s important to keep in mind that these burgers are on a softer side so need some extra space around them to help with moving around and flipping. Cook for 4-5 minutes on one side, carefully flip around and cook for another 3-4 minutes.
    6. Let the cooked burgers rest for 5 minutes or so, then serve!

Copyright © Eat the Vegan Rainbow, 2017

No-fumble Apple Crumble

Apple Crumble with Vegan Ice Cream
Apple Crumble with Vegan Ice Cream, via Eat the Vegan Rainbow
Mmmmm, apple crumble! Need I say more? This sort of pie, sort of pudding, sort of fruit bowl has been my go to dessert for some time now for couple of simple reasons. First of all, it does not require much careful measuring and weighing as dough and batter based desserts do if the cake or cookies are to come out just right. Second, it comes together very quickly and uses ingredients that I have on hand almost all the time. So, in the words of the American football jargon from the title of this post, it is practically impossible to fumble this recipe. But just to make it even more error-proof I simplified the recipe further.

Apple crumble goes under another name that you may be familiar with and that’s apple crisp, because the characteristic topping this dessert has is crispy and crumbly at the same time. The classic recipe starts with tart apples, like Granny Smith, and then uses lots and lots of sugar to sweeten things up, some flour to bind things together, and lots and lots of butter to get the topping, made of nuts and oats, crunchy. So basically you star from delicious fruit said to keep the doctor away, and add reasons that will in the long run likely lead you to pay your doctor a visit.

Apple Crumble Apples
Apple Crumble Starts with Apples, via Eat the Vegan Rainbow
In my recipe I removed the flour to make it gluten-free (I used corn starch instead) and removed the need for butter by adding some walnuts and almonds to my topping. Walnuts excel in the amount of polyunsaturated fat they have and are a great substitute for butter here, and almonds add more monounsaturated fat and some extra fiber. Needless to say, both walnuts and almonds taste more interesting than butter so the crumble/crisp flavor will blow you away!

When it comes to keeping things sweet without adding sugar, I decided to use raisins as natural sweeteners and to get them to their juicy magnificence I soaked them in hot water for 30 minutes, then drained, before use.

Apples, Raisins and Cinnamon
Apples, Raisins and Cinnamon on Their Way to Apple Crumble, via Eat the Vegan Rainbow
One last note is that I used some lime juice and lime zest and at the end I think that this small amount of very aromatic citrus made a huge difference. The crumble was delicious and had a wonderful aroma, so much so that we ate the whole crumble in one sitting. So much for portion control!

Apple Crumble

What you’ll need:

4 large tart apples (Granny Smith or other)

1 cup raisins

1/2 cup walnuts, raw

1/2 cup almond, raw

1/2 cup oats

2 tablespoons corn starch

1 lime, juice and zest

1 tablespoon cinnamon, ground

Cooking spray

What you’ll do:

  1. Preheat the oven to 375 F (190 C)
  2. Soak the raisins in 2 cups of warm water for 30 minutes.
  3. Cut the apples into slices and place in a large bowl. Squeeze the lime juice over the apple slices as you go and mix the juice in to keep your apples from oxidizing (turning brown) while you work.
  4. Drain the raisins and pat them dry. Add them to the sliced apples. Add lime zest, corn starch and cinnamon. Stir well to coat and combine.
  5. Spray the bottom and the sides of a square 8 x 8 in (20 x 20 cm) baking dish with cooking spray. Add the apple mix and spread around. Cover with foil and bake for 25 minutes.
  6. While the apple mix is baking prepare the crumble. In a food processors chop roughly the walnuts, almond and oats. You don’t want to make a fine meal, rather pulse the food processor and stop at a point where some of it is very fine but there are still plenty of chunky pieces left.
  7. Remove the foil from the baking apple mix and sprinkle the crumble on top. Don’t mix!
  8. Put the apple crumble back to the oven for another 15 minutes.
  9. Take it out of the oven and let it sit for 10 minutes to cool just slightly.Enjoy the Apple Crumble warm or cold!

Note on serving suggestions: I realize it is customary to serve warm apple crumble with cold vanilla ice cream, and that is swell! But give this crumble a try on its own – it is fantastic!

Note on peeling apples: I prefer not to peel my apples as peeling takes time and the peel adds a nice texture to the crumble. But if you like the crumble to be smoother then do peel them.

Note on the featured image: The featured image on the home page includes two small scoops of green ice cream. This is homemade coconut milk ice cream that owes its green color to food coloring – sorry for not coming up with something more natural… yet!

Copyright © Eat the Vegan Rainbow, 2017