White Bean and Spinach Soup

White Bean and Spinach Soup
White Bean and Spinach Soup, via Eat the Vegan Rainbow

From the very first time I tried a bite of this soup I was hooked! The texture is incredibly smooth and creamy, and the taste is amazing – this is real comfort food right there!!!

Plus: this soup is super easy and super affordable – and it is a perfect make-ahead or meal prep option since the flavor is even better the next day, or the day after, or the day after. The soup will hold well for 5-6 days if stored in a container with a tight lid in the fridge.

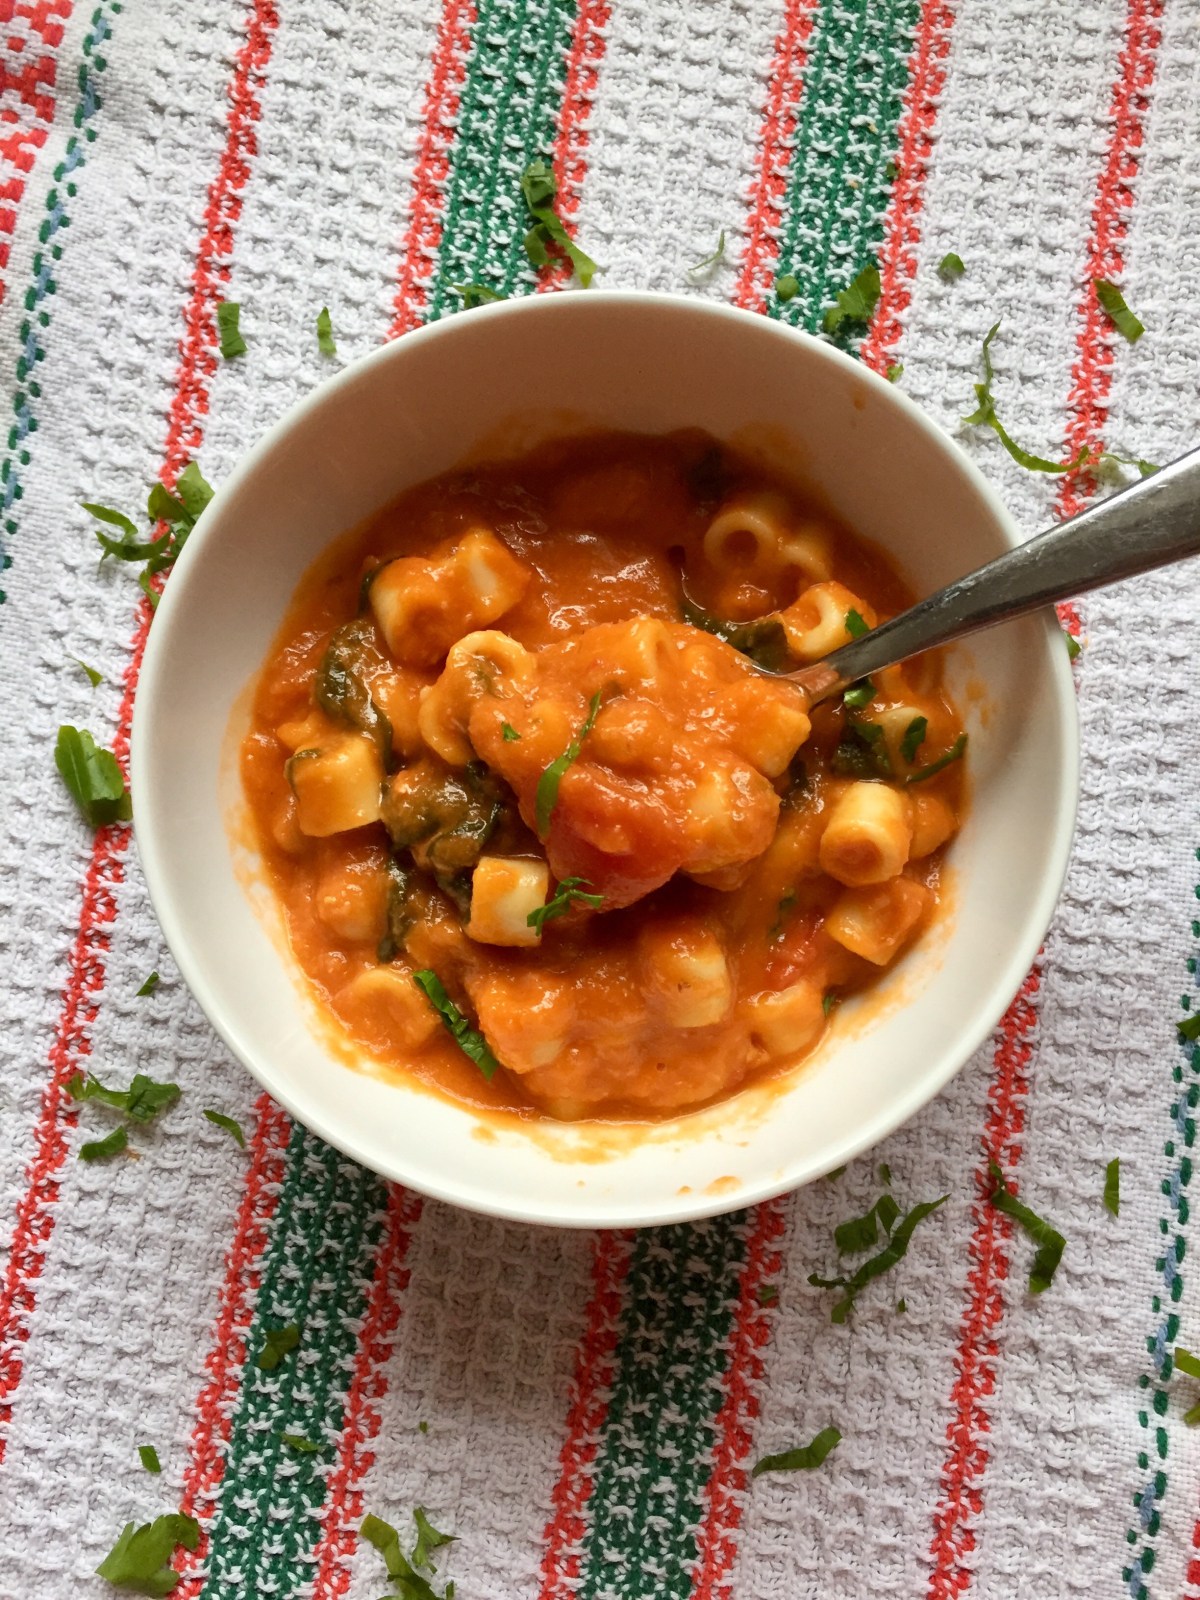
And if you are looking to throw an Italian-inspired party, this soup served with a tossed salad and fresh bread will do the trick! Vegan and non-vegan friends and family will just love it, especially those among them who seem alarmed by some of the less common vegan ingredients, like nutritional yeast, or unfamiliar add-ons. This soup is plain and simple – white beans (homemade or canned), tomatoes, baby spinach, olive oil, onion, garlic, oh and some pasta – THAT’S IT!

If you are wondering whether you have to use cannellini beans, the answer is no. Any small white bean will do – and you can definitely cook the beans yourself. About half a pound (225-250 g) of dried beans will probably be just about right for this soup. Quite frankly, the convenience of canned beans can’t be beat, ad that’s a fact – with a snap of a lid you are already there. And these days you can find most beans in “no salt added” version, in case you are monitoring your sodium intake. The same is true for crushed and diced tomatoes – in my grocery store you can find both in “no salt added” variety. Whether you prefer to skip salt or not, I should note that a little bit of salt goes a long way towards making this soup have a really exquisite flavor.

The pasta that I recommend for this soup is ditalini, small pasta that looks like very small and short macaroni. This type of pasta is commonly used in traditional Italian bean soup, Pasta e fagioli, which is really pasta and beans. Ditalini works well in bean dishes because it’s size is well matched to the size of the beans, so it harmonizes with the rest of the dish. If you can’t find ditalini, you can use any other short and tubular pasta, or even something like rotelle – the wheel shaped pasta which is kinda fun.

One huge trick for making this soup is to blend half of it and then add more chunkiness to it as it simmers. Blending part of the beans, sautéd onions and garlic, and crushed tomatoes makes for a perfect creamy base. You will think you are eating a soup made with a pile of butter and cream, or a heavy roux, or both – and none of this is true! one thing to be careful about is blending the hot mix – you can get burned so pay attention!!!


White Bean and Spinach Soup

What you’ll need:

  • 1/2 onion, diced
  • 6 cloves garlic, sliced
  • 3 15.5 oz (440 g) cans cannellini bean, divided
  • 1 28 oz (800 g) can crushed tomatoes
  • 1 14.5 oz (411 g) can diced tomatoes
  • 1 cup ditalini pasta (or other smaller pasta, like short macaroni
  • 1 lbs (454 g) baby spinach
  • 2 tablespoons olive oil


What you’ll do:

  1. Place the oil into a large pot and place it over the medium high heat. Add the onions and garlic. Sauté for 5 minutes, then add 1 1/2 can of cannellini beans and mix well. Cook for another 5 minutes, then turn the heat off. Add the crushed tomatoes and mix well.
  2. (TAKE EXTRA CARE) Pour the mix into a blender – take care as the soup will be very hot. Don’t use the blender unless the instructions state explicitly that it can be used with hot liquids. Make sure to use precaution to prevent burns. Blend the mix until smooth and silky. (You can also use a stick blender if you have one and blend the soup directly in the pot!)
  3. Pour the blended soup back into the pot, and use 1 to 2 cups of water to rinse out the blender. If you used a stick blender, do add 1-2 cups of water. Add diced tomatoes, and the rest of the beans. Bring to boil.
  4. Once the soup is boiling, add the spinach and wilt for 2 minutes or so. Finally, add the pasta (detalini), mix well and simmer for 5 minutes, then turn the heat off and let the pasta finish cooking. Serve with fresh salad, a piece of bread, and some vegan parmesan.

Copyright © Eat the Vegan Rainbow, 2019


Easy Gluten-free and Vegan Corn Bread

IMG_6216
Easy Gluten-free and Vegan Corn Bread, via Eat the Vegan Rainbow

What you will learn from this recipe is how to make corn bread that needs only seven ingredients (that’s including baking powder, baking soda, salt, and oil), is completely gluten-free, and entirely vegan! It is also simple, yet delicious, without extra sugar and other funky stuff that many recipes include.

I grew up eating plenty of corn bread, especially during winter months. I’ve also shared a recipe or two, providing different variations on the theme. Here, I wanted to share a recipe that strips away all the complexity and uses corn meal, corn starch and oil, together with leavening agents and carbonated (sparkling) water to create a nutty and mealy corn bread.

The bread is a bit on a crumbly side and it is best used with hearty stews, chilis and soups, those types of dishes that need a bit of bread to mix it in. For example, it would pair well with a cabbage and bean stew, or a bean soup with chorizo, or 15 bean chili!

The down side of this corn bread is that it does not store well, and it is really at its prime when it is fresh from the oven. So, if you feel that you may not need this much corn bread, make a smaller batch. It is so easy to make that you can whisk it all together as needed. If you are bothered by crumbliness, you can add some flax egg to the batter or chia egg.

Easy Gluten-free and Vegan Corn Bread

What you’ll need:

  • 3 cups of yellow corn meal
  • 1 cup of corn starch
  • 1/3 cup canola (or other vegetable or olive) oil
  • 1 teaspoon baking powder
  • 1 teaspoon baking soda
  • 1/4 teaspoon salt
  • 2 cups sparkling (carbonated) water
  • Cooking spray


What you’ll do:

  1. Preheat oven to 425 F (220 C).
  2. In a large mixing bowl, combine cron meal, corn starch, baking soda, baking powder and salt. Mix well, then add oil and combine. Batter will be soft (see picture above).
  3. Let the batter stand for 10 minutes or so.
  4. Spray the bottom and the sides of the 8 in x 8 in (20 cm x 20 cm) baking dish. Pour the batter in, smooth the top, then place in the preheated oven to bake at high temperature for 10 minutes.
  5. Lower the temperature to 350 F (175 C) and continue baking for another 20 minutes.
  6. Let the corn bread cool for 15 minutes or so, then cut and serve. Please note that this bread will not be asa great the next day so I suggest that you enjoy it fresh!


Copyright © Eat the Vegan Rainbow, 2019

Vegan 15 Bean Chili

Vegan 15 Bean Chili
Vegan 15 Bean Chili, via Eat the Vegan Rainbow

Beans are an essential staple of every vegan kitchen. Beans are rich in fiber, especially soluble fiber, which is taught to lower bad cholesterol, folate, good carbohydrates, and plant protein. That’s what makes beans an essential component of plant-based eating.

Beans come in many different colors and sizes – they can be white, like northern, lima, and navy beans, pink to dark red almost brown, like light and dark red kidney beans, black, like black beans, or multicolor, like black-eyed peas (which are actually beans) and pinto beans. All these varieties have slight differences – different cooking times, texture and flavor, not to mention appearance.

For example, if you are looking to make a mild dish that is smooth and buttery, you may want to go with navy beans or cannellini, which both work in a dish like this Tuscan-Style cassoulet, and if you are looking for a playful dish, like this Cowboy Caviar, you may want to reach for black-eyed peas.

I use beans all the time, and use both dry beans and canned beans. Canned beans are super quick and convenient, while dry beans are a bit cheaper, plus give you complete control over the amount of salt that goes in. But: dry beans do take a bit of time to make if you are using a traditional, pot on the stovetop method. Even with soaking the beans overnight, it will still take about 2 hours of cooking time to soften the beans. My preferred way to prepare dry beans is to soak them overnight, then cook them in a pressure cooker until done, and then incorporate them into whatever you are making. And although some claim that the pressure cooker will cook your beans quickly even if they have not been soaked, I have not tried this yet, so can’t advise on this here. An alternative is to use a slow cooker – overnight soaked beans should take about 6-8 hours.

Some of my favorite bean recipes are simple baked beans, veggie burgers, like white bean burgers with chia seeds, and a very beefy veggie burgers,  and soups, like this bean and leek soup with soy chorizo. Plus: beans are an essential ingredient for these wonderful BBQ ribs!

Recently, while browsing around in a grocery store, I discovered something new: Hurst Hambeens 15 Bean Soup Mix. This bag included a mix of 15 different legumes: beans (northern, pinto, large lima, blackeye, baby lima, kidney, cranberry, small white, pink, small red, white kidney, black), as well as lentils, yellow split, and green split peas, and chickpeas. And, of course, I had to give this mix a try!

Apparently, this mix is traditionally used for a ham soup and comes with a bag of seasoning included. I decided to take the mix in a different direction and go for a chili. Chili is a rich and thick bean stew, full of smokey flavors, and a bit of heat. It’s usually made small red beans, but I figured the more could be the merrier, so I went for it!

The recipe below uses stovetop cooking method, but you can definitely make this in a slow cooker (crock pot). And if you don’t have this specific bean mix, you can make one yourself by measuring about 1/4 cup of dry pinto, black, red kidney, black-eyed and navy (white) beans, as well as lentils, chickpeas and yellow and green split peas. Although not the full 15 bean range, there is enough variety in this mix that you will still get all the benefits of flavors and textures. Have fun!

IMG_6225

Vegan 15 Bean Chili

What you’ll need:

  • 1 bag (20 oz (about 600 g)) 15 Bean Soup mix (Hurst Hambeens 15 Bean Soup Mix or make your own – see above)
  • 3 stalks celery, roughly diced
  • 1 onion, roughly chopped
  • 2 carrots, roughly sliced
  • 3 cloves garlic, sliced
  • 2 tablespoons oil (canola or olive), divided
  • 1 6 oz (170 g) can tomato paste
  • 2 teaspoons cumin powder
  • 1 teaspoon chili powder
  • 3-4 Bay leaves
  • 2-3 cups vegetable stock, divided


What you’ll do:

  1. Rinse the beans, then cover them with water and soak overnight. If you are in a hurry you can also do a quick soak by: rinsing the beans, placing them in a pot, making sure they are fully covered with water, brining the water to boil, boiling for 5-10 minutes, turning the heat off and leaving the beans in hot water for an hour.
  2. After the beans are done soaking (either overnight or using a quick method) rinse them well and set aside.
  3. Place a large Dutch oven or another sturdy pot over medium high heat, add 1 tablespoon of oil, and onions, garlic and carrots. Let these caramelize, which can take up to 15 minutes. Don’t stir to frequently as you want to let the vegetables get slightly burnt and charred – that will add deeper flavors to the chili.
  4. Add the tomato paste, cumin and chili powder, coat everything well and cook for another 2-3 minutes.
  5. Place 1 cup of vegetable stock into a blender, then add the onion, garlic, carrot and spice mix, and 1 cup of soaked beans. Blend everything until smooth and take care not to burn yourself as the mix will be hot.
  6. Add the rest of the oil to your Dutch oven, pour the mixture from the blender back in, add the rest of the bean mix, another cup of vegetable stock and bay leaves. Mix to combine and bring to boil. Place the lid on, lower the heat to steady low level boil, a bit more than a simmer, and cook for 2 hours, stirring occasionally. Check after about an hour, as you may need to add more vegetable stock.
  7. Serve with some shredded cheese, sour cream, or diced avocados, and definitely with some corn bread, like this basic gluten-free version (nice and crumbly, perfect for chilis), very corn-y corn bread, or the more flavorful corn bread muffins.

Copyright © Eat the Vegan Rainbow, 2019

Roasted Asparagus and Spinach Dip

Roasted Asparagus and Spinach Dip, via Eat the Vegan Rainbow

Springtime is party time – I mean, after 6 months of winter we are finally seeing some sunshine and above freezing temperatures. And if you think I live in Alaska, think again – it’s the good ole New England and our snow just melted away two days ago!!!

Plus: since the next winter is just six months away, we are now all scrambling to have as many outdoor parties and get togethers as we can, to maximize the fun and the sun. These days, when it comes to parties good, rich dips are a necessity. Salsa and guacamole, many different types of hummus, including one of my favorites – the roasted beet hummus, and even jackfruit “crab” dip are all fantastic and versatile. All you need to do is bring couple of select dips out, and with some crackers (like these amazing seed crackers), or fresh bread, perhaps with some olives thrown in for good measure, and maybe dolmas (I have a thing for dolmas!), you will have an instant feast!

If you are looking for a dip the is a bit out of the ordinary, then look no further. This Roasted Asparagus and Spinach Dip has it all: charred roasted asparagus (you can grill them if you prefer), vibrant green spinach, loads of smoothness from the cashews, and subtle cheesiness from the nutritional yeast.

When you are using cashews to make vegan cheese, creams, sour cream or similar, it is best to use raw cashews and to soak them in cold water overnight – do this in the fridge, please! The soaking softens the tough nut and make cashews much easier to blend into smooth and silky consistency.

Depending on the type of blender you have you may want to start by adding liquids first, than thawed spinach (I find that using frozen spinach that has been thawed out and gently squeezed works well here), then asparagus, nutritional yeast, lemon juice and zest, and finally cashews that have been washed and drained. The stronger the blender, the smoother your dip can get. I like a bit of a texture in the dip, but it is up to you to decide how much blending makes sense based on your preference.

Enjoy this dip immediately, and although it can store for a day or two, you won’t need to worry about that – this dip will be long gone!!!

img_6229


Roasted Asparagus and Spinach Dip

What you’ll need:

  • 1 bunch of asparagus, trimmed (about 1 lbs (454 g))
  • 2 cups frozen spinach
  • 1 cup unsweetened, plain almond milk
  • 1 cup cashews, soaked overnight, then drained and rinsed
  • 1-2 tablespoons nutritional yeast (adjust to taste)
  • 1/2 lemon, juice and zest
  • 1/4 teaspoon salt
  • Cooking spray


What you’ll do:

  1. Preheat oven to 425 F (220 C), or the grill to the same temperature.
  2. Wash and trim the asparagus. Try to remove as much of the wooden part of stems, then spread the spears on the parchment paper lined baking sheet. Spray with cooking spray and roast for 20-30 minutes with occasional stirring. You can also grill the asparagus. Either way you are looking to cook the asparagus through while letting it caramelize and char.
  3. Place all the ingredients into a blender. Nutritional yeast is an acquired taste and you may want to add just a bit (1 teaspoon or so) and check for taste before adding more. Blend until smooth, then serve with your favorite chips, pretzel sticks, bread… The color of this spread is fantastic, and it goes well with Easter, being green and fresh. Enjoy the spring!

Copyright © Eat the Vegan Rainbow, 2018

Vegan Sweet Potato Pie with Pecan Topping

img_5985
Vegan Sweet Potato Pie with Pecan Topping, via Eat the Vegan Rainbow

Sweet potatoes are the most amazing vegetable that I used to avoid like the plague. I could not stand being served sweet potatoes as a side dish at traditional American Thanksgiving dinners, and I did not enjoy them as fries either.

But: I did give them a second chance (under y own conditions) and I am very glad I did. Sweet potatoes are sweet, very sweet, especially when roasted! This makes them an ideal natural sweetener for desserts and treats, and I’ve been using them as a key ingredient for pancakes, super-sweet sweet potato butter, and even chocolate mousse pie. Sweet potatoes are also a handy substitute for pumpkin as the consistency of roasted then mashed sweet potatoes matches that of canned pumpkin well. The main difference is the sweetness level, as the sweet potatoes tend to be sweeter, while pumpkin tends to be mild. So, if you decide to make something like these brownies, you may want to adjust the amount of additional sweet ingredients you put in.

My main trick when using sweet potatoes as an ingredient in desserts, is to roast the potatoes. Roasting sweet potatoes usually takes about 45 minutes at 425 F (220 C), and can’t be simpler. All you need to do is wash the potatoes, then place them, unpeeled, on a baking sheet and let them roast until soft. You can eat these roasted sweet potatoes as a quick snack, plus breakfast, lunch and dinner. If using to make desserts, let the potatoes cool completely before puréeing, so it is best to do the roasting a day in advance.

Sweet Potato Pie is not my invention. Oh, no – it’s a very traditional dessert of the southern United States. As with its cousin, the pumpkin pie, this dessert is traditionally made with condensed (evaporated) milk and eggs, which results in a custard-like pie. For this vegan version, coconut milk and brown sugar are cooked together to make a thick and sweet “condensed milk” substitute. Plus: the recipe uses corn starch that combines to give the pie smooth, creamy and rich consistency that is very similar to the original, and cinnamon, nutmeg and clover, which give it the easily recognizable aroma.

If you love baking, you may want to make your own pie crust. However, the store-bought crusts work well and many are vegan, so you do have a choice here. I recommend baking the crust half way through before pouring in the pie filling, and pricking it with the fork before placing in the oven to back. You may even want to weigh the crust down with beans because these crusts do tend to puff up, which is to be avoided (here is some handy advice on how to get to the perfect pre-baked crust)!

The final touch for this sweet potato pie are pecans. These nuts are also traditionally found in the southern United States, and if you don’t have them where you live you can definitely use walnuts, or almonds. You can also skip the topping altogether – the pie will not taste any less awesome!!!


Vegan Sweet Potato Pie with Pecan Topping

What you’ll need:

  • 1 store-bought pie crust (or make your own – a good recipe to follow is here)
  • 1 can (13.5 fl oz; 400 mL) full fat coconut milk (you can use coconut cream, but I don’t recommend using light coconut milk)
  • 1 cup brown sugar
  • 1 tablespoon vanilla extract
  • 3 roasted sweet potatoes, puréed
  • 1 cup corn starch
  • 1 teaspoon cinnamon
  • 1/2 teaspoon ground nutmeg
  • 1/4 teaspoon grund clover
  • 30-40 whole pecans
  • Whip cream for serving (optional)


What you’ll do:

  1. Preheat the oven to 350 F (175 C).
  2. In a heavy sauce pan, combine coconut milk, sugar and vanilla extract and place over medium heat. Bring to boil and decrease the heat to low, then simmer for 15 to 20 minutes, until thick. Final volume will be about 1/3 to 1/2 less than what you started with. Set aside and let the “condensed milk” cool.
  3. While the “condensed milk” is cooling, pre-bake the crust to about half way through, which will take about 10-15 minutes (if you are making your own crust, you will need to have one ready to go so plan accordingly). Take the pre-baked crust out and let it cool.
  4. As the crust is cooling, use a food processor to combine the “condensed milk”, sweet potato purée, corn starch, and the spices. The pie filling should be smooth, thick and rich.
  5. Pour the filling into the pre-baked pie crust, and return everything into the oven for another 20 minutes. After about 20 minutes, take the pie out, and working quickly top with pecan (or walnut, or almond) halves, arranging them in neat circles or spiral until the entire surface is covered. Return to the oven and bake for another 5 to 10 minutes, to allow the pie to finish baking and pecans to get slightly toasted. If you are keeping this pie nut free, skip the nuts, and bake for a total baking time of about 25 to 30 minutes.
  6. Leave the pie to cool completely before serving. Traditionally, this pie is served with whip cream, but you can serve it just as is, with whip cream or ice cream. Yummy!

Copyright © Eat the Vegan Rainbow, 2019

Basic Vegan Waffles

Basic Vegan Waffles via Eat the Vegan Rainbow
Basic Vegan Waffles, via Eat the Vegan Rainbow

If you are looking to add some sunshine to your plate, look no further! The waffles are here, and they are egg-free and dairy-free, and they can very easily be made gluten-free and nut-free as well. So, these waffles are allergy friendly, yet satisfying – they will please absolutely everyone because they use only simple ingredients and don’t require fussing with egg replacements or similar.

The key to these waffles (as well as any other type of waffles) is a really good waffle iron, that you want to keep at medium high heat. And: you also want to keep it well oiled to help the waffles crisp up and reach that beautiful golden-brown stage without sticking!

Another crucial ingredient here is lemon juice – since you are not using eggs, lemon juice is essential to get the baking soda working. Remember that baking soda and vinegar volcano experiment you did in elementary school? Yes, the principle here is the same – you need some acid to give baking soda a bit of a nudge and release all that gas (carbon-dioxide) that will make your waffles puff up. I you don’t have lemons handy, a bit of apple cider vinegar or plain vinegar will also do the trick.

One tricky step here is adding the right amount of liquid. The amount will vary depending how you measure your flour and what type of four you use. Not all gluten-free flours are the same – the ingredients vary and how those ingredients mix with liquids vary. And gluten-free flours will behave differently from plain all-purpose wheat flour – so, I’m afraid, this is not one-size-fits-all type of recipe and you will need to pay attention!

After you’ve mixed (or whisked) the first cup of liquid in (milk or water), make sure all the liquid is incorporated well before adding more. And, add the rest in 1/4 cup increments, making sure all is incorporated before adding more. You want the waffle batter to be pourable but dense – so just slightly thicker than a pancake batter, a a shade thiner than cake batter. If you have not given up by now – and I hope you haven’t – once you’ve mixed the batter to the right consistency let it sit for 5-10 minutes before using.

These waffles freeze well, and can be reheated in the microwave, or a toaster oven. My favorite thick here is to get them defrosted in the microwave for 30-45 seconds and then transfer to the toaster oven to crisp up!

Happy breakfast time!!!


Basic Vegan Waffles (with gluten-free and nut-free options)

Serves 4 (2-3 waffles depending on the size of your waffle iron)

What you’ll need:

  • 2 cups all-purpose gluten-free flour, I like King Arthur Flour (or all-purpose white flour)
  • ¼ cup raw sugar (vegan)
  • ¼ cup vegetable (or canola) oil
  • 1 tablespoon peanut butter powder (skip if concerned about allergies)
  • 1 tablespoon lemon juice
  • 1 tablespoon vanilla extract (or dial down the amount if you prefer less vanilla)
  • 1 teaspoon baking soda
  • 1 teaspoon baking powder
  • 2 cups unsweetened vanilla almond milk (or oat milk, soy milk, or water for nut-free version), divided
  • Cooking spray or some extra vegetable oil for brushing the waffle iron

What you’ll do:

  1. Place all the ingredients except milk into a large mixing bowl, in the order they were mentioned in. Mix well.
  2. Add 1 ½ cup of milk and mix, check for consistency than add ¼ cup of milk more, mix, check the consistency and add more milk if needed. The best waffle batter should pour out without resistance, but still be dense. Let the batter stand while you prepare the waffle iron.
  3. Heat the waffle iron, spray with the cooking spray if needed (my waffle iron is old and sticky so cooking spray helps a lot), then pour ¾ of a cup of the batter in (please note that this amount will depend on the size of the waffle iron you are using). The waffles should be done in 2-3 minutes – my waffle iron comes with a handy light that turns green when a waffle is done!
  4. Serve your waffles hot with butter, maple syrup, chopped nuts, strawberries, blueberries, and/or whipped cream, or if you are looking for something new: chopped pineapple and coconut for a piña colada waffles!

Copyright © Eat the Vegan Rainbow, 2019

Vegan Stuffed Peppers with Pistachios and Rice


Pistachios make a great snack! They are a tree nut related to cashews – so not an allergy friendly food. But, if you can enjoy nuts, pistachios are great to add to your nut rotation. As any other kind of nut, pistachios are versatile and work equally well as a simple raw (or slightly roasted, preferably dry roasted, no-salt-added) snack, or as an crunchy ingredient for many savory and sweet dishes. Last Thanksgiving, I made a lovely side dish with quinoa, roasted cranberries, and pistachios – you can’t get healthier and homier than that!

Of course, you can also use pistachios to make nut butter, or upgrade with couple of simple ingredients into a fancier creme spread. If you are using pistachios this way, you will need to soak them in water, preferably overnight. The soaking helps rehydrate the nuts and makes for a creamier and more spreadable butter/dip/spread. If you are watching your salt intake, soaking the pistachios and washing them out can also help remove some of the added salt if the only type of pistachios you can find in your store are the salted (or lightly salted) kind.

At this point you may be wondering what do pistachios have to do with vegan stuffed peppers? That’s a fair question – peppers are usually stuffed with some sort of mix of rice and/or beans, and other vegetables. But: there really is no limit when it comes to what you can use for the stuffing. Mashed potatoes? Sure, why not! Mushrooms and quinoa? Absolutely! Polenta? Sounds interesting! Corn and beans? Yes, of course!

My recipe below takes very traditional stuffing ingredients (rice, celery and carrots) and mixes it with pistachios, for a new take. Plus: this stuffing is versatile and can be used to stuff eggplant, zucchini, grape or cabbage leaves. It is cheap and the amount below will go a long way. Enjoy and have fun!


Vegan Stuffed Peppers with Pistachios and Rice

What you’ll need:

1 cup shelled pistachios

4 bell peppers, split in half lengthwise, with seeds removed

4 stalks celery, finely diced

2 carrots, finely diced

1 teaspoon minced garlic

1 tablespoon paprika (or smoked paprika)

2 teaspoons dried basil

1 teaspoon dried oregano

2 cups cooked rice (Arborio rice or other medium grain variety; I make a large batch of rice to serve as a side dish for the week and take some of that to make other dishes like this one)

2 tablespoon olive oil (optional; if not using oil you can use 2 tablespoons of vegetable broth to sauté the vegetables)

3 tablespoons fresh Italian (flat leaf) parsley, finely chopped

2 cups water, divided

What you’ll do:

  1. Cover pistachios with water, and soak overnight in the refrigerator. The next morning, drain and rinse the pistachios then grind them into a very fine paste. You can do this using a food processor or a hand held stick blender – here are some stick blenders that will give you good results. Set the paste to the side.
  2. Preheat the oven to 350 F (175 C).
  3. In a large pan add the oil (or vegetable stock if not using oil) and place over medium high heat. Add celery and carrots and sauté for 5-8 minutes or so, until softened and slightly browned.
  4. Add garlic, mix well and sauté for another 2-3 minutes.
  5. Add the pistachio paste and 1 cup of water, mix again and cook for another 5 minutes or so.
  6. Next, add the rice, paprika, basil and oregano and mix to combine. Increase the heat to high for just a couple of minutes until the stuffing starts to bubble and combine. Turn the heat off and mix in the parsley.
  7. Arrange the peppers in a large baking dish (I used a Pyrex dish with the following dimension: 15 x 10 in (38 x 26 cm)), and fill each half with the stuffing until all the stuffing is used up. Pour 1 cup of water to the bottom of the dish – make sure not to pour the liquid over the peppers, rather pour the water down the side and let it distribute. Cover the dish with some foil and place in the oven for 35 minutes or so.
  8. When 35 minutes are up, increase the temperature to 430 F (220 C), remove the foil and let the tops crisp up for 10 minutes or so. Take the peppers out the oven and let cool for about 20 minutes before serving. These peppers improve with time, so if you can I recommend making them a day ahead, letting them cool completely before putting them into refrigerator and then serving them the next day.
  9. Stuffed peppers are best enjoyed with a simple salad (think lettuce with just a bit of oil and vinegar), although I do like them with a scoop of yogurt!

Enjoy!

Copyright © Eat the Vegan Rainbow, 2019

Reboot Smoothie with Blueberries, Bananas, Oatmeal and Peanut Butter

Reboot smoothie with blueberries, peanut butter powder, and oatmeal
Reboot Smoothie with Blueberries, Peanut Butter Powder, and Oatmeal, via Eat the Vegan Rainbow

Some of you may know that I am not a real food blogger – and by real I mean a person who does food blogging, recipe development, food photography and cookbook writing full time. I started blogging about two years ago as a way to share some of the recipes I’ve been enjoying. For me, this was a way to combine my love for cooking and my love for writing. But: I do have another huge love in my life, one that overshadow all else, and it is love of science, especially the kind of science done at the interface of chemistry and biology. So, my real job is guiding one of the best chemical biology programs on the planet.

This job comes with an opportunity to travel to meet other scientists in the field, so we can share and learn from each other. Recently, I went on a trip which scientifically I enjoyed very much! However, the plane rides were bumpy, and they were delays, and stress, and long flights, and really limited food options at the airports. Which means that for couple of days my diet was OK, but not great. Plus: I tend to eat too much when I travel. Snacking helps pass the time, and although I know it is not healthy, it is what I do.

By the time I get back home, I am usually beyond exhausted sometimes due to the trip itself, but oftentimes because the amounts of salt, fat and sugar I consumed. That’s why I developed this wonderful smoothie to help me reboot and rebalance myself.

The smoothie comes together in a snap, like they all do, and uses blueberries, bananas, oatmeal and peanut butter powder. The peanut butter powder is something that you can now find in your local grocery store. It is made from roasted peanuts after all the oil haas been removed, which means that it has less calories and less fat, but more protein per serving than peanut butter. This powder retains all of the peanut aroma, and you can use it for smoothies, baking and even cooking things like Pad Thai. I like using it in this smoothie because it adds a nice punch of protein to it.

Bananas are an essential smoothie ingredient, no matter what. They add sweetness and creaminess to it, and make the smoothies rich, so much so that you will think you are getting spoiled. If you do not like bananas, this smoothie can be made with roasted sweet potatoes (yummy!), and even canned pumpkin purée. Bananas are full of vitamin B6, which is the essential cofactor of many enzymes that regulate our metabolism, and when it comes to vitamin B6 one banana goes a long way (more than 30% of your daily value)!

Blueberries are also key to the final flavor, and I recommend that, if you can, get frozen wild blueberries, preferably from Maine. This, of course may not be possible where you live so you can use any blueberries you have on hand, or strawberries, raspberries, blackberries or sweet cherries for that matter. The fruit you use can certainly be bought frozen, and I do this all the time as it ensures I have perfect fruit ready to go for whenever I need a smoothie. You can also use fresh in which case you may want to add a couple of ice cubes into your smoothie mix before blending if you prefer your smoothies icy cold.

Finally, just a bit of oatmeal will enhance the creaminess, and add more sustaining power to the smoothie. One serving will fuel you for a while!

One note on the blenders and the order in which you add the ingredients. Some of you may have industrial strength blenders that can handle anything. The one I have is good, but not fantastic and for my blender to work well I have to add liquids first, then things that are softer, then things that are harder. The order below is based on this principle, and you don’t need to follow it unless you have the kind of finicky blender I have.

Reboot Smoothie with Blueberries, Bananas, Oatmeal and Peanut Butter

What you’ll need for one very generous single serving or two smaller ones

1 cup almond milk (unsweetened, vanilla flavor or plain)

1 banana

1 cup frozen blueberries

1/4 cup oatmeal

2 tablespoons peanut butter powder


What you’ll do:

  1. Place the almond milk, chopped banana, blueberries, oatmeal and peanut butter powder into a blender. Close the lid and blend until smooth. Let the blended mix sit for about 10 minutes to allow the oatmeal to soak and soften. Then pour it out and enjoy!

Copyright © Eat the Vegan Rainbow, 2019

Nominated for the One Bite Vegan Food Blogger Awards

OBV Nominees 2

This is a fantastic way to start my Monday – waking up to discover that Eat the Vegan Rainbow, my blog where I share my down-to-Earth, budget-friendly recipes, has been nominated for the One Bite Vegan Food Blogger Awards. It is super thrilling to be included with so many other fantastic bloggers that have been an inspiration to me as I transitioned into vegan diet, and into blogging.

I am also grateful to One Bite Vegan for including me in their selection – they are a fantastic site that advocates for taking small changes to how and what we eat, and for showing people how even one bite can have a large impact. They share wonderful recipes and have a magazine “One bite vegan magazine”, which you can get for free delivered straight into your mailbox.

So, I hope you take a moment to vote – Eat the Vegan Rainbow is nominated in the “Inspired Mid Week Meals” category – especially if you have been enjoying the recipes that I’ve been sharing with you. Casting your vote puts you in the mix for winning something awesome: Vitamix Ascent Series A2500!!!

Please vote and share the word – and thank you all in advance!

Milka


nominated-logo.png

Quinoa-based Ground Beef Substitute

Quinoa-Based Ground Beef Substitute
Quinoa-Based Ground Beef Substitute, via Eat the Vegan Rainbow

Many people who transition or attempt to transition to a plant-based diet find access to meat replacement products to be helpful. This makes sense – most of us were raised eating meeting, enjoying hamburgers, hotdogs, ground beef tacos and many other things. So, I think it is only reasonable that we would be looking for familiar textures and flavors. Plus: given that meatless and vegan meat replacement products are now easily accessible at least in major grocery store chains in US, many of us with busy lives default to grabbing a bag of meatless crumbles. It’s easy and in many cases quite delicious!

However, if you want to maximize the health benefits, or don’t live near a grocery store stocked with meat replacement products, you should learn how to make some of them yourself. One of the easiest thing to make is ground beef substitute, and my previous version made with mushrooms and TVP (textured vegetable protein) is one of my most popular posts. Here, I wanted to share a super easy recipe for a ground beef substitute that is ideal for tacos, enchiladas, fully-loaded nachos or any other dish that usually uses well cooked and fully caramelized ground beef.

The recipe is very simple, but it does take a bit of time. It used quinoa as the protein source and practically the only ingredient. This grain is rich in protein, vitamins, fiber and minerals, and if you have not tried it yet I strongly recommend it. You can use quinoa almost anywhere you use rice, like in stuffed eggplant or gumbo. Given the high protein content, quinoa can be a great alternative to using gluten when making things like gluten-free vegan BBQ ribs. And, of course, quinoa tastes great by itself more or less, in simple side dishes like this one.

I hope you give this new take on ground beef substitute a try!

Quinoa-based Ground Beef Substitute

What you’ll need:

1 cup quinoa
1 1/2 cup to 2 cups water
2 tablespoons nutritional yeast
2 tablespoons vegetable oil
1 tablespoon chili powder
1 tablespoon tamari sauce

What you’ll do:

  1. Bring 1 1/2 cup water to boil, then add quinoa, lower the heat and simmer for 20-25 minutes. Check quinoa half way through and add more water if needed. Let the cooked quinoa cool completely before moving to the next step.
  2. Place cooked quinoa into a large mixing bowl, add nutritional yeast, oil, chili powder and tamari or soy sauce (tamari sauce is a gluten-free alternative to soy sauce). Mix well. If you are busy or planing ahead you can prepare this mixture a day ahead and store in the fridge until ready for the next set.
  3.  Preheat the oven to 425 F (220 C).
  4. Line a large baking sheet with some parchment paper and spread the quinoa mix, forming an even thin layer.
  5. Roast for 20 minutes, then take the quinoa-based ground beef substitute our the oven, mix well, and return for another 15 minutes. Check again to make sure that quinoa is nicely roasted, crunchy and well-browned. If so, you are done, if not place it back in the oven for another 5 minutes or so. Let the mixture cool then use as a taco filling, a pizza topping or to make some delicious enchiladas!

Copyright © Eat the Vegan Rainbow, 2019

Plantain Lasagna with Pinto Beans

img_2828
Plantain Lasagna with Pinto Beans, via Eat the Vegan Rainbow

The first time I tasted plantains, those longer, bigger bananas you sometimes see in your grocery store among other exotic fruits and vegetables, I did not like them. They were fried yet sort of mushy, and tasted very sweet although they were served as a savory side dish. So, for the next fifteen years I stayed away from them.

Few months ago I was watching a cooking show, and they talked about Puerto Rican lasagna – Pastelón – that looked delicious, with layers made of plantains rather than noodles. So I decided to give this lasagna a try. Please note that if you expect to see a traditional Pastelón recipe here, stop reading now and go elsewhere. I took a great deal of liberty here, so you will not find any meat or cheese here. What you will find is lots of beans and salsa. And lots, and lots of plantains.

The plantains you want to use here are very ripe. Some stores sell them ripe, but some carry only green looking plantains. You could get those and keep them in a paper bag until they get ripe – I tried this but it did not work really well. So now I go for off the shelf half-ripe plantains that, by the way, are very yellow with a bit of black. This article will help you navigate the plantains and different stages of their ripeness. For me the green plantains were too tough and the very ripe ones were too sweet so I settled on 75%-ripe.

Instead of frying the plantains, which is the most common way people make them edible, I roasted them. You will need to cut through the skin lengthwise and roast them for about half an hour. Their skin should turn totally black and once cooled they should be easy to peel and slice lengthwise into thin slices.

While your plantains are roasting, prepare your lasagna filling, which in this case is a batch of pinto beans, simmered with onions, roasted green chili peppers and spices.

The base for your lasagna will be salsa, and I just use store bought kind, and what will give this lasagna a slightly meaty feel is a layer of TVP – textured vegetable protein. Although the bag TVP comes in may recommend soaking, please don’t do it. This lasagna is juicy enough and the TVP will soften and cook as the lasagna is baking. After the TVP layer, come the plantain slices, and then the beans. Cover everything with foil, but it in the oven for forty five minutes or so, and that will be that. You will have an out of the ordinary lasagna on your hands to enjoy.


Plantains Lasagna with Pinto Beans

What you’ll need:

4 plantains, almost ripe

2 cups salsa, homemade or store bought

2 cups TVP (textured vegetable protein)

1 onion, diced

2 15.5 oz (440 g) cans pinto beans

1 4 oz (113 g) can fire roasted green chili peppers

1 teaspoon cumin

1 teaspoon chili powder

1 teaspoon smoked paprika

Cooking spray


What you’ll do:

  1. Preheat the oven to 425 F (220 C).
  2. Wash the plantains, cut their end off and cut a slit in their skin lengthways. Arrange on the foil or parchment paper lined baking sheet and put in the oven for 35-45 minutes.
  3. While plantains are roasting, prepare the beans. Spray the bottom of a large pan, I used my cast iron pan but you can use any pan you like, and place over medium heat.
  4. Add the onions and cook until golden, which will take about 5 minutes.
  5. Add the spices, and let the spices toast for a minute or so.
  6. Add the can of fire roasted green chili peppers and stir again.
  7. Finally add the beans and using a potato masher mash the beans while they cook. Don’t mash them all the way through – leave some of the beans whole. Let the beans simmer for 15 minutes or so.
  8. By the time the beans are done,  plantains will be too. The roasted plantains should be soft but not mushy.  Let the plantains cool before handling.
  9. Decrease the oven temperature to 350 F (175 C).
  10. Once cool enough to handle, peel the plantains and cut lengthwise into sheets. Adjust the thickness to your preference.
  11. Spray the bottom and the sides of a deep 9 x 13 in (23 x 33 cm) baking dish with cooking spray. Pour the salsa in and spread to cover the bottom. Distribute the TVP over the salsa to make one even layer. Place the roasted plantain slices over the TVP. Pour the beans over the plantains, cover the dish with some foil and put it in the oven for 30 minutes covered, then uncover and let the top brown for another 10 minutes.
  12. Take the lasagna out of the oven and let it rest for 10 minutes before serving. Serve with plain rice or enjoy as is, perhaps with a sprinkle of cheese alternative or a spoonful of macadamia nut queso fresco. Yum!!!

Copyright © Eat the Vegan Rainbow, 2019

Gluten-free Cinnamon Raisin Monkey Bread

Gluten-free Cinnamon Raisin Monkey Bread, via Eat the Vegan Rainbow

Have you ever heard of monkey bread? Well, neither have I until recently when I started thinking about an easy breakfast type of a bread that can be made quickly and without much fuss. Monkey bread, a pull apart sticky bread full of cinnamon and drenched in a sticky syrup, is one such option.

Most recipes for monkey bread out there start with a pre-made biscuit dough of some sort – this is fine, especially when you are in a rush, but most of these doughs are not gluten-free. Also: if you are paying attention to what you eat and how much salt and fat you consume, these products are probably not for you although most of them are actually vegan.

The recipe below is my attempt at making monkey bread that is gluten-free, relatively low on oil (and you can skip oil if you want an oil-free version), and full of lovely fruit and vegetable. To boost the flavors and sweetness, I am using pumpkin purée and raisins, and too boost healthy fats and provide a binder for the bread dough I am using chia seeds. Lastly, I am not using a great deal of sticky syrup – but just enough agave syrup to make this slightly over the top. This means that unlike monkey breads you may have had in the past this one is not dripping with gooey syrup, although it is sticky (and finger licking’ good!).

You can play with arrangements of the small dough pieces when you start to lay them out, and create any pattern you like. Traditional monkey bread is made in the Bundt pan. If you would like to experiment with that you will need to make several adjustments to the recipe below. First of all, you will need to prepare a different sticky sauce that is made from brown sugar and butter, and if you don’t want to use butter (vegan or otherwise), you may want to use a bit of corn or tapioca starch as a thickener. The sticky sauce would go to the bottom of your pan and dough chunks are layered one on top of each other. In that case, you will need to double the amount of dough from the recipe below and follow the instructions on how to assemble the bread here.

Gluten-free Cinnamon Raisin Monkey Bread

What you’ll need:

1 cup raisins

1/2 cup chia seeds

1 cup hot water

1 cup rice flour

1/2 cup arrowroot flour

1/4 cup glutinous rice flour (or corn/tapioca starch)

1 teaspoon baking powder

1 teaspoon baking soda

1 tablespoon cinnamon 

3/4 cup  pumpkin purée

3 tablespoons oil (canola or vegetable; you can skip if oil-free)

1 tablespoon apple cider vinegar 

1/3 cup agave nectar (or maple syrup), divided

Butter or oil for greasing the baking dish (optional)


What you’ll do:

  1. Cover the raisin with some water and leave them to soak overnight. If you are in a pinch and need them sooner, you can soak them in hot water and they should be ready to use within 15-30 minutes.
  2. When ready to make the monkey bread, turn the oven on to 350 F (175 C).
  3. Soak chia seeds in a cup of boiling water until gel-like substance forms. This usually takes 10-20 minutes.
  4. While chia seeds are soaking, mix together all the dry ingredients (flours and spices).
  5. In a separate bowl, mix together the wet ingredients: pumpkin puree, soaked chia seeds, oil, and vinegar. Mix well.
  6. Pour the wet ingredients into the dry ones, mix well, then add the raisins and mix again.
  7. Grease the bottom and the sides of a baking dish (8 x 8 in (20 x 20 cm)). You can skip this step if you are using a high quality non-stick pan. Pinch smaller chunks of the dough (roughly 1/4 cup), form into a ball by gently rolling (don’t pack too tightly, the dough should feel loose but not falling apart), and start arranging the monkey bread by placing the balls next to each other. Let them touch but don’t press the balls together. If you can’t squeeze them all in, start another layer and continue until all the dough is used up.
  8. When all the dough balls are all arranged, brush one half of the agave nectar over the top, and bake for 20-30 minutes. The monkey bread is done when the surface is completely brown.
  9. Take the monkey bread out of the oven, brush the rest of the agave nectar over, and leave to soak and cool for 15 minutes or so before digging in!

Copyright © Eat the Vegan Rainbow, 2019