Quick Quiche with Tofu and Mushrooms, via Eat the Vegan Rainbow
Eating pie for lunch sounds so decadent, doesn’t it? And that’s what makes quiche so appealing. I usually stay away from making quiche because I can’t deal with making my own crust. The crust takes time and effort that is beyond my capacity. Luckily for me, and I am guessing many of you, stores carry pre-made pie crusts that are ready to use.
My quiche recipe uses one of those and that really makes it come together relatively quickly. One tip when using the store bought frozen pie crust is to bake the crust by itself first for ten to fifteen minutes while you are mixing and preparing the other ingredients. This pre-baking will help make the crust nice and crunchy and help it hold the filling.
Filling is definitely the star of any quiche and it is traditionally made of eggs and cheese, often with mushrooms, ham, spinach, artichokes or other meat and vegetable components thrown into it. So, the result is usually light in texture but heavy on your stomach and very calorie dense.
In my first attempt to veganize quiche I decided to keep it simple and start with mushrooms, red onions and tofu as main ingredients. Most of the cooking actually takes place in a pan on the stove top as both red onions and mushrooms need to be fully cooked before they hit the pie crust. I recommend taking the time to caramelize the onions nice and slow, as well as let the mushrooms cook most of the way before adding tofu. In this case, the tofu needs to be drained and crumbled but you can skip the “pressing tofu” step that almost all tofu recipes have making this a really quick dish!
Quick Quiche with Caramelized Onions, Mushrooms and Tofu
What you’ll need:
1 store bought pie crust, vegan
1 red onion
10 oz (300 g) white mushrooms
14 oz (400 g) extra firm tofu, drained
2 tablespoons nutritional yeast
1 tablespoon corn starch
1 teaspoon dry basil leaves
1 teaspoon dry oregano leaves
Cooking spray
What you’ll do:
Preheat oven to 350 F (180 C). Once ready, put the pie crust in to pre-bake for 15 minutes.
Cut the onion into fine, thin slices.
Spray the bottom and sides of a frying pan with cooking spray and place it over medium high heat. Add the onion and let caramelize for 5 to 10 minutes. The onion should be nicely browned and soft.
While the onion is caramelizing, clean and slice the mushrooms, or you can always buy sliced mushrooms and skip this step.
Add sliced mushrooms to the onion mix and cook until mushrooms soften, which will take another 5 minutes or so.
Drain tofu and crumble it into small crumbles with a fork or with your hand. The size of the crumbles should be similar to scrambled egg.
Add crumbled tofu, nutritional yeast, corn starch, basil and oregano. Stir well the quiche filling, let brown for another 1 to 2 minutes, then turn the heat off and let sit until your pie crust is done pre-baking.
Pour the filling into the crust, spray the top with some cooking spray and return to oven for another 20 to 25 minutes, until the top is golden brown.
Take the quiche out, let stand for 5 minutes then serve with your favorite salad or top with some sun dried tomato shreds like I did on this occasion.
Mushroom and Eggplant Couscous, via Eat the Vegan RainbowSometimes you need to throw together couple of ingredients you have on hand and have the meal ready in a blink of an eye. This recipe is your one way ticket to a no fuss meal that is filling and satisfying. When it comes to easy and hands-off cooking nothing comes even remotely close to couscous. I’ve been making couscous for years and all you need to remember is to 1:2 ratio – 1 cup couscous plus 2 cups of boiling water – and to keep your lid on and your hand off.
Basically, once you pour your boiling water over the couscous and give it one gentle stir, all you need to do is put the lid on and let the couscous sit for 15-30 minutes. For best results use a fork to fluff the couscous up and that’s it – a delicious base for your meal is done!
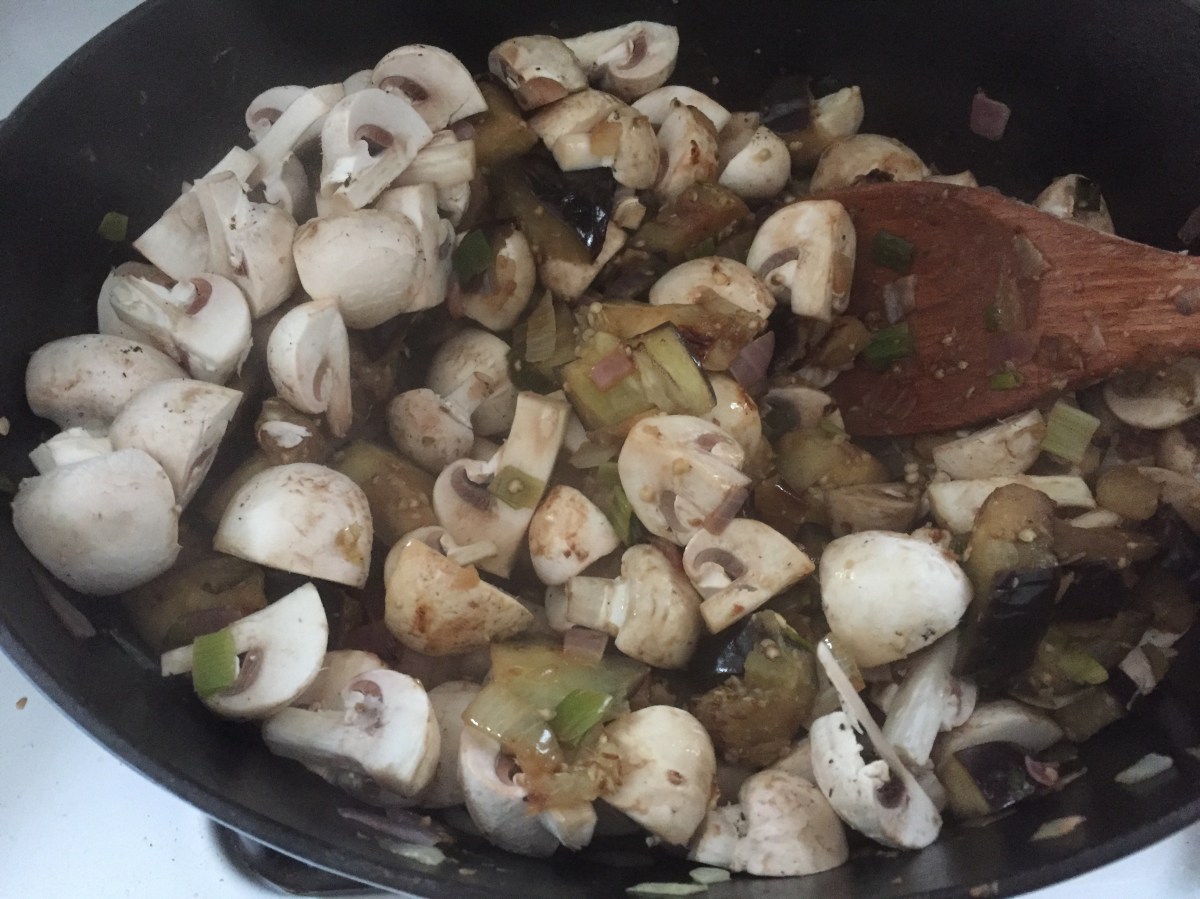
The rest is very straightforward. The eggplant needs to be chopped into good size, 1 x 1 in (2.5 x 2.5 cm), cubes and mushrooms need to be quartered. The cooking begins with browning onions, then adding eggplant and letting it brown for a bit, adding mushrooms and sprinkling some corn starch to bind everything together, especially mushrooms that tend to release a lot of liquid. Another important thing to do is deglaze the pot as a lot of great caramelized flavor will be stuck to the bottom of your pan. Here, just a little bit of vegetable stock will help.
Mushroom and Eggplant Stew, via Eat the Vegan Rainbow
Mushroom and Eggplant Couscous
What you’ll need:
2 medium eggplants, cubed
2 10 oz. (284g) white button mushrooms, quartered
1 yellow onion, diced
1/2 red onion, diced
2 tablespoons garlic, crushed
6 scallions, diced
3 tablespoons corn starch
1/2 cup vegetable stock
2 tablespoons lemon juice
1 teaspoon dry thyme
Cooking spray
What you’ll do:
Prepare couscous according to the box instructions, usually by mixing 1 cup of couscous with 2 cups of boiling water, putting the lid on the container and letting couscous soak for 15 to 30 minutes.
Spray the bottom and the sides of a large Dutch oven or another heavy pot with a good lid with cooking spray. Turn the heat to medium high, add diced onions and scallions and brown for 5-6 minutes.
Add garlic and sauté for 1 minute or so, letting the garlic release its aroma.
Add eggplant and let it brown which will take anywhere between 5 and 10 minutes, depending on the size of your pot.
Lower heat to medium, and add mushrooms, corn starch and thyme. Sauté for 5-8 minutes. You want your mushrooms to be soft.
Use the vegetable stock to deglaze the bottom of your pot and let everything cook for 5-10 minutes more, covered.
Fluff the couscous with a fork, then plate the couscous and spread the mushroom and eggplant stew on top. Sprinkle with fresh flat leaf (Italian) parsley, and enjoy!
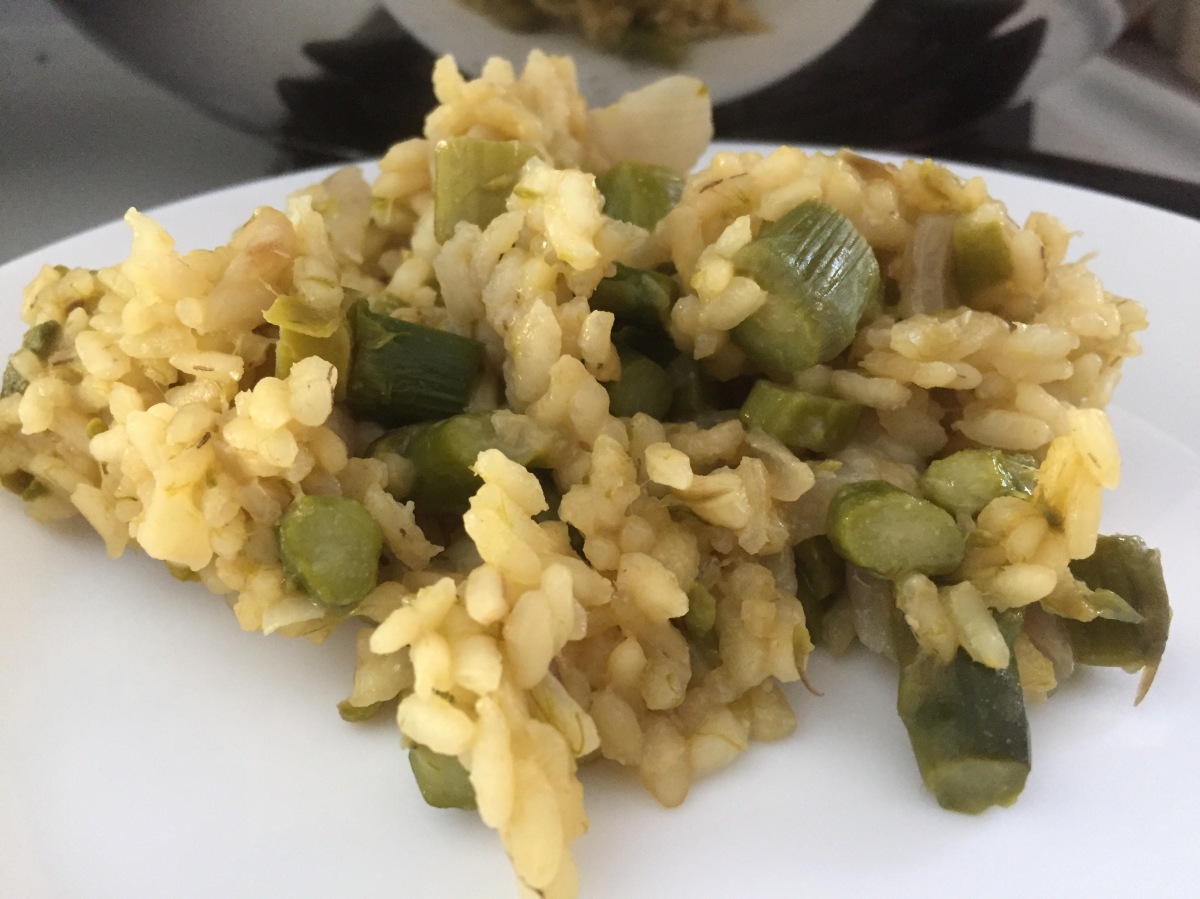
Healthy Asparagus Risotto, via Eat the Vegan RainbowSpring is in the air, although perhaps not yet on the ground, and when it comes to spring vegetables asparagus is it! If you haven’t enjoyed asparagus before, do give it a try. Asparagus is very easy to make as it tastes really good roasted, or in a soup. It is also one of those risotto-friendly ingredients that blends well with creamy rice to add crunch and earthy flavor.
The path to a really lovely risotto goes through picking the right rice and cooking it with patience and with a lot of stirring. My go-to rice for risottos, as well as for sushi and other rice dishes that need a stickier rice variety, is medium grain rice. This is a point of difference with most risotto recipes out there as they recommend using short grain rice variety called arborio rice. Arborio rice will work really well in this recipe too, so if you have it on hand go for it. The kinds of rice that may not work well here are the long grain variety, like Jasmine or Basmati rice.
Cooking risotto does require lots of stirring, and one trick that I use is to add the liquid in batches to let the rice absorb it before adding more. It takes time, but at the end your risotto will be rich and creamy without needing any butter, cream or parmesan, all common risotto ingredients.
My risotto recipe does use on less-common ingredient, nutritional yeast. If you will be preparing vegan recipes often nutritional yeast is definitely worth getting because it is a common add-on that mimics dairy. In the case of this risotto nutritional yeast acts as a substitute for parmesan cheese.
Healthy Asparagus Risotto
What you’ll need:
1 pound (500 g) green asparagus, chopped
1 yellow onion, diced
1 cup medium grain or short grain rice
2 tablespoons nutritional yeast
2-3 cups vegetable stock or water
Cooking spray
Lemon zest, lemon juice (optional)
What you’ll do:
Wash and trim the asparagus. I don’t peel it because I try to get spears that are thin and less woody, but if your asparagus is thick it will need peeling. Cut into approximately 1/2 in (1 to 1.5 cm) bits. You don’t need to be precise here but just think about what your final spoonful will look like and make sure your asparagus bits are small enough to be in harmony with the rice.
Dice the onion into fine dice.
Spray the bottom of a wide and shallow pan with cooking spray. Turn the heat to medium high. Add onions and cook until they soften and start to brown. This will take 4-5 minutes.
Add asparagus and let cook for another 4-5 minutes with occasional stirring.
Add the rice and stir well. Let cook for 1-2 minutes.
Lower the heat down to medium low. Add 1 cup of liquid. Stir well and let the rice soak up the liquid. Give it time and repeat with more liquid. Risotto is definitely one of those dishes that people fear to approach and many articles and posts have been written about how to get to the perfect bowl of risotto and avoid mistakes. Fear not, because all you really need to do is hang around your pot, watch your rice and add the liquid when the rice tells you its thirsty. The amount of rice in this recipe can take anywhere between 2 and 4 cups of liquid. You also might want to start by adding one cup at a time for first 2 cups and then decrease to 1/4 cup of liquid at a time. Keep going until the rice is soft but not mushy, a shade softer than al dente.
Turn the heat off and sprinkle with nutritional yeast. Mix everything together and let stand for 5 minutes.
Sprinkle with lemon zest and a dash of lemon juice just before serving!
Roasted Red Pepper Chickpea Burgers, via Eat the Vegan Rainbow
There are many things that every time I make then turn out perfect and exactly as I want them. Well, veggie burgers ain’t that! I’ve tried many veggie burger recipes and had failure after failure to reckon with.
The main issue with most of the veggie burger recipes I tried (and failed at) is that the burger consistency is just so delicate that they fall apart as they are cooked. One way to make the veggie burgers sturdier is to use a grain or a flour based binder, like bread crumbs, which I use in my Vegan Jackfruit “Crab” Cakes, or oats, which I used in my Meatless Meatballs. But, I really wanted to see if I can skip using those in a burger.
The recipe I came up with uses chickpeas – in all honestly because I bought one too many cans of chickpeas at a recent sale – and some roasted red peppers, for color and flavor. It also uses sunflower seeds that add a different texture, a bit of crunch, good amount of healthy fats and a good amount of iron, which is something that I keep in mind when cooking given that meat, a great source of dietary iron, is off my table. Additionally, a key ingredient that glues the burgers together is “flax egg”, which is flax meal soaked in water which turns it gooey and slimy, just like egg! The mix comes together really quickly and all you need will be a stick (hand-held) blender or a food processor.
Roasted Red Pepper Chickpea Burgers Mix, via Eat the Vegan Rainbow
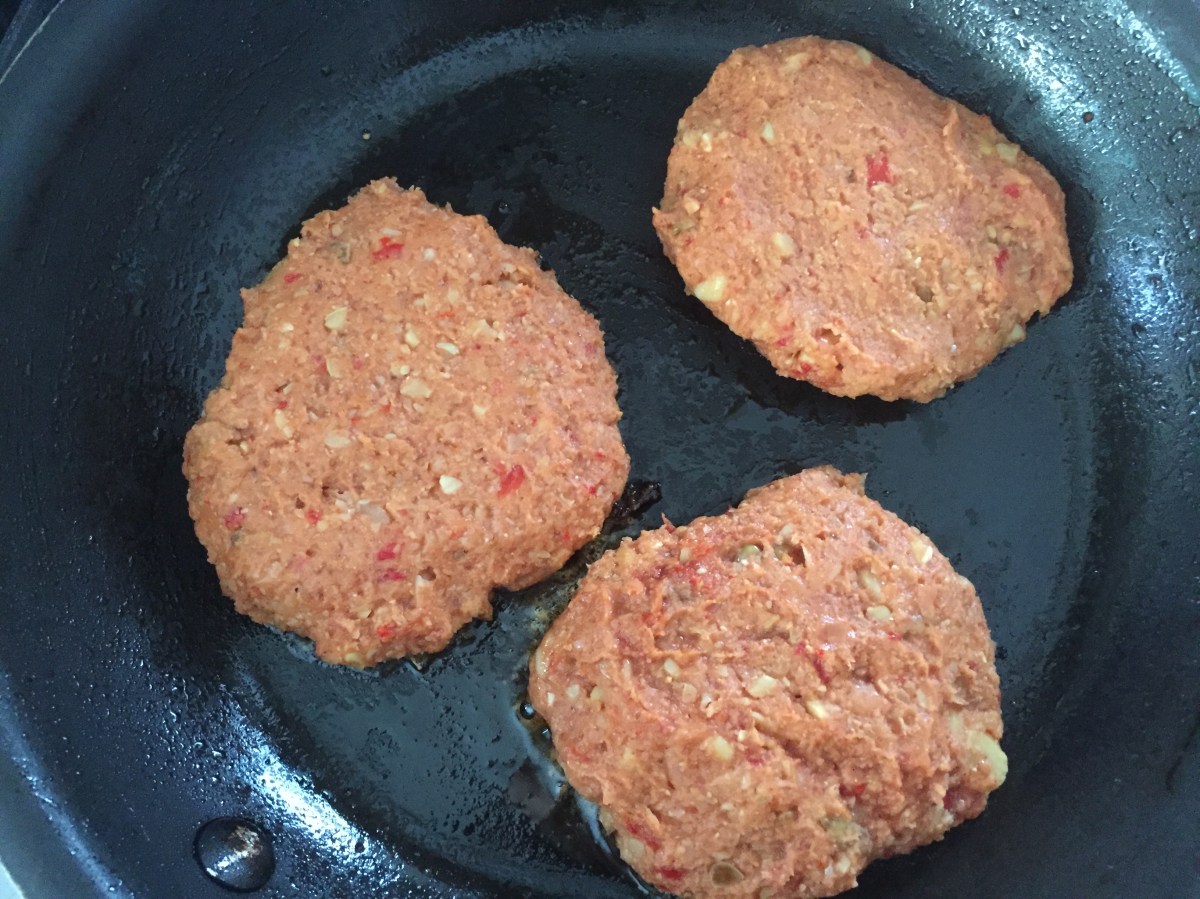
The rest of the preparation does take a bit of time but really not much effort because you will let the fridge or a freezer do some work for you. Placing formed patties into a fridge or a freezer to firm up is officially the greatest tip ever. It helped my Jackfruit “Crab” Cakes, and I can now say it most certainly helped these Roasted Red Pepper Chickpea Burgers. I recommend keeping the patties in the freezer for quite a bit, until they are almost frozen on the edges, because these burgers are still gentle and soft while they cook. They do come together as they cool off and they will be great when you serve them, but you will need to be gentle and careful when you flip them so give the patties plenty of room.
Roasted Red Peppers Chickpea Burgers in the Pan, via Eat the Vegan Rainbow
Leave the burgers to cool just for couple of minutes. As I mentioned, they will come out of the pan pretty soft and they will get firmer as they cool. You can serve these burgers any way you like your burgers served, in a bun or without. They have a delicious, just slightly sweet flavor from the roasted red peppers and the lovely browning they get as they cook.
Could you bake or broil these? I think that would work. Could you form patties, freeze them and then cook them a week later? I don’t see why not. But in that case I recommend thawing for a bit before letting them hit the griddle. Could these be grilled? Well, sorry to disappoint you but I don’t think so. But, this is not to say that I am not going to try. After all, experimenting is half the fun…
Roasted Red Pepper Chickpea Burgers, via Eat the Vegan Rainbow
1/2 cup roasted red peppers, homemade or store bought (jarred in water)
1/4 cup sunflower seeds, roasted and unsalted
1 tablespoon tomato paste
1 teaspoon onion powder
1 teaspoon garlic powder
1 teaspoon chili powder
1 teaspoon smoked paprika
1 teaspoon soy sauce
2 tablespoon flax meal
4 tablespoons hot water
Cooking spray
What you’ll do:
In a mixing/measuring cup mix flax meal and hot water. Stir well and let stand for 15-30 minutes.
Place the chickpeas in a large colander or a strainer. Rinse well and drain.
Put chickpeas, roasted red peppers, sunflower seeds, “flax eggs”, and all the spices in a large and deep mixing bowl (or the food processor if that’s what you are using instead of the stick blender) and blend until mostly blended. I like some texture to the burgers so I do leave some bigger chunks around, but follow your taste buds and preferences here.
Line a flat serving platter or a tray with wax paper. Using your hands shape the burgers and place them on the tray. This amount of the burger mix makes about 8 good size burgers. Put the burgers in the freezer for 30-45 minutes of refrigerator for 2-3 hours. If using the freezer method make sure the patties are not frozen through but still soft in the middle and mostly solid at the edges. If you are using the refrigerator, the patties need to give some resistance when you poke them.
Spray the bottom of your frying pan with cooking spray and heat over high heat. Put 3-4 burgers in at a time, how many depends on the size of your pan and it’s important to keep in mind that these burgers are on a softer side so need some extra space around them to help with moving around and flipping. Cook for 4-5 minutes on one side, carefully flip around and cook for another 3-4 minutes.
Let the cooked burgers rest for 5 minutes or so, then serve!
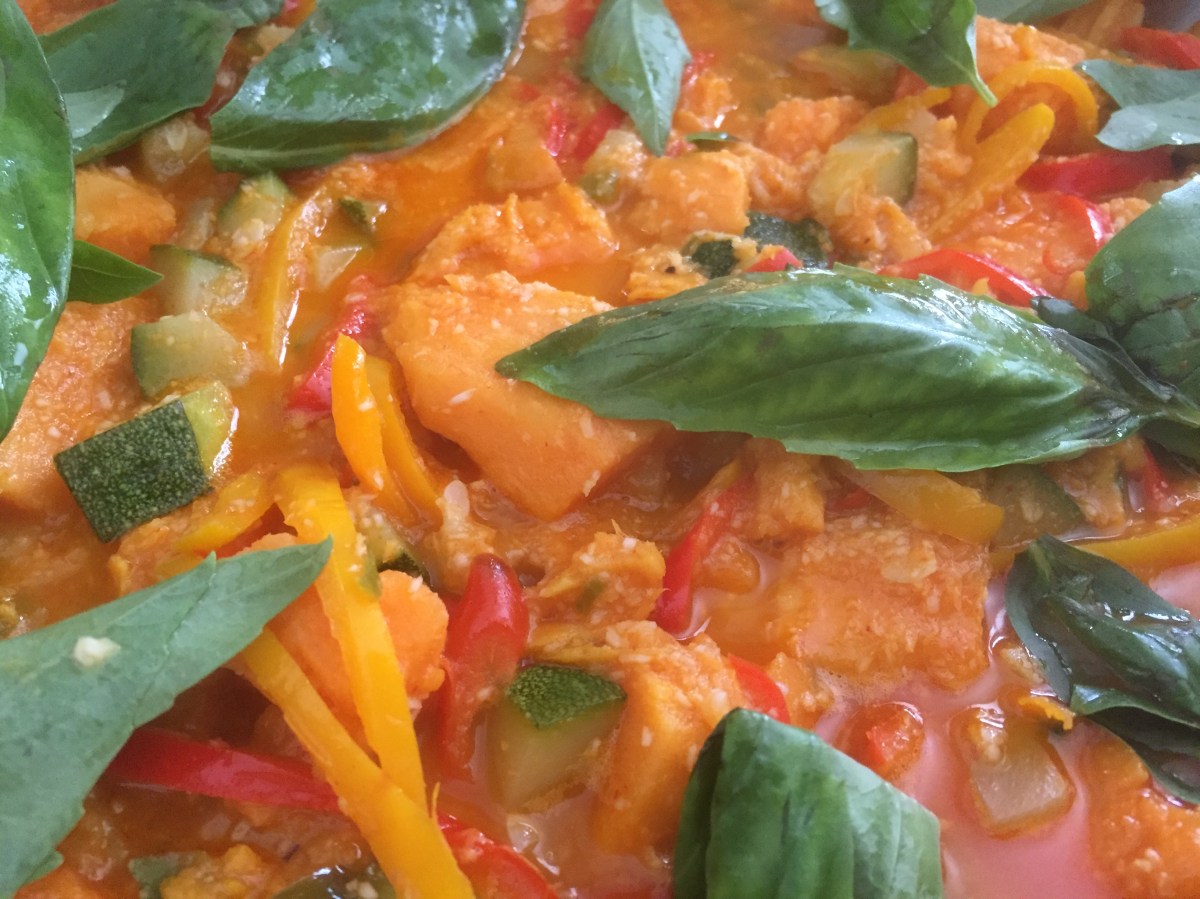
Vegan Red Curry with Sweet Potatoes and Zucchini, via Eat the Vegan RainbowI do like strong and bold spices, and food that is full of flavors yet not overpowering. So I gravitate towards Indian cuisine as you may have been able to tell given that I’ve already shared my vegan take on Chicken Tikka Masala and Saag Paneer. Another style of food that I enjoy comes from Southeast Asia, and I’ve been experimenting with Thai and Vietnamese recipes in the past. Most of those recipes do involve some animal ingredients so I wanted to try my hand at testing out the idea that Thai can be vegan.
My first stop on this journey is this Red Curry. You can make your own curry paste but Thai Kitchen Red Curry Paste is inexpensive, gluten free and vegan. It worked really well in this recipe so for now I am sticking with it!
In my view the secret to a great Red Curry is to go bold and diverse with your vegetables, and chop them in different ways so that your curry has some interesting color as well as texture. Here I use several different kinds of peppers, sweet potatoes and zucchini. You can use any kind of pepper you have handy. On this day in my kitchen I had a bag of mini sweet peppers that came in two colors, red and orange. I also got some shishito peppers that I’ve never used before but I figured it’s OK to be adventures. At the end, the shishitos turned out to be mild and did not overpower the flavors but I did remove all their seeds before using, which may have reduced any heat they would have brought in. If you do like your curry’s hot, you can use chili peppers, or other varieties with more heat.
Peppers and Zucchini for Vegan Red Curry, via Eat the Vegan RainbowFinal tip that I think makes a big difference is cooking the sweet potatoes almost all the way through before adding them to the curry. I cooked mine, skin on in the microwave and they came out perfectly sweet and delicious. What also makes a huge difference is using fresh basil and adding it at the very end so that it has just enough time to release its aroma without getting cooked.
Vegan Red Curry with Sweet Potatoes and Zucchini
What you’ll need:
2 large sweet potatoes, skin on
2 large zucchini, unpeeled
6 mini peppers, orange
6 mini peppers, red
4 shishito peppers
1 13.5 oz (400 mL) can light coconut milk
3 tablespoons shredded coconut, unsweetened
2 tablespoons red curry paste (like Thai Kitchen)
10 basil leaves, fresh
Cooking spray
What you’ll do:
Wash the sweet potatoes and put them in a large, microwave safe dish with 1/2 cup of water. Put the lid on, but don’t close all the way. Cook on high in the microwave for 10 minutes. Let stand for 15-20 minutes. Make sure sweet potatoes are cool enough to handle before you peel them. Chop the potatoes into 1 in x 1 in (2.5 cm x 2.5 cm) cubes. Set aside.
While sweet potatoes are cooking and resting, chop the zucchini and the peppers. You want zucchini chopped into small dice, and red and orange mini peppers into thin matchsticks. Clean the seeds out the shishito peppers and chop them very finely.
Spray the bottom of a large pan with cooking spray and heat on medium-high. Add all the peppers into the pan at once. Sauté for 10-15 minutes, until peppers are soft and their edges start to get brown.
Add diced zucchini and sauté for another 5 minutes, until zucchini is cooked about half way through.
Add curry paste, stir well and let sauté for another 5 minutes.
Add coconut milk and coconut shreds, and cook for another 5 minutes.
Add sweet potatoes. Mix well, lower the heat and simmer for 15-20 minutes. Turn the heat off, add fresh basil, and let stand for 5 minutes.
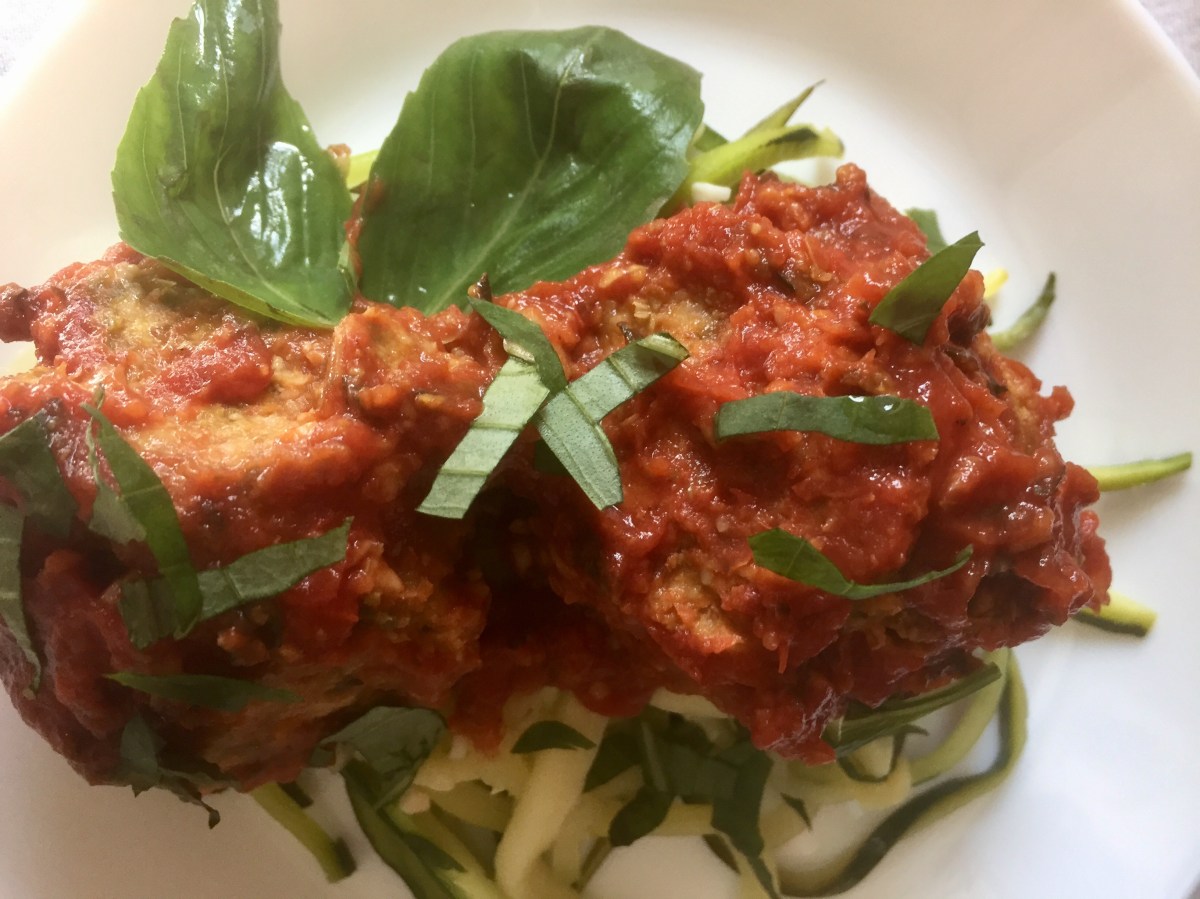
Gluten-free Vegan Spaghetti & Meatballs, via Eat the Vegan RainbowCan gluten-free, vegan cooking be budget friendly, healthy, feed the whole family, and yet leave everyone feeling they are getting away with something? The answer is yes, and this recipe is my evidence. I use no fancy ingredients, and no fancy techniques.
How did I end up here? Well, as they say “Necessity is the mother of invention”. What happened is that I found myself facing a large bag of frozen vegetable mix, which I have cooked with many times before never to any great success. This is a classic item you can find in any grocery store – a bag that includes unspecified amounts of frozen peas, corn, green beans, carrots, and lima beans. The price on these is usually too hard to resist, and they keep really well if kept frozen so I usually have a couple in my freezer in case of an emergency where all other options dry up.
So one of those emergency situations came up and this time around, perhaps because of all this blogging I’ve been doing recently, I had a real brain wave. I decided to transform the relatively amorphous tasting vegetable mix into really incredible vegan meatballs, or should I say veggie balls?
Frozen Vegetable Mix, thawed, via Eat the Vegan RainbowThere are couple of simple tips that when put together make this recipe work. First of all, thaw your vegetables don’t cook them! Depending on the amount of veggies you use this may take 5-10 minutes in the microwave on high. Once the veggies are thawed and soft all through, use a stick (immersion) blender, or a food processor to make a thick paste out of it all. This will be a base for your “meatballs”.
Another thing that you will need to do is add flavor to the mix. Although each one of these veggies is lovely on their own and when fresh, put all together and after freezing and thawing they do lose some of their flavor. My secret ingredient in this recipe is definitely a dash of Trader Joe’s Chile Lime Seasoning Bland. If you don’t live in the area with a handy Trader Joe’s store near by, you can use regular chili powder and add some lime or lemon zest – that will do the trick!
You will have to be a bit patient with this recipe as it does take a bit of time. First of all, I use oats to help the meatballs stick together. I did not leave the oats whole, rather I blended them all into the veggie mix using a stick blender, added the spices, and left the mix to sit for about 15 minutes. That gives oats some time to absorb the liquid and make the mix stick together better, which helps for the next step – forming the “meatballs” and browning them. I recommend using a Dutch oven to brown the “meatballs”, as well as simmering the rich tomato sauce.
Vegan “Meatballs” Browned in a Dutch Oven, via Eat the Vegan RainbowOne word of advice is not to overcrowd your Dutch oven, and keep some room in between the “meatballs”. This helps them cook, and helps you maneuver them around. Once the “meatballs” are nicely browned set them aside and use the same Dutch oven for putting your tomato sauce together. I kept my recipe simple and my cost down by using canned crushed tomatoes and using some crushed garlic, dried oregano and dried basil to flavor the sauce. The sauce does not need to cook for long, and once it starts to simmer nicely and gently you can add the “meatballs” back.
Vegan Meatballs in Tomato Sauce, via Eat the Vegan RainbowDon’t forget to lower the heat , bring the post to a very gentle simmer, and put the lid on! Without the lid you will soon end up with tomato sauce all over the stove top and the floor as this sauce does erupt in tiny little tomato sauce geysers.
To keep the recipe ultra healthy and gluten-free, I paired the meatballs with simple Zucchini Spaghetti.
Place the frozen vegetable into a microwave safe dish and microwave on high for 5-10 minutes to thaw the vegetables and slightly heat them through.
Place the vegetables into a large mixing bowl. Use the stick blender to grind the vegetables into a relatively fine paste.
Add oats and blend again.
Add tomato paste, soy sauce, as well as onion, garlic, chili and lime chili powder. Mix well and let stand for 15 minutes or so.
Spray the bottom of a large Dutch oven with cooking spray and bring to medium high heat. Use 1/4 cup or the ice cream scoop to scoop out the “meatball” mix and form the balls. Place them into the hot Dutch oven and let brown for 2-3 minutes. Turn the “meatballs” over and brown on the other side. Take them out of the Dutch oven and set aside. Spray with more cooking spray if needed and add another batch of “meatballs”. Continue until all your “meatballs” have been browned.
Bring the heat up to high, add more cooking spray, and add crushed garlic and dried oregano and basil. Let it bloom, develop & release the aroma for 1-2 minutes. Add crushed tomatoes. Depending how much tomato sauce you’d like to have you may need to adjust the amount of crushed tomatoes you add. Bring the tomato sauce to a simmer and let it simmer for 5-10 minutes.
Turn the heat way down and add back the “meatballs”. You will likely have two layers of meatballs which is fine, but it’s a good idea to keep in mind that they are relatively soft so treat them gently! Make sure they are nicely snuggled and covered by the sauce. Put the lid on and let the “meatballs” and sauce simmer for 15 – 20 minutes.
When you are ready to serve, start with a generous amount of Zucchini Spaghetti, add couple of vegan meatballs, spread some sauce, and top with fresh basil. Enjoy!
Update: Few days ago I used the same “meatball” mix and made a “meatloaf” out of it. It worked really well!!! Here are couple of pictures to show you what it all looks like. One tip: bake the “meatloaf” on 375 F (190 C) for 25-30 minutes first, before putting on the tomato paste, then bake for 15 minutes more. Let the “meatloaf” stand for 15 minutes before cutting – the loaf will be soft when it comes out of the oven but it will firm up!
I never had jackfruit in my life until last night. And just like that this weird plant food became one of my favorite ingredients and the one I want to use in as many of my dishes as possible. What is jackfruit?
Jackfruit is a popular ingredient in South and Southeast Asian cooking, but it remains obscure to most living in the Western world. This means that finding jackfruit may turn out to be difficult as your regular grocery store is unlikely to carry it. But, let me tell you: jackfruit is so wonderful that it is worth jumping through few hoops to get it. My starting point were online retailers, like Amazon, and that would have been fine has it not been for the fact that I wanted to start cooking right away and could not wait for the delivery.
So I got down to plan B and found a local Asian market, in my case Formosa Marketplace, and the place did not disappoint. They got exactly what I was looking for – young jackfruit in brine. Jackfruit also comes ripe in syrup, but that is not the kind that you want for your savory dishes, plus it is not the kind that seems particularly healthy given all that added sugar. If you are interested in learning more about jackfruit and getting the idea what type of dishes you can use it in, the Vegetarian Resource Group has a useful post.
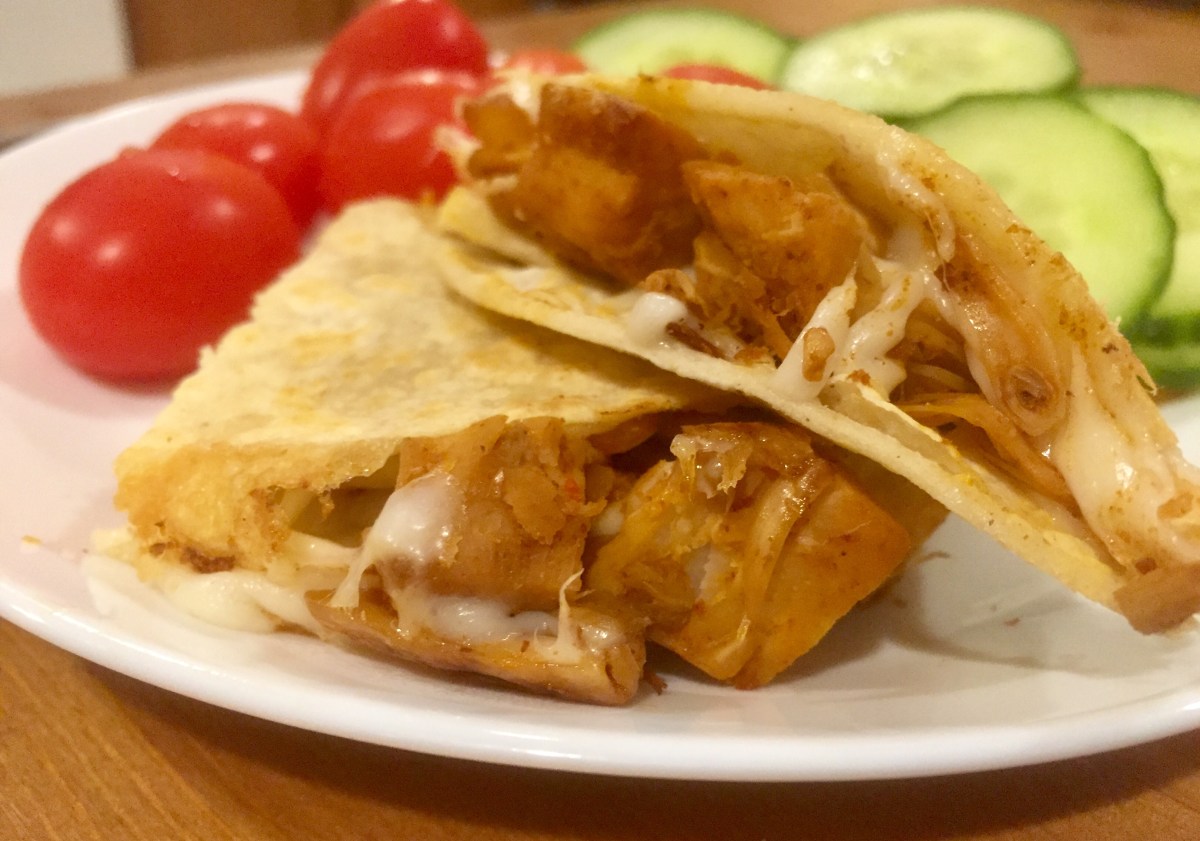
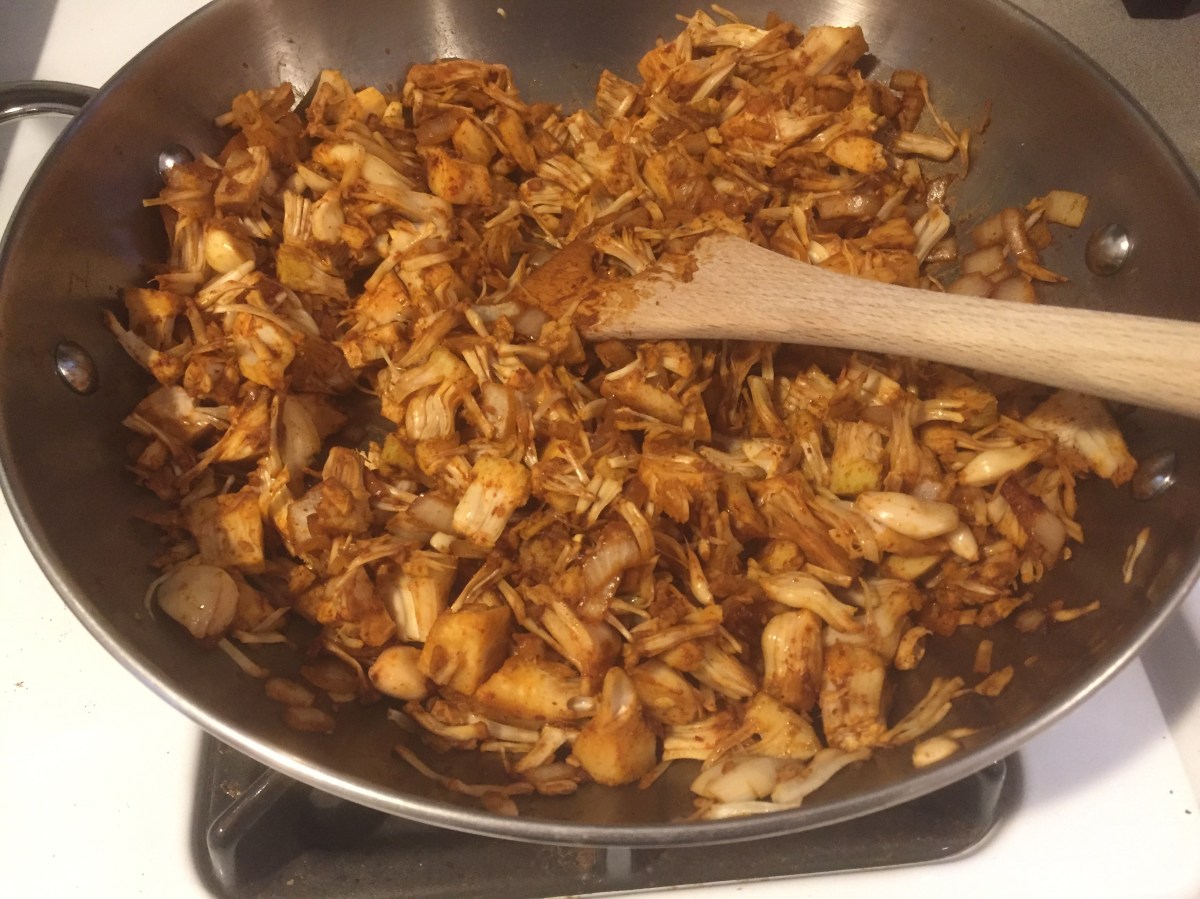
How do you get from a can of young jackfruit to a taco filling? It’s super easy. All you need to do is rinse the jackfruit and let it drain and dry. Once the jackfruit stops dripping, you will need to go and pull the fruit pieces apart, which does take a bit of effort and time but makes for more surface area to absorb all the lovely flavors you will add next.
Although you could use a pre-made taco seasoning mix, there’s no need for that as those usually contain quite a lot of quite unnecessary salt. One additional ingredient that you will need is almond cheese. I have not yet figured out how to make almond cheese on my own, so for now I get the one from my local Trader Joe’s. They carry shredded almond cheese that is delicious and affordable.
When all is said and done, your jackfruit taco filling will look something like this.
Jackfruit Taco filling, via Eat the Vegan Rainbow
To build tacos, you will also need corn tortillas, but possibilities are close to endless. You can customize your tacos by adding salsa, avocado, fire roasted green chili peppers, cilantro, lime juice, and shredded iceberg lettuce. For me some cucumber slices and pearl tomatoes on the side hit the spot!
Jackfruit Tacos
What you’ll need (for 4 tacos, 2 people):
1 10 oz. (280 g) can of young jackfruit in brine
1 onion, finely diced
1 tablespoon minced garlic
1 teaspoon smoked paprika
1 teaspoon chili powder
1/2 lime, just juice
1/4 cup water
4 corn tortillas, soft
1/2 cup almond cheese
cooking spray
What you’ll do:
Place jackfruit in a strainer and rinse it well with water to get rid of the salty brine. Let the jackfruit drain for 15-20 min, and then pat dry with a paper, or a cloth towel. Next, pull the jackfruit pieces apart to get a pile of finer shreds.
Spray the bottom of a pan with cooking spray and turn the heat to medium high. Add finely diced onion and minced garlic to the pan and let the onion and garlic aromas develop for 3-5 min.
Next add the spices and let them simmer for 1-2 min. This will help the spices toast and intensify the flavor. Don’t worry if some of your spices, onion or garlic stick to the bottom of the pan as lime juice and water that you’ll add next will serve to deglaze the bottom. You may need to adjust the amount of water as you go along, so I recommend starting easy by adding 1-2 tablespoons and going from there.
Once you are happy with the deglazing and the consistency, which should be somewhere between the ketchup and tomato paste, it’s time to add jackfruit. Make sure jackfruit is fully coated with your sauce, and simmer for 5-10 min, until jackfruit browns just slightly. Leave to the side.
Heat a non-stick frying pan with cooking spray and place over high heat. Put one corn tortilla in, top it with jackfruit filing and 1/4 of your cheese and fold the tortilla over. Brown on one side for 1-2 min then flip over and brown on the other side for 1 min or so.
Enjoy!
Note: You can use leftover taco filling in number of different ways. You can top a sandwich, or rice and other grains, as well as pasta or zucchini spaghetti.