Plantains and Beans Chili, via Eat the Vegan Rainbow
Plantains are those weird looking, giant bananas that look either too green or way past their prime, and usually not very appetizing. But, they are a staple of certain cuisines and I’ve had them while I lived in Ghana, almost exclusively deep fried. Unfortunately, deep fried plantains were not quite to my taste and I stayed away from them until very recently.
I was inspired by a Puerto Rican “lasagna” recipe that used plantains instead of noodles and was happy with the results. Here, I wanted to do something slightly different. I started from really ripe plantains and roasted them without peeling. Then, I made mashed plantains and combined them with plain, white beans (navy beans), and a handful of spices to create a rich and dense chili. Why does this chili work? First of all, plantains are full of starch and relatively sweet, adding lots of great flavor almost as if you were adding molasses. The spices and flavor agents, tomato paste, Chile Lime seasoning bland, and paprika helped the taste along. Lastly, the navy beans worked well here because they added smoothness and creaminess. Sprinkling some fresh cilantro complements the ensemble, and you could also spoon some dairy-free sour cream on top or some plant-based yogurt.
Plantains and Beans Chili, via Eat the Vegan Rainbow
Plantain and Bean Chili
What you’ll need:
4 very ripe plantains, roasted
1/2 lbs (225 g) white beans, cooked or from the can
1 onion, diced
2 tablespoons tomato paste
1 teaspoon ground cumin
1 teaspoon Chile Lime seasoning bland (this is a product from Trader Joe’s but you can make your own with some chili powder, salt, and lime zest)
1/2 teaspoon paprika
Cooking spray
1/4 cups fresh cilantro, roughly chopped
What you’ll do:
Get ripe plantains – those that have quite a few black areas on them – wash them and place them on a baking sheet without peeling. Roast the plantains at 425 F (220 C) for an hour. Their skins will turn black and they should soften inside.
Let the plantains cool then peel them and mash with a potato masher. You could also put them into a food processor and pulse until fine.
Heat a cast iron pan over the medium high heat. Add the cooking spray, spices, tomato paste, and the diced onion and let everything caramelize well, which could take up to 15 minutes.
Add the plantains and let the bottom start to brown. Mix well and cook for 5 to 8 minutes.
Add the cooked beans – I cook mine in a pressure cooker after soaking them overnight – and let the dish simmer for 10 minutes or so.
Serve with a dash of fresh cilantro, or other types of topping you prefer to use on your chili.
Scallion Crêpes with Sesame and Ginger Dipping Sauce, via Eat the Vegan Rainbow
In Serbia, ex-Yugoslavia, where I grew up, there is only one type of pancakes people make – palačinke. They are huge in Central Europe and on the Balkans, and if you are wondering how to pronanounce their name before you munch on them, you would pronounce “č” the same way you do the digraph “ch”. They are thin, they roll and fold easily, they can handle any type of topping, and they are super easy to make. They are also pretty much the same thing as crêpes, so I am sticking with that better known name for the rest of the post. It’s probably one of the first recipes my mom taught me, and knowing how to make crêpes was a bit of a teenage rite of passage for my friends and me. If you knew how to make them you were definitely a part of the in-crowd!!!
And while crêpes are considered very much a French thing (and now you probably appreciate that they are also huge on the Balkans), scallion (or green onion) pancakes hail from a totally different culture – they are a staple of Chinese cooking. Some of the Scallion Pancake recipes use chicken fat (!), but the one by Ming Tsai, a TV chef known for his East-West fusion cuisine, is vegan-friendly, and you may want to give it a try. But, these pancakes do require kneading, and a bit more hands on than I am prepared to do.
So, channeling my inner Ming Tsai and his East-meets-West fusion style, I now give you Scallion Crêpes with Toasted Sesame Seeds and Ginger Dipping Sauce. The crêpes take about an hour to make, from start to finish, and the sauce comes together in five minutes or so.
If you have never made crêpes before, relax – they don’t take much time or much effort. All you need is a large bowl and a large whisk, or a large blender. Your goal is to mix wet and dry ingredients until a smooth and very runny batter forms. Crêpes come out best when you use a large frying pan with a very flat bottom, when you keep your pan hot, but not too hot, and when you drizzle a drop or two of fresh oil before pouring in a new batch of batter in. If you have a really fantastic non-stick pan, you may be able to skip the oil but crêpes can be sticky, so proceed with caution.
One of my mom’s tricks is to use a teaspoon of oil and a really hot pan for the first crêpe. That crêpe is too oily and is usually discarded, but cooking it seasons the pan so that you only a drop or two of oil for the rest of the crêpes that should slide right out there when done.
There’s a bit of technique to flipping the crêpes over. First of all, you will need to figure out how much batter you need to pour in to make a thin, yet not too flimsy crêpe. For a regular size frying pan (8 in; 20 cm) I’d say start with 3/4 cup of batter. Pour the batter in the middle of the pan and then move your pan around quickly to help the batter spread around all the way to the edges, making one smooth, thin layer.
Second thing that you will need to know is when to flip, and the answer to that is when the uncooked side starts to look dry, which should not take more than couple of minutes. Once you see that it’s time to take hold of the pan’s handle and give it a shake. If everything is working according to the plan your crêpe should be sliding around the pan freely. If not, you will need to use a thin spatula to slide it under the crêpe and ensure all the sticking points are unstuck. The best spatulas to use for this are the metal ones you would normally use to frost a cake.
With your crêpe’s surface looking dry and your crêpe moving freely around the pan you are ready to flip. I flip my crêpes either by tossing them in the air – that’s my signature move and a crowd pleaser, and it took quite a few mistakes to perfect – or by using my fingers. I grab the edge of a pancake with both hands and flip it over, taking good care not to touch the pan. This only works if the edges of your crêpe are curling up and away from the sides of the frying pan.
Now that you know what I typically do, let me tell you what I think you should do. The best thing to try first is to use a thin, long and wide spatula that can go under the crêpe and in one swift move flip the crêpe over.
Once the epic flipping of the crêpe has been accomplished the crêpe will need only a minute to finish cooking on the other side. Normally, you would add a spread or a filling just after you slide the crêpe out while it’s still hot. In this case I actually don’t think the spread is needed as all the scallions make the flavor pretty rich to begin with. Add to that the dipping sauce full of soy sauce, toasted sesame seeds, squeez of lime, and freshly grated ginger – mmmmm… – and you’ll get plenty of flavor.
Scallion Crêpes with Sesame and Ginger Dipping Sauce
What you’ll need:
For the Crêpes
2 cups all-purpose flour
2 tablespoon corn starch
1 3/4 cup aquafaba (liquid from a can of chickpeas)
1 cup almond milk, plain and unsweetened
1 cup scallions (spring onions), white and green parts, chopped
Oil for cooking
For the Sauce
1/2 cup soy sauce, reduced sodium
2 tablespoons lime juice, freshly squeezed
2 tablespoons sesame seeds, toasted
2 teaspoons ginger, freshly grated
1 teaspoon crushed red pepper flakes (optional; skip if you don’t enjoy spicy food)
What you’ll do:
Place all the crêpes’ ingredients except scallions in a blender and mix well. You can also mix everything up with a regular mixer or by hand. The resulting batter should be smooth and clumps-free.
Add the chopped scallions, mix them in and let the batter rest for 30 minutes.
While the batter is resting, mix together the dipping sauce. For best results use fresh ingredients, and toast the sesame seeds yourself – they need only 2-3 minutes in a toaster oven or in a frying pan on the stove top. Cool the seeds a bit before mixing with the rest of the ingredients.
Heat a large frying pan with a flat bottom until hot. Add a teaspoon of oil and 3/4 cup of batter. Spread the batter around until it covers the entire surface of the pan.
Lower the heat to medium to medium high, and cook until the upper side starts to look dry. Flip the crêpe and continue cooking on the other side for another 1-2 minutes.
Slide the crêpe out, fold twice, making a sort of triangle, and keep the crêpes warm either by covering them, or by putting them in a warm oven.
When all the crêpes are done, arrange them on a platter and enjoy with the dipping sauce (or without!).
Summer Squash Noodles with Pumpkin Seed Pesto, via Eat the Vegan Rainbow
A sunny day in late November is a real treat. It sends strong reminders of the summer that’s gone, and that, as well as too much root vegetables on the plate over the Thanksgiving holiday, made me reach out for summer squash.
Summer squash is not something I routinely make. I prefer zucchini and Italian squash, but this time around it was the summer squash that looked the freshest so that’s what I got. I used my spiralizer to make some summer squash noodles – if you don’t know what spiralizer is, it’s a kitchen gadget that you’d think you can totally live without but in reality you really can’t.
Joking aside, spiralizer is a gadget that makes long, amazing noodles from all sorts of vegetables and fruit. Initially, I thought I can get by with a mandoline slicer – and that worked fine couple of times. But, after buying spiral cut zucchini from the store few times – and paying through the roof for it – I finally broke down and bought an actual spiralizer. The gadget paid off for itself already, and I’ve enjoyed spiralizing zucchini, summer squash, sweet potatoes, apples and beets.
I paired summer squash with a simple oil-free pumpkin seed pesto, which has four ingredients only: raw pumpkin seeds, roasted garlic, fresh parsley and nutritional yeast. The pesto comes together in a food processor in less than two minutes and it’s ready to use immediately. Plus, the pesto uses pumpkin seeds so in a way builds on all the pumpkin craziness of the season, which I kicked off with my Pumpkin Truffles.
You can make this dish completely oil free, but I did use some cooking spray to oil the baking dish. It helps brown the pesto and the squash, and it does help with cleaning up. This baked summer squash “pasta” goes well with a side of chopped roasted red peppers, some shredded vegan cheese, ripe avocado slices, or a squeeze of lemon. It’s easily customizable, but it’s also a meal on its own.
Note: this same recipe would work with spiralized zucchini or spiralized Italian squash!!!
Baked Summer Squash Noodles with Pumpkin Seed Pesto
What you’ll need:
5 pieces of summer squash, spiralized
2 cups pumpkin seeds, raw
1/2 cup flat leaf parsley
3 cloves garlic, roasted
2 tablespoon nutritional yeast
Cooking spray
What you’ll do:
Preheat the oven to 350 F (175 C).
Spray the bottom and sides of a large and deep baking dish with cooking spray.
Place your spiralized summer squash in a large mixing bowl.
In a food processor combine pumpkin seeds, roasted garlic, fresh parsley and nutritional yeast. Pulse until a fine pesto forms.
Pour the pumpkin seed pesto over the summer squash noodles and toss to combine.
Pour everything into the baking dish and bake uncovered for 15-20 minutes.
Cover the baking dish with foil and bake covered for another 15 minutes or so. Serve hot, or cold as a salad with a drizzle of balsamic vinegar!!!
Homemade 1-minute Peanut Butter Nutella, via Eat the Vegan Rainbow
Believe it or not, you can now make your own Nutella-like spread in less than a minute. Yes, you read that right – and it is not a question of gimmicky gadgets or anything like that. It’s really all about having three ingredients at hand and readily available. The trifecta in this case consists of peanut butter powder, cocoa powder and stevia.
Peanut butter powder is my newest discovery so let me rave about it for few minutes. I believe that you can now get peanut butter powder in any US-based grocery store. Even the peanut butter behemoth, Jif, has its own version of this product, which I have not tried yet so can’t really comment on whether that specific brand is any good and how it compares to others.
Peanut butter powder is mostly protein left over after you remove most of the fat (and thus lots of calories), so it is an ideal addition to smoothies, oatmeal, baking, even desserts like Dark Chocolate Almond Butter Cups (as a substitute for almond butter), and even Pad Thai or other dishes that ask for peanut butter. The powder adds creaminess and packs all of that peanut flavor so a little usually goes quite a long way.
Plus, as a bonus, it transforms into a peanut butter-like spread when mixed with some water!
There are couple of different peanut butter powder “formulations” out there so check the ingredients list first in order to make an informed decision. My first excursion into the peanut butter powder land involved a product that contained added sugar, and that was not what I was looking for. So, I currently use peanut butter powder that lists only one ingredient: peanuts! Needless to say, if you do have a peanut allergy, this is not for you!!!
The recipe below is my new go-to, quick fix bread spread which has less calories, is low-fat and low-sugar so completely vegan, paleo-friendly, and done in a minute. I call it Homemade Peanut Butter Nutella because it combines that rich darkness of cocoa with the peanut aromas into a creamy spread. The recipe below makes one serving – I’ve no clue whether this would store well because I make one single serving at a time, so I recommend you start off using it in this way as well.
Homemade 1-minute Peanut Butter Nutella, via Eat the Vegan Rainbow
Homemade 1-Minute Peanut Butter Nutella
What you’ll need:
2 tablespoons peanut butter powder (no sugar added)
2 tablespoons dark cocoa powder
1 packet stevia powder (or your sweetener of choice)
2-3 tablespoons hot water
What you’ll do:
Combine the dry ingredients (peanut butter powder, cocoa powder and stevia) in a mixing bowl.
Add hot water, one tablespoon at a time, and mix well with a spoon until you get the smooth and spreadable consistency.
Enjoy on toast, fruit, or in any other way you would normally use a spread like Nutella for!!!
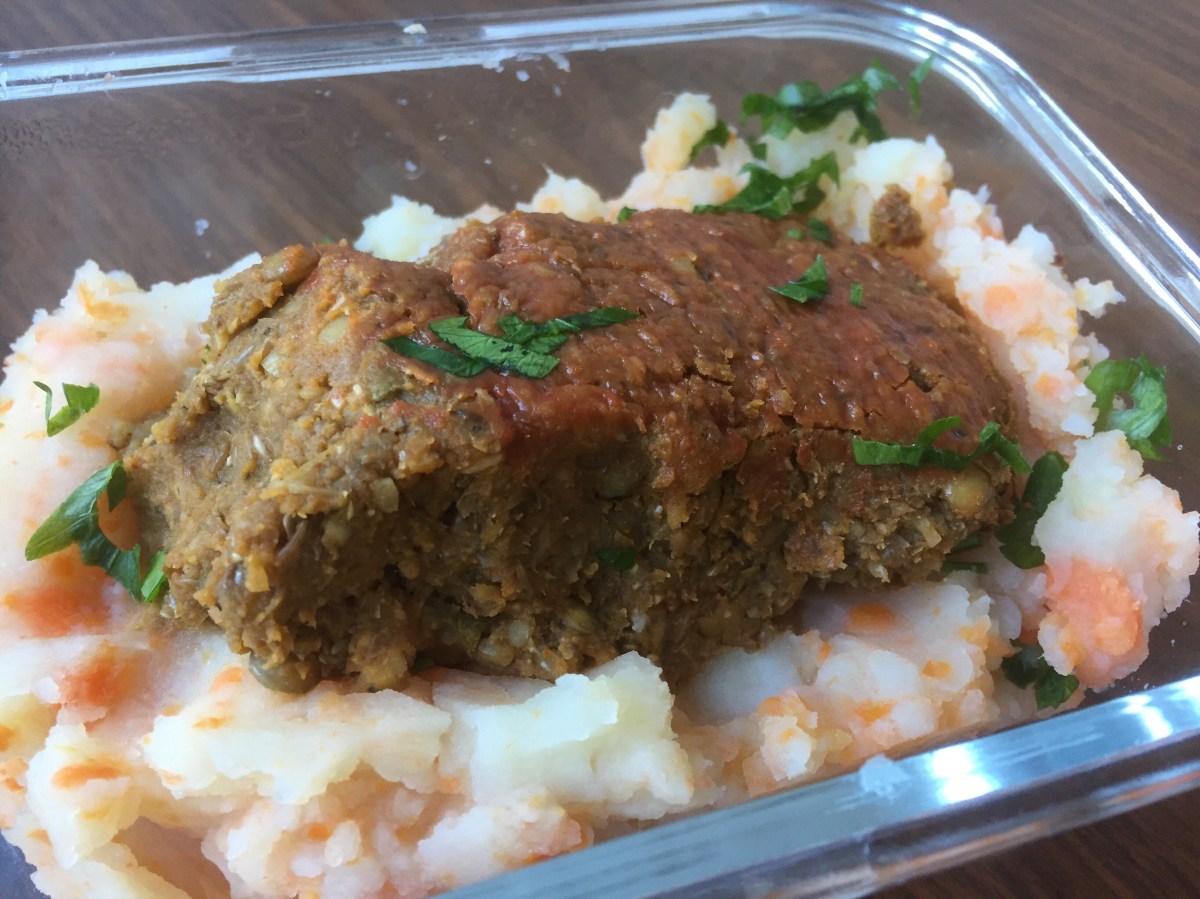
Lentil and Pumpkin Meatloaf with Carrot-Potato Mash, via Eat the Vegan Rainbow
Meatloaf – that one dish that is universally despised yet it persists against all odds. During my meat eating days, I may have made meatloaf once or twice and it did not make a great impression. This Lentil-loaf is different. It’s full of flavor and lightness, while at the same time a little goes a long way.
The key ingredient are the lentils. They are one of those ingredients that can replace minced or ground meat in almost anything. I used them in Shepherd’s Pie, and in Lasagna, as well burgers, meatballs and in that staple of vegan cooking, Lentil Soup. Lentils are cheap, available, nutritious, and lend themselves to many spice and flavor combinations.
In this meatloaf, lentils are the meat, but meat is not all it takes to make a loaf. So, to bind everything together I use a can of pumpkin. The pumpkin holds things together almost as good as an egg would. If your loaf turns out a bit softer than you like, add some oats or some bread crumbs to it. I also recommend letting the loaf sit for 15 minutes or so after coming out of the oven to firm up before serving.
Finally, what really makes a huge difference is what you do to onions and celery before you mix them all into a loaf. I recommend that you place the diced onions and celery, with a dash of cooking spray or oil, into a microwave for five minutes or so. You want the aromatics to soften and brown as they will not have a real chance to do so while the loaf is baking. This will add a nice sweet and savory tone to the loaf and help lentils and the pumpkin, as neither one has a strong flavor. To help them out even further, you will need to add some more umami-type of components, like the Worcestershire and the tamari sauce.
You can serve this meatloaf with any sides you like. Here, I paired it with mashed carrots and potatoes. Adding some carrots to the plain, white potato mash makes it more colorful, playful and in some ways healthier. Plus, it offers a break from the routine! You can make the mash withou adding any salt or butter (oil), it would taste just fine, especially when served with this lentil and pumpkin loaf which has plenty of flavor itself.
Lentil and Pumpkin Meatloaf with Carrot-Potato Mash
What you’ll need:
For the Meatloaf:
1 yellow onion, diced
2 cloves garlic, crushed
4 stalks celery, diced
16 oz (454 g) brown lentils, cooked
1 15 oz (425g) can pumpkin
1/3 cup tamarind sauce
1 tablespoon Worcestershire sauce, vegan
1 tablespoon dried oregano
1 tablespoon dried basil
1 teaspoon chili powder
2 teaspoon smoked paprika
1/4 cup ketchup
Cooking spray
For Carrot-Potato Mash:
6 carrots, peeled and chopped
4 potatoes, white, peeled and chopped
1 tablespoon butter, vegan
1/4 teaspoon salt
What you’ll do:
Bring 4 cups of water to boil and add the lentils that have been washed and sorted. Reduce the heat and simmer for 30 minutes until lentils are fully cooked. Drain the excess liquid and transfer the lentils into a large mixing bowl. Let them cool while you assemble the other ingredients.
Peel, wash and chop the carrots and potatoes into smallish cubes of about similar size. Place in a large pot or a pressure cooker, cover with water, bring to boil and cook for 20 minutes if using a conventional method or 10 minutes in the pressure cooker. Drain from excess liquid, add the salt and butter and mash it with the potato masher. Place into a serving dish and cover with foil to keep warm until the meatloaf is ready. If you like you can even place the mashed carrots and potatoes into an oven safe dish and let the top get crunchy.
Preheat the oven to 375 F (190 C).
While lentils are cooling and carrots and potatoes boiling, dice onions and celery. Place into a microwave safe bowl, spray with cooking spray or with 1/4 teaspoon oil and microwave on high for 5-6 minutes, until soften and slightly browned. Add to the lentils when ready.
Add the rest of the meatloaf ingredients (except ketchup), and using a stick blender form a well blended mixture. You can also use a food processor. In both cases, do leave some lentils whole to add to the texture of the final meatloaf.
Line a large baking sheet, or a loaf pan if you prefer your meatloaf more loaf-y, with a foil, spray with come cooking spray to prevent loaf from sticking, form the loaf with your hands if you are using the baking sheet, and place into the oven (if you are using regular size loaf pans you will have enough of a mixture for two loafs).
Bake for 20 minutes, take the meatloaf out and spread the ketchup across the surface, and bake for another 10 minutes. Take the loaf out and let it rest for 15 minutes before serving.
Serve the meatloaf with the mashed vegetables and enjoy!
10-Minute No-Sugar Added Blueberry Jam, via Eat the Vegan Rainbow
Let me try to make this post as short as the recipe itself. It’s probably already too long because, amazingly, you will need less than ten minutes to go from frozen blueberries to this instant blueberry jam!
The jam is sweet, spreadable and full of pure blueberry flavor. You can use it on anything you would normally put the jam on, and you can store it in the fridge for a week or so, although it will probably not last that long.
What’s the secret? Not much really. It all comes down to mixing frozen blueberries with tapioca starch in a large, microwave safe bowl and letting you microwave oven take care of the rest. You can have some warm jam on you pancakes but I recommend patience and letting the jam cool completely before enjoying!
10-Minute No-Sugar Added Blueberry Jam
What you’ll need:
3 cups blueberries, frozen
2 tablespoons tapioca starch
What you’ll do:
In a microwave safe bowl, mix together blueberries and tapioca starch. Mix well until the blueberries are well covered with starch.
Place in the microwave and microwave on full power for 5 minutes.
Take the bowl out, mix well again and put back into the microwave oven for another 5 minutes.
When the second 5 minutes are up, mix again and check that jam is starting to become dense.
You can use both the warm and the cold blueberry jam on pancakes, toast, oatmeal…
You see… I told you it was short and it is absolutely sweet!!!