Slow Cooker Hodgepodge

Slow Cooker Hodgepodge
Slow Cooker Hodgepodge, via Eat the Vegan Rainbow

A slow cooker, also known as Crock Pot (which is a brand name I think), may seem like one of those kitchen gadgets that you’ll get, use once and forget. Although I use my slow cooker once a month or so, it is absolutely wonderful to have around. There have been many instances when my weekends were busier than my work days (and I do all my cooking on weekends) and slow cooker came to the rescue. I would set the thing up in the morning before I got out the door, and the dinner would be ready by the time I came back in the evening, warm and delicious!

For example, the recipe I am sharing here was the one I made for a dinner party – and everyone walked away with their bellies and taste buds completely happy!!! That’s another reason to get a slow cooker – it can really help with all those dinner parties and pot lucks. The crock pot serves not only to cook food but can hold food warm for hours.

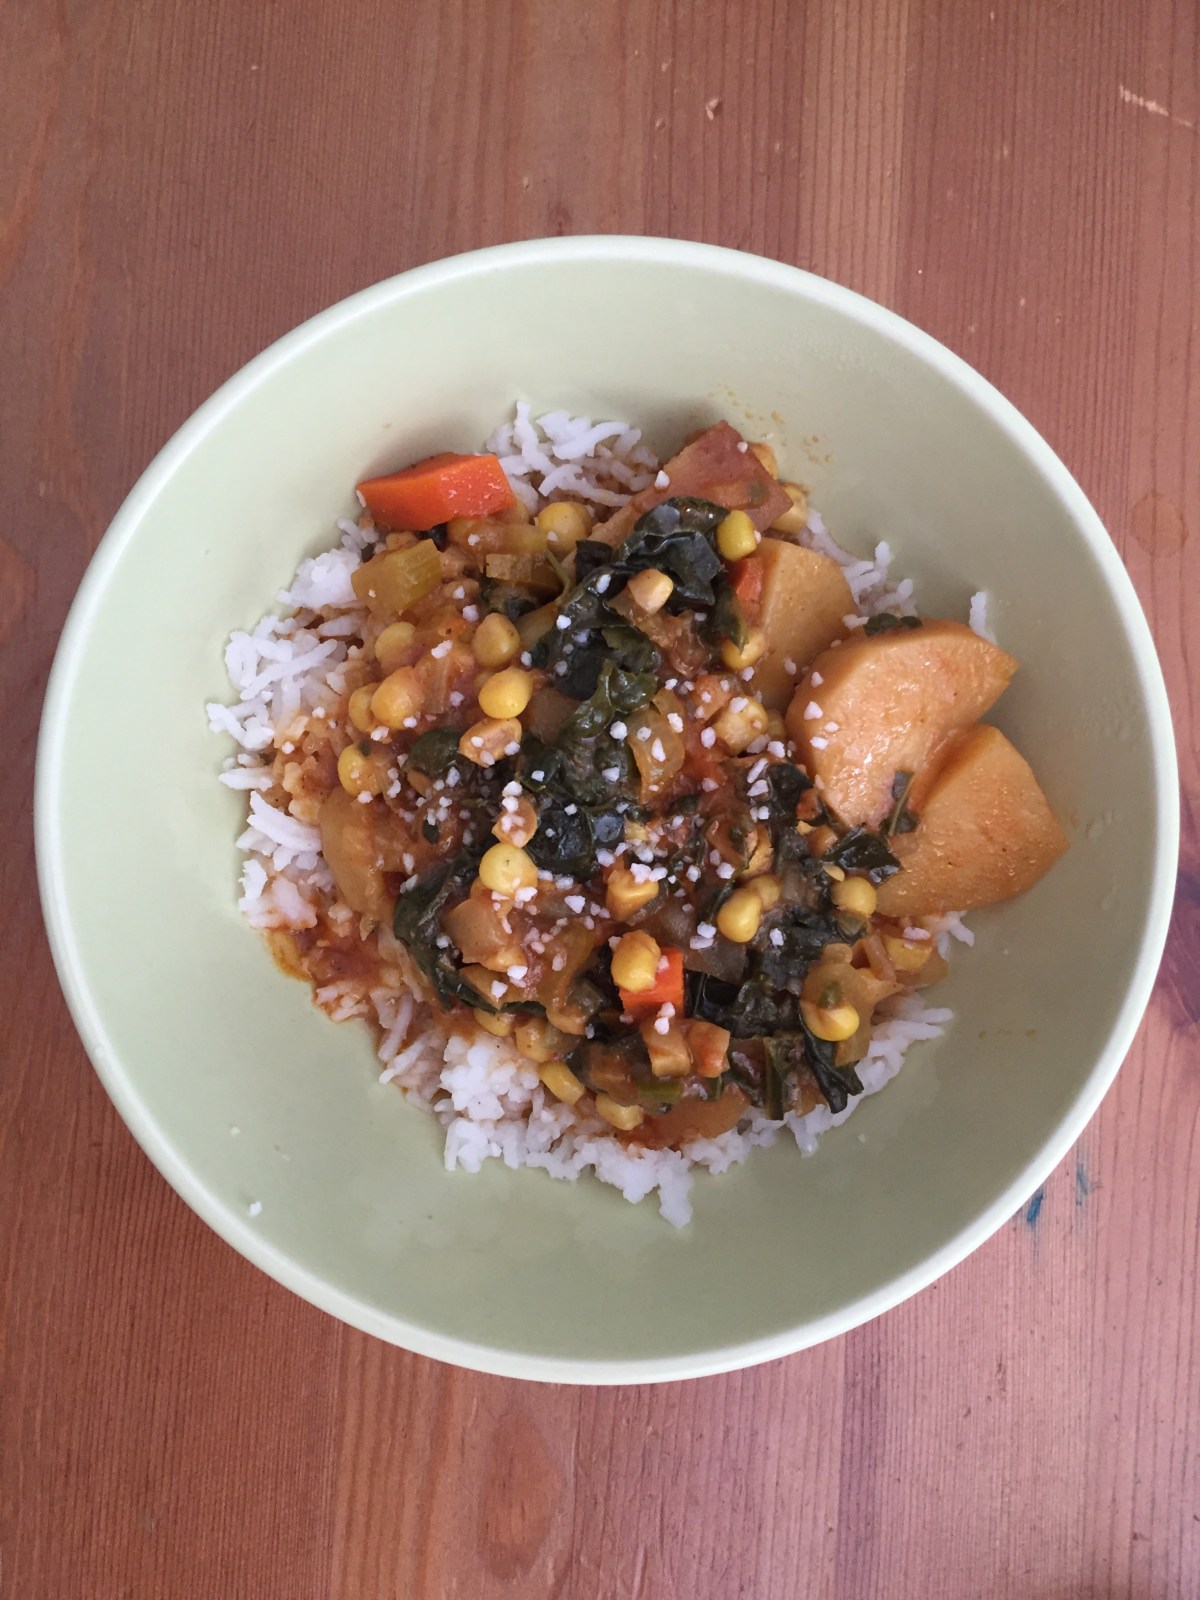
My favorite thing to make in a crock post are sort of stews – hearty dishes with a handful of ingredients that are full of flavors and warmth. This jackfruit stew is a good example (and I also used jackfruit to make a “chicken” tikka masala in a slow cooker as well as BBQ pulled pork), as is this tofu-mango-chickpea curry.

The inspiration for this hodgepodge – which technically means “confused mixture” – was all the great vegetables that were in my weekly CSA share (CSA stands for Community-Supported Agriculture and is a program in the area where I live that supports local farmers and give local folks like me access to farm fresh produce). The recipe uses corn (kernels only), kale, potatoes, carrots, celery, and onion. All these ingredients work together well, and I don’t recommend that you make some sweeping swaps. Things that would likely work are using peas instead of corn, using rutabaga or turnip instead of potatoes, and chard, collard greens or spinach instead of kale.

However, there really is no substitute for the mirepoix – carrots, onions and celery. This makes the base of the dish and I can’t think of the ways to sub these – my apologies for those of you with onion allergies! Usually, mirepoix ingredients are sautéd; however, the slow cooker does not have this function. So, I recommend either sautéing diced carrots, celery and onion in a pan over medium-high heat for 8-10 minutes, or mixing the diced vegetables with some oil and putting them in a microwave oven for about 5 minutes. This will help brown and soften them, and will help with flavors!

Another shortcut that you can take when using a crock pot is to use a liner – this will make your clean up really, really quick! A liner is a special type of plastic bag that you put inside your crock pot and place all ingredients in it. The food cooks as it does normally and you end up with a clean pot afterwards. What’s not to love!!!

In addition to veggies, what makes this an amazing feast are the spices, curry powder and bay leaves, and coconut milk, which gives this stew its creaminess. Serve over rice or couscous, and perhaps with some coarse salt (which is what I topped mine with). Enjoy!

Slow Cooker Hodgepodge

Slow Cooker Hodgepodge

What you’ll need:

  • 1-1.5 lbs (500-800 g) white potatoes
  • 4 ears of corn, just the kernels (or 4 cups frozen corn kernels, defrosted, or about 2 cans (15 oz; 400 g) of whole kernel corn)
  • 1 bunch (6 cups) kale (or chard or collard greens), just sliced leaves, stems removed
  • 4 large carrots, peeled and diced
  • 6 talks celery, sliced
  • 1 onion, diced
  • 1 tablespoon curry powder
  • 3 tablespoons tomato paste
  • 2 cups vegetable stock
  • 1 can (13.66 fl oz; 400 mL) coconut milk
  • 4-5 bay leaves
  • 1 tablespoon vegetable (or olive, or canola) oil
  • OPTIONAL: Rice to serve

What you’ll do:

  1. Wash, peel and chop the potatoes into 1 to 1 1/2 in (2.5 – 3.5 cm) cubes. Place in the crock pot that has been lined with a liner, if using.
  2. If starting from fresh corn, wash the ears, and using a sharp knife go down each ear and get just the kernels. If using frozen corn, it’s best to leave it on the kitchen counter overnight to defrost, but you can start from frozen as well. If using canned whole kernel corn, drain and rinse before using. Place over the potatoes.
  3. Wash, drain and de-vein the kale to remove all the tough stems. Chop the leaves into rough shreds. Place over the corn.
  4. Peel and dice the onions and carrots, and dice the celery. Place onions, carrots and celery into a microwave safe dish, mix with 1 tablespoon of oil, and place in a microwave for 5-6 minutes on high power. You can also sauté on the stove top. Pour over the potatoes, corn and kale.
  5. Place a non-stick frying pan over medium-high heat. Add the curry powder and dry toast for 1-2 minutes, then pour over the veggies in the crock pot.
  6. Pour the coconut milk, vegetable stock and tomato paste into a measuring cup or a mixing bowl large enough to hold everything. Mix together to combine. Don’t worry if there are chunks and clumps, but do give it a good mix. Pour over the vegetables in the crock pot.
  7. Give everything a good mix, tuck the bay leaves throughout the stew, cover with the lid and turn the crock pot on high heat for 6-8 hours.
  8. Serve over rice, or couscous, and sprinkle with salt (Note: this recipe does not use added salt, but you can add as little or as much salt as you like!).

Copyright © Eat the Vegan Rainbow, 2019

Homemade Nut and Seed Granola

Homemade Nut and Seed Granola
Homemade Nut and Seed Granola, via Eat the Vegan Rainbow

There are so many granolas out there. And there are ready made ones that you can get from the store. So, why should you ever bother making granola at home?

Well, I bet it is sometimes hard to find the perfect granola – some may be too sweet, some may include things you don’t like, some may have flavoring agents (spices) that you can’t stand or that overpower your palate. So, what I am getting at here is that knowing how to make granola comes in handy – you can use the same technique and just switch ingredients in and out as you please.

For example, I am not a huge lover of dried fruit in my granola so I made this batch with nuts and seeds. If you are allergic, you can make granola entirely out of nuts and still get a great snack/breakfast item.

Also: you are in complete control of the sugar levels. In many cases, store bought granola mixes are just to sweet. Making your own allows you to dial sugar up or down – recommend using a syrup: agave or maple or even stevia or molasses. You do need something sticky that will serve as a glue to bind all the ingredients together. Here, I used agave syrup, and 1/3 of a cup, although it does not sound like much, is plenty.

Now, when it comes to preparation, you will need a parchment paper-lined baking sheet (or two). The first step is getting the granola spread out as much as possible. It is nice to have clusters, so don’t break every cluster apart, but you do want to make sure that you are leaving plenty of space between clusters so that they get a chance to brown and crisp up on all sides. If you discover that a single baking sheet can’t hold the entire amount you get using the measures below, use two sheets. The main trick here is to start low and slow, and “dehydrate” the granola at 200 F (which is just about 100 C) for an hour or two.

However, in order to get the final, toasted crunchiness you do need to increase the heat to 425 F (220 C) or higher. This second step takes only 5-10 minutes, and you do need to stay put and check how things are going every minute or two. It’s important to keep stirring the granola, move pieces around, and flip them over. This will prevent the burning, yet let the toasty flavors develop.

You can keep the granola in the air tight container for a week, and it will keep. You can bring it along to hikes, or have on hand as a quick snack. You can certainly enjoy it for breakfast. Putting a bit of yogurt (preferably unsweetened because granola does contain added sugar) in a small jar, and topping it with fresh fruit or a fruit compote, and some granola is all you need to get going in the morning. Closed with a tight lid, these jars can go right into your bag and come along as you rush out of house. They can also be a great mid-afternoon pick-me-up.

I admit that I sometimes go a bit crazy and add granola into my oatmeal – it is indulgent but once in a while I think it’s OK. Enjoy!


Homemade Nut and Seed Granola

What you’ll need:

  • 1/3 cup almonds
  • 1/3 cup buckwheat
  • 1/3 cup flax seed
  • 1/3 cup unsweetened coconut flakes
  • 1/3 cup sunflower seed
  • 1/3 cup pumpkin seed
  • 1/3 cup rolled oats
  • 1/3 cup hemp seeds (hulled)
  • 1/3 cup agave syrup (maple syrup or other liquid sweetener of your choice)
SERVING SUGGESTIONS
  • 1/2 cup plain plant-based yogurt
  • 1/2 cup fresh fruit (like blackberries pictured above)

What you’ll do:

  1. Preheat the oven to 200 – 210 F (about 100 C).
  2. Place the almonds into the food processor and process 4-5 times, until roughly chopped.
  3. Add the next 6 ingredients (all except hemp seeds and agave syrup) and process for another 4-5 times. You want everything to be chopped finely but not turned into a meal or flour.
  4. Pour everything into a large mixing bowl, add hemp seed and the syrup and mix well to combine. Make sure that the syrup covers everything evenly.
  5. Line a large baking sheet with parchment paper. Spread the granola evenly in a single layer of well separated clusters. Place into the oven on low heat for an hour.
  6. After an hour at low heat, increase the heat to 425 F (220 C) and toast the granola for another 5-8 minutes. Make sure you check on your granola every minute and mix each time to allow every nook and cranny to get toasted. CAUTION: you do need to baby sit this part because your granola will easily burn!!!
  7. Once nicely toasted, take the granola out and let it cool completely before using. You can use it as a dry snack, or with some milk for breakfast. My favorite is topping a bit of yogurt with a homemade berry syrup and granola – yummy!

Copyright © Eat the Vegan Rainbow, 2019

Basic Falafels with Pan-Toasted Chickpeas

img_6511
Basic Falafels with Pan-Toasted Chickpeas, via Eat the Vegan Rainbow

Falafels are the kind of food I struggled with. I love them when I get them in restaurants (etc.), but I hated every single batch I ever made at home. They would taste weird, either with a strange metallic taste or uncooked garlic flavor, and I could never get them to be cooked through and nicely crunchy.

One reason for this that I am very much aware of is that most restaurants deep fry their falafels. That’s fair enough for them, but I’m not a deep frying sort of person. So, I started experimenting to see what can be done to recreate the great falafel taste without too much extra oil. (I did tried baking and broiling, and oil free but could not get those to work – so oil is in!)

My first issue was with chickpeas. Although you can use canned or chickpea flour, for authentic flavor you do need to start with raw chickpeas. And that was a part of my problem – no matter what I did, there was always something a bit unappetizing with the flavor. One explanation for why deep fried falafels don’t suffer from this shortcoming is that deep frying actually cooks everything through to a high temperature while most of other methods leave things a bit underdone.

So I came up with a solution that made a huge difference. After soaking the dry chickpeas for about a day, rinsing them and changing the water once half way through, I rinse them, dry them in a kitchen towel and then pan-toast them. What I do is place a large non-stick pan over high heat, make it quite hot, then add the chickpeas and let them toast so that they are browned but not burned. You can also try roasting but that may take longer. Pan-toasting takes about 5 minutes, and at the end you have chickpeas that are lightly cooked, enriched with flavor, and with most of that metallic tang removed. One problem solved!

Second problem is garlic. Again, I would end up with falafels with raw garlic flavor, probably for the same reason – without deep frying the inside does not have time to cook through. So, I decided to dial down the amount and use just a bit of garlic powder instead of raw garlic.

The rest is all about mixing everything together and adding a binder, in this case some flax “egg” – that’s flax meal that has been soaked in hot water for a while. I also recommend letting the falafel mixture rest for at least 30 minutes in the fridge before frying.

And now we come to frying – there’s just no other way to make these come out awesome. So, use some oil, real oil not a cooking spray – in my case using just enough oil to cover the bottom of a pan was enough – and let the “fried” falafels rest on some paper towel to soak the excess grease.

Eat these falafels while they are fresh and crunchy. Leftovers will be fine but there’s nothing better than a fresh batch.

Enjoy!

Basic Falafels with Pan-Toasted Chickpeas

What you’ll need:

  • 1 lbs chickpeas, soaked for 24 hours, drained, rinsed oat dried and pan toasted
  • 1/4 cup flax meal
  • 3/4 cup hot water
  • 1 cup parsley flat leaf
  • Juice of 1 lemon
  • 1 teaspoon cumin
  • 1 teaspoon paprika
  • 1 teaspoon onion powder
  • 1/2 teaspoon garlic powder
  • Oil for frying

What you’ll do:

  1. Soak dry chickpeas in 8-10 cups of water (they need to be fully submerged with about an inch (2.5 cm) of water above the chickpea layer. I recommend soaking for 12 hours, changing the water, then soaking for another 12 hours for a total of 1 day. I also suggest you do this at room temperature on your kitchen counter.
  2. Drain and rinse the chickpeas and shake of excess water.
  3. Bring a large non-stick pan over high heat. Once the bottom of the pan is hot, pour in the chickpeas and let them toast until they get dry and fairly browned. This will take about 5-8 minutes and you will need to stay next to the pan to mix the chickpeas frequently and prevent burning.
  4. Pour the toasted chickpeas into the food processor, and let them cool for 15-20 minutes.
  5. While chickpeas are cooling, make the flax egg by soaking the flax meal in 3/4 cup hot water. Mix really well to fully combine flax meal and hot water and leave for 15 minutes. The mixture will become dense and gel-like.
  6. Add parsley, lemon juice and the spices to chickpeas and process until the mixture is well combined and smooth.
  7. Add the flax egg and process for another minute or so.
  8. Let the mixture stand for 30 minutes, until chickpeas are completely cool and the mix has had time to settle and combine.
  9. Bring your favorite frying pan (or a cast iron pan) over medium high heat. Add enough oil to cover the bottom well. Using your hands, form falafels and fry them in the hot oil. These will take 3-5 minutes per side, with the second side usually taking a bit less time to brown. Don’t over-crowd the pan as you do need some space to maneuver the falafels, so be ready to fry them in batches, adding extra oil as needed.
  10. Let the fried falafels rest on some paper towels, which will help absorb any excess oil.
  11. Serve fresh and hot!

Copyright © Eat the Vegan Rainbow, 2019

Vegan Olivier “Russian” Salad with Toasted Sesame Seed

Vegan Olivier Salad with Toasted Sesame Seeds
Vegan Olivier Salad with Toasted Sesame Seeds, via Eat the Vegan Rainbow

Salads come in many different shapes and forms. Some are light and simple, some are complex and filling. Many don’t even have any greens in them, although most do have vegetables, unless they are a fruit salad. It’s this last requirement for vegetables that makes this next dish technically a salad. Olivier Salad, also known as Russian Salad (Ruska Salata) in the parts of the world I grew up in, is the type of a salad you get to enjoy when you don’t have much access to fresh vegetables but have plenty of frozen, pickled or frozen vegetables on hand. And plenty of potatoes, of course.

Growing up, we used to make large bowls of this salad for every special occasion, and serve it as an appetizer. The traditional recipe uses boiled potatoes, carrots, and peas, as well as boiled ham and even eggs, and pickles – all finely diced and mixed with mayo and a bit of mustard. Serve this concoction with fresh bread, and you don’t need much more!

I’ve spruced up this recipe into an amazing vegan feast below by omitting the ham and eggs and using vegan mayo. My secret ingredients? Toasted sesame seeds and fresh dill!

I served this new take on the old favorite at a party recently and people of Russian, Brazilian and US origin all went crazy for it. I suppose deep down we all find messy flavors of mushy vegetables smeared in mayonnaise with hints of pickle juice comforting and lovable!

I hope you give it a try. Looking for one last insider tip? Try it with some corn bread – you will go bananas, I guarantee it!!!

Vegan Olivier “Russian” Salad with Toasted Sesame Seeds

What you’ll need:

  • 2 15 oz (425g) cans peas and diced carrots (or 1 15 oz (425g) can each of sweet peas and diced carrots); you can also boil your own 1 1/2 cup finely diced carrots and the same amount of peas
  • 3 14 oz (400g) cans whole white potatoes, or peel and boil two large potatoes until done
  • 6-8 large kosher dill pickles (not sweet pickles – those will not work here!)
  • 1 cup mayo (vegan)
  • 1 tablespoon dijon mustard
  • 1 cup toasted sesame seeds (toasted in a toaster oven or on the stove top – if using a stove top method please watch out and use a lid as seeds will start to “jump” out of the pan as they get heated
  • 1 cup fresh dill, finely chopped

What you’ll do:

  1. Chop all the vegetables that need chopping (carrots, potatoes and pickles) finely. Place in a large mixing bowl, add mayo, mustard, toasted sesame seeds, and chopped dill. Mix together until combined and leave in the fridge for at least 3 hours, preferably overnight.
  2. Serve with crackers, bread, corn bread or enjoy as is!

Copyright © Eat the Vegan Rainbow, 2019