Hello! My name is Milka.
I like to think of myself as the Goddess of Fruit and Veg, and an Occasional Nut!
For me, one of the most important things is to have fun preparing the food, and sharing the joy with those who you are feeding. My blog's name was inspired by my daughter's love of rainbows, and serves as a daily reminder of the important things in life, like vegan rainbows and well-fed unicorns.
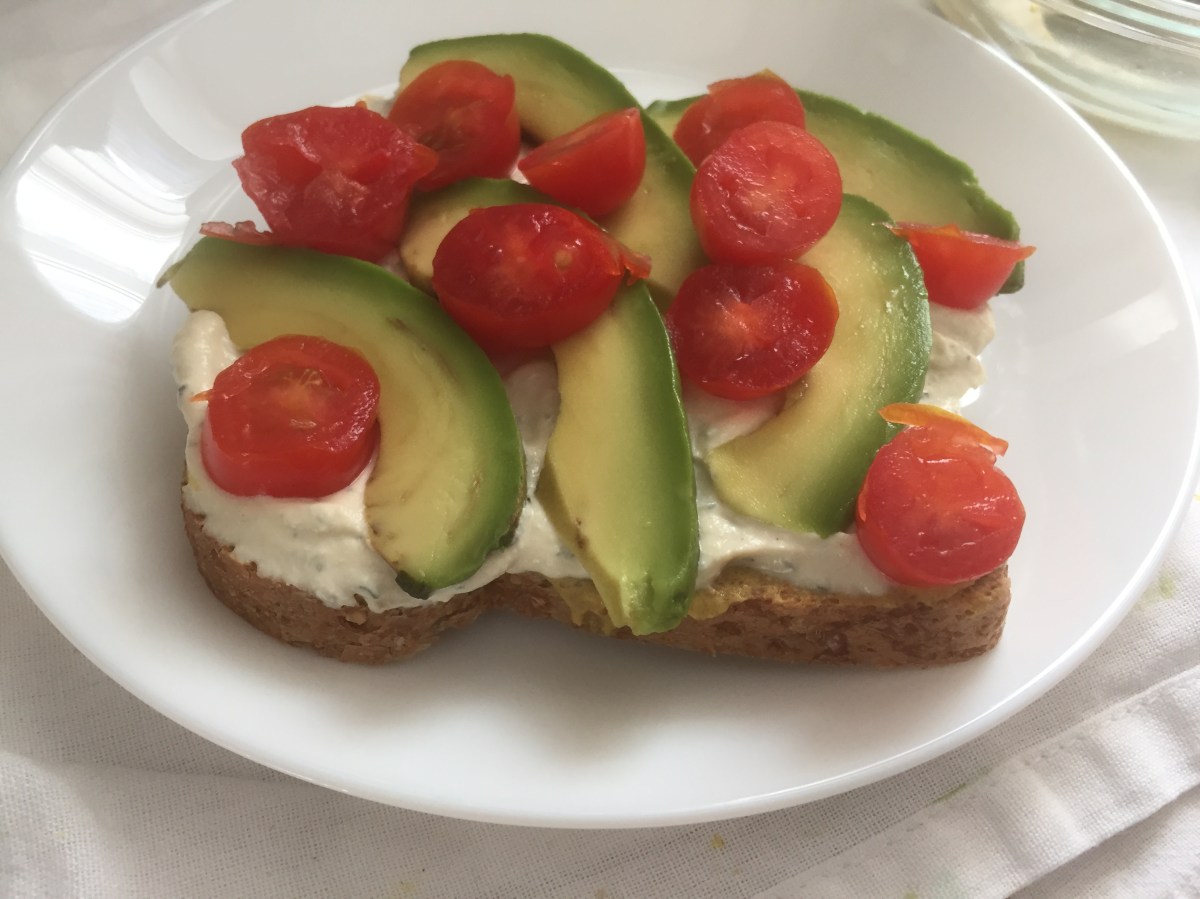
Vegan Herb Mayo, via Eat the Vegan RainbowI am a huge sandwich lover – give me some bread, a tasty spread, and a pile of veggies on top any day of the week and at any time of the day, and I’ll be a happy, and a well fed, camper! One of my favorite sandwich spreads of all time is mayo, and I’m not ashamed to admit that in my college days I used to put mayo not only on French fries – I am a European after all – but on spaghetti as well. Although my love of mayo did not waver over the years, my use of it did.
No doubt about it, mayo is delicious. Also no doubt about it, it is not really good for you. Unfortunately, available mayo alternatives, like the light versions or even some of the vegan versions I tried, have not been very good at hitting my taste buds the same way real mayonnaise does. So, I decided to develop my own recipe and I think I am getting close to the ideal.
My Vegan Herb Mayo uses cashews and tofu to build the consistency and body, and Dijon mustard, lemon juice, lemon zest and basil to give this mayo a bit of je ne sais quoi. The result is a lighter and healthier spread that I use on my sandwiches and Sweet Potato & White Potato Medallions. It also makes an excellent Tartar Sauce that you can use on vegan seafood or vegan chicken. Yummy!
Vegan Herb Mayo Sandwich, via Eat the Vegan Rainbow
Vegan Herb Mayo
What you’ll need:
1/2 cup raw cashews
1/4 cup almond milk
14 oz (400 g) extra firm tofu
1 tablespoon nutritional yeast
1 tablespoon Dijon mustard
1 tablespoon lemon juice
1 teaspoon dry basil
1/2 teaspoon lemon zest
What you’ll do:
Cover the cashews with water and leave them in refrigerator to soak overnight. Then throw the water out and pat dry the cashews
Place tofu in a strainer and let it drain in refrigerator overnight. Next, pat dry the tofu and crumble it into a smaller chunks.
Place all the ingredients into a food processor or a blender and blend until smooth. Enjoy your Vegan Herb Mayo! This mayo stores well in the fridge for up to a week.
Note: If you ever find yourself in a situation where you have leftover Cashew Cream, like for example while making Vegan Chicken Tikka Masala, I suggest taking an extra step and transforming it into this delightful mayo-like spread.
Vegan Chicken Tikka Masala with Saffron Brown Basmati Rice, via Eat the Vegan RainbowChicken Tikka Masala has been on the menu of all Indian restaurants that I ever went to. But the origins of this dish are far from clear, some claiming that the dish was created in Glasgow, while others claim it originates from Punjab. Regardless of its origin and history, every Chicken Tikka Masala recipe I ever tasted had five things in common: juicy and tender chicken,a yogurt marinade, fragrant tomato simmer sauce, cream, and lots and lots of ghee (clarified butter). These five things make Chicken Tikka Masala incredibly tasty, as well as elaborate to make, as well as very heavy on saturated fat and calories.
Well, I think the dish is overdue for a makeover, and there are many that agree with this view. While researching, I found many recipes that explore using tofu, meatless chicken strips, cauliflower, chickpeas, or other things as a chicken substitute, and I bet these all taste great. But, what I wanted to do here is take my new favorite ingredient, jackfruit, which I recently transformed into a fabulous Jackfruit Tacos, and see if it works in an Indian dish.
I also wanted to make a lengthy prep into something more manageable, so my recipe uses a slow cooker to do all the work of bringing jackfruit, spices and the tomato simmer sauce together. This also helps with the fat content, which I cut way, way down while maintaining the intensity of the flavors. The resulting recipe is straightforward but there are couple of tricks and tips to it.
First tip is to use a slow cooker liner. I am not sure if there are other brands out there, but I found that Reynolds Slow Cooker Liners work really well. The food gets cooked perfectly and the clean up is a breeze!
Second tip is to quick pre-cook your aromatics. In this case I use onions and garlic, and apply a method that I found in one of the America’s Test Kitchen cookbooks where you mix your aromatics with a bit of oil and microwave them for 5-6 minutes before adding them to the slow cooker. I’ve been using this method for more than a year now and apply it to get the aromatics (onions, garlic, carrots, celery,…) going, because I found that the slow cooker just can’t get them to develop the slightly caramelized flavor that a stow top cooking will do for you. However, microwaving with a bit of oil takes care of that and works perfectly!
Third tip is to rinse, drain and dry your jackfruit, assuming that you are starting from the canned version, and chopped it into small pieces. Do make sure that jackfruit is well rinsed and drained. Otherwise you will end up with Vegan Chicken Tikka Masala that may be too salty and too soupy.
So, once you have your jackfruit and your aromatics ready, it’s time to get cooking!
Vegan Chicken Tikka Masala in a slow cooker, via Eat the Vegan Rainbow
Vegan Chicken Tikka Masala
What you’ll need:
2 cans (10 oz, 280 g) young jackfruit in brine
1 can (28 oz, 800 g) crushed tomatoes, no salt added
1 yellow onion, diced
2 tablespoons garlic, crushed
2 tablespoons tomato paste
2 teaspoons ginger, freshly grated
2 teaspoons garam masala
2 teaspoons ground cumin
1/2 cup cashews, raw
1/4 cup almond milk
cooking spray
fresh cilantro
What you’ll do:
Place diced onions, garlic (I use the one from the jar, as I shared in my Oh My! It’s Vegan Shepherd’s Pie! post) and tomato paste in a microwave safe bowl. Spray the aromatics with cooking spray, mix well and microwave on high for 5-6 minutes. Be careful when you handle the bowl, it will be hot so I recommend using oven mittens.
Line your slow cooker with the liner, and add the can of crushed tomatoes, jackfruit that has been rinsed, dried and chopped to small pieces, as well as all the spices and the microwaved aromatics. Mix well. Cover and turn your slow cooker on “HIGH” for 4 hours.
While the slow cooker is going, start soaking the cashews in water. Let them sit for 4 hours in the refrigerator and once your slow cooker is done take the cashews out, dump the water out and place the cashews and almond milk in a blender. What you are doing here is making vegan Cashew Cream, and this amount of cashews should give you more than enough to make this Vegan Chicken Tikka Masala into a creamy perfection. However, do take it easy when adding Cashew Cream and what I usually do is add the cream one tablespoon at the time, mix Vegan Chicken Tikka Masala well, and check for flavor. I keep adding the Cashew Cream until I am happy with the flavor, color and consistency. Don’t worry if you discover that you made a bit too much Cashew Cream, you can always use it to top your backed potatoes, or turn it into Vegan Herb Mayo.
When ready to serve, plate your Vegan Chicken Tikka Masala, or should I call it Jackfruit Tikka Masala?, with some Saffron Brown Basmati Rice and top it with fresh cilantro.
Note: Cilantro does tend to go flat in few days from purchase so one way to keep it fresh for longer is to rinse it out soon after you get back from the grocery store, put them in a glass jar like you would a bunch of flowers, and keep them on your kitchen counter top – which is a trick I picked up watching Rachel Ray. Also when it comes to cilantro, basil and parsley, I prefer to use my kitchen scissors to cut them up!
I never had jackfruit in my life until last night. And just like that this weird plant food became one of my favorite ingredients and the one I want to use in as many of my dishes as possible. What is jackfruit?
Jackfruit is a popular ingredient in South and Southeast Asian cooking, but it remains obscure to most living in the Western world. This means that finding jackfruit may turn out to be difficult as your regular grocery store is unlikely to carry it. But, let me tell you: jackfruit is so wonderful that it is worth jumping through few hoops to get it. My starting point were online retailers, like Amazon, and that would have been fine has it not been for the fact that I wanted to start cooking right away and could not wait for the delivery.
So I got down to plan B and found a local Asian market, in my case Formosa Marketplace, and the place did not disappoint. They got exactly what I was looking for – young jackfruit in brine. Jackfruit also comes ripe in syrup, but that is not the kind that you want for your savory dishes, plus it is not the kind that seems particularly healthy given all that added sugar. If you are interested in learning more about jackfruit and getting the idea what type of dishes you can use it in, the Vegetarian Resource Group has a useful post.
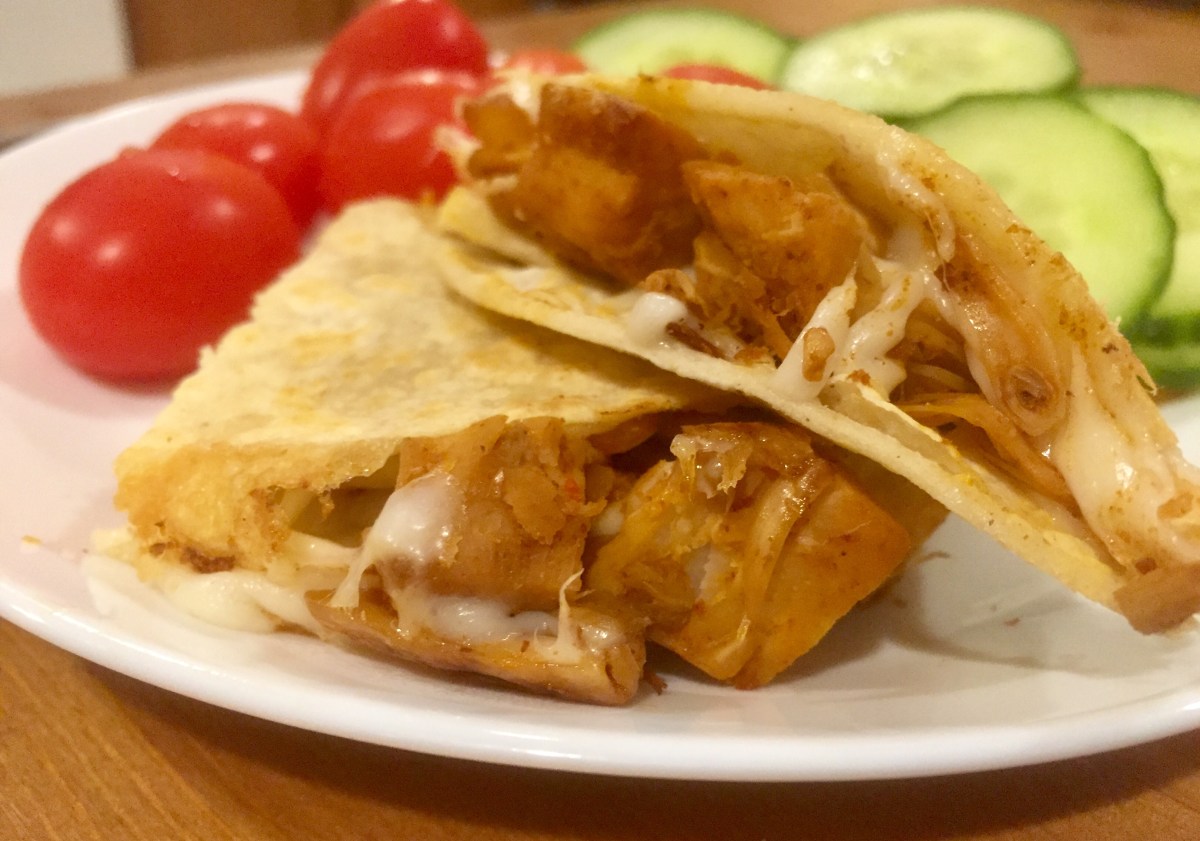
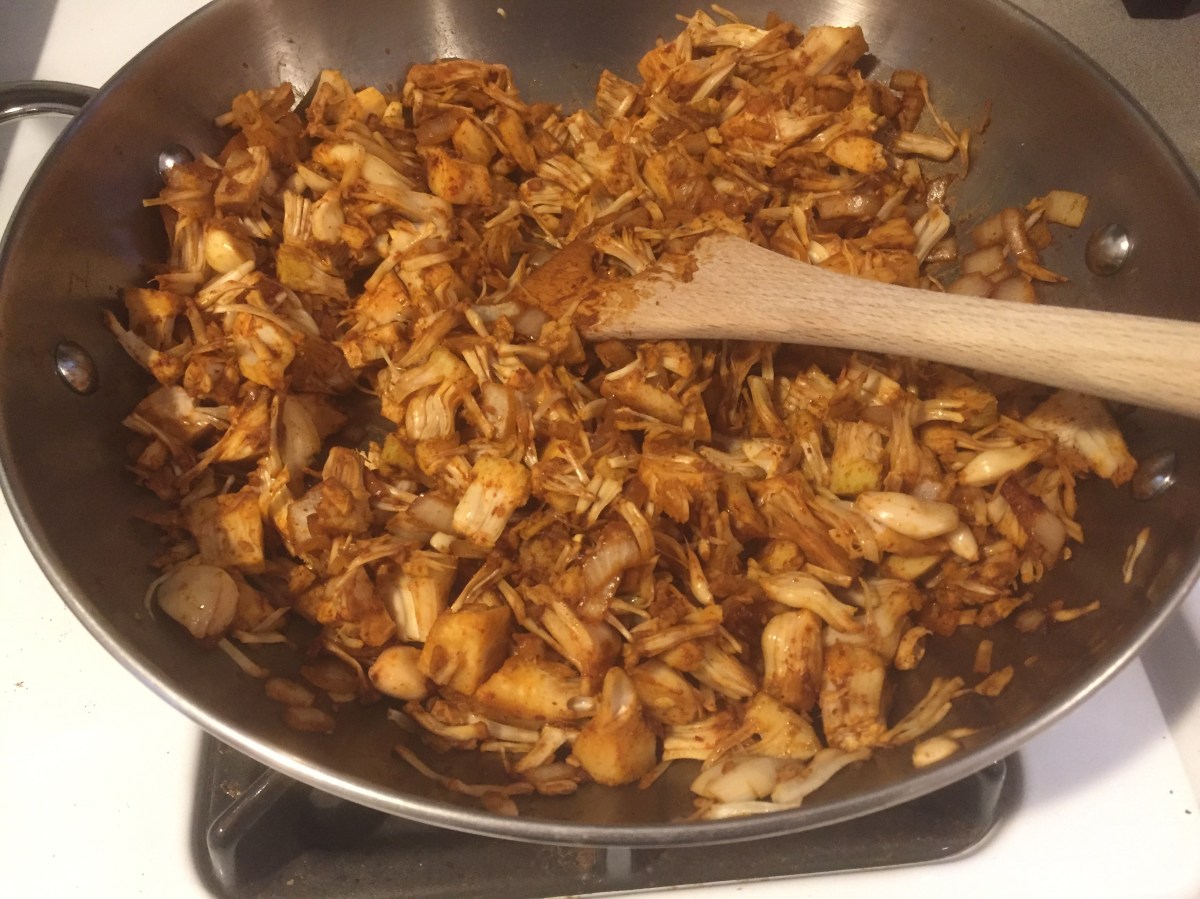
How do you get from a can of young jackfruit to a taco filling? It’s super easy. All you need to do is rinse the jackfruit and let it drain and dry. Once the jackfruit stops dripping, you will need to go and pull the fruit pieces apart, which does take a bit of effort and time but makes for more surface area to absorb all the lovely flavors you will add next.
Although you could use a pre-made taco seasoning mix, there’s no need for that as those usually contain quite a lot of quite unnecessary salt. One additional ingredient that you will need is almond cheese. I have not yet figured out how to make almond cheese on my own, so for now I get the one from my local Trader Joe’s. They carry shredded almond cheese that is delicious and affordable.
When all is said and done, your jackfruit taco filling will look something like this.
Jackfruit Taco filling, via Eat the Vegan Rainbow
To build tacos, you will also need corn tortillas, but possibilities are close to endless. You can customize your tacos by adding salsa, avocado, fire roasted green chili peppers, cilantro, lime juice, and shredded iceberg lettuce. For me some cucumber slices and pearl tomatoes on the side hit the spot!
Jackfruit Tacos
What you’ll need (for 4 tacos, 2 people):
1 10 oz. (280 g) can of young jackfruit in brine
1 onion, finely diced
1 tablespoon minced garlic
1 teaspoon smoked paprika
1 teaspoon chili powder
1/2 lime, just juice
1/4 cup water
4 corn tortillas, soft
1/2 cup almond cheese
cooking spray
What you’ll do:
Place jackfruit in a strainer and rinse it well with water to get rid of the salty brine. Let the jackfruit drain for 15-20 min, and then pat dry with a paper, or a cloth towel. Next, pull the jackfruit pieces apart to get a pile of finer shreds.
Spray the bottom of a pan with cooking spray and turn the heat to medium high. Add finely diced onion and minced garlic to the pan and let the onion and garlic aromas develop for 3-5 min.
Next add the spices and let them simmer for 1-2 min. This will help the spices toast and intensify the flavor. Don’t worry if some of your spices, onion or garlic stick to the bottom of the pan as lime juice and water that you’ll add next will serve to deglaze the bottom. You may need to adjust the amount of water as you go along, so I recommend starting easy by adding 1-2 tablespoons and going from there.
Once you are happy with the deglazing and the consistency, which should be somewhere between the ketchup and tomato paste, it’s time to add jackfruit. Make sure jackfruit is fully coated with your sauce, and simmer for 5-10 min, until jackfruit browns just slightly. Leave to the side.
Heat a non-stick frying pan with cooking spray and place over high heat. Put one corn tortilla in, top it with jackfruit filing and 1/4 of your cheese and fold the tortilla over. Brown on one side for 1-2 min then flip over and brown on the other side for 1 min or so.
Enjoy!
Note: You can use leftover taco filling in number of different ways. You can top a sandwich, or rice and other grains, as well as pasta or zucchini spaghetti.
It is mid-February in New England, and we have already endured three snow storms this month. This is not unusual, and makes February unbearable. Just when I think the winter is almost over, this short month rolls around and brings tons of snow, subfreezing temperatures, messy roads, no-school days… Of course, not everything is gloom and doom, as slopes are inviting and winter wonderland is all around me.
After few hours outside, braving the elements, enjoying the slopes, or just digging the car out of the pile snow, there is nothing better than coming into a warm kitchen and enjoying a bowl (or two) of a hearty soup. Most of us have grown up with some version of the chicken noodle soup. These days, though, what really warms my heart, my tummy and my wallet is split pea soup, and I have recently developed my take on this staple that doubles the amount of vegetables, and ends up with nice, rich consistency. Although my Vegan Split Pea Soup is remarkably hearty, it only takes a handful ingredients and just 30 min to make.
Ingredients for the Vegan Split Pea Soup, via Eat the Vegan Rainbow
Please note that there’s nothing Consommé about this one, folks! I recommend serving Vegan Split Pea Soup with a slice or two of sprouted bread, toasted, and you have yourself a heart warming lunch that is sure to fill you up and keep you going well into the cold February winter eve. I hope this soup helps us you power through the last bit of winter!
Spray the bottom of a large pot with cooking spray and turn the heat to medium to medium-high.
Add the vegetables, except the split peas, and let them brown for about 5 min.
Rinse split yellow peas under some cold water and shake the access off. Placing them in a strainer works well. Once rinsed add them to the pot and let split peas brown just for 2-3 min.
Add the stock and water, mix everything together, increase the heat, and bring the soup to boil. Once the soup starts boiling, decrease the heat to low and let the soup simmer for about 30 minutes.
Enjoy as the main dish or as a nice introduction to a more substantial feast.
Note: This recipe works with split yellow peas, split green peas, and lentils. I like to top my soup with some crushed red pepper flakes, black pepper, and some parsley, as you can see from the picture above. Parsley adds a nice, fresh note to the soup and the black pepper and red pepper flakes do give it a bit of a punch. But, if you prefer less heat you can also top this soup with some lemon juice and lemon rind.
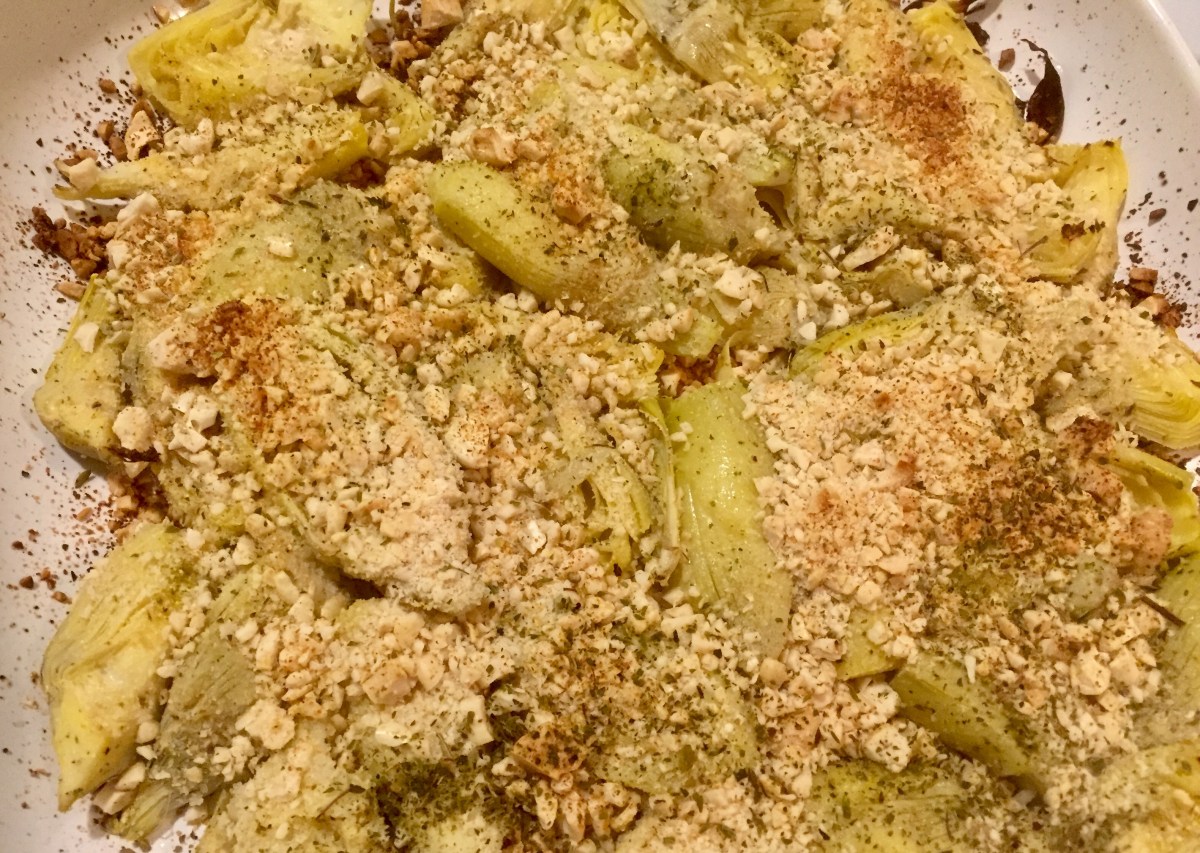
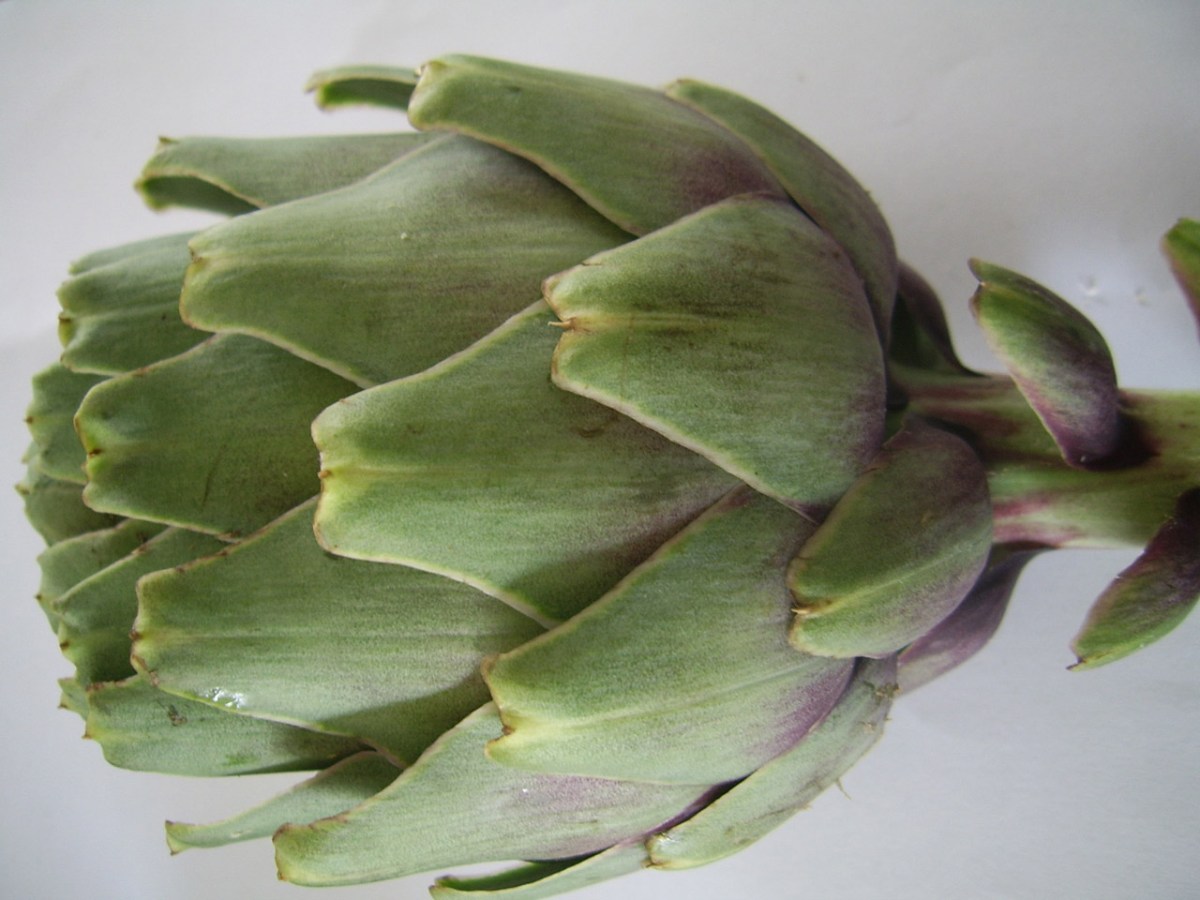
Roasted Artichoke Hearts with Cashew Crumble, via Eat the Vegan RainbowValentine’s Day is upon us, and although not as exciting as it once was, I still make a point of preparing a special surprise treat for those I love best, my family. In the past the menu would usually include shellfish, an array of finger foods, and lots and lots of chocolate. This year I am doing something new – vegan and gluten free meal that is healthy and indulgent. Plus, I wanted to have fun and play around a symbol of Valentine’s Day, the heart!
So, I came up with the Roasted Artichoke Hearts with Cashew Crumble as a perfect recipe that has a lot of heart in it. But, there was a major problem with this idea: I don’t know how to cook artichoke. I remember trying to deal with artichokes and realizing that I don’t have the patience required to go from the luscious green bulb to the tasty heart that’s hidden inside it. All I can say it: thank goodness for the can!
Luscious artichoke, unfriendly ingredientUsing canned artichokes works really well in many recipes, and not wanting to make this dish into a major project I decided to give canned artichokes an opportunity to shine in a roasted dish. I figured that if I can make tofu nice and crunchy, I can do that to canned artichoke hearts as well. The key trick here is to make sure artichoke hearts are fully drained and dried before putting them in the oven. To do that, I left my artichoke hearts in a strainer for couple of hours, and then patted them as dry as I could with a paper towel. I also decided to top them with a cashew crumble, and the result was a perfect combination of crunchy, slightly tart, and very inviting dish that perfectly graced our Valentine’s Day menu.
Roasted Artichoke Hearts with Cashew Crumble
What you’ll need:
2 cans (14 oz/400g) artichoke hearts in water
1/2 cup raw cashews
1 teaspoon dried oregano
1/2 teaspoon garlic powder
cooking oil spray
What you’ll do:
Preheat oven to 425F(220C).
Let artichoke hearts drain in a strainer for couple of hours, then pat dry them with a paper or cloth towel.
Spray an oven proof 8 x 8 in (20 x 20 cm) dish with cooking spray, lightly, add artichoke hearts, and sprinkle with oregano and garlic. Mix well.
Using a food processor make a cashew crumble. Don’t ground the cashews to a fine meal and make sure that you have a good mix of finely ground and chunky cashew crumble.
Top the artichoke hearts with cashew crumble and splash with another round of cooking spray.
Roast for 20-25 min.
You can serve Roasted Artichoke Hearts with Cashew Crumble as an appetizer, or as a main dish. As a part of a main dish I paired them with Zucchini Spaghetti, but they would work well in any salad, and in a sandwich, with pickles and mustard, or with vegan ricotta and tomatoes.
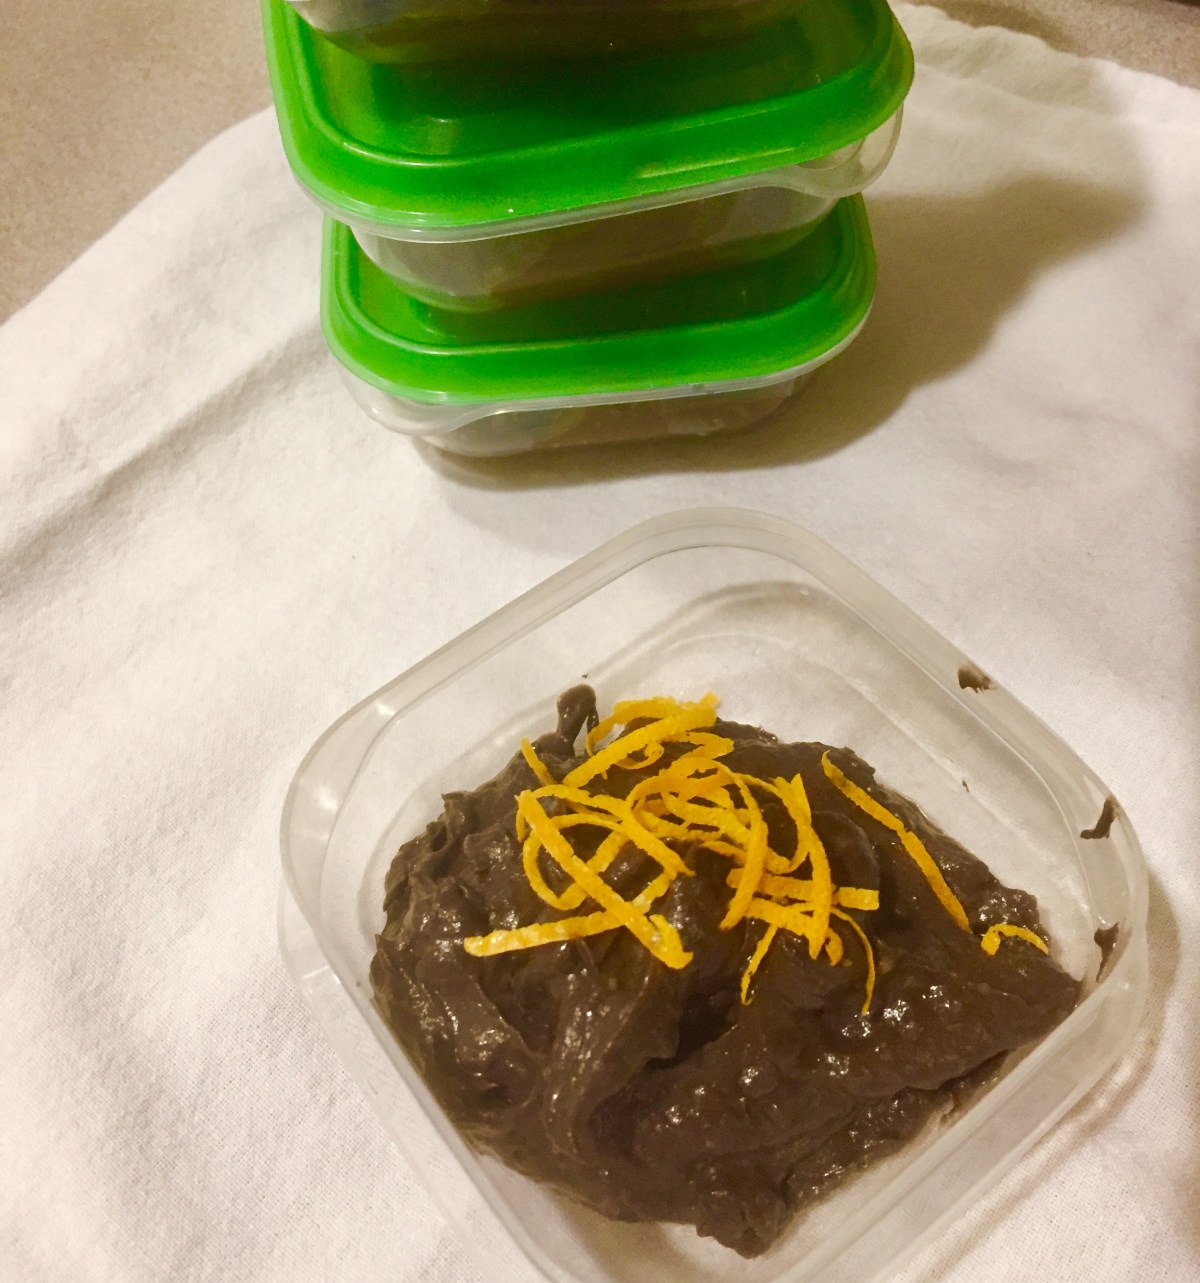
Note: if you are looking for that special something to spice up your Valentine’s dinner I recommend you try this fabulous Chocolate Pudding I found in Whole Foods’ twitter stream. My tip: shave some orange peel on top to add a lovely citrus aroma and a touch of color. Also, don’t worry about making too much because this pudding will disappear in a blink of an eye. If not, it does store well for couple of days and makes a great kids’ (and grown up) snack.
Vegan Chocolate Mousse, via Eat the Vegan Rainbow inspired by Whole Foods
Zucchini spaghetti, via Eat the Vegan RainbowZucchini spaghetti are vegan, gluten free and guilt free pasta for the 21st century! Easy and quick to make, zucchini spaghetti are also versatile and friendly to many different toppings and sauces. I paired them with Roasted Artichoke Hearts with Cashew Crumble, sprinkled with crushed red pepper flakes, and walked away satisfied!
Cooking zucchini spaghetti takes almost no time at all, as the dish is done in less than 15 min. However, transforming zucchini into spaghetti does take some time and some specialized equipment. You’ve likely noticed the rise of spiralizers and spiralizing. My local grocery store chain even carries spiralized vegetables (zucchini, summer squash, carrots and butternut squash). My first attempt at zucchini spaghetti did start from the store bought spiralized zucchini. We absolutely loved the flavor and I wanted to make zucchini spaghetti part of our regular dinner menu. So I needed to find a more cost-effective way to enjoy zucchini spaghetti without paying inflated price at the store or buying a spiralizer.
Here, America’s Test Kitchen came to my rescue. ATK has an excellent post on how to spiralize and cook spiralized vegetables, and one of the suggestions they give is to use mandoline slicer to make spaghetti. Bingo! I resurrected my mandoline slicer from the basement bin of infrequently used kitchen implements, and bought two nice and long zucchini to test this method out. As you can see from the picture, this experiment was a success and two zucchini gave enough spaghetti for 3-4 servings.
All this makes me extremely excited because I finally found something I can use my mandoline slicer for, and I found a low calorie, healthy and satisfying substitute for one of my favorite foods on earth, spaghetti!
Zucchini Spaghetti
What you’ll need:
2 long zucchini
1 1/2 teaspoon minced garlic
cooking spray
What you’ll do:
Spiralize zucchini using a spiralizer or a mandoline slicer.
Heat the skillet with some cooking spray on medium heat.
Add zucchini spaghetti and minced garlic to the skillet. Use tongs to gently move zucchini spaghetti around so it cooks evenly.
Give yourself 5-10 minutes of cooking time and enjoy!
Note: The resulting spaghetti are a bit wet, and what I like to do is to pour excess liquid out once the cooking is done. You can decrease the amount of moisture if you roast the zucchini (this is the method ATK post recommends), or if you scoop put the middle. I think I may try to do that next and see what happens. In that case do remember that you can use what you scoop out in a soup, or a stew.
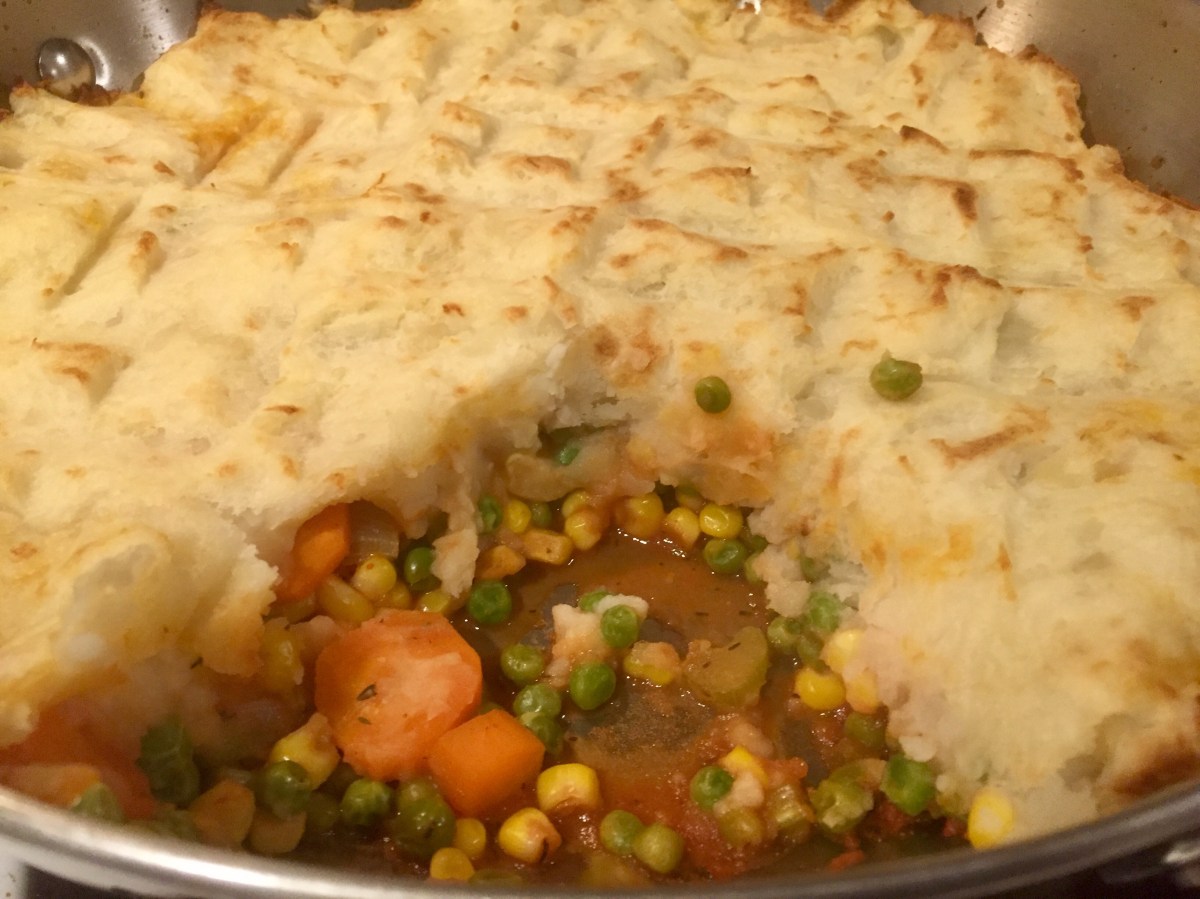
In many ways Shepherd’s Pie is a humble dish. But, it is also one of the best loved go-to comfort foods, which earned it one of the top places on the epicurious most popular recipes list. Although meat features prominently as a key ingredient, I have recently tackled this meat-lover staple and transformed it into a hearty and healthy vegan feast.
Trust me, making Vegan Shepherd’s Pie is easy as a pie. The recipe below does not require any fancy equipment or fancy ingredients. To save time and money, I recommend using frozen vegetables – they are a great and inexpensive alternative to fresh. These days many grocery store chains also offer pre-washed, pre-chopped, ready-to-use vegetables. I tend to stay away from those as I find them to be overpriced and don’t offer much more (or different) than the frozen veg!
One recent discovery I made, which I must share because it’s one of those things I did not know that I would like before I tried it, is crushed garlic in a jar! I’ve been ignoring this product, mostly because I am a bit of a garlic purist, but once I tried it I am not going back, at least for dishes that cook and simmer for a while. Raw garlic is still a must for all the raw applications or when having sliced garlic is preferable to minced. If you want to go deeper into the jar vs. fresh garlic discussion Nava Atlas, a vegan and vegeterian blogger and writer, had a great post on the topic.
If you are wondering what’s the highlight of this dish for me, I have to say it is using coconut milk for mashed potato topping. It adds incredible creaminess and a subtle flavor that is further enhanced by placing your pie under a broiler for few minutes at the end. But more on that below.
So, arm yourself with an armful of vegetables and let’s get cooking!
Vegan Shepherd’s Pie
What you’ll need:
For the filling
1 large onion, diced
3 large carrots, cut in rounds
4 stalks celery, diced
2 cups frozen peas (use fresh if you prefer)
2 cups frozen corn (use fresh if you prefer)
1 tablespoon tomato paste
1 teaspoon dried thyme
2/3 cup vegetable (vegan) low-sodium cooking stock
cooking spray
For the topping
2 lbs (1 kg) Russet (white) potatoes
1 cup light coconut milk
1 teaspoon crushed garlic
cooking spray
What you’ll do:
Spray the bottom of your Dutch oven, or any other pot that can go from the stove top straight into the oven, with the cooking spray and turn the heat to medium high. Add onions, carrots and celery. Let cook, with occasional mixing, for 5 min, until golden and soft.
Stir in tomato paste and thyme, and let their flavors develop for 1-2 min.
Add the stock, and use your wooden spoon to scrap up all the caramelized flavors from the bottom of your pot.
Next, peas and corn all go in. Mix it in and let everything simmer for 20-25 min. (Don’t think you can take a break at this point, as you do have mashed potato topping to make!)
Wash and peel your potatoes. Cut them in smaller pieces as this helps them boil faster. Put them in a pot with enough water to cover and boil for 15-20 min, until soft.
Drain the potatoes and let them cool a bit. Add coconut milk and garlic, and mash away until nice and smooth.
Top your Vegan Shepherd’s Pie filling with mashed potatoes, spread to cover and use your spoon to make the traditional crosshatch pattern on top.Spray with a bit of cooking oil to help with browning.
Put your pie into a 375F (190C) oven and cook for 20 min or so. Then turn on your broiler on HI, and broil for 5 minutes until the top gets nicely browned!
Voilà, you made it. Time to share and enjoy!
Note: as you may have noticed I don’t use extra salt in my recipes, and the stock I use is low-sodium. You will now best what your taste buds and your body can handle, so I leave it to you to decide whether you need salt or not. In my view, most dishes are just fine without any added salt and I bet you will be too!!!
Roasted Sweet Potato Butter, by Eat the Vegan RainbowGrowing up sweet potatoes never crossed my plate or my palate. My first encounter with this vegetable, and the American love of it, came in the form of a Thanksgiving staple: the sweet potato casserole with pecans and marshmallow topping. Unfortunately, for both me and sweet potatoes, this first encounter was far from a success. I liked the taste of the casserole, but not as a side dish – it was too sweet and too rich. So, I walked away thinking that sweet potatoes have no purpose other than making people who like to overindulge for holidays feel like they ate healthy because they just had some vegetables.
Luckily for me, over the years I slowly introduced myself to sweet potatoes, and I stand before you today, a complete sweet potato convert! My conversion was inspired not only by the fact that sweet potatoes are full of fiber and vitamin A, but my decision to break away from the social norms and expectations. I still can’t stand them on my dinner plate, but I do eat sweet potatoes for breakfast, snack and dessert. If you haven’t tried roasted sweet potato as a grab-and-go snack, straight from the fridge and cold, you don’t know what you’ve been missing. I know it sounds weird, but do try it – cold roasted sweet potato snack will not disappoint you, I guarantee!
Over the last month I started experimenting with vegan cooking, and few days ago I ended up in the sweet potato heaven, better known as the Roasted Sweet Potato Butter (see recipe below). I was looking for something my family can use instead of butter and maple syrup on their favorite breakfast food, the pancakes. In the past I’ve come across apple butter and pumpkin butter, and the latter got me thinking that So far we discovered that the Roasted Sweet Potato Butter works on pancakes, and toast, and chocolate mousse, and… It turns out, this simple spread is IT – 50% Thanksgiving, 50% Christmas, and 100% fabulously satisfying. I hope you enjoy it!
Roasted Sweet Potato Butter
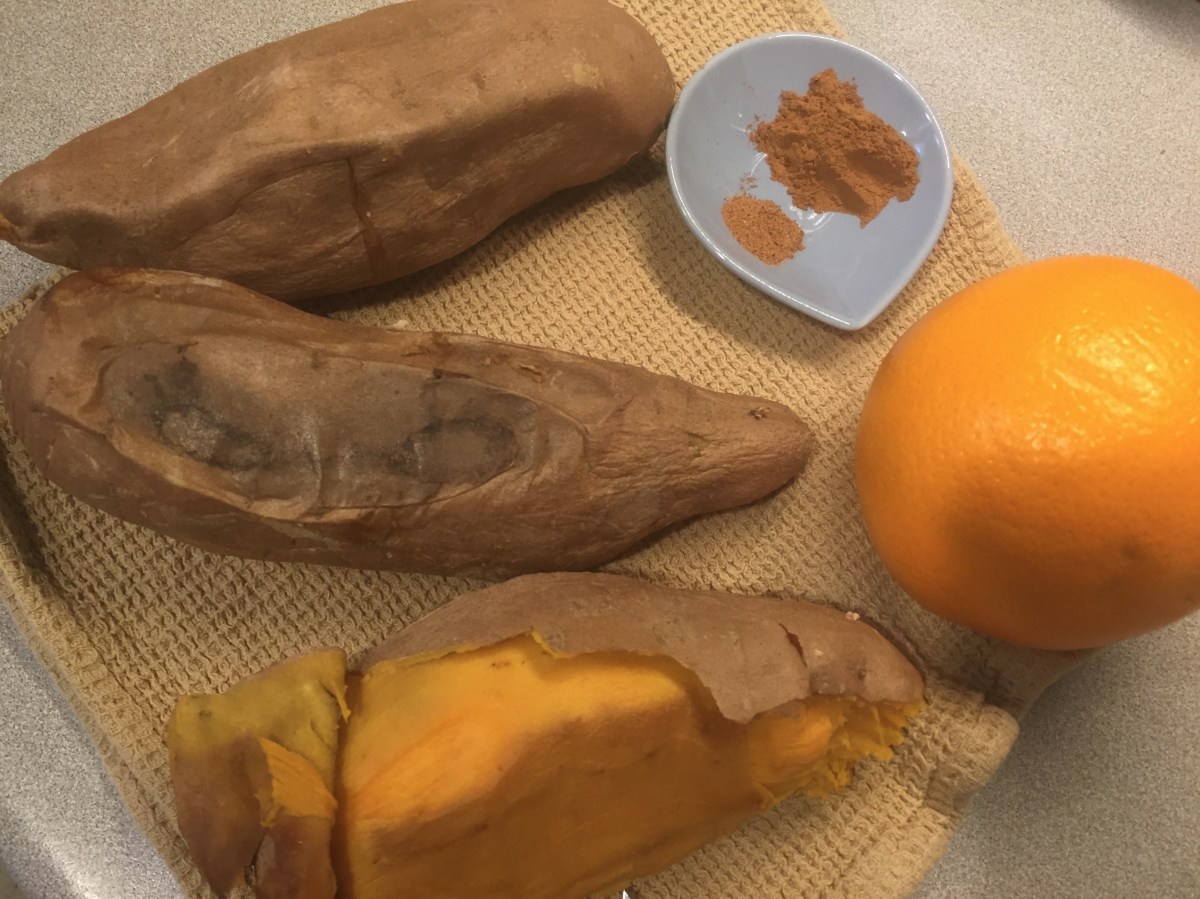
What you’ll need for Roasted Sweet Potato Butter, by Eat the Vegan Rainbow
What you’ll need:
3 large sweet potatoes
1 orange
1 teaspoon ground cinnamon
1/2 teaspoon ground nutmeg
What you’ll do:
Preheat oven to 425F (220C). Wash sweet potatoes under warm water, scrubbing them with the food brush and put them aside. Line a baking sheet with foil – I find that using foils saves time when it comes to clean-up – and place your potatoes on, nicely spaced out. Once the oven is ready, put it in and forget it for about 30 min. You can check if your potatoes are done by poking them with a fork – if it goes in without resistance your potatoes are done. Take them out and let them cool for at least 4 hours, best overnight.
Once the potatoes are completely cold, peel them and cut them into smaller chunks, about 1 in x 1 in (2.5 cm x 2.5 cm). The size of the chunks depends on the power of your blender, and for the one I have this is as big as the chunks can get to ensure smooth blending. Put your sweet potato in a food processor or a blender.
Add cinnamon and nutmeg.
Add zest of one orange – please remember to wash your orange before zesting!
Add juice of one orange or about 1/2 cup of orange juice.
Blend until smooth.
Store in the glass jar or another type of air-tight container for up to a week, but believe me, this Roasted Sweet Potato Butter will not stand a chance.
Note: Final consistency should be smooth, yet the butter should not be runny. You can adjust consistency to taste by adding more orange juice if needed so I recommend you start with 1/4 cup at first and add as you go, so you don’t end up with a sweet potato smoothie. There is nothing wrong with a sweet potato smoothie, of course, but that is a culinary story for another day!