Grilled Eggplant

Grilled Eggplant
Grilled Eggplant, via Eat the Vegan Rainbow
Summertime and the grilling is easy… Well, that’s me paraphrasing the George Gershwin classic, but the statement is spot on. Grilling is easy, and it is my favorite way of preparing food during the hot summer months. Over the years I figured out how to grill quite a few different things, and at the end of the day grilling is really easy and with a little practice you can get really good at grilling almost anything.  My Grilled Portobello Steaks recipe was just the beginning of “From the Grill” section of this blog and in addition to that recipe and the Roasted Red Beets Hummus, there’s much more to come.

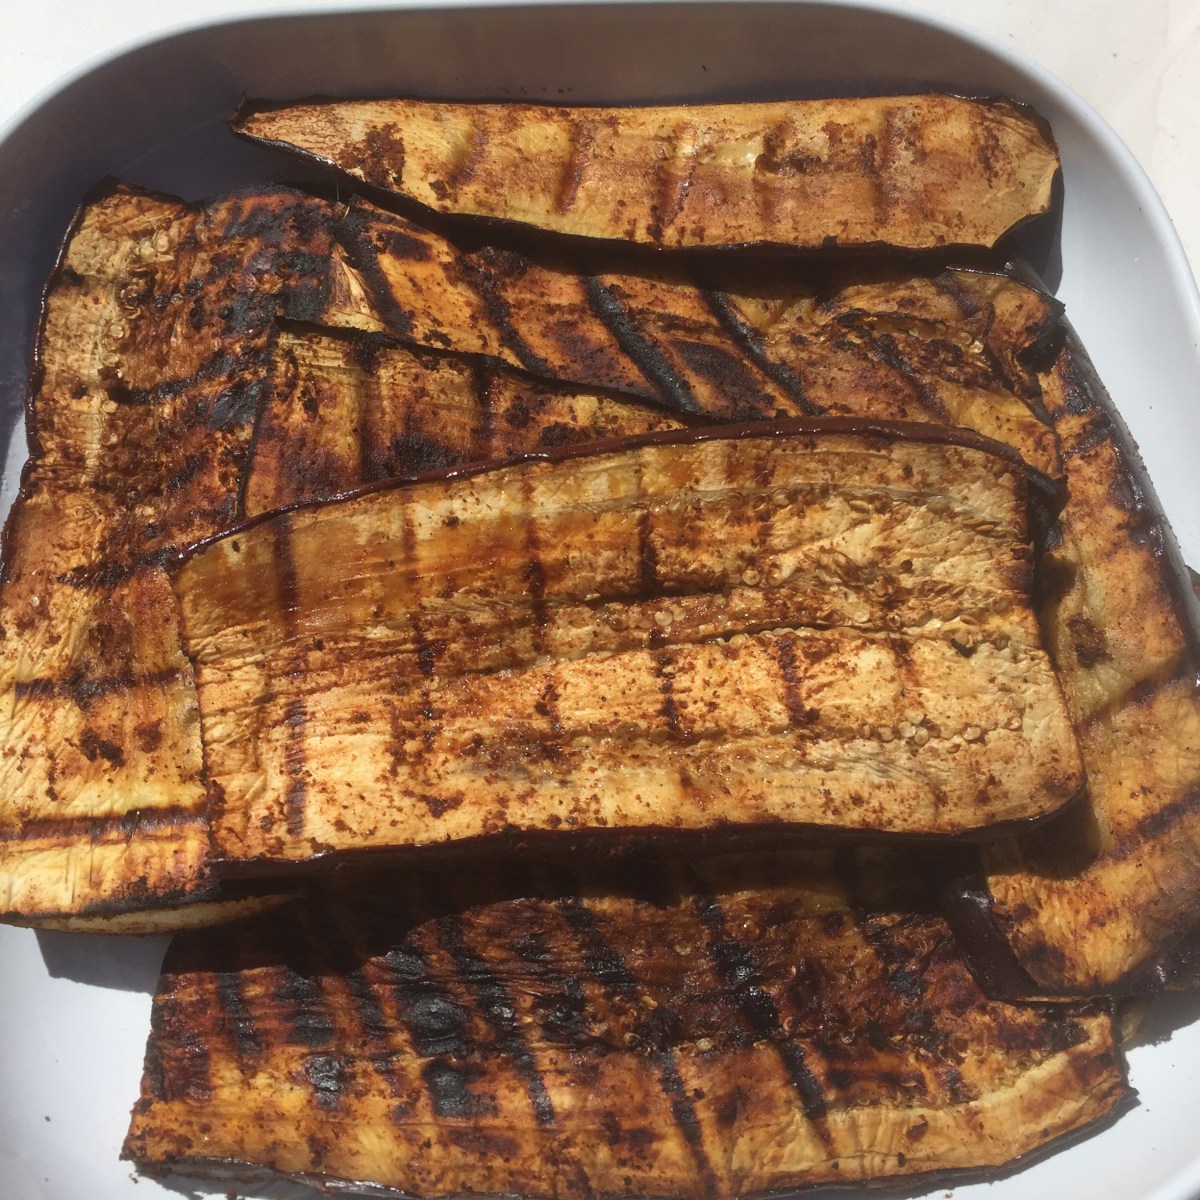
Today I am sharing a quick and easy way to make perfect grilled eggplant. Eggplant is a tricky vegetable to make because of its spongy texture that absorbs oil like crazy making almost every commonly encountered eggplant dish too oily and too rich. In the past I tried the trick where you sprinkle salt on the eggplant slices and let it sit between the paper towels, which does help but it adds salt and it takes time. More recently I started skipping all this and either simply cubing the eggplant, skin and all, or roasting the eggplant before stuffing.

Now this Grilled Eggplant recipe couldn’t be easier and does not require any special eggplant handling. Actually, the simple marinade I make, which includes couple of smokey spices, like smoked paprika, chili powder, liquid smoke and allspice, mixed with lemon juice and zest, can work well for summer squash, zucchini, or even tofu.

Grilled Eggplant
Grilled Eggplant, via Eat the Vegan Rainbow

Grilled Eggplant

What you’ll need:

2 large eggplants

1/2 lemon, juice and zest

2 tablespoons soy sauce

2 tablespoons liquid smoke

1 teaspoons smoked paprika

1 teaspoons allspice

1 teaspoons chili powder

1 teaspoons onion powder

1 teaspoons garlic powder

Vegetable oil

Cooking spray

What you’ll do: 

  1. In a large plastic container with a tight fitting lid, mix lemon juice and zest, soy sauce, liquid smoke and all the spices to make a pasty marinade.
  2. Wash and dry the eggplant. Cut lengthwise into 1/4 in (2.5 cm) thick slices.
  3. Place the eggplant into the marinade. Cover every piece well (use your fingers to help spread it out) and stack ghee eggplant slices. Cover with the lid and let stand for 30 to 60 minutes on the kitchen counter.
  4. Prepare your outdoor grill as you normally do. For me this means turning all the burners on high (I have a gas grill) with the lid down for 10 minutes, turning the flames down to low then using a steel brush to clean the grill grate. Finally, before placing food on the grill, I oil the grill well. I use a pair of long tongs and a paper towel dipped in vegetable oil.
  5. Bring the heat up to medium. Spray each eggplant slice with a bit of cooking spray before placing on the grill. Leave it to grill on one side for about 4 to 5 minutes. Depending on how hot your grill is this may take a bit longer.
  6. Spread the leftover marinade over the top of the eggplant slices before turning over. Grill for another 3 to 5 minutes.
  7. Take off the grill and serve. The grilled eggplant works well as a topping for couscous, rice or polenta. It also works really well in sandwiches and salads. My serving suggestion would be to wrap it in a grilled pita topped with plain hummus and sprinkled with kalamata olives.

Copyright © Eat the Vegan Rainbow, 2017

Sunday Slow Cooker Jackfruit Stew

Jackfruit is the “It” ingredient of the plant-based and vegan cooking world. When I started blogging about my plant-based cooking exploration and experimentation, jackfruit was one of those exotic ingredients that I could only get in a local Asian grocery store.

My first jackfruit recipe were the tacos, which still make a frequent appearance at the dinner table because they take no time to make and are really, really good. But what I discovered soon after is that jackfruit is a lovely and realistic stand in for seafood, and you can make a fabulous crab-free crab cakes and clam-free New England clam chowder. I’ve also used jackfruit to make a very rich chickenless tikka masala – yummy!

So in order to feed this new hunger for jackfruit I would go to the Asian grocery store and buy a pile of canned green jackfruit in brine. But, two weeks ago I found out that Trader Joe’s now carries jackfruit suggesting that this amazing plant has gone mainstream.  I still bought more than I need just in case and immediately jumped on testing it out.

What I did with two cans of young (green) jackfruit in brine this time around is transform it into a mellow slow cooker (crockpot) stew infused with onions, garlic, Indian bay leaf, dry basil and ground cumin, as well as spiced up with a bit of red and green chili pepper. In case you are wondering about the Indian bay leaf, the tree it comes from belongs to the same family as the cinnamon tree so the flavor is a bit of a mix between bay leaf and cinnamon. So, if you don’t have Indian bay leaf on hand, you can simply use some regular bay leaf and a dash of cinnamon.

What I like to do when using canned vegetables is to dump the contents of the can out into a strainer and rinse well with lots of water. Then I let access water drain out for few minutes before using. In the case of jackfruit I also prefer to pull the bits of fruit apart, so what I end up with is a pile of pulled jackfruit ready to be flavored in any way I like.

My favorite slow cooker trick that I mentioned before, but is definitely worth repeating, is to combine the aromatics (onion, garlic, chili peppers, and spices), add some oil or cooking spray, and soften in the microwave for three to five minutes.  This helps them develop some caramelization and flavors that slow cooker is not able to achieve. Finally, these days I don’t use the slow cooker unless lined up with crockpot liners that make the cleanup an absolute breeze.

One last note: don’t worry if you don’t have a slow cooker. You can try making this stew on a stovetop in a Dutch oven type of pot or any other. If this is what you are doing remember to brown your aromatics in a bit of oil first then add the jackfruit, and lastly diced tomatoes. The benefit of using a slow cooker is that you set it and forget it, which frees you up to spend your Sunday doing whatever…

Slow Cooker Jackfruit Stew

What you’ll need:

2 cans (10 oz, 280 g) young jackfruit in brine

1 can (28 oz, 800 g) petit diced tomatoes

1 yellow onion, diced

2 tablespoons garlic, crushed

1 red chili pepper, seeds and veins removed

1 green chili pepper, seeds and veins removed

1 tablespoon basil, dried

1 teaspoon ground cumin

2-3 Indian bay leaves

1 teaspoon vegetable oil

What you’ll do:

  1. Rinse and drain the jackfruit to clean out access brine. Pull the jackfruit pieces apart, removing any hard bits of core and seeds that may have been present (I leave softer bits of core and seeds in).
  2. Place the jackfruit in the crockpot that’s been lined with a liner.
  3. Remove the seeds and the veins from the chili peppers and diced them finely. Dice the onions and crush the garlic.
  4. Mix chili peppers, onion, garlic, dry basil, and ground cumin in a microwave safe bowl with the vegetable oil until everything is well coated. Microwave for 3-5 minutes.
  5. Add the aromatics to the crockpot as well as petit diced tomatoes and mix everything together.
  6. Cover and cook on low for 5 hours.
  7. Serve over basmati rice, or even pasta. This stew is fragrant and just discretely spicy. You can definitely adjust the level of spiciness to fit your palate.
  8. Copyright © Eat the Vegan Rainbow, 2017

Roasted Red Beets Hummus

Roasted Red Beets Hummus
Roasted Red Beets Hummus, via Eat the Vegan Rainbow

I am a bit on the roasted beets kick these days. I just shared how I used them in a salad, this post is all about a hummus I put together, and, believe it or not, I have a pile of roasted beets in the fridge that are waiting for me to figure out what to do with them.

Beets Roasting on a Grill
Beets Roasting on a Grill, via Eat the Vegan Rainbow

The batch in the fridge was roasted in the oven, and that method – cranking the heat to 425 F (220 C) and roasting them for about 30 to 45 minutes – will work here as well. But the beets that I used for this hummus were roasted on a grill. I recommend you try this next time you grill your veggies, tofu or try my Portobello Mushroom Steaks. Your grill will already be on so it’s perfect time to wrap your bits in some foil and toss them on!

The rest of this hummus recipe is super easy. You will need a large mixing bowl, two cans of chickpeas, rinsed and pat dried, some lemon juice, and a spoonful or two of almond butter, and all the lovely roasted beets, cooled and peeled. You will also need a hand-held, stick blender, and let it rip until everything is well blended and smooth. You can always use a good processor if you have one or a powerful blender. I have neither so hand-held, stick blender is my tool of choice.

What you’ll end up with is a nice pile of lovely and bright magenta hummus that will keep well in a plastic container with a tight lid for a week in the refrigerator.

Roasted Red Beets Hummus, via Eat the Vegan Rainbow

Roasted Red Beets Hummus

What you’ll need:

3 red beets

2 15.5 oz (439 g) cans chickpeas (garbanzo beans), low sodium

3-4 tablespoons lemon juice

2 tablespoons almond butter

What you’ll do:

  1. Roast the beets, let them cool and peel. You can roast them in the oven or on the grill. Either way I recommend wrapping them in foil. This will minimize the mess and speed up the roasting. Regardless of where you roast them, it will take about 30 to 45 minutes to get the beets roasted all the way through. Please note that you can eat beets raw, so you can actually skip the roasting all together. Roasting does help bring the natural sweetness of beets out more, so in my opinion it’s worth an effort.
  2. Cut the roasted beets into cubes, and place into a food processor or the large mixing bowl.
  3. Place the chickpeas into a strainer, rinse them well and pat dry.
  4. Add chickpeas to the bits, add the rest of the ingredients and blend until smooth. Serve any way you like. For me hummus is one of the best sandwich spreads ever, and this one works like a dream when paired with avocados!!!
  5. Copyright © Eat the Vegan Rainbow, 2017

Baby Kale with Roasted Beets and Leeks tossed with a Lemon Vinaigrette

Baby Kale with Roasted Beets and Leeks, Tossed with a Lemon Vinaigrette, via Eat the Vegan Rainbow
Salads can be simple, but as I was putting together my first ever plant-based – vegan – Easter dinner this year I decided that going for impressive, fabulous and a bit over the top, even when it comes to a salad, wouldn’t hurt. Maybe you’ve already seen, or even tasted, my Meatless Shepherd’s Pie – if you haven’t now would be a good time to do it – and this salad is what I paired it with.

The base of the salad is baby kale which you can probably get these days in any well-stocked supermarket. If you can’t find baby kale go with mixed field greens or baby lettuce, or just chop up some romain or butter lettuce. Stay away from baby spinach and iceberg lettuce as I am not convinced those two will play nice with roasted beets and roasted leeks.

What makes preparing this salad a bit more elaborate than your tossed salad is the fact that both leeks and beets need to be cleaned, chopped, roasted and cooled before hitting the salad bowl. I’ve already shared how to clean leeks, so I used the same cleaning method on this occasion as well. For this recipe I recommend cleaning and chopping the beets before roasting to maximize the amount of beer surface that is nicely caramelized. You may want to wear gloves when you handle beets as they will stain your hands. I personally don’t mind it at all but if you do please plan to protect your hands an wear the gloves.

Baby Kale with Roasted Beets and Leeks tossed with a Lemon Vinaigrette

What you’ll need:

3 beets

3 leeks

11 oz (312 g) baby kale

1 lemon, juice and zest

2 tablespoons olive oil

1 tablespoon Dijon mustard

Cooking spray

What you’ll do:

  1. Preheat the oven to 425 F (220 C).
  2. Clean the leeks to remove all the sand and dirt that leeks usually come with. Dry well and place on the parchment paper lined baking sheet. Spray with a generous amount of cooking spray.
  3. Peel the beets and cut them to 1 in (2.5 cm) cubes. Place on the parchment paper lined baking sheet and spray with cooking spray.
  4. Roast for 20 to 25 minutes.
  5. Take out of the oven and let cool for several hours. You want the roasted vegetables to be at room temperature for this one!
  6. To make the lemon vinaigrette, mix together juice and zest of one lemon, with the olive oil and Dijon mustard.
  7. Place baby kale in a large salad bowl. Top with roasted beets and leeks, and drizzle the vinaigrette all over the salad. Toss everything together and serve!!!
  8. Copyright © Eat the Vegan Rainbow, 2017

Oh My… It’s Another Meatless Shepherd’s Pie

Meatless Shepherd’s Pie, via Eat the Vegan Rainbow

The first full meal post on this blog was my version of that classic, Shepherd’s Pie. The reason I kicked things off by veganizing a classic was that I wanted to push the limits and see if I can do it and be happy with the results. At that point I was one month into plant-based diet, and felt that I need to step it up in terms of how I create my meals. That’s a quick story behind the first Vegan Shepherd’s Pie.

Once that recipe was published I did get some backlash from people who firmly believed that a Shepherd’s Pie without meat is an abomination. I obviously don’t agree and have now created another version of Shepherd’s Pie that is so close to the original that very few people will know the difference. I served this for Easter Sunday dinner few weeks ago, and it was a hit!

The three main tricks I used are to fully cook the lentils on their own in water, to use full sprigs of rosemary without chopping, and to grind the mushrooms in the food processor before using. All these three things put together make this Shepherd’s Pie taste very, very similar to the ground lamb containing version. Except that this recipe leaves the lambs alone – which can’t be bad, right?


And if you are not concerned about the well-being of lambs much, perhaps you’ll find the health benefits of this recipe or its budget-friendliness more appealing. Regardless of your reasons, I hope you find at least one to compel you to try this meatless Shepherd’s Pie. Enjoy!!!

Meatless Shepherd’s Pie

What you’ll need (for 8 HUNGRY people):

14 oz (400 g) dark (brown) lentils

4 large carrots, chopped

5 celery stalks, diced

1 onion, diced

20 oz (570 g) mushrooms

3-4 sprigs of rosemary

2 tablespoons thyme, chopped

4 cups green peas, frozen

6 potatoes, medium size

3 cloves garlic

1/4 cup almond milk

2 tablespoons olive oil

Cooking spray

What you’ll do:

    1. Cook lentils according to bag instructions. In brief, for this amount of lentils you’ll need 4-6 cups of water that you need to bring to boil. Once the water is boiling add rinsed lentils in and simmer until lentils are done, which will take 20 to 25 minutes. Set cooked lentils aside.
    2. Peel and cube the potatoes. Put them in a large pot, and add the garlic cloves too. You don’t need to chop the garlic as it will soften during boiling and you will be able to mash it with potatoes. Cover the potatoes with water and bring to boil. Decrease the heat and boil until potatoes are cooked through. Take the pot of the heat, and let it cool off before mashing.
    3. Clean the mushrooms with a paper towel to remove any visible bits of dirt. Use a food processor to chop the mushrooms until they are about the same size as little bits of ground meat.
    4. Spray the bottom of a large frying pan with cooking spray and turn the heat on to medium high. Add onion,  carrots and celery. Sauté for 3 to 5 minutes.
    5. Add whole sprigs of rosemary and chopped thyme and stir everything together. Sauté for another 8 to 10 minutes.
    6. Add chopped mushrooms, stir well and sauté until mushrooms are softened, which should not take longer than 5 minutes.
    7. Add frozen green peas, and mix everything together.  You can lower the heat or turn it completely off as all you need to do now is mix the pie filling until the peas thaw.
    8. Take rosemary sprigs out and discard. Some of the leaves will fall off and that’s OK. Remove as many as you can but leaving some in will help the flavor develop further.
    9. Add cooked lentils and mix everything together. Set aside.
    10. Preaheat the oven to 375 F (190 C).
    11. While the oven is preheating, mash the potatoes. To the pot of boiled potatoes that have been drained and cooked, add almond milk, olive oil and mash using a potato masher until the mashed potatoes are soft and smooth. You can always add more almond milk to get the consistency just right.
    12. Spay the bottom and the sides of a large baking dish with cooking spray. Pour the Shepherd’s Pie filling in and smooth out.
    13. Spoon the mashed potatoes over the top. Smooth out the mash and then using a fork create nooks and ridges. Spray the top with a bit more cooking spray and place in the oven for 15 to 20 minutes or until the potato topping is nice and browned.
    14. Serve with your favorite salad or even some vegan gravy. Trust me, this Shepherd’s Pie will leave you speechless!

Copyright © Eat the Vegan Rainbow, 2017

Easy Breadfruit Curry

Easy Breadfruit Curry, via Eat the Vegan Rainbow
Breadfruit is not something that you can find in your local grocery store unless you live in one of the tropical countries where it’s been a staple food for millennia. Yet, it’s a fruit, or maybe I should say a vegetable, that has been taking the fancy of historians, writers, artists and the silver screen perhaps because of its poetic name, breadfruit, that suggest ability to pick your loaf of a branch! Or perhaps because it hails from exotic regions of our planet that one could reach only by taking an epic journey, like the one taken by the “Bounty“, a ship whose voyage and its mutiny is part of actual and the movie making history.

To be quite honest all my knowledge of breadfruit comes from watching different versions of the mutiny on the Bounty movies so I got quite excited when I saw it in my local Indian supermarket. I was looking for some frozen jackfruit and the breadfruit was right next to it. So I grabbed a bag and decided to give breadfruit a try!

Texture-wise, breadfruit is not unlike jackfruit, and they do belong to the same plant family. But, breadfruit is a bit softer, at least in my hands, and less chewy. It worked really well in this simple curry, and pairs really well with simple Basmati Rice.

The recipe is really simple and starts with frozen breadfruit, scallions (green onions), curry powder, green curry and turmeric, and finishes with some rich coconut cream. The dish comes together into a fragrant curry that tastes almost decadent.

Easy Breadfruit Curry

What you’ll need:

14 oz (400 g) bread fruit frozen

6 scallions (green onions)

1 teaspoon turmeric

1 teaspoon curry powder

1 tablespoon green curry paste, like Thai Kitchen (or make your own)

13.5 oz (400 ml) coconut cream

Cooking spray

What you’ll do:

  1. Spray a large pan with cooking spray and place over medium high heat.
  2. While the pan is heating up chop scallions, both white and green parts. Add to the pan and sauté for 3-5 minutes.
  3. Add the green curry paste, turmeric and curry powder. Mix everything together and sauté for another minute or two.
  4. Add the breadfruit. You can add it frozen or defrost in a microwave. Mix well, and let sauté for 10 minutes or so until breadfruit is soft, covered in spices and starts to brown.
  5. Pour in the coconut milk and deglaze the bottom, which means use your wooden spoon and coconut milk to lift all the brown bits of caramelized scallions and spices of the bottom of the pan and incorporate them into the sauce.
  6. Decrease the heat to low and let simmer for 15 to 20 minutes.
  7. Serve over rice, couscous or even polenta!!!
  8. Copyright © Eat the Vegan Rainbow, 2017

Mexican Stuffed Mushrooms

Mexican Stuffed Mushrooms, via Eat the Vegan Rainbow

It is May 5th, which in this part of the world means it’s time for Cinco de Mayo, a celebration of Mexican culture and heritage. Big part of any culture is the food, and Mexican food has been one of my favorites for years.  So I could not sit this one out!!!

My Cinco de Mayo tribute recipe is this Mexican Stuffed Mushrooms, that starts with large stuffing mushrooms and uses a stuffing with layers of flavors, all very evocative of what you might expect to find in pub nachos or a tortilla.

These large, plump mushrooms are a perfect vehicle for the rich stuffing and what I like to do is roast the mushroom caps by themselves first, to get rid of extra moisture. And while the mushrooms are roasting, I focus on putting the stuffing together.

As I mentioned previously, I don’t like vasting lovely bits of mushrooms – stems: I’m talking about you! – as there is lots of great flavor in them. So, this stuffing uses all the mushroom stems finely chopped, and mixes them with just a bit of vegan ground beef substitute to maximize the umami flavor.


Now in terms of getting a bit of Mexican flavors going, I applied a shortcut and went for a jar of store bought chunky salsa. You can definitely make your own, or go with any salsa flavor and heat level you enjoy. In case you are wondering, I used mild.

My final touch was to cut up some soft corn tortillas and add them to the stuffing. This adds a bit of texture and brings the flavors much closer to what you’d expect from a Mexican cuisine inspired dish. For the last stage of baking I topped each mushroom with some grated vegan cheese and let it melt for few minutes. Finally, I sprinkled some fresh cilantro on top. If you can’t stand cilantro, you can use flat leaf parsley or fresh basil. Although it would make it less of a Mexican flavor and aroma experience, it will still make these mushrooms yummy!

Mexican Stuffed Mushrooms

What you’ll need:

28 oz (680 g) large stuffing mushrooms

1/2 package Trader Joe’s “Beefless Ground Beef” (or 1 cup homemade version)

3 tablespoon chives, finely chopped

1/2 large yellow onion, chopped

1 teaspoon Trader Joe’s Everyday Seasoning (or adjust the amount of sea salt, black pepper, mustard seeds, chili pepper, coriander, onion garlic paprika to taste)

3 corn tortillas, cut into small chunks

1/2 cup salsa, divided

1/2 cup shredded cheese, divided

Fresh cilantro, finely chopped

Cooking spray

What you’ll do:

    1. Preheat oven to 425 F (220 C).
    2. Wipe the mushrooms of any visible bits of dirt using a damp paper towel. Remove the stems carefully so that you don’t break the caps. Save the stems for later.
    3. Line a baking sheet with parchment paper and place the mushroom caps on, their hole side up. Put them into the preheated oven for 10 to 15 minutes.
    4. Spray a large frying pan with cooking spray and place over medium heat. Add chopped onions and chopped chives. Let them brown for about 5 minutes.
    5. While the mushroom caps are roasting, and onions and chives are sautéing, chop the stems to small pieces and add them to the pan.
    6. Sauté for another 5 minutes then add the beefless ground beef and the seasoning. If you don’t have this specific seasoning mix, you can use store bought taco seasoning, or similar, or just add your own mix of chili powder, paprika, black paper and coriander to taste. Mix everything well together and sauté for another 5 minutes.
    7. Turn the heat off and mix in the chopped corn tortillas. Let stand for about 5 to 10 minutes. This will help the tortillas soak up some of the excess liquid mushrooms may have released as well as soak up then flavors.
    8. Take the mushroom caps out of the oven, and bring the heat down to 350 F (180 C). Using a pair of kitchen tongs, or similar, gently invert the mushroom caps so that the liquid that collected in them drains out. Place the dry mushroom caps into a deep baking dish. Spoon the stuffing into the mushrooms. I like to spoon the stuffing high and if your baking dish is deep enough you don’t have to worry about the stuffing spilling over as there will be a dish to catch it all.
    9. Place one teaspoon of salsa on each stuffed mushroom, and then heap the shredded cheese on top. Spray the tops with some cooking spray and place the dish into the oven. Bake for 10 to 15 minutes, until the cheese starts to melt and the mushrooms are completely cooked.
    10. Take it out of the oven and cool only slightly. Sprinkle with fresh cilantro, or another herb of your choice, just before serving and enjoy as an appetizer or a part of your main course.

Copyright © Eat the Vegan Rainbow, 2017

Sweet Potato and Leek Soup

Sweet Potato and Leek Soup with Tofu Bacon, via Eat The Vegan Rainbow
Soups are part of all cultures and culinary traditions. So it is no wonder that I make pots and pots of soups each week. My absolutely go to soup is Vegan Split Pea Soup or variations of it made with lentils, but over the last few months I have also shared with you a colorful and fabulously satisfying Bean & Leek Soup with Soy Chorizo, and even a vegan version of the New England Clam Chowder.

Why such a soup passion? Well, I grew up eating soup almost every day, and the soups my mom made came in many different shapes, forms and sizes. Soups are a great way to combine different bits and bobs into a one pot to create a satisfying meal for a family. In general, soups are easy to make, very inexpensive, and they store and reheat very well. So, what’s not to love?

This Sweet Potato and Leek Soup is my take on a standard soup that is usually made with potatoes, leeks, butter and heavy cream. I got rid of butter and heavy cream and replaced potatoes with sweet potatoes, making this version a bit sweeter. But, I did not remove all the fun – I made some tofu bacon to top this soup with. The Buddhist Chef makes the most fabulous tofu bacon and I’ve been using his recipe to make crunchy and delicious vegan bacon that works as a snack, in sandwiches and now on soups.

You can top this soup with couple of other toppings if you don’t have time to make the tofu bacon. Chives or green onions (scallions) will work, as will cashew sour cream like the one Angela Liddon shared on her Oh She Glows site, or simple croutons aka piece of toast cut in smaller pieces. Regardless what you put on top of your bowl of Sweet Potato and Leek soup what’s inside it is a tasty, creamy and healthy soup.

Sweet Potato and Leek Soup

What you’ll need:

5 sweet potatoes

2-3 large leeks

2 carrots

4 cups vegetable stock (optional)

3 cups water (or 7 cups if you decide not to use stock)

1 cup almond milk

2 tablespoons potato starch

2 bay leaves

Cooking spray

What you’ll do:

  1. Peel and cube sweet potatoes and carrots into a rough chunks. The size of the chunks does not really matter because you will use a blender at the end to create a smooth and creamy soup. But, the smaller the chunks the quicker the cooking so decide for yourself if you would like to spend more time simmering or more time chopping.
  2. Prepare the leeks using the cleaning method of your choice. The leeks are very often full of send and dirt that gets inside the leek so you will need to open them up and wash everything out. I described my preferred cleaning method in one of my previous posts.
  3. Spray the bottom of a large pot with the cooking spray and place it over the medium high heat. Add leeks and sauté for 5 minutes. The leeks should soften and start to brown.
  4. Add sweet potatoes, carrots, bay leave and potato starch. Mix well and sauté for another 3 to 5 minutes.
  5. Add vegetable stock and/or water. mix well and turn the heat on high. Stirring occasionally, bring the pot to boil then turn the heat down to a gentle simmer. Simmer for 15 to 30 minutes, depending on whether your vegetables were chopped into smaller or larger chunks.
  6. Take the bay leaves out and add the almond milk. Using either a counter top blender or a hand held stick blender to blend the soup together and create smooth soup. Top with any topping you like and enjoy!
  7. Copyright © Eat the Vegan Rainbow, 2017

Oatmeal Raisin Cookies

Oatmeal Raisin Cookies, via Eat the Vegan Rainbow

Today is a double whammy of a day. It’s the National Oatmeal Cookie Day and at the same time the National Raisin Day. So I just had to join in the celebrations by putting those two together into these lovely, healthy and chewy Oatmeal Raisin Cookies that use couple of very simple ingredients and take no time to make.

I decided to start with some naturally sweet ingredients in order to completely omit using added sugar. So I went for a combination of carrots and raisins, both with an amazing amount of sweetness that baking brings out to an amazing extent.

For my oatmeal, I decided to toast some of it to add extra dimensions of nuttiness to the flavor of these cookies without the need to use any nuts. Additional trick I used is to grind most of the oats which made it easy to skip using flour. Still, I did add a bit of corn starch to help the cookies along, and “flax egg” to bind everything together.

Of course, you can’t have a good batch of moist cookies without adding a bit of fat and in this case I decide to use solids out of the can of coconut cream. I used all the liquid and couple of tablespoons of solids for my Bread Fruit Curry, so I had some solids leftover. You can also use coconut oil in this application as well. The oil does not need to be fully melted but it does need to be softened so that can mix well with the rest of the ingredients.

So without any further ado I give to you on this special day gluten-free and dairy-free, no sugar added Oatmeal Raisin Cookies.

Gluten-free, Dairy-free, No Sugar Added Oatmeal Raisin Cookies, via Eat the Vegan Rainbow

Oatmeal Raisin Cookies

What you’ll need (for 24, 2 in (5 cm) diameter cookies):

3 large carrots

1 cup raisins

2 cups oatmeal

1/4 cup flax meal

3/4 cup water

1/4 cup corn starch

1/4 cup coconut oil, melted

1 tablespoon cinnamon

1 tablespoon vanilla

1 teaspoon baking powder

1/2 teaspoon baking soda

What you’ll do:

  1. Preheat oven to 350 F (175 C).
  2. Place raisins into a large cup and cover with hot water. Let them soak for 30 minutes.
  3. Add flax meal to a large cup and mix well with 3/4 cups of hot water. Let stand for 15-30 minutes.
  4. Toast 1/2 cup of oat meal in a toaster oven until they begin to slightly brown and start smelling lovely and deliciously toasty, which should take about 2-3 minutes. Keep an eye on the toaster oven though as the oats will burn quickly. You can toast the oatmeal on the stove top, using a frying pan. I recommend dry toasting them, although you can use a drop of oil or cooking spray to help the toasting along.
  5. Add the toasted oats to a food processor and grind to a fine meal. Pour the toasted oatmeal into a large mixing bowl.
  6. Add another 1 cup of oatmeal to the food processor and grind as finely as the previous batch. Combine with the ground toasted oatmeal.
  7. Add reminder of the oatmeal (1/2 cup) into the mixing bowl without grinding for added texture.
  8. Grind carrots finely using the food processor and add to the oatmeal mix.
  9. Drain the raisins well and add to the oatmeal and carrots.
  10. Add “flax egg” and mix well. The mixture should be moist but not runny.
  11. Add the rest of the ingredients and mix well. If your coconut oil needs a but of melting, put it in the microwave for 30 to 60 seconds. Keep an eye on it because you don’t want it to be completely melted, just soft enough to be able to mix well.
  12. Line two baking sheets with parchment paper and spoon out the cookies with a tablespoon. This should yield 24 cookies, 12 per baking sheet. Use your fingers to shape the cookies into nice, flat rounds or any shape you like. Their final thickness is about 1/2 in (1 cm) and they will not spread or rise much so make sure that you do actually flat them out before baking.
  13. Bake for 16 to 18 minutes. The cookies will be soft to touch but will firm up a bit as they cool.
  14. You can frost them with simple sugar frosting if you like, but I did want to keep this recipe “added sugar” free and they are delicious as is. Enjoy!!!
  15. Copyright © Eat the Vegan Rainbow, 2017

Grilled Portobello Mushroom Steaks

Grilled Portobello Mushroom Steaks
Grilled Portobello Mushroom Steaks, via Eat the Vegan Rainbow
It’s that time of year in New England when we jump out of our winter lairs and onto our no-longer-snow-covered decks to fire up the grill. I love grilling, and if anyone ever told you that grilling is a guy thing, don’t listen to them as grilling is for everyone! There is something very primal that comes to forth when you find yourself outdoors, standing in front of the fire and flames, and you hear the sizzle of delicious food getting caramelized, charred and transformed into the mouth watering delights.

I love using my grill, especially during the summer months, because it gets the food cooked fast without heating the kitchen and makes clean up a breeze. Add to that a delight of summer evenings and eating outside, and it can hardly get better than that. I make piles of grilled vegetables and have even developed an awesome way of making grilled pizza, which I’ll share in another post.

Here I’ll share how to get the perfect Grilled Portobello Mushroom Steaks as grilled steaks are the quintessential example of this type of cooking. For this recipe to work you do need to use very large portobello mushroom caps. The ones I found in our local grocery store are about 4 to 5 in (10 to 12 cm) in diameter, and that’s the size I recommend for a recipe like this as the bigger portobello caps will hold up to grilling much better. Most of the really large portobello mushrooms will come without stems, but if the ones you get include the stems I recommend using the stems to make your own vegan “scallops”.

The recipe is really very simple and the mushroom steaks cook very quickly. The most time consuming step is putting the marinade together and letting the mushrooms soak up some flavors, which will take anywhere between one to two hours. If you are pressed for time you can skip this step and simply apply the same marinade liquid to the mushrooms as they grill.

Are there any tricks to getting a perfect grilled portobello mushroom steak? Yes, there are a couple. The first one is really more of an universal grilling advice than mushroom specific: make sure your grill grate is clean, hot and well oiled (for more on how to prepare your grill for perfect grilling results check this post out). This will help the food go on and not stick to the grates. I recommend using paper towel dipped in oil and a pair of long kitchen tongs to do this. The second trick is mushroom specific as I recommend grilling the mushrooms cap side facing up first in order to allow for all the excess moisture to drip out, before flipping the cap over. Finally, if you are into the grill marks you need to remember to rotate your cap by 90 degrees half way through the cooking.

Following these easy steps will bring delicious grilled mushroom steaks to your plate!

Grilled Portobello Mushroom Steaks

What you’ll need:

(for 4 servings)

4 extra large portobello mushroom caps

2 tablespoons A.1. steak sauce (or any other steak sauce, homemade or store-bought)

2 tablespoons soy sauce

1 tablespoon olive oil

1 teaspoon garlic powder

1 teaspoon onion powder

2 teaspoons smoked paprika

2 teaspoons chili powder

Some oil to brush your grill

What you’ll do:

  1. Wipe the portobello caps with a paper towel to remove any dirt. Set aside.
  2. Whisk together all the rest of the ingredients in a container large enough to hold all four mushroom steaks.
  3. Place the mushroom steaks into the marinade and make sure they are fully coated and covered. Marinate for 30 to 60 minutes. If you decide to skip this step simply coat the mushrooms with the marinade before placing on the grill.
  4. While mushrooms are marinating, prepare your outdoor grill for medium high heat grilling. If you have any questions on how to do this, Whole Foods Market has a post that can help. Don’t have an outdoor grill? You can use the indoor grill or a grill pan for this recipe as well. In that case simply follow whatever steps you usually take when grilling indoors over medium high to high heat.
  5. Place your mushroom steaks on the grill top side up, spread some marinade over the steaks, and grill for 4 to 5 minutes.
  6. Spread some more marinade on top, turn the caps over and grill top side down for 3 minutes, then lift up and rotate by a very rough quarter turn, and grill for another 2 minutes. You can skip this rotating step. It does not change the flavor of the steaks, but it does make for those well-known (and loved) grill marks.
  7. Enjoy the perfect grilled portobello mushroom steak with your favorite sides, like Cauliflower Mash and a field greens salad!
  8. Copyright © Eat the Vegan Rainbow, 2017

Quick Quiche with Caramelized Onions, Mushrooms and Tofu

Quick Quiche with Tofu and Mushrooms
Quick Quiche with Tofu and Mushrooms, via Eat the Vegan Rainbow

Eating pie for lunch sounds so decadent, doesn’t it? And that’s what makes quiche so appealing. I usually stay away from making quiche because I can’t deal with making my own crust. The crust takes time and effort that is beyond my capacity. Luckily for me, and I am guessing many of you, stores carry pre-made pie crusts that are ready to use.

My quiche recipe uses one of those and that really makes it come together relatively quickly. One tip when using the store bought frozen pie crust is to bake the crust by itself first for ten to fifteen minutes while you are mixing and preparing the other ingredients. This pre-baking will help make the crust nice and crunchy and help it hold the filling.

Filling is definitely the star of any quiche and it is traditionally made of eggs and cheese, often with mushrooms, ham, spinach, artichokes or other meat and vegetable components thrown into it. So, the result is usually light in texture but heavy on your stomach and very calorie dense.

In my first attempt to veganize quiche I decided to keep it simple and start with mushrooms, red onions and tofu as main ingredients. Most of the cooking actually takes place in a pan on the stove top as both red onions and mushrooms need to be fully cooked before they hit the pie crust. I recommend taking the time to caramelize the onions nice and slow, as well as let the mushrooms cook most of the way before adding tofu. In this case, the tofu needs to be drained and crumbled but you can skip the “pressing tofu” step that almost all tofu recipes have making this a really quick dish!

Quick Quiche with Caramelized Onions, Mushrooms and Tofu

What you’ll need:

1 store bought pie crust, vegan

1 red onion

10 oz (300 g) white mushrooms

14 oz (400 g) extra firm tofu, drained

2 tablespoons nutritional yeast

1 tablespoon corn starch

1 teaspoon dry basil leaves

1 teaspoon dry oregano leaves

Cooking spray

What you’ll do:

    1. Preheat oven to 350 F (180 C). Once ready, put the pie crust in to pre-bake for 15 minutes.
    2. Cut the onion into fine, thin slices.
    3. Spray the bottom and sides of a frying pan with cooking spray and place it over medium high heat. Add the onion and let caramelize for 5 to 10 minutes. The onion should be nicely browned and soft.
    4. While the onion is caramelizing, clean and slice the mushrooms, or you can always buy sliced mushrooms and skip this step.
    5. Add sliced mushrooms to the onion mix and cook until mushrooms soften, which will take another 5 minutes or so.
    6. Drain tofu and crumble it into small crumbles with a fork or with your hand. The size of the crumbles should be similar to scrambled egg.
    7. Add crumbled tofu, nutritional yeast, corn starch, basil and oregano. Stir well the quiche filling, let brown for another 1 to 2 minutes, then turn the heat off and let sit until your pie crust is done pre-baking.
    8. Pour the filling into the crust, spray the top with some cooking spray and return to oven for another 20 to 25 minutes, until the top is golden brown.
    9. Take the quiche out, let stand for 5 minutes then serve with your favorite salad or top with some sun dried tomato shreds like I did on this occasion.

Copyright © Eat the Vegan Rainbow, 2017

Chocolate Bon Bons with Dates, Walnuts and Apples

Chocolate Bon Bons with Dates, Walnuts and Apples
Chocolate Bon Bons with Dates, Walnuts and Apples, via Eat the Vegan Rainbow
It is Easter Sunday, so you might as well kick back, relax and have some bon bons. So I wanted to share with everyone who observe Easter today and everyone who are just looking for a simple, nutritious and adorable dessert recipe this super-easy and kids-friendly recipe for Bon Bons. This recipe was my entry into Food52 contest Your Best Recipe with Dates.

Dates, especially Medjool dates, are fabulously sweet fruit of date palm trees and have been used in Middle Eastern and North African regions for centuries. Growing up in Serbia (ex-Yugoslavia), dates were a special, almost candy, treat we’d get especially for Christmas Eve.

You may have seen dates in your dried fruit aisle, and that is exactly where you’ll find Medjool dates as well. Some stores have also been featuring them around the produce stands, but don’t expect to find raw dates – at least I’ve never seen them raw. Not to worry though, dried dates work really well in a recipe like these bon bons with a little help of warm water and thirty minutes of rehydration.

The bon bons come together really quickly and there isn’t much to making them really. But, in order to make them easier to handle in the last stage where they meet the melted chocolate you should let them sit in a freezer for half an hour. That will help them hold their shape during their chocolate bath.

Not fan of chocolate? You can skip it and roll the bon bons in coconut flakes, chopped walnuts, slivered almonds or anything else that will make your taste buds jump for joy!!!

One last thing: this recipe is super kid-friendly and if you are looking for something you can make together with any little chefs in your life this is it. There is a bit of mixing and a bit of hands on digging into a mix and making bon bons with your hands, which is sure to please. Plus: as the recipe is no-bake everything is safe to try and lick for those without tree nut allergies. If you are looking to make this recipe tree nut free, you could try doubling the amount of oats and skipping the walnuts. I am not 100% sure this will work, but I am about 95% sure it will – I hope this is good enough for you to give these bon bons a try.

Chocolate Bon Bons with Dates, Walnuts and Apples

What you’ll need:

medjool dates

cup oats

cup walnuts

Granny Smith apple

teaspoon cinnamon

ounces chocolate, vegan

cup coconut flakes, unsweetened

What you’ll do:

  1. Remove the pits and soak medjool dates in warm water for 30 – 60 minutes.
  2. Place oats and walnuts into a food processor and grind them into a fine meal. Pour out into a large mixing bowl.
  3. Core the Granny Smith apple, but don’t peel it. Add it to the food processor and processes it until very fine. Add the apple to the walnut and oats mix. Add the cinnamon.
  4. Drain the dates. Using a small food processor or a hand held (stick) blender, blend the dates into a fine paste. Add the paste to the mixing bowl. Mix everything together using a wooden spoon or a spatula.
  5. Using a measuring spoon, measure out 1 tablespoon of the mix out into your hand. Form a ball (a bon bon) and place it on a freezer safe tray covered with wax paper. The recipe should make 18-24 bon bons.
  6. Put the bon bons in the freezer for 30 minutes.
  7. Just before 30 minutes is up, melt the chocolate either in the microwave or using a double boiler.
  8. Place 1/4 cup of unsweetened coconut flakes at a time in a flat dish. Take the bon bons out of the freezer, dip them into the melted chocolate and roll them in the coconut flakes. Alternatively, you can skip the chocolate and roll the bon bons in coconut flakes only!
  9. Leave the finished bon bons on the kitchen counter for about 30 minutes to allow the chocolate to harden.
  10. Enjoy!
  11. Copyright © Eat the Vegan Rainbow, 2017