Fancy Faux-Lobster Roll

Fancy Vegan
Fancy Faux-Lobster Roll, via Eat the Vegan Rainbow
During long, winter months when days are short, snow piles up high and it does not get above freezing for weeks on end, New Englander likes to enjoy things like pots and pots of piping hot New England Clam Chowder, a creamy and rich seafood based soup. This winter I did something that just a year ago would have sound like a total science fiction and impossibility. I made completely plant-based, clam-free New England “Clam” Chowder.

Now that we are approaching the high summer, I felt ready to tackles another recipe that New England self-identifies with, the Lobster Roll! If you’ve never tasted or seen a Lobster Roll let me quickly describe how it’s made. You take a hot dog bun, steam it or toast it and fill it with chunk so of cooked lobster meat tossed with some mayonnaise and chopped celery. The main flavor you get is usually the combination of mayo and celery, and you may get some citrus overtones since the roll is often served with a lemon wedge.

So far, jackfruit was my go-to seafood replacement. Jackfruit works really well in crab-less Jackfruit “Crab” Cakes, in Clam-free “Clam” Sauce, and in vegan New England “Clam” Chowder, but for the lobster rolls I wanted a different texture and milder flavor as canned jackfruit that I have access to is usually a bit salty and sour. So I did a little bit of research and discovered that heart of palm seems to be everybody’s favorite lobster stand-in. I have not really used heart of palm before so I was not sure what exactly to expect.

Luckily for me, my local Trader Joe’s carries 14 oz. jars of heart of palm in brine, so I decided to go for it. This amount of hearts of palm is enough to make four generous rolls using a standard size hot dog bun. The rolls come together in less than ten minutes and definitely qualify as a quick lunch or dinner. I recommend rinsing the heart of palm well and chopping it into relatively small piece. I know that chunks of lobster in some of the most revered lobster rolls out there are pretty large but in this case I do think that making celery and heart of palm pieces about the same size works better to integrate the flavors. Plus it makes for more manageable bites. So, get a large mixing bowl out and lets make a much lighter, cheaper, safer and, lets face it, tastier and kinder lobster roll.

Fancy Faux-Lobster Rolls
Fancy Faux-Lobster Rolls, kinder and safer, via Eat the Vegan Rainbow

Fancy Faux-lobster Roll

What you’ll need (for 4 servings):

1 14 oz (400 g) jar heart of palm
6 stalks celery
1/2 cup vegan Mayo (store bought or homemade)
1 tablespoon lemon juice
1 teaspoon old bay seasoning
1 teaspoon Dijon mustard
3-4 springs of fresh dill, chopped
4 hot dog buns


What you’ll do:

  1. Drain and rinse heart of palm. Pat dry and cut in half lengthwise and then across into 1/2 in (1 to 1.5 cm) pieces. Place into a large mixing bowl.
  2. Chop celery into thin slices, approximately matching the size of the heart of palm pieces. Add to the mixing bowl.
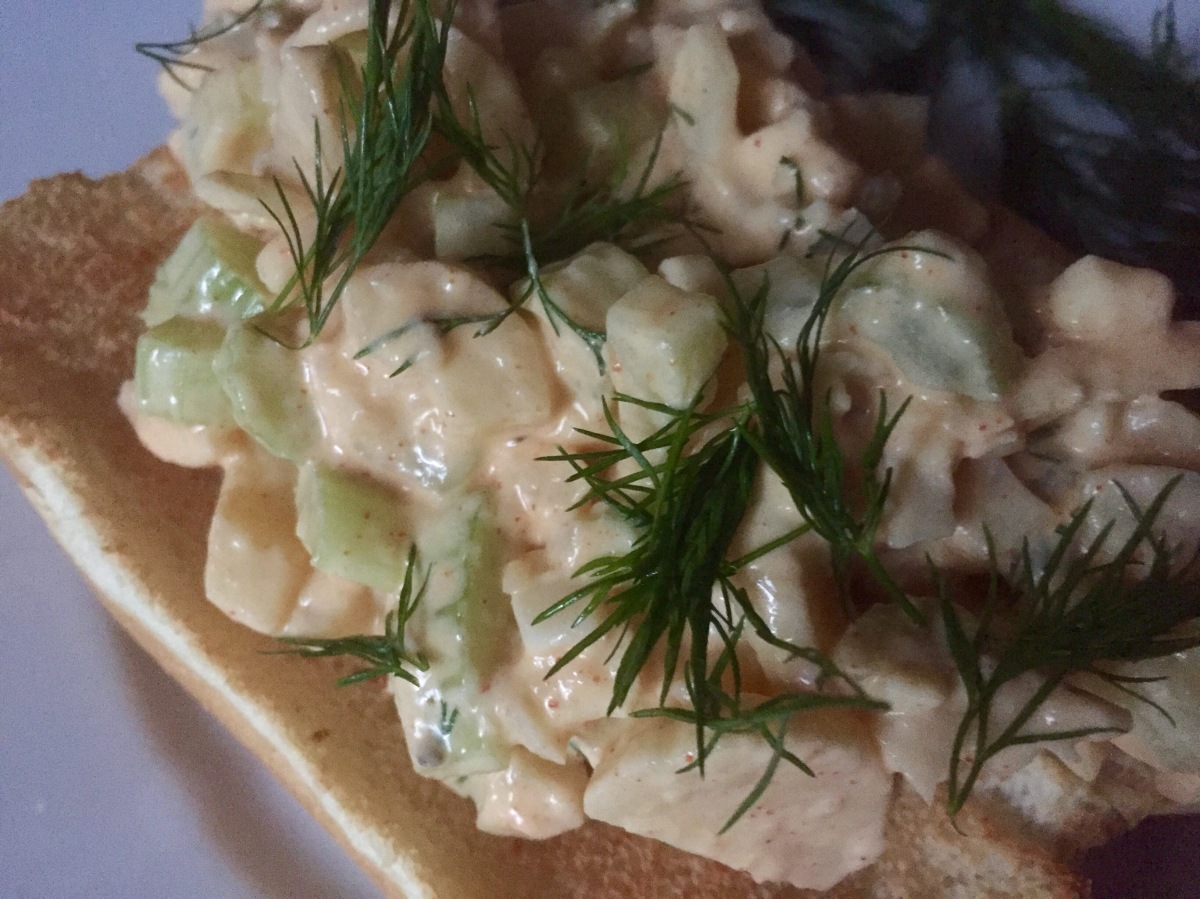
  3. Add the rest of the ingredients and mix well. Let rest for 30 minutes.
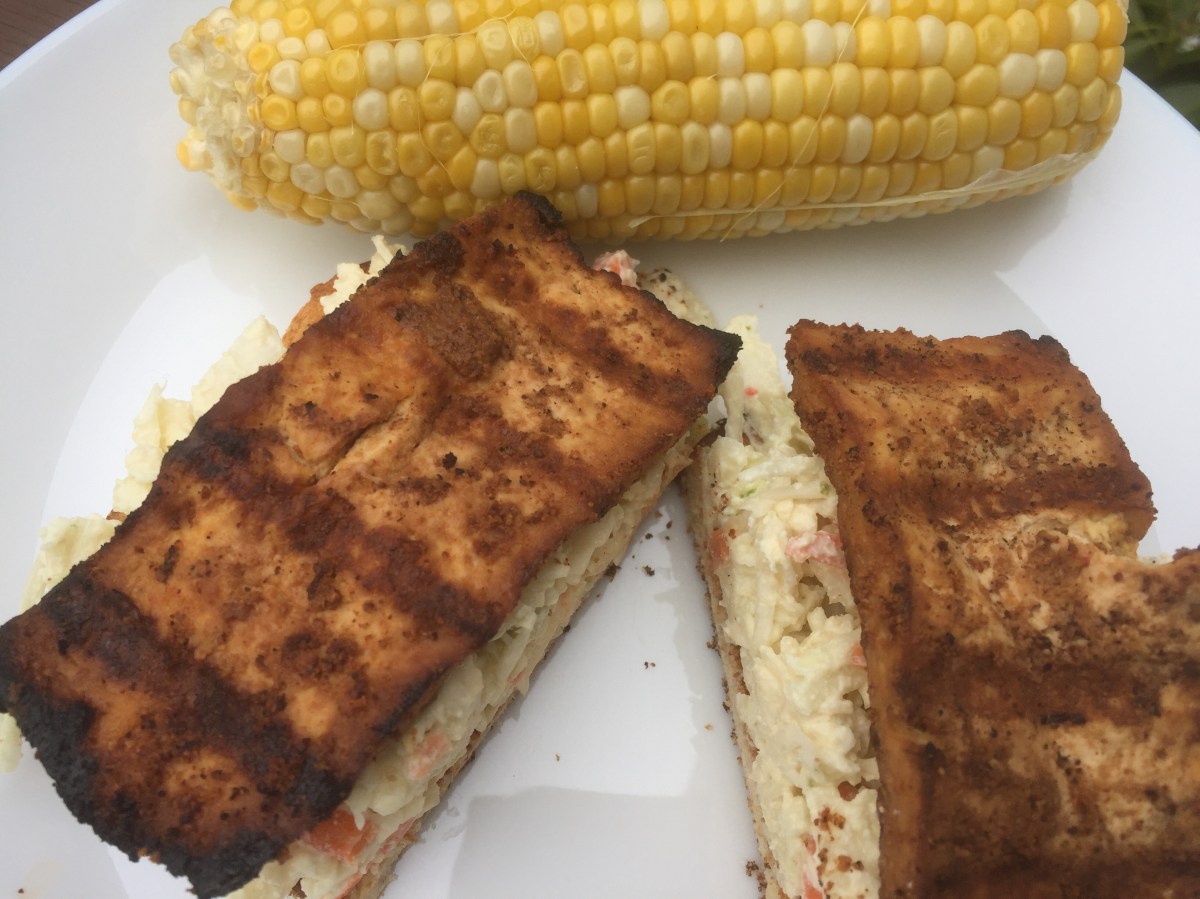
  4. Toast four hot dog rolls then top them with generous amount of faux-lobster filling. Sprinkle more dill on, if you like, and enjoy! The flavor is so fresh and satisfying that you will not want to add anything to this, but just in case you are wondering what to pair Fancy Faux-Lobster Roll with, you can try boiled or baked potatoes with just a splash of olive oil. That ought to do it!

Copyright ©Eat the Vegan Rainbow, 2017


Quick and Easy French Toast

Vegan French Toast
Vegan French Toast, via Eat the Vegan Rainbow
There’s nothing easier than French toast – and nothing that brings as much smiles and sunshine to the breakfast table. The secret to a great French toast is the bread, and my preferred kind is of a spongy variety. After all, the point is to get as much as that rich, delicious egg mixture absorbed. Except that for vegans, French toast may seem unattainable given all the eggs, milk, cream and butter that go into it.

Well in the same way I shattered your misconception that you have to kiss your popovers goodbye if you decide to go 100% plant-based, I will now share the amazingly easy and wonderful way to make vegan French toast.

img_2040
Vegan French Toast with Strawberries and Powdered Sugar, via Eat the Vegan Rainbow

Quick and Easy French Toast

(4 servings, with 3 slices per serving)

What you’ll need:

12 slices bread, soft and spongy

6-8 oz (170-225 g) silken tofu

1 1/2 cup almond milk

1 tablespoon brown sugar

1 tablespoon vanilla extract

2 teaspoons ground cinnamon

1/2 teaspoon turmeric

2 cups strawberries

1-2 tablespoon powdered sugar

Cooking cooking spray


What you’ll do
:

  1. Place all the ingredients, except bread, strawberries and powdered sugar into a blender and blend until well aerated and smooth.
  2. Pour the mixture into a flat bottom dish big enough for two pieces of bread to soak at the same time side by side. Common pie dish works really well for this.
  3. Soak the bread for couple of minutes, flipping once.
  4. Spray the bottom of a frying pan or a griddle with some cooking spray and bring the heat to high. Place the soaked bread on hot surface and cook for 1-2 minutes on high than 1-2 minutes on medium heat. Flip over and repeat the same process to finish off the second side.
  5. Serve with fresh cut strawberries and a dusting of powdered sugar. You can also go for vegan butter, coconut flakes, chopped nut topping, maple syrup, jam, or a drizzle of melted super-dark chocolate. Regardless of what you choose to top this French toast with, it will bring joy to your breakfast!


Copyright © Eat the Vegan Rainbow, 2017

Homemade Ground Beef Substitute


img_2031
Homemade Ground Beef Substitute, via Eat the Vegan Rainbow

Without a doubt ground beef is one of the staples of American cuisine. And it is also something that many meat substitutes are trying to recreate. This means that you can now go to most supermarkets and get a meatless ground beef product off the shelf. Some are tried are really good, like the Trader Joe’s one or the Beyond Burger, but it’s the price tag that is a bit troublesome plus I am a bit of a control freak and like to know exactly what goes on my plate.

So, I have been making my own meatless beef. I’ve been fairly happy with my burger experiment, and I’ve been also happy with a tofu based ground beef substitute that was created by Glow Kitchen. That ground beef substitute was very influential in my early days of vegan cooking that I recently included it in my list of 5 Must-Try Recipes for Beginner Vegans. It worked really well in applications like stuffed peppers but I wanted to explore ground mushroom and TVP (textured vegetable protein) based versions. I had such an amazing result when I used ground mushrooms, in combination with lentils, as a filling for Shepherd’s Pie, that I just have to figure out a way to fold them into a ground beef substitute.

As a general rule, if you want to recreate a meat dish without using any meat, stick with spices, texture and consistency that evokes the appearance that you are aiming for. Grounding mushrooms was definitely a breakthrough for me, as well as using TVP without pre-soaking! Plus, adding spices like cumin and paprika, as well as coconut aminos or a dash of soy sauce brings out that meat-like flavor. My final touch is just a little bit of tomato paste, for color as well as flavor. When all the components are in, and well mixed, I let the mixture just rest for at least an hour. Thus helps flavors merge and combine and TVP soften.

At the end, what you have after all this mixing, grinding and resting is a mix that looks very much like ground beef yet tastes so much better and richer. You can use the mix to stuff your peppers, in a sauce like Bolognese, or sautée as us and use in tacos, on pizza, or for any other purpose you can think of. You can definitely make meatballs out of it, or even hamburgers. This homemade ground beef substitute is versatile and very budget friendly so you can definitely afford to make batch after batch especially if you get your TVP from jet.com, the cheapest source of this ingredient I could find.

Homemade Ground Beef Substitute

What you’ll need:

10 oz (283 g) white mushrooms

1 1/3 cups TVP (textured vegetable protein)

1 tablespoon liquid smoke

1/3 cup vegetable oil

2 tablespoon tomato paste

1 tablespoon liquid coconut aminos

1 teaspoon cumin

1 teaspoon paprika

1 teaspoon onion powder

1 teaspoon garlic powder

1/4 teaspoon salt

Cooking spray (if the idea is to sautée the mix; for other applications just follow the procedure you would normally follow)

What you’ll do:

  1. Wipe the mushrooms with a paper towel to remove any bits of dirt. Put in the food processor and grind to a fine grind. Pour out into a large mixing bowl.
  2. Add the rest of the ingredients, except cooking spay, mix well and let the mixture rest for at least 1 hour.
  3. Once the mix has rested it is ready to use. The mix browns well and makes for a great taco filling or nacho topping. It can also be used to stuff peppers and to make hamburgers or meatless meatballs, in which case you don’t to brown the mix but ma need to form patties and leave them in the fridge to firm up before cooking.


Copyright © Eat the Vegan Rainbow, 2017

Best DIY Sushi Ever!

Best DIY Sushi
Best DIY Sushi Rolls with Minty Peas & Red Cabbage, via Eat the Vegan Rainbow

If you think that making sushi requires hours of practice, one-on-one instruction from a sushi master chef and special equipment… well, you may be right if your goal is to make sushi that contains fish or seafood, especially given health risks involved. But, if you want to explore the wonderful and delightful world of plant-based sushi, all you need is about an hour or two, and some imagination.

I made my first vegan maki sushi, the kind where filling and rice are wrapped in sea weed, few months ago, and I really enjoyed the process and the flavors. I got inspired to start thinking about what ingredients would work together well, and whether there are any dipping sauces I could use to complement the sushi.

The results of this brainstorming are before you: Green & Orange Sushi Rolls and Peas & Cabbage Sushi Rolls, with Peanut Dipping Sauce and Sour Lemongrass Dipping Sauce.

The basic requirement for a great sushi is plenty of sticky rice. You can get special sushi rice but you can also use any short and medium grain variety of rice. For sushi, I use the same rice I use for risottos. The trick is to add the rice to boiling water, reduce the heat and let the rice gently simmer with occasional mixing.

Finally, leaving the rice to cool will help you handle it as well as help the rice get nice and very sticky. I recommend dipping your hands in water before handling the rice and then keep wetting them as you spread and press the rice.

One other thing you need to pay attention to is what side of seaweed sheet you pile your rice on. It should be the one that feels slightly rough, so that your outside is nice a smooth. What I discovered is that you don’t really need the bamboo sushi rolling mat or any special equipment. The main thing to remember is to go easy on the stuffing so your rolls don’t end up to full. This will make them hard to roll and more likely to rip. I hope you go for these vegan versions of sushi, or create your own. There really is no limit and no rules!

DIY Sushi with Two Dipping Sauces

What you’ll need:

FOR THE STICKY RICE

1 cup short or medium grain rice

2 cups water

FOR GREEN & ORANGE SUSHI ROLLS

1 1/2 cup cooked rice

3 seaweed (nori) sheets

1 carrot

1 English cucumber

1 avocado

1/4 cup sesame seeds

1/4 cup black sesame seeds

FOR CABBAGE AND PEAS SUSHI ROLLS

1 1/2 cup cooked rice

3 seaweed (nori) sheets

2 cups peas, frozen

2 cups water

2 cups shredded red cabbage

1 teaspoon sesame seeds, toasted

1 teaspoon black pepper

1 teaspoon salt

1/2 teaspoon garlic powder

2 teaspoons rice vinegar

1 cup fresh mint leaves

FOR PEANUT DIPPING SAUCE

2 tablespoons peanut butter, unsalted

1 tablespoon rice vinegar

2 teaspoons sriracha(or other hot sauce)

1/4 cup water

2 teaspoons panko, toasted

FOR LEMONGRASS DIPPING SAUCE

1/4 cup rice vinegar

2 tablespoons soy sauce, reduced sodium

1/4 cup fresh cilantro, finely chopped

1 tablespoon lemongrass, finely chopped

1 teaspoon ginger, grated

What you’ll do:

  1. Bring 2 cups of water to boil and add the rice. Lower the heat to gentle simmer and cook the rice, stirring occasionally, until all the water is absorbed, and the grains are soft. Set to the side and let it cool.
  2. In another pot bring 2 cups of water to boil and add frozen peas. Cook until well done for about 15 minutes.
  3. While rice and peas are cooking, put together the dipping sauces. In a medium size bowl, combine all the peanut sauce ingredients, except panko, and mix well to combine. Toast panko in the toaster oven, or in a pan over high heat, for 1-2 minutes. Top the peanut dipping sauce with toasted panko.
  4. In another bowl, combine all the ingredients for the lemongrass dipping sauce and set aside.
  5. Prepare your roll stuffers, like cucumbers, carrots, avocados or anything else you like. The trick is to make your veggie sticks long and thin.
  6. To make the red cabbage, place finely shredded red cabbage in a bowl and add all the rest of the ingredients except mint leaves. Mix everything well using your hands. Squeezing the cabbage as you mix will help soften it and make it absorb flavors better. Let the cabbage “marinate” for 30 to 60 minute.
  7. When peas are fully cooked drain and purée them.
  8. Once the rice is cool it is safe to handle. Place a piece of the seaweed sheet on the flat kitchen surface rough surface up. Place 1/2 cup of sticky rice on the sheet. Spread the rice to cover most of the seaweed sheet using your wet hands. Next, place the topping on 3/4 of the way towards one end of the sheet, and start rolling from that edg, slowly and gently. The roll should come together nicely.Cut the roll into sushi piece. One note on peas and cabbage rolls: spread the pea purée across entire rice and the pickled cabbage and mint leaves in a single line, 2/3 of the way from the edge.
  9. Serve the sushi with the two dipping sauces, some pickled ginger and wasabi paste. Enjoy!

Copyright ©Eat the Vegan Rainbow, 2017

Easy Spanakopita Rolls


Easy Spanakopita
Easy Spanakopita Rolls, via Eat the Vegan Rainbow
Let me describe Greek and Middle Eastern pies. They are made using very thin sheets of dough, called phyllo dough, and than build by either interleaving layers of phyllo dough with a filling or by rolling/holding the filling in phyllo pockets or rolls. As you can imagine, these pies are diverse and varied, as many different ingredients can be made into an amazing pie filling. If you still have trouble picturing what one of these pies may look like just think of baklava, probably the most famous of phyllo based pies.

Some of my favorite phyllo pies are cheese pie, mushroom pie and spinach pie. This last one has been brought to the frozen sections of most grocery store chain in US and known as spanakopita.

Traditionally, spanakopita recipe uses spinach as a central ingredient and combines it with cheese, eggs and onions to create either a rolled or layered pie that is served both warm and cold, usually accompanied by a yogurt drink.

Now I offer you a vegan version of this pastry that uses almonds and nutritional yeast as a substitute for cheese and eggs. Here I used store bought phyllo dough sheets precut into triangles that I picked up in an Indian store. You can use any phyllo dough you like, or make your own.

The spanakopita rolls come together quickly and bake to a lovely, crispy appetizers that are easy to pass around. They are also a great breakfast item, a quick snack or a dinner add-on. As I mentioned, you can eat them hot or cold, but they are really the best served fresh from the oven as while their phyllo dough exterior is crunchy. They will get soft as they sit for few hours or overnight so if you plan to serve them the next day you’ll need to reheat them in a toaster oven.


Spanakopita Rolls

(Makes 24 rolls)

What you’ll need:

24 triangle-shaped thick phyllo dough sheets (or thinner phyllo dough sheets stacked 2-3 together and cut to triangle pieces)

4 cups frozen spinach

1 cup almonds, dry roasted

1/4 cup almond milk

1 tablespoon nutritional yeast

1 tablespoon lemon juice

1 teaspoon garlic powder

1 teaspoon onion powder

1/2 teaspoon ground nutmeg

Olive oil, or olive oil cooking spray

What you’ll do:

  1. Preheat the 400 F (200 C).
  2. Soak the almonds in cold water for 1-2 hours at room temperature or in the fridge overnight. Drain to remove excess water, add nutritional yeast and lemon juice, and start grinding to a fine paste, adding the almond milk slowly. You may not need the whole 1/4 cup or you may need a bit more – you be the judge because what you are looking for is a nice smooth  consistency of a paste, not a sauce.
  3. Place frozen spinach in a large mixing bowl and purée using a hand held immersion (stick) blender. You can also purée the spinach in a food processor.
  4. Combine spinach with the almond paste and mix well. Add the spices and mix again.
  5. Lay out the piece of phyllo on a flat surface, spray with cooking spray, or drizzle a drop or two off olive oil, and spoon 2-3 tablespoons of spinach pie filling onto the long end of the pastry then roll towards the tip. Tuck the ends in and place on a baking sheet. I like to line my baking sheet with parchment paper for easy clean up, but that’s not really needed.
  6. Once all your rolls are ready, spray the tops with cooking spray or drizzle oil, and put in the oven for 25-30 minutes. You want the tops golden brown.
  7. Let the spanakopita rolls cool for 10-15 minutes and serve.


Copyright © Eat the Vegan Rainbow, 2017

5 Must-try Recipes for Beginner Vegans

Rainbow of Fruits and Veggies
Rainbow of Fruits and Veggies, via Eat the Vegan Rainbow
Half a year ago I made a decision to ditch meat, and dairy, and eggs, and honey, and fish, and seafood. What I was left with was a whole bunch of plants that all of a sudden went from being a side dish to being the star ingredients of everything I was cooking.

Six months in I have to admit that cooking have never been more fun. Every single recipe is still an adventure because it offers an opportunity to experiment and challenge my preconceived views of what a dish should look and taste like. Additionally I have also discovered that many others are curious about plant-based eating and interested in learning more how to replace meat and cheese in their diets. I never expected that sharing my experiences and cooking tips and tricks would be so enjoyable but it is! I love blogging about the recipes I develop and I love engaging with those interested in vegan cooking techniques and strategies.

So, in observation of World Meat Free Day today, I wanted to help anyone who is still thinking whether to take the plunge into plant-based cuisine waters and share five recipes that will make your transition much smoother. These are the recipes that changed my views of what plants can do, and I hope they’ll help you as well!!!

  1. Tofu Bacon – this recipe is so fantastic that you may want to make a double batch as one will not last long. Shared by The Buddhist Chef, this recipe not only tought me how to make crispy tofu, but introduced me to liquid smoke, an ingredient that I know use all the time, especially when grilling as it gives grilled food, like this Grilled Eggplant, an extra edge.
  2. Cashew Cheeses – I approached cashew cheese with disbelief but recipes like this Easy Garlic & Herb Vegan Cheese, developed by Minimalist Baker, and this Cashew Ricotta Cheese, by Simple Veganista, completely changed my mind and my pallet. They also introduced me to nutritional yeast, something I know use pretty regularly for that pleasant cheese flavor.
  3. Jackfruit Carnitas Tacos (Pulled Pork Tacos) – this recipe by The Edgy Veg opened my eyes to the world of jackfruit, a fruit (or a vegetable, not sure which) that I’ve never heard of before. It turns out jackfruit is an absolute must have ingredient for vegan cooking and my crab-less Jackfruit “Crab” Cakes remains one of my favorite things to make and eat!
  4. Vegan Substitute for Ground Beef – this recipe by Glow Kitchen has been truly transformative as it convinced me that homemade meat substitutes are feasible, tasty, and super affordable, thus definitely worth an effort.
  5. Healthy Chocolate Pudding – this was the first vegan dessert I made and I am still amazed that some brave soul at some point said to themselves: “Enough is enough – I am putting avocados and bananas together and lets see what happens!”. Credit for this recipe goes to Whole Foods Market.

All in all, the most important thing you should do in order to be a great vegan cooking success is to keep an open mind. As these five examples show vegan recipes combine unexpected ingredients so don’t talk yourself from trying just because you were not raised eating jackfruit or combining bananas and avocados. For example, my most unexpected recipe is Vegan Popovers – who knew popovers don’t need milk or eggs?

Happy World Meat Free Day and enjoy your plant-based existence!!!


Copyright © Eat the Vegan Rainbow, 2017

Blueberry Cheesecake 2.0, a Real Space-Age Treat

Vegan Blueberry Cheesecake
Vegan Blueberry Cheesecake, via Eat the Vegan Rainbow

First time I had cheesecake I was twenty five! Yes, it’s true – I spent the first twenty five years of my life in a blissful ignorance, completely unaware that cheesecakes existed. But, soon after moving to US I did partake on a slice and fell in love immediately and over the years things just better and better.

First of all, cheesecakes are easy to make. They are also very versatile because you can customize them in many different ways. I used to make pumpkin cheesecake topped with baked apples and pecan caramel for Thanksgiving because pumpkin pie is sort of boring.

My other favorite cheesecake I used to make was plain vanilla topped with homemade blueberry syrup. So one night, as I was making myself a light dessert of blueberry smoothie, I got inspired to try and make Cheesecake 2.0 – the 21st century version that is dairy-free, gluten-free, and egg-free.

Being the space age type of dessert, this recipe uses an ingredient that you can’t find in a grocery store: agar powder. Chemically speaking, agar is a sugar polymer and I’ve used it a great deal to make many, probably thousands, of agar plates in Petri dishes, which I then used to grow bacterial cultures. (For those interested in the source, agar is isolated from algae (seaweed), so although not of plant origin, I think it is safe to say that definitely plant-like in many ways and not animal-derived.)

So, when I discovered that agar has a culinary application I was skeptical. But when I thought about what I need agar to do – act as a jelling agent in the same way gelatin would – I concluded that my skepticism was not founded in reality and chemical facts but some silly prejudice. Thus, I bought a small jar of agar powder and I’ve been using it to make hard (and shreddable) cheese quite successfully. In this recipe I took agar powder a step further and used it as the firming agent for the cheesecake. It did the trick and the result was a yummy cake with excellent smooth yet firm texture.

Blueberry Cheesecake 2.0
Blueberry Cheesecake for the 21st Century, via Eat the Vegan Rainbow

Blueberry Cheesecake 2.0

What you’ll need:

FOR THE CRUST

1 cup walnuts

1 cup cashews

1 tablespoon brown sugar

1 tablespoon vegan Butter

FOR THE CHEESECAKE FILLING

2 cups blueberries, frozen

1/2 cup oatmeal

1 1/2 cup vanilla almond milk, unsweetened

4 teaspoon agar

2 cups water

What you’ll do:

  1. Use a grinder or a food processor to grind walnuts and cashews to a relatively fine meal.
  2. Pour the ground nuts into an 8 to 9 in (20 to 23 cm) round springform pan.
  3. Add brown sugar and mix well.
  4. Add melted vegan butter (30 sec in a microwave should be enough to melt this amount) and using your fingers mix the melted butter in so that all of your nut and sugar mix is moist. Press the mix into the bottom of the pan to form a crust. Set aside.
  5. In a large blender mix almond milk, blueberries and oatmeal until smooth.
  6. To prepare agar powder, bring 2 cups of water to boil and add the agar. Use a whisk to mix everything together lower the heat to simmer and keep mixing and simmering for 4 to 5 minutes.
  7. Add hot agar to the blender in small batches, 1/2 cup at a time. Pause to incorporate then add more until the entire amount of agar is incorporated.
  8. Pour the filling into the springform pan and use a spatula or a flat spoon to spread around and flatten the top.
  9. Refrigerate for at least 4 hours, best overnight.
  10. Pop it out of the springform pan, cut and serve as is, or with fruit and/or vegan whip cream. I made one from chickpea water (aquafaba), but you can make any one you like or skip it!


Copyright © Eat the Vegan Rainbow, 2017

Creamy Mango & Chickpea Curry Tofu

Creamy Mango & Chickpeas Curry Tofu
Creamy Mango & Chickpeas Curry Tofu, via Eat the Vegan Rainbow
Slow cooker (crock pot) is one of my favorite small kitchen appliances and definitely the best way to make dishes that come together only after long, long simmering. Putting everything into a slow cooker is so much easier than baby sitting a simmering stew bubbling away on the stove top! But: slow cooker is slow and if you’d like to have food ready for the dinner (supper) time, you need to remember to fill it up and turn it on 3 to 6 hours in advance. Once all is set and you press the start button, you are free to do whatever and enjoy the day knowing that your delicious dinner is simmering away.

I use my slow cooker often and I find that it works really well for things like stews, or dishes like Vegan Chicken Tikka Masala. Here is another example of a delicious curry that combines tofu, chickpeas and mango with some crushed tomatoes and coconut cream into a fragrant and very creamy curry.

Serve it with Saffron Brown Basmati Rice and you are done!

Creamy Mango & Chickpea Curry Tofu

What you’ll need: 

2 16 oz (454 g) tofu blocks, extra firm

28 oz (800g) can crushed tomatoes

2 15.5 oz (439g) cans chickpeas

1 cup mango chunks, frozen

15 oz (425g) can coconut cream

1 yellow onion, diced

3 cloves garlic, thinly sliced

2 teaspoons curry powder

1 teaspoon ground cumin

1/2 teaspoon turmeric

Fresh cilantro

Cooking spray


What you’ll do:

  1. Drain or press tofu for 30 minutes. I usually just leave the block of tofu in a strainer and flip the block over once. That’s usually enough for dishes that don’t need the tofu to be super dense and chewy.
  2. Cut the tofu into single bite chunks. From a 16 oz block I usually get 16 pieces so you can use that as a rough guideline.
  3. Line the inside of your slow cooker crock pot with a liner. You can skip this step of course – I just recommend it as it makes clean up an absolute breeze. Add the tofu, chickpeas that have been drained, and frozen mango chunks. You can use fresh as well but frozen mango chunks are just something I have on hand for my smoothies so it’s a bit of a staple in my kitchen.
  4. Add the spices and mix well.
  5. Dice the onion and slice the garlic. Place in a microwave safe dish, spray with cooking spray and microwave for 5 minutes. This will start the caramelization process of your aromatics and help them develop flavors.
  6. Pour the onions and garlic over the mango chunks.
  7. Pour in the crushed tomatoes and mix again.
  8. Add coconut cream and mix to incorporate.
  9. Put the lid on and turn your slow cooker on high for 3 to 4 hours.
  10. When playing, serve over rice, quinoa or couscous and top with fresh cilantro.


Copyright © Eat the Vegan Rainbow, 2017

Black-Eyed Peas Burgers

Black-Eyed Pea Burgers
Black-Eyed Pea Burgers, via Eat the Vegan Rainbow
Still hunting for that perfect meat-free burger? I’m with you and I’m still searching. But in the meantime my Roasted Red Peppers Chickpea Burgers I shared recently, and these Black-Eyed Peas Burgers here are really close to where I want my burgers to be.

As with the chickpea burgers, the big secret to getting the burgers to stick together is to let the patties firm up in the fridge or the freezer. The rest is really easy and requires a large mixing bowl, a stick (immersion) blender (or a food processor), and couple of easy to find ingredients. These are really simple and I’d say they qualify as a quick mid-week dinner.

Black-Eyed Peas Burgers

What you’ll need:

2 15.5 oz (439 g) cans black-eyed peas

3 large carrots

1/2 cup pumpkin seeds

2 tablespoons almond butter

2 tablespoons flax meal

1 teaspoon smoked paprika

1 teaspoon onion powder

1 teaspoon garlic powder

1 tablespoon sesame seeds

Cooking spray

What you’ll do:

  1. In a small mixing bowl combine flax meal with 4 tablespoons of hot water to make Flax Egg.
  2. Place black-eyed peas in a strainer and rinse well. Drain to remove excess water and pat dry. Place in a large mixing bowl.
  3. Use a food processor to chop the carrots very finely. Add to the mixing bowl.
  4. Add the rest of the ingredients, including the Flax Egg, and blend everything together using an immersion (stick) blender. If you don’t have a stick blender you can also use a food processor. The mix should be relatively smooth, but some chunkiness is OK.
  5. Line the large tray with wax paper. Use your hands to form the burger patties. They should be about 1/8 in (1 cm) thick. Arrange the patties on the tray, cover with another sheet of wax paper and put in the freezer for about 30 minutes. If you leave them in the refrigerator you will need to give them couple of hours.
  6. Place a large pan over medium-high heat and let it get nice and hot. Spray the bottom with the cooking spray and add burgers to the pan in small batches. Cook for about 5-6 minutes on one side then flip over and finish cooking for another 4-5 minutes on the other side.
  7. Serve as you would any other burger, perhaps with some Fat Free Roasted Potato Medallions on the side as a healthy alternative to French fries.
  8. Copyright © Eat the Vegan Rainbow, 2017

Grilled Tofu Sandwich with Spicy Coleslaw


Grilled Tofu & Spicy Cole Slaw Sandwich
Grilled Tofu and Spicy Coleslaw Sandwich, via Eat the Vegan Rainbow

Let’s face it: if you don’t enjoy some grilled food during the fleeting late spring, you are totally missing out. And even if you are a committed vegan or a plant-based eater you should not stay grill deprived.

I’ve already showed you how to make phenomenal grilled portobello mushroom steaks, and flavorful grilled eggplant. Today is the day when we cross the Rubicon of vegan grilling with a Grilled Tofu recipe. Trust me: once you try it, you will not be going back!

Before I dive into the details, I have to give credit where credit is due. In this case it all comes down to a fabulous Tofu Bacon recipe developed by The Buddhist Chef. I made that bacon quite a few times and it is absolutely amazing. That recipe inspired me to look for other ways to cook tofu and get it taste and look in a way you would never expect. So here I decided to see whether I can optimize tofu for grilling.

What I discovered is that for successful grilled tofu you do need to cut thicker slices, so I recommend slices that are about 1/2 in (1.5 cm) in thickness. What you’ll need to do is start from extra firm tofu and drain it really well. I left my block of tofu in a strainer and put a heavy can on top to help the draining. Let it sit for one to two hours then pat dry and slice.

The sliced tofu goes into a marinade, and this is a critical step because no matter how good your grilling skills are, tofu is so subtle tasting that grilling it as is will not produce a rich flavor.  The marinade I use builds on the Tofu Bacon recipe by using liquid smoke, smoked paprika, chili powder, and cumin, which all work together towards giving tofu the extra smoky aroma. You will need a bit of oil in this marinade, as well as a bit of steak sauce or vegan Worcestershire sauce. Let the tofu marinate for about an hour, then grill it on high and enjoy with your favorite add-ons.

On this occasion I went with a simple steamed corn on the cob, toasted bread, and vegan spicy coleslaw. For this coleslaw you can use any vegan mayo you like, including store bought one. I recommend adding some ground mustard for extra punch. The coleslaw and grilled tofu work incredibly well – they are match made in heaven!

Grilled Tofu Tray
Grilled Tofu, via Eat the Vegan Rainbow

Grilled Tofu Sandwich with Spicy Coleslaw

What you’ll need:

FOR GRILLED TOFU

2 14 oz. (400 g) extra firm tofu

2 tablespoons soy sauce

2 tablespoons vegetable oil

1 tablespoon vegan Worcestershire sauce

1 tablespoon liquid smoke

1 teaspoon garlic powder

1 teaspoon onion powder

1 teaspoon smoked paprika

1 teaspoon chili powder

Vegetable oil (to oil grill grates)

Bread for serving

FOR SPICY COLESLAW

16 oz (454 g) bag of Coleslaw mix (or 2 cups shredded green cabbage plus 1 cup shredded carrots)

1/2 cup vegan mayo

3 tablespoons white vinegar

1 tablespoon Dijon mustard

2 teaspoons ground mustard seeds

1 teaspoon ground black pepper

1/4 teaspoon salt


What you’ll do:

  1. In a large bowl, mix all the Spicy Coleslaw ingredients together, cover with plastic wrap and set aside for couple of hours. Coleslaw needs some time to “mature”, mostly because cabbage needs a bit of time to soften and become smooth and more palatable.
  2. Drain the tofu and leave in the strainer for 2-3 hours. You can do this overnight in which case leave the tofu blocks in the refrigerator, or you can use any other method of pressing tofu you are used to.
  3. Once the tofu is pressed/drained, slice each block into 8 slices. Arrange in a single layer, in a deep baking dish or any other type of a container with a flat bottom that will allow your tofu slices to rest flat and absorb the marinade.
  4. To make a marinade mix all the ingredients (except bread and oil you need for the grill grate). Mix well and pour over the tofu slices.
  5. Marinate tofu slices for 1-2 hours.
  6. When ready to grill, prepare your grill as you usually do. In my case this means turning all the burners on (I have a gas grill) to full blast, closing the lid and letting any bits and pieces of food from last time burn off for 10 minutes. Then, I turn down the flames, scrape the grill grates well, and oil them with fresh batch of vegetable oil.
  7. For grilling tofu I recommend medium high to high flames, so bring the flame up and place the tofu pieces on. Grill for 5-10 minutes on one side, brush on the marinade, flip them over and grill for another 5-8 minutes. If you like the classical grill marks, you will need to rotate your tofu by about 45 degrees and let it grill some more. If doing that, I suggest you keep brushing on the marinade so your tofu does not dry out.
  8. Keep your grilled tofu tightly wrapped in some foil, to keep it hot while you grill or toast the bread. Once the bread is ready, place a good amount of spicy coleslaw on and top with grilled tofu. I like my sandwiches open faced by you can definitely make this into a standard sandwich, or a wrap. Serve with some grilled or boiled corn for a summer meal worth sharing!


Copyright © Eat the Vegan Rainbow, 2017

Puffy Popovers of the Vegan Kind

Puffy Popovers of the Vegan Kind
Puffy Popovers of the Vegan Kind, via Eat the Vegan Rainbow

If you never had a popover before let me try to describe it to you: it is light as a feather and hollow, not actually fried dough but tasting as if the fried dough has decided to leave the deep frier and take a yoga breathing class to fill itself with air and become almost weightless. Popovers are a special breakfast treat to rejoice and enjoy, sprinkled with powdered sugar, with a spoonful of jam, or a handful of sliced fruit. Anyway you cut it they are amazing!

Popovers get their fluffy structure from lots of eggs, milk and butter, and their final elevated shape from a specially designed popover pan. Although popover pan may remind you of a muffin pan, which may lead you to believe that you can just your muffin pan to make popover, it’s best not to go there. I tried it, and it did not end well. So, you will need to get a real popover pan if you want to make the puffiest of popovers and there is not substitution for it!

But, is there a substitution for eggs, milk and butter? Of course there is! At first I was very skeptical that I can make popovers work by replacing basically the three quarters of ingredients that make popovers with vegan alternatives, but I did and it does!!!

My vegan, plant-based version is also very simple, with three main ingredients only: silken tofu, white wheat flour and unsweetened vanilla almond milk. To that you can add things like maple syrup, agave nectar or sugar, a bit more vanilla extract, a sprinkle of lemon, lime or orange zest, or cinnamon, for a sweet version, or stick with plain almond milk, a dash of salt and a sprinkle of dry basil and oregano for a more savory version. The basic batter is flexible and customizable, so feel free to make these popovers your own. Of course, you can always stick with the basic batter and add layers of flavors with condiments like jam, nuts, fruit, cashew sour cream, or macadamia nut queso fresco.

The main trick to making perfect, puffy popovers is to preheat the popover pan by itself before pouring in the batter, and then add the batter when pan is scorching hot and sizzling. Then bake the popovers at high temperature for a short period of time, lower it down and leave them to make for a while. I add an extra step where I decrease the temperature gradually so my popovers spend fifteen minutes at 425 F (220 C), then 20 minutes at 375 F (190 C) and finally another 10 minutes at 350 F (175 C). This helps them puff up and then cook through to their final glorious heights.

Puffy Popovers all in the row
Puffy Popovers all in the Row, Eat the Vegan Rainbow

Puffy Popovers

What you’ll need:

16 oz (454 g) silken tofu

1 1/2 cup unsweetened vanilla almond milk

1 1/2 cup flour

1 tablespoon vanilla extract

1 teaspoon turmeric (optional; for color only)

Salt, to taste (h/t to Pamela who left a helpful comment re adding a pinch of salt)

Cooking spray

What you’ll do:

  1. Preheat the oven to 425 F (220 C). Once preheated, place the popover pan in for 15 minutes to get sizzling hot.
  2. Drain excess liquid from tofu but don’t press. Place the tofu, almond milk and vanilla extract into a blender and blend on high until smooth.
  3. Add flour 1/2 cup at a time and blend well. Add turmeric if you like to give your batter a bit of a yellow tint and make it visually more egg-like. Mix everything well. The batter consistency should be similar to American pancakes (a bit denser than crapes).
  4. Wearing good oven mittens, take the popover pan out, spray with cooking spray, and pour the batter in, about 2/3 of the way. Place the popover pan on the baking sheet (to minimize splatter) and put it in the oven.
  5. Bake at 425 F (220 C) for 15 minutes, then lower the heat to 375 F (190 C) for 20 minutes and finish at 350 F (175 C) for an additional 10 minutes.
  6. Take out the oven and let cool for 10 minutes. The finished popovers should slide out the pan with ease.
  7. Enjoy warm as is, or with any topping you like!

Copyright © Eat the Vegan Rainbow, 2017

A Very Beefy Veggie Burger

"Beef" Veggie Burger
“Beef” Veggie Burger, via Eat the Vegan Rainbow
For many researching and investing into meat alternatives, making a plant-based burger that looks, cooks and tastes like real beef has become one of the most important goals. Several years ago, I heard Pat Brown, founder and CEO of Impossible Foods, give a talk and one thing Pat mentioned was how incredibly hard it is to re-create a plant-based hamburger. Burgers are such a huge part of American culture, so offering a meatless alternative is unlikely to convince anyone to go meat-free unless that alternative is spot on, juicy and meaty.

But, lets be honest: veggie burgers are definitely not hitting this mark. For the most part, they are a mix of vegetables thrown together and shaped into a patty that usually falls apart as you are grilling it. I know this sounds mean, but it is what it is. I myself have been down the road of trying to figure out how to keep my veggie burgers together while at the same time make them taste authentic many times before. Some attempts have been a total failure, some, like this Roasted Red Peppers and Chickpea Burger, have been a success.

Don’t get me wrong – I love veggie burgers! They have amazing flavors and textures, and they are fun to eat. Also: I am not a fan of hamburgers, but I live in a land of hamburger lovers so I agree with Pat Brown’s general idea that in order to convince people to give up their meat we need to offer them something incredible to sizzle on the grill and stick inside the bun. And just in case you are wondering whether there is any such thing available in retail stores, you should head out to your local Whole Foods Market and get some Beyond Meat‘s The Beyond Burger. I had it few nights ago and it blew my mind!

So although I am most certainly going to be getting those burgers again, they do come with a relatively unfriendly price tag, which means I am where I started: trying to home brew an impossible, incredible and all-around awesome meat-free burger. This recipe for A Very Beefy Veggie Burger is one step closer to achieving that ideal combination of flavor, texture and grillability and the tip top secret of this recipe is to use TVP (Textured Vegetable Protein) without pre-soaking and letting it absorb all the ground mushroom and mashed beans juices. This batch of burgers was cooked in a grill pan because the weather in New England has been very rainy lately and I just could not wait to make these, but the patties are firm enough to withstand the ultimate test of an outdoor grill.

As for condiments, sky is truly the limit. I paired these burgers with some Vegan Herb Mayo, cucumber and tomato slices, butter lettuce and Roasted Red Beets Hummus, but you can use anything you like. The flavor of these patties is very, very similar to what you can expect from a hamburger, but the texture and juiciness does need more work. Still, I will try, try, try again until I develop the recipe for a mouth-watering, and inexpensive, beef-less burger. As Silicon Valley is now funding these types of efforts, perhaps I can re-write the stereotype of “two guys in a garage” into “one woman in the kitchen” story? That would be fun!!!

Very Beefy Plant-Based Burger
Very Beefy Plant-Based Burger, via Eat the Vegan Rainbow
Note: Just in case you are asking yourself why we should go meatless, Bill Gates offered some well-articulated arguments in the Future of Food post few years ago.


A Very Beefy Veggie Burger

What you’ll need:

2 15.5 oz (439 g) cans of Roman (cranberry) beans

1 cup TVP (Textured Vegetable Protein; I used Bob’s Red Mill TVP)

8 oz. (227 g) baby bella mushrooms

2 tablespoons almond butter

2 tablespoons nutritional yeast

1 tablespoon soy sauce, reduced sodium

1 tablespoon Worcestershire sauce, vegan

1 teaspoon onion powder

1 teaspoon garlic powder

Cooking spray


What you’ll do:

  1. Drain and rinse the beans. Pat dry and place in the large mixing bowl.
  2. Use a food processor to grind the mushrooms. Add the mushroom meat to the mixing bowl.
  3. Add TVP and the rest of the ingredients (except the cooking spray) into the bowl and use the immersion blender to blend everything into a mixture that looks like ground beef, with the same type of texture. You can also do this step in the food processor.
  4. Let the mixture stand for 30 to 60 minutes on the kitchen counter, then shape the burgers and leave them in the refrigerator for about an hour to firm up. This will give TVP time to soak up all the juice from mushrooms and bean and soften just enough to give a nice ground beef texture to the burger without making it too soft and crumbly.
  5. Heat the grill or the grill pan on high and make sure that your grill grate or your pan are generously oiled. Reduce the heat to medium before putting your burgers on. Grill for 4 to 5 minutes on one side, then flip over and grill for additional 4 to 5 minutes.
  6. Put your burger buns on the grill for a minute or two to toast them gently, then top with mayo, burger, cucumber slices, tomatoes, lettuce, roasted beet hummus or whatever floats your boat – and bite in!!!

Correction: the original post said “yeast extract” but that’s not correct. I used nutritional yeast so I made the correction now. Thanks to Mary Dion for flagging this to me on Facebook!!!

Copyright © Eat the Vegan Rainbow, 2017